Uso dell'API di formattazione in un componente di Power Apps
Power Apps Component Framework espone un'API di formattazione particolarmente utile quando si devono formattare più valori nell'applicazione. Questa unità mostra come usare questa API mediante una tabella HTML che illustra come usare i vari metodi disponibili.
Inizializzazione del progetto del componente
Per inizializzare il progetto del componente, effettuare i seguenti passaggi:
Avviare Visual Studio Code.
Selezionare Nuovo terminale dal menu Terminale.
Cambiare la directory passando alla cartella di origine.
cd sourceDalla directory di origine creare una directory denominata Formatting-API.
md Formatting-APIEseguire il seguente comando per passare alla nuova directory.
cd Formatting-APIInizializzare il progetto eseguendo il seguente comando.
pac pcf init --namespace SampleNamespace --name FormattingAPI --template fieldEseguire npm install per caricare le librerie dipendenti nel progetto.
npm installAprire il progetto in Visual Studio Code eseguendo il seguente comando.
code -a .
Implementazione della logica del componente di codice
Per implementare la logica del componente di codice, effettuare i seguenti passaggi:
Espandere la cartella FormattingAPI e aprire il file ControlManifest.Input.xml.
Sostituire l'intero manifesto con il codice XML seguente.
<?xml version="1.0" encoding="utf-8" ?>
<manifest>
  <control namespace="SampleNamespace" constructor="FormattingAPI" version="1.1.0" display-name-key="TS_FormattingAPI_Display_Key" description-key="TS_FormattingAPI_Desc_Key" control-type="standard">
    <property name="controlValue" display-name-key="controlValue_Display_Key" description-key="controlValue_Desc_Key" of-type="SingleLine.Text" usage="bound" required="true" />
    <resources>
      <code path="index.ts" order="1" />
      <css path="css/TS_FormattingAPI.css" order="2" />
    </resources>
  </control>
</manifest>
Aggiungere i file di supporto che si trovano in questo manifesto in un secondo momento.
Aprire il file Index.ts.
Sopra il metodo constructor inserire le seguenti variabili private.
// PCF framework delegate that will be assigned to this object that would be called whenever any update happens.
private _notifyOutputChanged: () => void;

// Reference to the div element that holds together all the HTML elements that you are creating as part of this control
private divElement: HTMLDivElement;

// Reference to HTMLTableElement rendered by control
private _tableElement: HTMLTableElement;

// Reference to the control container HTMLDivElement
// This element contains all elements of your custom control example
private _container: HTMLDivElement;

// Reference to ComponentFramework Context object
private _context: ComponentFramework.Context<IInputs>;

// Flag if control view has been rendered
private _controlViewRendered: Boolean;
Nel metodo init inserire la logica seguente.
this._notifyOutputChanged = notifyOutputChanged;
this._controlViewRendered = false;
this._context = context;

this._container = document.createElement("div");
this._container.classList.add("TSFormatting_Container");
container.appendChild(this._container);
Nel metodo updateView aggiungere la logica seguente:
if (!this._controlViewRendered)
{
    // Render and add HTMLTable to the custom control container element
    let tableElement: HTMLTableElement = this.createHTMLTableElement();
    this._container.appendChild(tableElement);

    this._controlViewRendered = true;
}
Aggiungere i seguenti metodi helper per generare la tabella HTML che visualizzerà i valori formattati dopo il metodo destroy.
/**
* Helper method to create an HTML Table Row Element
* @param key : string value to show in left column cell
* @param value : string value to show in right column cell
* @param isHeaderRow : true if method should generate a header row
*/
private createHTMLTableRowElement(key: string, value: string, isHeaderRow: boolean): HTMLTableRowElement
{
    let keyCell: HTMLTableCellElement = this.createHTMLTableCellElement(key, "FormattingControlSampleHtmlTable_HtmlCell_Key", isHeaderRow);
    let valueCell: HTMLTableCellElement = this.createHTMLTableCellElement(value, "FormattingControlSampleHtmlTable_HtmlCell_Value", isHeaderRow);

    let rowElement: HTMLTableRowElement = document.createElement("tr");
    rowElement.setAttribute("class", "FormattingControlSampleHtmlTable_HtmlRow");
    rowElement.appendChild(keyCell);
    rowElement.appendChild(valueCell);

    return rowElement;
}

/**
* Helper method to create an HTML Table Cell Element
* @param cellValue : string value to inject in the cell
* @param className : class name for the cell
* @param isHeaderRow : true if method should generate a header row cell
*/
private createHTMLTableCellElement(cellValue: string, className: string, isHeaderRow: boolean): HTMLTableCellElement
{
    let cellElement: HTMLTableCellElement;

    if (isHeaderRow)
    {
        cellElement = document.createElement("th");
        cellElement.setAttribute("class", "FormattingControlSampleHtmlTable_HtmlHeaderCell " + className);
        let textElement: Text = document.createTextNode(cellValue);
        cellElement.appendChild(textElement);
    }
    else
    {
        cellElement = document.createElement("td");
        cellElement.setAttribute("class", "FormattingControlSampleHtmlTable_HtmlCell " + className);
        let textElement: Text = document.createTextNode(cellValue);
        cellElement.appendChild(textElement);
    }
    return cellElement;
}
Aggiungere il metodo seguente, che contiene esempi di utilizzo dell'API di formattazione, salvandoli come celle di tabella dopo i metodi helper.
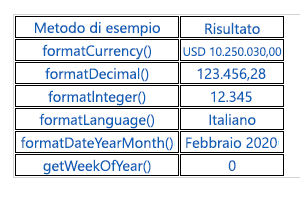
/**
* Creates an HTML Table that showcases examples of basic methods available to the custom control
* The left column of the table shows the method name or property that is being used
* The right column of the table shows the result of that method name or property
*/
private createHTMLTableElement(): HTMLTableElement
{
    // Create HTML Table Element
    let tableElement: HTMLTableElement = document.createElement("table");
    tableElement.setAttribute("class", "FormattingControlSampleHtmlTable_HtmlTable");

    // Create header row for table
    let key: string = "Example Method";
    let value: string = "Result";
    tableElement.appendChild(this.createHTMLTableRowElement(key, value, true));

    // Example use of formatCurrency() method
    // Change the default currency and the precision or pass in the precision and currency as additional parameters.
    key = "formatCurrency()";
    value = this._context.formatting.formatCurrency(10250030);
    tableElement.appendChild(this.createHTMLTableRowElement(key, value, false));

    // Example use of formatDecimal() method
    // Change the settings from user settings to see the output change its format accordingly
    key = "formatDecimal()";
    value = this._context.formatting.formatDecimal(123456.2782);
    tableElement.appendChild(this.createHTMLTableRowElement(key, value, false));

    // Example use of formatInteger() method
    // change the settings from user settings to see the output change its format accordingly.
    key = "formatInteger()";
    value = this._context.formatting.formatInteger(12345);
    tableElement.appendChild(this.createHTMLTableRowElement(key, value, false));

    // Example use of formatLanguage() method
    // Install additional languages and pass in the corresponding language code to see its string value
    key = "formatLanguage()";
    value = this._context.formatting.formatLanguage(1033);
    tableElement.appendChild(this.createHTMLTableRowElement(key, value, false));

    // Example of formatDateYearMonth() method
    // Pass a JavaScript Data object set to the current time into formatDateYearMonth method to format the data
    // and get the return in Year, Month format
    key = "formatDateYearMonth()";
    value = this._context.formatting.formatDateYearMonth(new Date());
    tableElement.appendChild(this.createHTMLTableRowElement(key, value, false));

    // Example of getWeekOfYear() method
    // Pass a JavaScript Data object set to the current time into getWeekOfYear method to get the value for week of the year
    key = "getWeekOfYear()";
    value = this._context.formatting.getWeekOfYear(new Date()).toString();
    tableElement.appendChild(this.createHTMLTableRowElement(key, value, false));

    return tableElement;
}
Selezionare File e Salva tutto per salvare tutte le modifiche.
Al termine degli aggiornamenti, la classe completata dovrebbe essere simile alla seguente.
import {IInputs, IOutputs} from "./generated/ManifestTypes";

export class FormattingAPI implements ComponentFramework.StandardControl<IInputs, IOutputs> {

    // PCF framework delegate that will be assigned to this object that would be called whenever any update happens.
    private _notifyOutputChanged: () => void;

    // Reference to the div element that holds together all the HTML elements that you are creating as part of this control
    private divElement: HTMLDivElement;

    // Reference to HTMLTableElement rendered by control
    private _tableElement: HTMLTableElement;

    // Reference to the control container HTMLDivElement
    // This element contains all elements of your custom control example
    private _container: HTMLDivElement;

    // Reference to ComponentFramework Context object
    private _context: ComponentFramework.Context<IInputs>;

    // Flag if control view has been rendered
    private _controlViewRendered: Boolean;

    /**
    * Used to initialize the control instance. Controls can kick off remote server calls and other initialization actions here.
    * Dataset values are not initialized here, use updateView.
    * @param context The entire property bag is available to control through the Context Object; It contains values as set up by the customizer and mapped to property names that are defined in the manifest and to utility functions.
    * @param notifyOutputChanged A callback method to alert the framework that the control has new outputs ready to be retrieved asynchronously.
    * @param state A piece of data that persists in one session for a single user. Can be set at any point in a control's life cycle by calling 'setControlState' in the Mode interface.
    * @param container If a control is marked control-type='starndard', it will receive an empty div element within which it can render its content.
    */
    public init(context: ComponentFramework.Context<IInputs>, notifyOutputChanged: () => void, state: ComponentFramework.Dictionary, container:HTMLDivElement)
    {
        this._notifyOutputChanged = notifyOutputChanged;
        this._controlViewRendered = false;
        this._context = context;

        this._container = document.createElement("div");
        this._container.classList.add("TSFormatting_Container");
        container.appendChild(this._container);
    }

    /**
    * Called when any value in the property bag has changed. This includes field values, datasets, global values such as container height and width, offline status, control metadata values such as label, visible, and so on.
    * @param context The entire property bag that is available to control through the Context Object; It contains values as set up by the customizer that are mapped to names defined in the manifest and to utility functions
    */
    public updateView(context: ComponentFramework.Context<IInputs>): void
    {
        if (!this._controlViewRendered)
        {
            // Render and add HTMLTable to the custom control container element
            let tableElement: HTMLTableElement = this.createHTMLTableElement();
            this._container.appendChild(tableElement);

            this._controlViewRendered = true;
        }
    }

    /**
    * It is called by the framework prior to a control receiving new data.
    * @returns an object based on nomenclature that is defined in the manifest, expecting object[s] for property marked as "bound" or "output"
    */
    public getOutputs(): IOutputs
    {
        return { };
    }

    /**
    * Called when the control is to be removed from the DOM tree. Controls should use this call for cleanup,
    * such as canceling any pending remote calls, removing listeners, and so on.
    */
    public destroy()
    {

    }

    /**
    * Helper method to create an HTML Table Row Element
    * @param key : string value to show in left column cell
    * @param value : string value to show in right column cell
    * @param isHeaderRow : true if method should generate a header row
    */
    private createHTMLTableRowElement(key: string, value: string, isHeaderRow: boolean): HTMLTableRowElement
    {
        let keyCell: HTMLTableCellElement = this.createHTMLTableCellElement(key, "FormattingControlSampleHtmlTable_HtmlCell_Key", isHeaderRow);
        let valueCell: HTMLTableCellElement = this.createHTMLTableCellElement(value, "FormattingControlSampleHtmlTable_HtmlCell_Value", isHeaderRow);

        let rowElement: HTMLTableRowElement = document.createElement("tr");
        rowElement.setAttribute("class", "FormattingControlSampleHtmlTable_HtmlRow");
        rowElement.appendChild(keyCell);
        rowElement.appendChild(valueCell);

        return rowElement;
    }

    /**
    * Helper method to create an HTML Table Cell Element
    * @param cellValue : string value to inject in the cell
    * @param className : class name for the cell
    * @param isHeaderRow : true if method should generate a header row cell
    */
    private createHTMLTableCellElement(cellValue: string, className: string, isHeaderRow: boolean): HTMLTableCellElement
    {
        let cellElement: HTMLTableCellElement;

        if (isHeaderRow)
        {
            cellElement = document.createElement("th");
            cellElement.setAttribute("class", "FormattingControlSampleHtmlTable_HtmlHeaderCell " + className);
            let textElement: Text = document.createTextNode(cellValue);
            cellElement.appendChild(textElement);
        }
        else
        {
            cellElement = document.createElement("td");
            cellElement.setAttribute("class", "FormattingControlSampleHtmlTable_HtmlCell " + className);
            let textElement: Text = document.createTextNode(cellValue);
            cellElement.appendChild(textElement);
        }
        return cellElement;
    }

    /**
    * Creates an HTML Table that showcases examples of basic methods that are available to the custom control
    * The left column of the table shows the method name or property that is being used
    * The right column of the table shows the result of that method name or property
    */
    private createHTMLTableElement(): HTMLTableElement
    {
        // Create HTML Table Element
        let tableElement: HTMLTableElement = document.createElement("table");
        tableElement.setAttribute("class", "FormattingControlSampleHtmlTable_HtmlTable");

        // Create header row for table
        let key: string = "Example Method";
        let value: string = "Result";
        tableElement.appendChild(this.createHTMLTableRowElement(key, value, true));

        // Example use of formatCurrency() method
        // Change the default currency and the precision or pass in the precision and currency as additional parameters.
        key = "formatCurrency()";
        value = this._context.formatting.formatCurrency(10250030);
        tableElement.appendChild(this.createHTMLTableRowElement(key, value, false));

        // Example use of formatDecimal() method
        // Change the settings from user settings to see the output change its format accordingly
        key = "formatDecimal()";
        value = this._context.formatting.formatDecimal(123456.2782);
        tableElement.appendChild(this.createHTMLTableRowElement(key, value, false));

        // Example use of formatInteger() method
        // change the settings from user settings to see the output change its format accordingly.
        key = "formatInteger()";
        value = this._context.formatting.formatInteger(12345);
        tableElement.appendChild(this.createHTMLTableRowElement(key, value, false));

        // Example use of formatLanguage() method
        // Install additional languages and pass in the corresponding language code to see its string value
        key = "formatLanguage()";
        value = this._context.formatting.formatLanguage(1033);
        tableElement.appendChild(this.createHTMLTableRowElement(key, value, false));

        // Example of formatDateYearMonth() method
        // Pass a JavaScript Data object set to the current time into formatDateYearMonth method to format the data
        // and get the return in Year, Month format
        key = "formatDateYearMonth()";
        value = this._context.formatting.formatDateYearMonth(new Date());
        tableElement.appendChild(this.createHTMLTableRowElement(key, value, false));

        // Example of getWeekOfYear() method
        // Pass a JavaScript Data object set to the current time into getWeekOfYear method to get the value for week of the year
        key = "getWeekOfYear()";
        value = this._context.formatting.getWeekOfYear(new Date()).toString();
        tableElement.appendChild(this.createHTMLTableRowElement(key, value, false));

        return tableElement;
    }

}
Aggiunta di stili al componente di codice
Per aggiungere stili al componente di codice, effettuare i seguenti passaggi:
Creare una nuova sottocartella css nella cartella FormattingAPI.
Creare un nuovo file TS_FormattingAPI.css all'interno della sottocartella CSS.
Aggiungere il seguente contenuto di stile al file TS_FormattingAPI.css.
.SampleNamespace\.FormattingAPI
{
    font-family: 'SegoeUI-Semibold', 'Segoe UI Semibold', 'Segoe UI Regular', 'Segoe UI';
}

.SampleNamespace\.FormattingAPI .TSFormatting_Container
{
    overflow-x: auto;
}

.SampleNamespace\.FormattingAPI .FormattingControlSampleHtmlTable_HtmlRow
{
    background-color: #FFFFFF;
}

.SampleNamespace\.FormattingAPI .FormattingControlSampleHtmlTable_HtmlHeaderCell
{
    text-align: center;
}

.SampleNamespace\.FormattingAPI .FormattingControlSampleHtmlTable_HtmlCell,
.SampleNamespace\.FormattingAPI .FormattingControlSampleHtmlTable_HtmlHeaderCell
{
    border: 1px solid black;
    padding-left: 3px;
    padding-right: 3px;
}

.SampleNamespace\.FormattingAPI .FormattingControlSampleHtmlTable_HtmlInputTextCell
{
    border: 1px solid black;
    padding: 0px;
}

.SampleNamespace\.FormattingAPI .FormattingControlSampleHtmlTable_HtmlHeaderCell
{
    font-weight: bold;
    font-size: 16px;
}

.SampleNamespace\.FormattingAPI .FormattingControlSampleHtmlTable_HtmlCell_Key
{
    color: #1160B7;
}

.SampleNamespace\.FormattingAPI .FormattingControlSampleHtmlTable_HtmlCell_Value
{
    color: #1160B7;
    text-align: center;
}
Selezionare File e Salva tutto per salvare tutte le modifiche.
Compilazione ed esecuzione del componente
Per compilare ed eseguire il componente, effettuare i seguenti passaggi:
Creare la soluzione eseguendo il seguente comando.
npm run buildAl completamento della compilazione è possibile sottoporre a test il nuovo componente API di formattazione eseguendo il comando npm start.
npm startChiudere la finestra del browser del test harness.
Tornare al terminale e interrompere il Watcher tenendo premuto CTRL+C.
Digitare Y, quindi premere INVIO.
Per altre informazioni, vedere Implementazione del componente API di formattazione.