Creare un'app per l'accesso Windows Hello
Questa è la parte 1 di una procedura dettagliata completa su come creare un'app UWP (piattaforma Windows universale) di Windows 10 e Windows 11 che utilizza Windows Hello come alternativa ai tradizionali sistemi di autenticazione con nome utente e password. L'app usa un nome utente per l'accesso e crea una chiave Hello per ogni account. Questi account verranno protetti dal PIN configurato in Windows Settings nella configurazione di Windows Hello.
Questa procedura dettagliata è suddivisa in due parti: la compilazione dell'app e la connessione del servizio back-end. Al termine di questo articolo, continuare con la parte 2: servizio di accesso di Windows Hello.
Prima di iniziare, è necessario leggere la panoramica di Windows Hello per una conoscenza generale del funzionamento di Windows Hello.
Operazioni preliminari
Per creare questo progetto, avrai bisogno di esperienza con C# e XAML. Si dovrà anche usare Visual Studio 2015 (Community Edition o versione successiva) o una versione successiva di Visual Studio, in un computer Windows 10 o Windows 11. Anche se Visual Studio 2015 è la versione minima richiesta, è consigliabile usare la versione più recente di Visual Studio per gli aggiornamenti più recenti per sviluppatori e sicurezza.
- Aprire Visual Studio e selezionare il progetto > Nuovo > File.
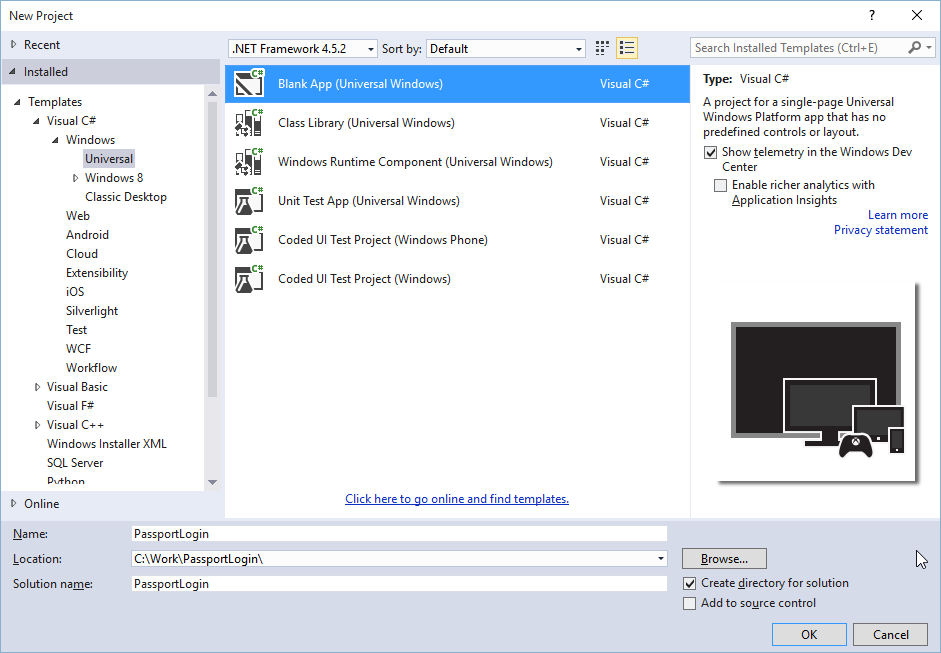
- Questa operazione aprirà una finestra "Nuovo progetto". Navigazione in Modelli > Visual C#.
- Selezionare App vuota (Windows universale) e assegnare all'applicazione il nome "PassportLogin".
- Compilare ed eseguire la nuova applicazione (F5), verrà visualizzata una finestra vuota visualizzata sullo schermo. Chiudere l'applicazione.
Esercizio 1: Accedere con Microsoft Passport
In questo esercizio si apprenderà come verificare se Windows Hello è configurato nel computer e come accedere a un account usando Windows Hello.
Nel nuovo progetto creare una nuova cartella nella soluzione denominata "Views". Questa cartella conterrà le pagine che verranno spostate in questo esempio. Fare clic con il pulsante destro del mouse sul progetto in Esplora soluzioni, selezionare Aggiungi > Nuova cartella, quindi rinominare la cartella in Visualizzazioni.

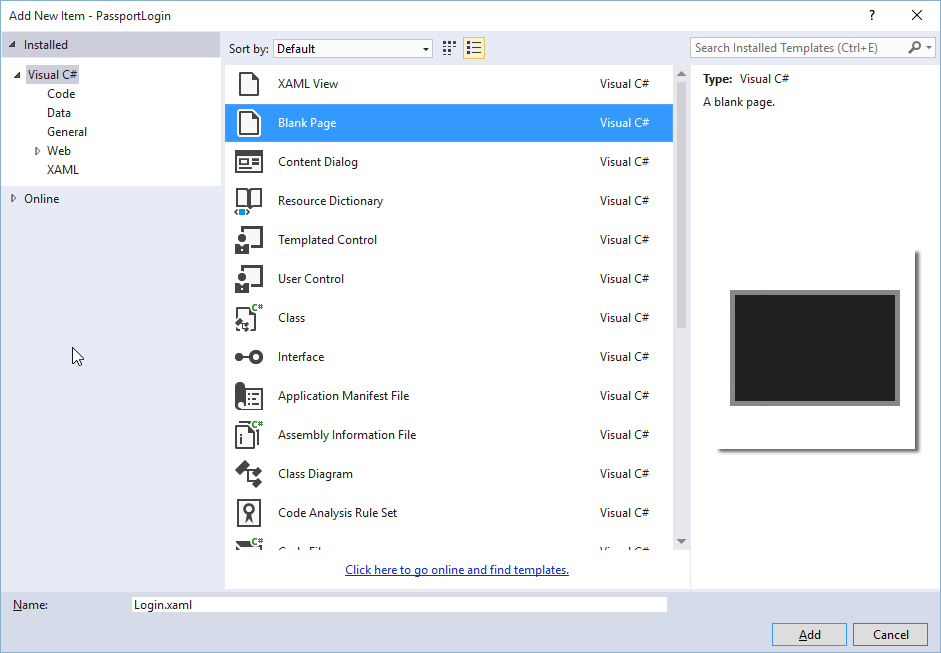
Fare clic con il pulsante destro del mouse sulla nuova cartella Visualizzazioni, selezionare Aggiungi > Nuovo elemento e selezionare Pagina vuota. Assegnare alla pagina il nome "Login.xaml".
Per definire l'interfaccia utente per la nuova pagina di accesso, aggiungere il codice XAML seguente. Questo codice XAML definisce un oggetto StackPanel per allineare gli elementi figlio seguenti:
- TextBlock che conterrà un titolo.
- TextBlock per i messaggi di errore.
- TextBox per il nome utente da inserire.
- Pulsante per passare a una pagina di registrazione.
- TextBlock per contenere lo stato di Windows Hello.
- TextBlock per spiegare la pagina di accesso perché non sono presenti utenti back-end o configurati.
<Grid Background="{ThemeResource ApplicationPageBackgroundThemeBrush}">
  <StackPanel Orientation="Vertical">
    <TextBlock Text="Login" FontSize="36" Margin="4" TextAlignment="Center"/>
    <TextBlock x:Name="ErrorMessage" Text="" FontSize="20" Margin="4" Foreground="Red" TextAlignment="Center"/>
    <TextBlock Text="Enter your username below" Margin="0,0,0,20"
               TextWrapping="Wrap" Width="300"
               TextAlignment="Center" VerticalAlignment="Center" FontSize="16"/>
    <TextBox x:Name="UsernameTextBox" Margin="4" Width="250"/>
    <Button x:Name="PassportSignInButton" Content="Login" Background="DodgerBlue" Foreground="White"
        Click="PassportSignInButton_Click" Width="80" HorizontalAlignment="Center" Margin="0,20"/>
    <TextBlock Text="Don't have an account?"
                TextAlignment="Center" VerticalAlignment="Center" FontSize="16"/>
    <TextBlock x:Name="RegisterButtonTextBlock" Text="Register now"
               PointerPressed="RegisterButtonTextBlock_OnPointerPressed"
               Foreground="DodgerBlue"
               TextAlignment="Center" VerticalAlignment="Center" FontSize="16"/>
    <Border x:Name="PassportStatus" Background="#22B14C"
               Margin="0,20" Height="100" >
      <TextBlock x:Name="PassportStatusText" Text="Microsoft Passport is ready to use!"
             Margin="4" TextAlignment="Center" VerticalAlignment="Center" FontSize="20"/>
    </Border>
    <TextBlock x:Name="LoginExplaination" FontSize="24" TextAlignment="Center" TextWrapping="Wrap"
        Text="Please Note: To demonstrate a login, validation will only occur using the default username 'sampleUsername'"/>
  </StackPanel>
</Grid>
Per ottenere la compilazione della soluzione, è necessario aggiungere alcuni metodi al code-behind. Premere F7 o usare il Esplora soluzioni per passare alla Login.xaml.cs. Aggiungere i due metodi di evento seguenti per gestire gli eventi Login e Register. Per il momento questi metodi impostano ErrorMessage.Text su una stringa vuota.
namespace PassportLogin.Views
{
    public sealed partial class Login : Page
    {
        public Login()
        {
            this.InitializeComponent();
        }

        private void PassportSignInButton_Click(object sender, RoutedEventArgs e)
        {
            ErrorMessage.Text = "";
        }
        private void RegisterButtonTextBlock_OnPointerPressed(object sender, PointerRoutedEventArgs e)
        {
            ErrorMessage.Text = "";
        }
    }
}
Per eseguire il rendering della pagina di accesso, modificare il codice MainPage per passare alla pagina di accesso al caricamento di MainPage. Aprire il file MainPage.xaml.cs. In esplora soluzioni fare doppio clic su MainPage.xaml.cs. Se non si riesce a trovarlo, fare clic sulla piccola freccia accanto a MainPage.xaml per visualizzare il code-behind. Creare un metodo del gestore eventi caricato che passerà alla pagina di accesso. Si dovrà aggiungere un riferimento allo spazio dei nomi Visualizzazioni.
using PassportLogin.Views;

namespace PassportLogin
{
    public sealed partial class MainPage : Page
    {
        public MainPage()
        {
            this.InitializeComponent();
            Loaded += MainPage_Loaded;
        }

        private void MainPage_Loaded(object sender, RoutedEventArgs e)
        {
            Frame.Navigate(typeof(Login));
        }
    }
}
Nella pagina di accesso è necessario gestire l'evento OnNavigatedTo per verificare se Windows Hello è disponibile nel computer. In Login.xaml.cs implementare quanto segue. Si noterà che l'oggetto MicrosoftPassportHelper contrassegna un errore. Ciò è dovuto al fatto che non è ancora stato implementato.
public sealed partial class Login : Page
{
    public Login()
    {
        this.InitializeComponent();
    }

    protected override async void OnNavigatedTo(NavigationEventArgs e)
    {
        // Check Microsoft Passport is setup and available on this machine
        if (await MicrosoftPassportHelper.MicrosoftPassportAvailableCheckAsync())
        {
        }
        else
        {
            // Microsoft Passport is not setup so inform the user
            PassportStatus.Background = new SolidColorBrush(Windows.UI.Color.FromArgb(255, 50, 170, 207));
            PassportStatusText.Text = "Microsoft Passport is not setup!\n" +
                "Please go to Windows Settings and set up a PIN to use it.";
            PassportSignInButton.IsEnabled = false;
        }
    }
}
Per creare la classe MicrosoftPassportHelper, fare clic con il pulsante destro del mouse sulla soluzione PassportLogin (Windows universale) e scegliere Aggiungi > Nuova cartella. Assegnare alla cartella il nome Utils.

Fare clic con il pulsante destro del mouse sulla cartella Utils e scegliere Aggiungi Classe >. Assegnare alla classe il nome "MicrosoftPassportHelper.cs".
Modificare la definizione della classe di MicrosoftPassportHelper in statico pubblico, quindi aggiungere il metodo seguente per informare l'utente se Windows Hello è pronto per essere usato o meno. Sarà necessario aggiungere gli spazi dei nomi necessari.
using System;
using System.Diagnostics;
using System.Threading.Tasks;
using Windows.Security.Credentials;

namespace PassportLogin.Utils
{
    public static class MicrosoftPassportHelper
    {
        /// <summary>
        /// Checks to see if Passport is ready to be used.
        ///
        /// Passport has dependencies on:
        ///     1. Having a connected Microsoft Account
        ///     2. Having a Windows PIN set up for that _account on the local machine
        /// </summary>
        public static async Task<bool> MicrosoftPassportAvailableCheckAsync()
        {
            bool keyCredentialAvailable = await KeyCredentialManager.IsSupportedAsync();
            if (keyCredentialAvailable == false)
            {
                // Key credential is not enabled yet as user
                // needs to connect to a Microsoft Account and select a PIN in the connecting flow.
                Debug.WriteLine("Microsoft Passport is not setup!\nPlease go to Windows Settings and set up a PIN to use it.");
                return false;
            }

            return true;
        }
    }
}
In Login.xaml.cs aggiungere un riferimento allo spazio dei nomi Utils. Verrà risolto l'errore nel metodo OnNavigatedTo.
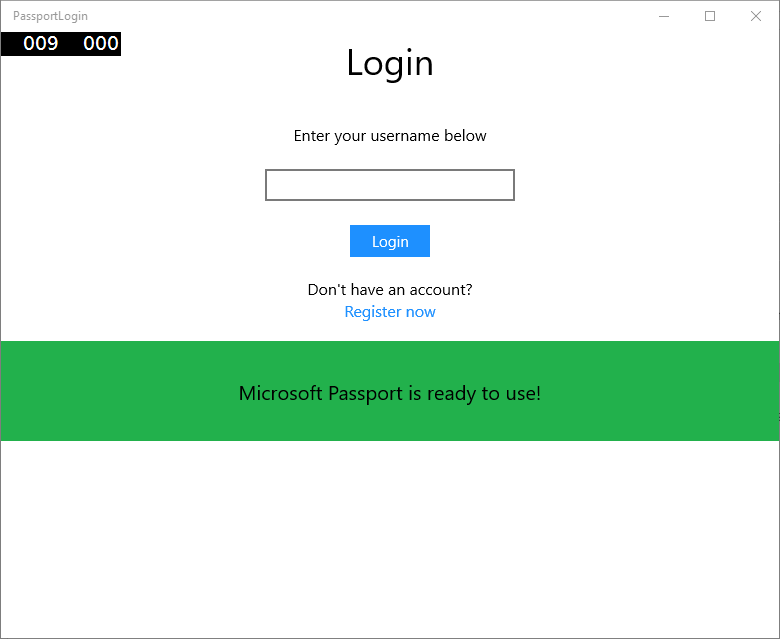
using PassportLogin.Utils;Compilare ed eseguire l'applicazione (F5). Si passerà alla pagina di accesso e il banner di Windows Hello indicherà se Hello è pronto per l'uso. Verrà visualizzato il banner verde o blu che indica lo stato di Windows Hello nel computer.

L'operazione successiva da eseguire consiste nel creare la logica per l'accesso. Creare una nuova cartella denominata "Modelli".
Nella cartella Models creare una nuova classe denominata "Account.cs". Questa classe fungerà da modello di account. Poiché si tratta di un esempio, conterrà solo un nome utente. Modificare la definizione della classe in public e aggiungere la proprietà Username.
namespace PassportLogin.Models
{
    public class Account
    {
        public string Username { get; set; }
    }
}
È necessario un modo per gestire gli account. Per questo lab pratico perché non è presente alcun server o un database, verrà salvato e caricato localmente un elenco di utenti. Fare clic con il tasto destro sulla cartella Utils e aggiungere una nuova classe denominata "AccountHelper.cs". Modificare la definizione della classe in modo che sia statica pubblica. AccountHelper è una classe statica che conterrà tutti i metodi necessari per salvare e caricare l'elenco di account in locale. Il salvataggio e il caricamento funzioneranno usando un XmlSerializer. Sarà anche necessario ricordare il file salvato e dove è stato salvato.
using System;
using System.Collections.Generic;
using System.IO;
using System.Text;
using System.Threading.Tasks;
using System.Xml.Serialization;
using Windows.Storage;
using PassportLogin.Models;

namespace PassportLogin.Utils
{
    public static class AccountHelper
    {
        // In the real world this would not be needed as there would be a server implemented that would host a user account database.
        // For this tutorial we will just be storing accounts locally.
        private const string USER_ACCOUNT_LIST_FILE_NAME = "accountlist.txt";
        private static string _accountListPath = Path.Combine(ApplicationData.Current.LocalFolder.Path, USER_ACCOUNT_LIST_FILE_NAME);
        public static List<Account> AccountList = new List<Account>();

        /// <summary>
        /// Create and save a useraccount list file. (Updating the old one)
        /// </summary>
        private static async void SaveAccountListAsync()
        {
            string accountsXml = SerializeAccountListToXml();

            if (File.Exists(_accountListPath))
            {
                StorageFile accountsFile = await StorageFile.GetFileFromPathAsync(_accountListPath);
                await FileIO.WriteTextAsync(accountsFile, accountsXml);
            }
            else
            {
                StorageFile accountsFile = await ApplicationData.Current.LocalFolder.CreateFileAsync(USER_ACCOUNT_LIST_FILE_NAME);
                await FileIO.WriteTextAsync(accountsFile, accountsXml);
            }
        }

        /// <summary>
        /// Gets the useraccount list file and deserializes it from XML to a list of useraccount objects.
        /// </summary>
        /// <returns>List of useraccount objects</returns>
        public static async Task<List<Account>> LoadAccountListAsync()
        {
            if (File.Exists(_accountListPath))
            {
                StorageFile accountsFile = await StorageFile.GetFileFromPathAsync(_accountListPath);

                string accountsXml = await FileIO.ReadTextAsync(accountsFile);
                DeserializeXmlToAccountList(accountsXml);
            }

            return AccountList;
        }

        /// <summary>
        /// Uses the local list of accounts and returns an XML formatted string representing the list
        /// </summary>
        /// <returns>XML formatted list of accounts</returns>
        public static string SerializeAccountListToXml()
        {
            XmlSerializer xmlizer = new XmlSerializer(typeof(List<Account>));
            StringWriter writer = new StringWriter();
            xmlizer.Serialize(writer, AccountList);

            return writer.ToString();
        }

        /// <summary>
        /// Takes an XML formatted string representing a list of accounts and returns a list object of accounts
        /// </summary>
        /// <param name="listAsXml">XML formatted list of accounts</param>
        /// <returns>List object of accounts</returns>
        public static List<Account> DeserializeXmlToAccountList(string listAsXml)
        {
            XmlSerializer xmlizer = new XmlSerializer(typeof(List<Account>));
            TextReader textreader = new StreamReader(new MemoryStream(Encoding.UTF8.GetBytes(listAsXml)));

            return AccountList = (xmlizer.Deserialize(textreader)) as List<Account>;
        }
    }
}
Implementare quindi un modo per aggiungere e rimuovere un account dall'elenco locale di account. Queste azioni salveranno ogni elenco. Il metodo finale necessario per questo lab pratico è un metodo di convalida. Poiché non esiste un server di autenticazione o un database di utenti, verrà convalidato in base a un singolo utente hardcoded. Questi metodi devono essere aggiunti alla classe AccountHelper.
public static Account AddAccount(string username)
        {
            // Create a new account with the username
            Account account = new Account() { Username = username };
            // Add it to the local list of accounts
            AccountList.Add(account);
            // SaveAccountList and return the account
            SaveAccountListAsync();
            return account;
        }

        public static void RemoveAccount(Account account)
        {
            // Remove the account from the accounts list
            AccountList.Remove(account);
            // Re save the updated list
            SaveAccountListAsync();
        }

        public static bool ValidateAccountCredentials(string username)
        {
            // In the real world, this method would call the server to authenticate that the account exists and is valid.
            // For this tutorial however we will just have an existing sample user that is just "sampleUsername"
            // If the username is null or does not match "sampleUsername" it will fail validation. In which case the user should register a new passport user

            if (string.IsNullOrEmpty(username))
            {
                return false;
            }

            if (!string.Equals(username, "sampleUsername"))
            {
                return false;
            }

            return true;
        }
L'operazione successiva da eseguire consiste nell'gestire una richiesta di accesso da parte dell'utente. In Login.xaml.cs creare una nuova variabile privata che conterrà l'accesso all'account corrente. Aggiungere quindi una nuova chiamata al metodo SignInPassport. In questo modo le credenziali dell'account verranno convalidate usando il metodo AccountHelper.ValidateAccountCredentials. Questo metodo restituirà un valore booleano se il nome utente immesso corrisponde al valore stringa hardcoded impostato nel passaggio precedente. Il valore hardcoded per questo esempio è "sampleUsername".
using PassportLogin.Models;
using PassportLogin.Utils;
using System.Diagnostics;

namespace PassportLogin.Views
{
    public sealed partial class Login : Page
    {
        private Account _account;

        public Login()
        {
            this.InitializeComponent();
        }

        protected override async void OnNavigatedTo(NavigationEventArgs e)
        {
            // Check Microsoft Passport is setup and available on this machine
            if (await MicrosoftPassportHelper.MicrosoftPassportAvailableCheckAsync())
            {
            }
            else
            {
                // Microsoft Passport is not setup so inform the user
                PassportStatus.Background = new SolidColorBrush(Windows.UI.Color.FromArgb(255, 50, 170, 207));
                PassportStatusText.Text = "Microsoft Passport is not setup!\nPlease go to Windows Settings and set up a PIN to use it.";
                PassportSignInButton.IsEnabled = false;
            }
        }

        private void PassportSignInButton_Click(object sender, RoutedEventArgs e)
        {
            ErrorMessage.Text = "";
            SignInPassport();
        }

        private void RegisterButtonTextBlock_OnPointerPressed(object sender, PointerRoutedEventArgs e)
        {
            ErrorMessage.Text = "";
        }

        private async void SignInPassport()
        {
            if (AccountHelper.ValidateAccountCredentials(UsernameTextBox.Text))
            {
                // Create and add a new local account
                _account = AccountHelper.AddAccount(UsernameTextBox.Text);
                Debug.WriteLine("Successfully signed in with traditional credentials and created local account instance!");

                //if (await MicrosoftPassportHelper.CreatePassportKeyAsync(UsernameTextBox.Text))
                //{
                //    Debug.WriteLine("Successfully signed in with Microsoft Passport!");
                //}
            }
            else
            {
                ErrorMessage.Text = "Invalid Credentials";
            }
        }
    }
}
È possibile che il codice commentato faccia riferimento a un metodo in MicrosoftPassportHelper. In MicrosoftPassportHelper.cs aggiungere in un nuovo metodo denominato CreatePassportKeyAsync. Questo metodo usa l'API Windows Hello in KeyCredentialManager. La chiamata a RequestCreateAsync creerà una chiave Passport specifica per accountId e il computer locale. Si notino i commenti nell'istruzione switch se si è interessati a implementare questo in uno scenario reale.
/// <summary>
/// Creates a Passport key on the machine using the _account id passed.
/// </summary>
/// <param name="accountId">The _account id associated with the _account that we are enrolling into Passport</param>
/// <returns>Boolean representing if creating the Passport key succeeded</returns>
public static async Task<bool> CreatePassportKeyAsync(string accountId)
{
    KeyCredentialRetrievalResult keyCreationResult = await KeyCredentialManager.RequestCreateAsync(accountId, KeyCredentialCreationOption.ReplaceExisting);

    switch (keyCreationResult.Status)
    {
        case KeyCredentialStatus.Success:
            Debug.WriteLine("Successfully made key");

            // In the real world authentication would take place on a server.
            // So every time a user migrates or creates a new Microsoft Passport account Passport details should be pushed to the server.
            // The details that would be pushed to the server include:
            // The public key, keyAttesation if available,
            // certificate chain for attestation endorsement key if available,
            // status code of key attestation result: keyAttestationIncluded or
            // keyAttestationCanBeRetrievedLater and keyAttestationRetryType
            // As this sample has no concept of a server it will be skipped for now
            // for information on how to do this refer to the second Passport sample

            //For this sample just return true
            return true;
        case KeyCredentialStatus.UserCanceled:
            Debug.WriteLine("User cancelled sign-in process.");
            break;
        case KeyCredentialStatus.NotFound:
            // User needs to setup Microsoft Passport
            Debug.WriteLine("Microsoft Passport is not setup!\nPlease go to Windows Settings and set up a PIN to use it.");
            break;
        default:
            break;
    }

    return false;
}
Dopo aver creato il metodo CreatePassportKeyAsync, tornare al file Login.xaml.cs e rimuovere il commento dal codice all'interno del metodo SignInPassport.
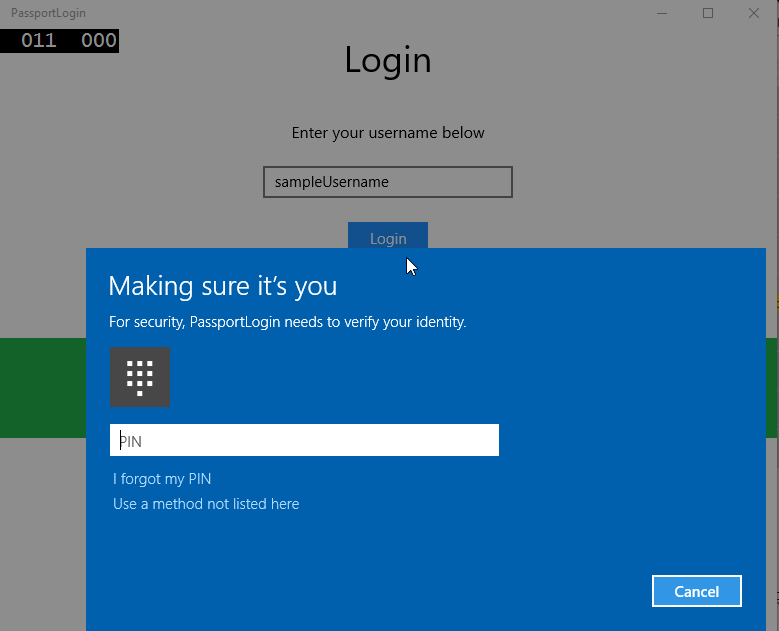
private async void SignInPassport()
{
    if (AccountHelper.ValidateAccountCredentials(UsernameTextBox.Text))
    {
        //Create and add a new local account
        _account = AccountHelper.AddAccount(UsernameTextBox.Text);
        Debug.WriteLine("Successfully signed in with traditional credentials and created local account instance!");

        if (await MicrosoftPassportHelper.CreatePassportKeyAsync(UsernameTextBox.Text))
        {
            Debug.WriteLine("Successfully signed in with Microsoft Passport!");
        }
    }
    else
    {
        ErrorMessage.Text = "Invalid Credentials";
    }
}
Compilare ed eseguire l'applicazione. Verrà visualizzata la pagina di accesso. Digitare "sampleUsername" e fare clic su login. Verrà richiesto un prompt di Windows Hello che chiede di immettere il PIN. Dopo aver immesso correttamente il PIN, il metodo CreatePassportKeyAsync sarà in grado di creare una chiave di Windows Hello. Monitorare le finestre di output per verificare se vengono visualizzati i messaggi che indicano l'esito positivo.
Esercizio 2: Pagine di benvenuto e selezione utente
In questo esercizio si continuerà dall'esercizio precedente. Quando una persona accede correttamente, deve essere visualizzata in una pagina di benvenuto in cui può disconnettersi o eliminare il proprio account. Quando Windows Hello crea una chiave per ogni computer, è possibile creare una schermata di selezione utente, che visualizza tutti gli utenti che hanno eseguito l'accesso a tale computer. Un utente può quindi selezionare uno di questi account e passare direttamente alla schermata iniziale senza dover immettere nuovamente una password perché è già stata autenticata per accedere al computer.
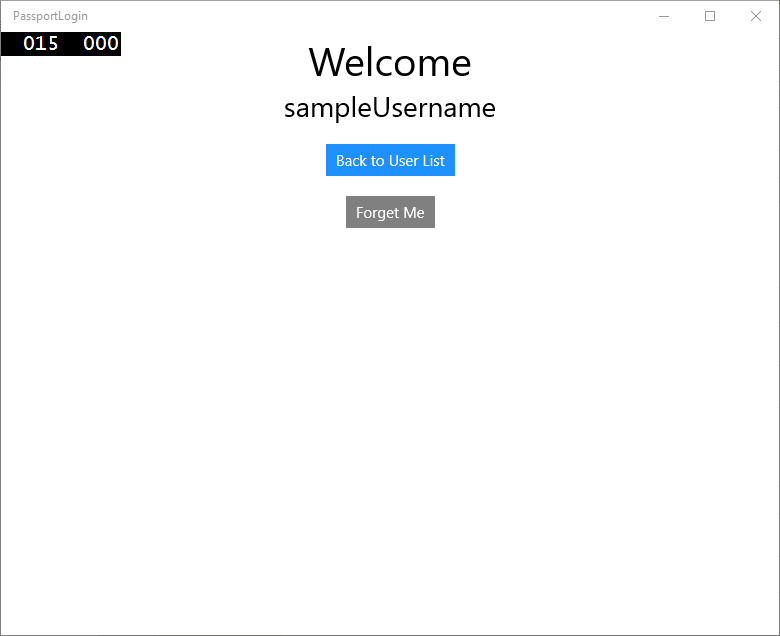
Nella cartella Visualizzazioni aggiungere una nuova pagina vuota denominata "Welcome.xaml". Aggiungere il codice XAML seguente per completare l'interfaccia utente. Verrà visualizzato un titolo, il nome utente connesso e due pulsanti. Uno dei pulsanti tornerà a un elenco di utenti (che verrà creato in un secondo momento) e l'altro pulsante gestirà l'oblio di questo utente.
<Grid Background="{ThemeResource ApplicationPageBackgroundThemeBrush}">
  <StackPanel Orientation="Vertical">
    <TextBlock x:Name="Title" Text="Welcome" FontSize="40" TextAlignment="Center"/>
    <TextBlock x:Name="UserNameText" FontSize="28" TextAlignment="Center" Foreground="Black"/>

    <Button x:Name="BackToUserListButton" Content="Back to User List" Click="Button_Restart_Click"
            HorizontalAlignment="Center" Margin="0,20" Foreground="White" Background="DodgerBlue"/>

    <Button x:Name="ForgetButton" Content="Forget Me" Click="Button_Forget_User_Click"
            Foreground="White"
            Background="Gray"
            HorizontalAlignment="Center"/>
  </StackPanel>
</Grid>
Nel file code-behind Welcome.xaml.cs aggiungere una nuova variabile privata che conterrà l'account connesso. Sarà necessario implementare un metodo per eseguire l'override dell'evento OnNavigateTo, che archivierà l'account passato alla pagina di benvenuto. Si dovrà anche implementare l'evento click per i due pulsanti definiti in XAML. Sarà necessario un riferimento alle cartelle Models e Utils.
using PassportLogin.Models;
using PassportLogin.Utils;
using System.Diagnostics;

namespace PassportLogin.Views
{
    public sealed partial class Welcome : Page
    {
        private Account _activeAccount;

        public Welcome()
        {
            InitializeComponent();
        }

        protected override void OnNavigatedTo(NavigationEventArgs e)
        {
            _activeAccount = (Account)e.Parameter;
            if (_activeAccount != null)
            {
                UserNameText.Text = _activeAccount.Username;
            }
        }

        private void Button_Restart_Click(object sender, RoutedEventArgs e)
        {
        }

        private void Button_Forget_User_Click(object sender, RoutedEventArgs e)
        {
            // Remove it from Microsoft Passport
            // MicrosoftPassportHelper.RemovePassportAccountAsync(_activeAccount);

            // Remove it from the local accounts list and resave the updated list
            AccountHelper.RemoveAccount(_activeAccount);

            Debug.WriteLine("User " + _activeAccount.Username + " deleted.");
        }
    }
}
Si potrebbe aver notato una riga commentata nell'evento forget user click. L'account viene rimosso dall'elenco locale, ma attualmente non è possibile rimuoverlo da Windows Hello. È necessario implementare un nuovo metodo in MicrosoftPassportHelper.cs che gestirà la rimozione di un utente di Windows Hello. Questo metodo userà altre API di Windows Hello per aprire ed eliminare l'account. Nel mondo reale quando si elimina un account il server o il database deve ricevere una notifica in modo che il database utente rimanga valido. Sarà necessario un riferimento alla cartella Models.
using PassportLogin.Models;

/// <summary>
/// Function to be called when user requests deleting their account.
/// Checks the KeyCredentialManager to see if there is a Passport for the current user
/// Then deletes the local key associated with the Passport.
/// </summary>
public static async void RemovePassportAccountAsync(Account account)
{
    // Open the account with Passport
    KeyCredentialRetrievalResult keyOpenResult = await KeyCredentialManager.OpenAsync(account.Username);

    if (keyOpenResult.Status == KeyCredentialStatus.Success)
    {
        // In the real world you would send key information to server to unregister
        //for example, RemovePassportAccountOnServer(account);
    }

    // Then delete the account from the machines list of Passport Accounts
    await KeyCredentialManager.DeleteAsync(account.Username);
}
Tornare Welcome.xaml.cs rimuovere il commento dalla riga che chiama RemovePassportAccountAsync.
private void Button_Forget_User_Click(object sender, RoutedEventArgs e)
{
    // Remove it from Microsoft Passport
    MicrosoftPassportHelper.RemovePassportAccountAsync(_activeAccount);

    // Remove it from the local accounts list and resave the updated list
    AccountHelper.RemoveAccount(_activeAccount);

    Debug.WriteLine("User " + _activeAccount.Username + " deleted.");
}
Nel metodo SignInPassport (di Login.xaml.cs), dopo che CreatePassportKeyAsync ha esito positivo, passare alla schermata iniziale e passare l'account.
private async void SignInPassport()
{
    if (AccountHelper.ValidateAccountCredentials(UsernameTextBox.Text))
    {
        // Create and add a new local account
        _account = AccountHelper.AddAccount(UsernameTextBox.Text);
        Debug.WriteLine("Successfully signed in with traditional credentials and created local account instance!");

        if (await MicrosoftPassportHelper.CreatePassportKeyAsync(UsernameTextBox.Text))
        {
            Debug.WriteLine("Successfully signed in with Microsoft Passport!");
            Frame.Navigate(typeof(Welcome), _account);
        }
    }
    else
    {
        ErrorMessage.Text = "Invalid Credentials";
    }
}
Compilare ed eseguire l'applicazione. Accedere con "sampleUsername" e fare clic su login. Immettere il PIN e, in caso di esito positivo, passare alla schermata iniziale. Provare a fare clic su dimentica utente e monitorare la finestra di output per verificare se l'utente è stato eliminato. Si noti che quando l'utente viene eliminato rimane nella pagina di benvenuto. Si dovrà creare una pagina di selezione utente a cui l'app può passare.
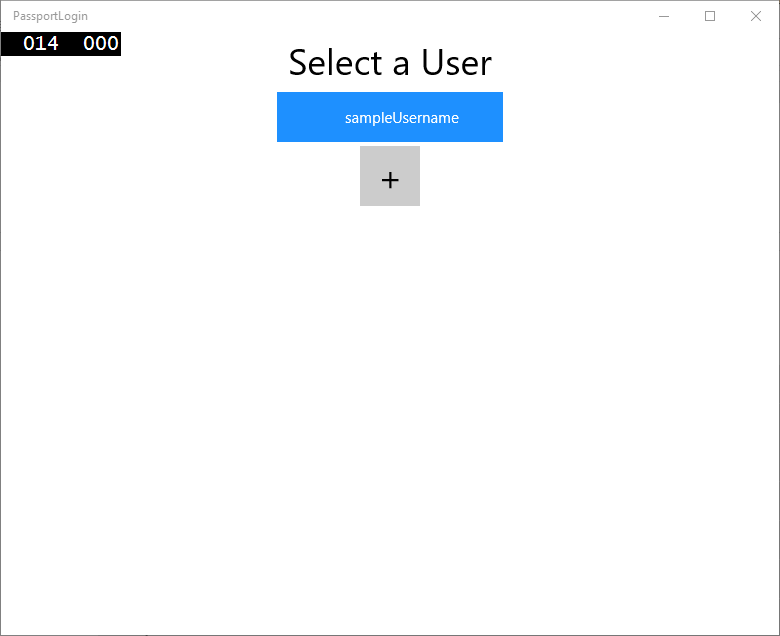
Nella cartella Views creare una nuova pagina vuota denominata "UserSelection.xaml" e aggiungere il codice XAML seguente per definire l'interfaccia utente. Questa pagina conterrà un controllo ListView che visualizza tutti gli utenti nell'elenco degli account locali e un pulsante che passerà alla pagina di accesso per consentire all'utente di aggiungere un altro account.
<Grid Background="{ThemeResource ApplicationPageBackgroundThemeBrush}">
  <StackPanel Orientation="Vertical">
    <TextBlock x:Name="Title" Text="Select a User" FontSize="36" Margin="4" TextAlignment="Center" HorizontalAlignment="Center"/>

    <ListView x:Name="UserListView" Margin="4" MaxHeight="200" MinWidth="250" Width="250" HorizontalAlignment="Center">
      <ListView.ItemTemplate>
        <DataTemplate>
          <Grid Background="DodgerBlue" Height="50" Width="250" HorizontalAlignment="Stretch" VerticalAlignment="Stretch">
            <TextBlock Text="{Binding Username}" HorizontalAlignment="Center" TextAlignment="Center" VerticalAlignment="Center" Foreground="White"/>
          </Grid>
        </DataTemplate>
      </ListView.ItemTemplate>
    </ListView>

    <Button x:Name="AddUserButton" Content="+" FontSize="36" Width="60" Click="AddUserButton_Click" HorizontalAlignment="Center"/>
  </StackPanel>
</Grid>
In UserSelection.xaml.cs implementare il metodo caricato che passerà alla pagina di accesso se non sono presenti account nell'elenco locale. Implementare anche l'evento SelectionChanged per ListView e un evento Click per Button.
using System.Diagnostics;
using PassportLogin.Models;
using PassportLogin.Utils;

namespace PassportLogin.Views
{
    public sealed partial class UserSelection : Page
    {
        public UserSelection()
        {
            InitializeComponent();
            Loaded += UserSelection_Loaded;
        }

        private void UserSelection_Loaded(object sender, RoutedEventArgs e)
        {
            if (AccountHelper.AccountList.Count == 0)
            {
                //If there are no accounts navigate to the LoginPage
                Frame.Navigate(typeof(Login));
            }


            UserListView.ItemsSource = AccountHelper.AccountList;
            UserListView.SelectionChanged += UserSelectionChanged;
        }

        /// <summary>
        /// Function called when an account is selected in the list of accounts
        /// Navigates to the Login page and passes the chosen account
        /// </summary>
        private void UserSelectionChanged(object sender, RoutedEventArgs e)
        {
            if (((ListView)sender).SelectedValue != null)
            {
                Account account = (Account)((ListView)sender).SelectedValue;
                if (account != null)
                {
                    Debug.WriteLine("Account " + account.Username + " selected!");
                }
                Frame.Navigate(typeof(Login), account);
            }
        }

        /// <summary>
        /// Function called when the "+" button is clicked to add a new user.
        /// Navigates to the Login page with nothing filled out
        /// </summary>
        private void AddUserButton_Click(object sender, RoutedEventArgs e)
        {
            Frame.Navigate(typeof(Login));
        }
    }
}
Nell'app sono presenti alcuni punti in cui si vuole passare alla pagina UserSelection. In MainPage.xaml.cs è necessario passare alla pagina UserSelection anziché alla pagina di accesso. Mentre si è nell'evento caricato in MainPage, sarà necessario caricare l'elenco degli account in modo che la pagina UserSelection possa controllare se sono presenti account. Sarà quindi necessario modificare il metodo caricato in modo che sia asincrono e aggiungere anche un riferimento alla cartella Utils.
using PassportLogin.Utils;

private async void MainPage_Loaded(object sender, RoutedEventArgs e)
{
    // Load the local Accounts List before navigating to the UserSelection page
    await AccountHelper.LoadAccountListAsync();
    Frame.Navigate(typeof(UserSelection));
}
Successivamente si vuole passare alla pagina UserSelection dalla pagina di benvenuto. In entrambi gli eventi clic è necessario tornare alla pagina UserSelection.
private void Button_Restart_Click(object sender, RoutedEventArgs e)
{
    Frame.Navigate(typeof(UserSelection));
}

private void Button_Forget_User_Click(object sender, RoutedEventArgs e)
{
    // Remove it from Microsoft Passport
    MicrosoftPassportHelper.RemovePassportAccountAsync(_activeAccount);

    // Remove it from the local accounts list and resave the updated list
    AccountHelper.RemoveAccount(_activeAccount);

    Debug.WriteLine("User " + _activeAccount.Username + " deleted.");

    // Navigate back to UserSelection page.
    Frame.Navigate(typeof(UserSelection));
}
Nella pagina di accesso è necessario il codice per accedere all'account selezionato dall'elenco nella pagina UserSelection. Nell'evento OnNavigatedTo archiviare l'account passato alla struttura di spostamento. Per iniziare, aggiungere una nuova variabile privata che identificherà se l'account è un account esistente. Gestire quindi l'evento OnNavigatedTo.
namespace PassportLogin.Views
{
    public sealed partial class Login : Page
    {
        private Account _account;
        private bool _isExistingAccount;

        public Login()
        {
            InitializeComponent();
        }

        /// <summary>
        /// Function called when this frame is navigated to.
        /// Checks to see if Microsoft Passport is available and if an account was passed in.
        /// If an account was passed in set the "_isExistingAccount" flag to true and set the _account
        /// </summary>
        protected override async void OnNavigatedTo(NavigationEventArgs e)
        {
            // Check Microsoft Passport is setup and available on this machine
            if (await MicrosoftPassportHelper.MicrosoftPassportAvailableCheckAsync())
            {
                if (e.Parameter != null)
                {
                    _isExistingAccount = true;
                    // Set the account to the existing account being passed in
                    _account = (Account)e.Parameter;
                    UsernameTextBox.Text = _account.Username;
                    SignInPassport();
                }
            }
            else
            {
                // Microsoft Passport is not setup so inform the user
                PassportStatus.Background = new SolidColorBrush(Windows.UI.Color.FromArgb(255, 50, 170, 207));
                PassportStatusText.Text = "Microsoft Passport is not setup!\n" +
                    "Please go to Windows Settings and set up a PIN to use it.";
                PassportSignInButton.IsEnabled = false;
            }
        }
    }
}
Il metodo SignInPassport deve essere aggiornato per accedere all'account selezionato. MicrosoftPassportHelper richiederà un altro metodo per aprire l'account con Passport, perché per l'account è già stata creata una Passport. Implementare il nuovo metodo in MicrosoftPassportHelper.cs per accedere a un utente esistente con Passport. Per informazioni su ogni parte del codice, leggere i commenti sul codice.
/// <summary>
/// Attempts to sign a message using the Passport key on the system for the accountId passed.
/// </summary>
/// <returns>Boolean representing if creating the Passport authentication message succeeded</returns>
public static async Task<bool> GetPassportAuthenticationMessageAsync(Account account)
{
    KeyCredentialRetrievalResult openKeyResult = await KeyCredentialManager.OpenAsync(account.Username);
    // Calling OpenAsync will allow the user access to what is available in the app and will not require user credentials again.
    // If you wanted to force the user to sign in again you can use the following:
    // var consentResult = await Windows.Security.Credentials.UI.UserConsentVerifier.RequestVerificationAsync(account.Username);
    // This will ask for the either the password of the currently signed in Microsoft Account or the PIN used for Microsoft Passport.

    if (openKeyResult.Status == KeyCredentialStatus.Success)
    {
        // If OpenAsync has succeeded, the next thing to think about is whether the client application requires access to backend services.
        // If it does here you would Request a challenge from the Server. The client would sign this challenge and the server
        // would check the signed challenge. If it is correct it would allow the user access to the backend.
        // You would likely make a new method called RequestSignAsync to handle all this
        // for example, RequestSignAsync(openKeyResult);
        // Refer to the second Microsoft Passport sample for information on how to do this.

        // For this sample there is not concept of a server implemented so just return true.
        return true;
    }
    else if (openKeyResult.Status == KeyCredentialStatus.NotFound)
    {
        // If the _account is not found at this stage. It could be one of two errors.
        // 1. Microsoft Passport has been disabled
        // 2. Microsoft Passport has been disabled and re-enabled cause the Microsoft Passport Key to change.
        // Calling CreatePassportKey and passing through the account will attempt to replace the existing Microsoft Passport Key for that account.
        // If the error really is that Microsoft Passport is disabled then the CreatePassportKey method will output that error.
        if (await CreatePassportKeyAsync(account.Username))
        {
            // If the Passport Key was again successfully created, Microsoft Passport has just been reset.
            // Now that the Passport Key has been reset for the _account retry sign in.
            return await GetPassportAuthenticationMessageAsync(account);
        }
    }

    // Can't use Passport right now, try again later
    return false;
}
Aggiornare il metodo SignInPassport in Login.xaml.cs per gestire l'account esistente. Verrà usato il nuovo metodo nella MicrosoftPassportHelper.cs. In caso di esito positivo, l'account verrà eseguito l'accesso e l'utente passerà alla schermata iniziale.
private async void SignInPassport()
{
    if (_isExistingAccount)
    {
        if (await MicrosoftPassportHelper.GetPassportAuthenticationMessageAsync(_account))
        {
            Frame.Navigate(typeof(Welcome), _account);
        }
    }
    else if (AccountHelper.ValidateAccountCredentials(UsernameTextBox.Text))
    {
        //Create and add a new local account
        _account = AccountHelper.AddAccount(UsernameTextBox.Text);
        Debug.WriteLine("Successfully signed in with traditional credentials and created local account instance!");

        if (await MicrosoftPassportHelper.CreatePassportKeyAsync(UsernameTextBox.Text))
        {
            Debug.WriteLine("Successfully signed in with Microsoft Passport!");
            Frame.Navigate(typeof(Welcome), _account);
        }
    }
    else
    {
        ErrorMessage.Text = "Invalid Credentials";
    }
}
Compilare ed eseguire l'applicazione. Accedere con "sampleUsername". Digitare il PIN e, se l'operazione riesce, verrà visualizzata la schermata iniziale. Fare clic di nuovo sull'elenco utenti. Si dovrebbe ora vedere un utente nell'elenco. Se si fa clic su questo Passport consente di accedere di nuovo senza dover immettere nuovamente password e così via.
Esercizio 3: Registrazione di un nuovo utente di Windows Hello
In questo esercizio verrà creata una nuova pagina che creerà un nuovo account con Windows Hello. Questa operazione funzionerà in modo analogo al funzionamento della pagina di accesso. La pagina di accesso viene implementata per un utente esistente che esegue la migrazione per l'uso di Windows Hello. Una pagina PassportRegister creerà la registrazione di Windows Hello per un nuovo utente.
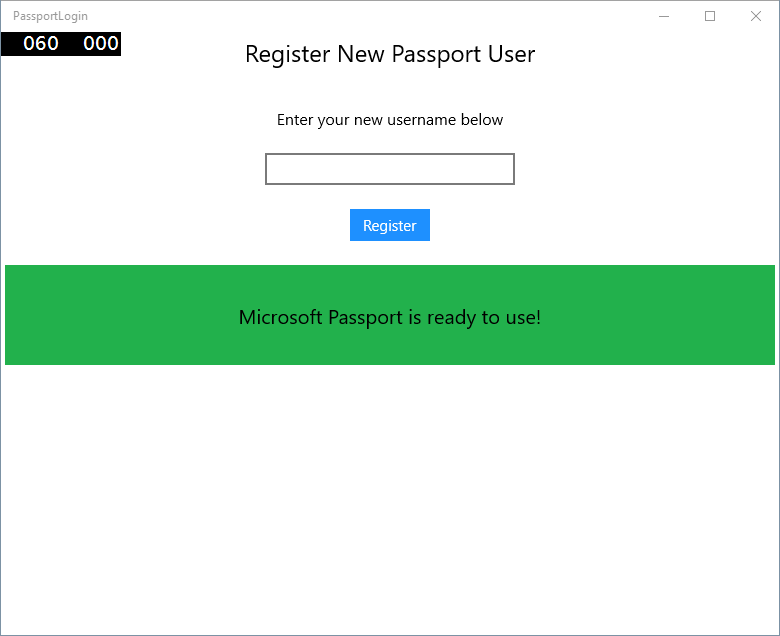
Nella cartella views creare una nuova pagina vuota denominata "PassportRegister.xaml". Nel codice XAML aggiungere quanto segue per configurare l'interfaccia utente. L'interfaccia qui è simile alla pagina di accesso.
<Grid Background="{ThemeResource ApplicationPageBackgroundThemeBrush}">
  <StackPanel Orientation="Vertical">
    <TextBlock x:Name="Title" Text="Register New Passport User" FontSize="24" Margin="4" TextAlignment="Center"/>

    <TextBlock x:Name="ErrorMessage" Text="" FontSize="20" Margin="4" Foreground="Red" TextAlignment="Center"/>

    <TextBlock Text="Enter your new username below" Margin="0,0,0,20"
               TextWrapping="Wrap" Width="300"
               TextAlignment="Center" VerticalAlignment="Center" FontSize="16"/>

    <TextBox x:Name="UsernameTextBox" Margin="4" Width="250"/>

    <Button x:Name="PassportRegisterButton" Content="Register" Background="DodgerBlue" Foreground="White"
        Click="RegisterButton_Click_Async" Width="80" HorizontalAlignment="Center" Margin="0,20"/>

    <Border x:Name="PassportStatus" Background="#22B14C"
               Margin="4" Height="100">
      <TextBlock x:Name="PassportStatusText" Text="Microsoft Passport is ready to use!" FontSize="20"
             Margin="4" TextAlignment="Center" VerticalAlignment="Center"/>
    </Border>
  </StackPanel>
</Grid>
Nel file code-behind del PassportRegister.xaml.cs implementare una variabile account privata e un evento click per il pulsante di registrazione. Verrà aggiunto un nuovo account locale e verrà creata una Passport.
using PassportLogin.Models;
using PassportLogin.Utils;

namespace PassportLogin.Views
{
    public sealed partial class PassportRegister : Page
    {
        private Account _account;

        public PassportRegister()
        {
            InitializeComponent();
        }

        private async void RegisterButton_Click_Async(object sender, RoutedEventArgs e)
        {
            ErrorMessage.Text = "";

            //In the real world you would normally validate the entered credentials and information before
            //allowing a user to register a new account.
            //For this sample though we will skip that step and just register an account if username is not null.

            if (!string.IsNullOrEmpty(UsernameTextBox.Text))
            {
                //Register a new account
                _account = AccountHelper.AddAccount(UsernameTextBox.Text);
                //Register new account with Microsoft Passport
                await MicrosoftPassportHelper.CreatePassportKeyAsync(_account.Username);
                //Navigate to the Welcome Screen.
                Frame.Navigate(typeof(Welcome), _account);
            }
            else
            {
                ErrorMessage.Text = "Please enter a username";
            }
        }
    }
}
È necessario passare a questa pagina dalla pagina di accesso quando si fa clic su Registra.
private void RegisterButtonTextBlock_OnPointerPressed(object sender, PointerRoutedEventArgs e)
{
    ErrorMessage.Text = "";
    Frame.Navigate(typeof(PassportRegister));
}
Compilare ed eseguire l'applicazione. Provare a registrare un nuovo utente. Tornare quindi all'elenco di utenti e verificare che sia possibile selezionare l'utente e l'accesso.
In questo lab sono state apprese le competenze essenziali necessarie per usare la nuova API di Windows Hello per autenticare gli utenti esistenti e creare account per i nuovi utenti. Con questa nuova conoscenza è possibile iniziare a rimuovere la necessità per gli utenti di ricordare le password per l'applicazione, ma rimanere sicuri che le applicazioni rimangano protette dall'autenticazione utente. Windows 10 e Windows 11 usano la nuova tecnologia di autenticazione di Windows Hello per supportare le opzioni di accesso biometriche.
Argomenti correlati
Commenti e suggerimenti
Presto disponibile: Nel corso del 2024 verranno gradualmente disattivati i problemi di GitHub come meccanismo di feedback per il contenuto e ciò verrà sostituito con un nuovo sistema di feedback. Per altre informazioni, vedere https://aka.ms/ContentUserFeedback.
Invia e visualizza il feedback per