適用対象: ✔️ Linux VM ✔️ フレキシブルなスケール セット
この記事では、Azure ポータルを使用して新しいディスクと既存のディスクの両方を Linux 仮想マシンに接続する方法について示します。 Azure Portal で Windows VM にデータ ディスクを接続することもできます。
このブラウザーはサポートされなくなりました。
Microsoft Edge にアップグレードすると、最新の機能、セキュリティ更新プログラム、およびテクニカル サポートを利用できます。
適用対象: ✔️ Linux VM ✔️ フレキシブルなスケール セット
この記事では、Azure ポータルを使用して新しいディスクと既存のディスクの両方を Linux 仮想マシンに接続する方法について示します。 Azure Portal で Windows VM にデータ ディスクを接続することもできます。
VM にディスクを接続する前に、次のヒントを確認してください。
仮想マシンのサイズによって、接続できるデータ ディスク数は変わります。 詳細については、「 仮想マシンのサイズ」を参照してください。
次のステップを実行します。
Azure portal にアクセスして VM を検索します。 [仮想マシン] を検索して選択します。
ディスクを接続する VM を一覧から選択します。
[仮想マシン] ページの [設定] で、[ディスク] を選択します。
次のステップを実行します。
[ディスク] ウィンドウの [データ ディスク] で、 [新しいディスクを作成し接続する] を選択します。
マネージド ディスクの名前を入力します。 既定の設定を確認し、必要に応じて、 [ストレージの種類] 、 [サイズ (GiB)] 、 [暗号化] 、 [ホスト キャッシュ] を更新します。

完了したら、ページの上部にある [保存] を選択してマネージド ディスクを作成し、VM 構成を更新します。
次のステップを実行します。
[ディスク] ペインの [データ ディスク] で、[既存のディスクのアタッチ] を選びます。
[ディスク名] のドロップダウン メニューを選択し、使用可能なマネージド ディスクのリストからディスクを選択します。
[保存] を選択して既存のマネージド ディスクをアタッチし、VM の構成を更新します。
Linux VM から使用できるように新しいディスクのパーティション分割、フォーマット、マウントを行うには、SSH で VM に接続します。 詳細については、Azure 上の Linux における SSH の使用方法に関するページをご覧ください。 次の例では、パブリック IP アドレス 10.123.123.25 と、ユーザー名 azureuser を指定して、VM に接続します。
ssh azureuser@10.123.123.25
ご利用の VM に接続したら、ディスクを特定する必要があります。 この例では、lsblk を使用してディスクを一覧表示します。
lsblk -o NAME,HCTL,SIZE,MOUNTPOINT | grep -i "sd"
The output is similar to the following example:
sda     0:0:0:0      30G
├─sda1             29.9G /
├─sda14               4M
└─sda15             106M /boot/efi
sdb     1:0:1:0      14G
└─sdb1               14G /mnt
sdc     3:0:0:0       4G
In this example, the disk that was added was sdc. It's a LUN 0 and is 4GB.
For a more complex example, here's what multiple data disks look like in the portal:
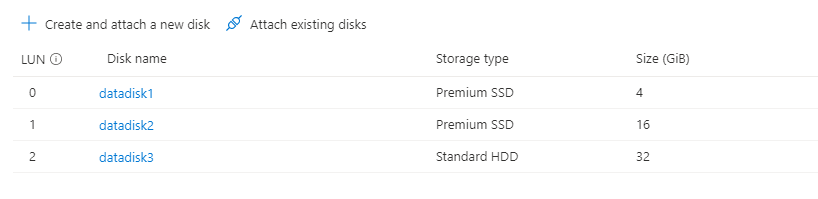
In the image, you can see that there are 3 data disks: 4 GB on LUN 0, 16GB at LUN 1, and 32G at LUN 2.
Here's what that might look like using lsblk:
sda     0:0:0:0      30G
├─sda1             29.9G /
├─sda14               4M
└─sda15             106M /boot/efi
sdb     1:0:1:0      14G
└─sdb1               14G /mnt
sdc     3:0:0:0       4G
sdd     3:0:0:1      16G
sde     3:0:0:2      32G
From the output of lsblk you can see that the 4GB disk at LUN 0 is sdc, the 16GB disk at LUN 1 is sdd, and the 32G disk at LUN 2 is sde.
Important
If you are using an existing disk that contains data, skip to mounting the disk. The following instructions will delete data on the disk.
If you're attaching a new disk, you need to partition the disk.
The parted utility can be used to partition and to format a data disk.
parted that is available for your distro.The following example uses parted on /dev/sdc, which is where the first data disk will typically be on most VMs. Replace sdc with the correct option for your disk. We're also formatting it using the XFS filesystem.
sudo parted /dev/sdc --script mklabel gpt mkpart xfspart xfs 0% 100%
sudo mkfs.xfs /dev/sdc1
sudo partprobe /dev/sdc1
Use the partprobe utility to make sure the kernel is aware of the new partition and filesystem. Failure to use partprobe can cause the blkid or lslbk commands to not return the UUID for the new filesystem immediately.
Create a directory to mount the file system using mkdir. The following example creates a directory at /datadrive:
sudo mkdir /datadrive
Use mount to then mount the filesystem. The following example mounts the /dev/sdc1 partition to the /datadrive mount point:
sudo mount /dev/sdc1 /datadrive
To ensure that the drive is remounted automatically after a reboot, it must be added to the /etc/fstab file. It's also highly recommended that the UUID (Universally Unique Identifier) is used in /etc/fstab to refer to the drive rather than just the device name (such as, /dev/sdc1). If the OS detects a disk error during boot, using the UUID avoids the incorrect disk being mounted to a given location. Remaining data disks would then be assigned those same device IDs. To find the UUID of the new drive, use the blkid utility:
sudo blkid
The output looks similar to the following example:
/dev/sda1: LABEL="cloudimg-rootfs" UUID="11111111-1b1b-1c1c-1d1d-1e1e1e1e1e1e" TYPE="ext4" PARTUUID="1a1b1c1d-11aa-1234-1a1a1a1a1a1a"
/dev/sda15: LABEL="UEFI" UUID="BCD7-96A6" TYPE="vfat" PARTUUID="1e1g1cg1h-11aa-1234-1u1u1a1a1u1u"
/dev/sdb1: UUID="22222222-2b2b-2c2c-2d2d-2e2e2e2e2e2e" TYPE="ext4" TYPE="ext4" PARTUUID="1a2b3c4d-01"
/dev/sda14: PARTUUID="2e2g2cg2h-11aa-1234-1u1u1a1a1u1u"
/dev/sdc1: UUID="33333333-3b3b-3c3c-3d3d-3e3e3e3e3e3e" TYPE="xfs" PARTLABEL="xfspart" PARTUUID="c1c2c3c4-1234-cdef-asdf3456ghjk"
Note
Improperly editing the /etc/fstab file could result in an unbootable system. If unsure, refer to the distribution's documentation for information on how to properly edit this file. You should create a backup of the /etc/fstab file is created before editing.
Next, open the /etc/fstab file in a text editor. Add a line to the end of the file, using the UUID value for the /dev/sdc1 device that was created in the previous steps, and the mountpoint of /datadrive. Using the example from this article, the new line would look like the following:
UUID=33333333-3b3b-3c3c-3d3d-3e3e3e3e3e3e /datadrive xfs defaults,nofail 1 2
When you're done editing the file, save and close the editor.
Note
Later removing a data disk without editing fstab could cause the VM to fail to boot. Most distributions provide either the nofail and/or nobootwait fstab options. These options allow a system to boot even if the disk fails to mount at boot time. Consult your distribution's documentation for more information on these parameters.
The nofail option ensures that the VM starts even if the filesystem is corrupt or the disk does not exist at boot time. Without this option, you may encounter behavior as described in Cannot SSH to Linux VM due to FSTAB errors
lsblk を再度使用して、ディスクとマウントポイントを表示できるようになりました。
lsblk -o NAME,HCTL,SIZE,MOUNTPOINT | grep -i "sd"
出力は次のようになります。
sda     0:0:0:0      30G
├─sda1             29.9G /
├─sda14               4M
└─sda15             106M /boot/efi
sdb     1:0:1:0      14G
└─sdb1               14G /mnt
sdc     3:0:0:0       4G
└─sdc1                4G /datadrive
sdc が /datadrive にマウントされていることがわかります。
一部の Linux カーネルでは、ディスク上の未使用ブロックを破棄するために TRIM/UNMAP 操作がサポートされます。 この機能は主に、削除されたページが無効になり、破棄できることを Azure に通知するのに役立ちます。 この機能を使用すると、非管理対象 Standard ディスクやディスク スナップショットなど、消費されたストレージの量に基づいて課金されるディスクのコストを節約できます。
Linux VM で TRIM のサポートを有効にする方法は 2 通りあります。 通常どおり、ご使用のディストリビューションで推奨される方法をお問い合わせください。
次のように、 /etc/fstab で discard マウント オプションを使用します。
```config
UUID=33333333-3b3b-3c3c-3d3d-3e3e3e3e3e3e   /datadrive   xfs   defaults,discard   1   2
```
場合によっては、discard オプションがパフォーマンスに影響する可能性があります。 または、 fstrim コマンドを手動でコマンド ラインから実行するか、crontab に追加して定期的に実行することができます。
Ubuntu
sudo apt-get install util-linux
sudo fstrim /datadrive
RHEL
sudo yum install util-linux
sudo fstrim /datadrive
SUSE
sudo zypper install util-linux
sudo fstrim /datadrive