Get started with Progressive Web Apps
Progressive Web Apps (PWAs) are simply web apps that are progressively enhanced with native app-like features on supporting platforms and browser engines, such as launch-from-homescreen installation, offline support, and push notifications. On Windows 10 with the Microsoft Edge (EdgeHTML) engine, PWAs enjoy the added advantage of running independently of the browser window as Universal Windows Platform apps.
This guide gives you an overview of PWA basics by building a simple localhost web app as a PWA using Microsoft Visual Studio and some PWA Builder utilities. The finished product works similarly across any browser that supports PWAs.
Tip
For a quick way to convert an existing site to a PWA and package it for Windows 10 and other app platforms, review PWA Builder.
Prerequisites
You may build PWAs with any web development IDE. The following are only prerequisites for this guide, which walks you through PWA tooling support in the Windows developer ecosystem.
Download the (free) Visual Studio Community 2017. You may also use the Professional, Enterprise, or Preview editions. From the Visual Studio Installer, choose the following Workloads.
- Universal Windows Platform development
- Node.js development
Set up a basic web app
For the sake of simplicity, use the Visual Studio Node.js and Express app template to create localhost web app that serves up an index.html page. Imagine this as a placeholder for the compelling, full-featured web app that you are developing as a PWA.
Launch Visual Studio, and start a new project.
- File > New > Project...
Ctrl+Shift+N
Under JavaScript, select Basic Node.js Express 4 Application. Set the name and location and choose OK.
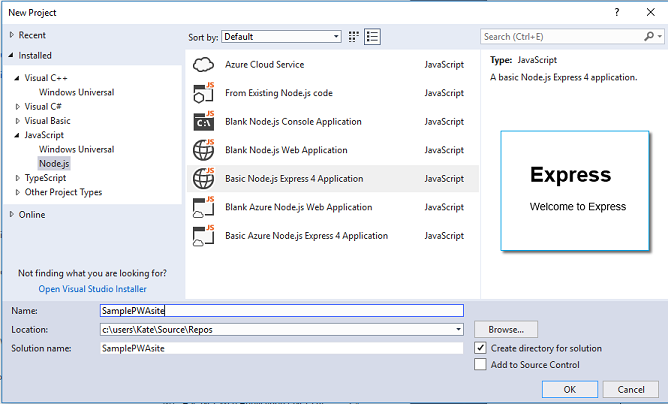
Once your new project loads, choose Build (
Ctrl+Shift+B) and Start Debugging (F5). Verify that yourindex.htmlfile loads when you browse tohttp://localhost:1337.
Turn your app into a PWA
Now it is time to wire up the basic PWA requirements for your web app: a Web App Manifest, HTTPS and Service Workers.
Web App Manifest
A Web App Manifest is a JSON metadata file describing your app, including the name, author, entry page URL, and one or more icons. Because it follows a standards-based schema, you must only supply a single web app manifest for the PWA that you are installing on any platform, OS, and device combination that supports PWAs. In the Windows ecosystem, your web app manifest signals to the Bing web indexer that your PWA is a candidate for automatic inclusion in the Microsoft Store, where it may reach nearly 700 million active monthly users as a Windows 10 app.
If this were an existing live site, you may generate a web app manifest using PWA Builder. Since it is still an unpublished project, copy a sample manifest.
In the Visual Studio Solution Explorer, right-click the public folder and select Add > New File..., specifying
manifest.jsonas the item name.In the
manifest.jsonfile, copy the following code.{ "dir": "ltr", "lang": "en-us", "name": "My Sample PWA", "scope": "/", "display": "browser", "start_url": "https://PLACEHOLDER-FOR-PWA-URL", "short_name": "SamplePWA", "theme_color": "transparent", "description": "A sample PWA for testing purposes", "orientation": "any", "background_color": "transparent", "related_applications": [], "prefer_related_applications": false, "icons": [] }In a real PWA, the next step is to customize name, start_url, short_name, description, and icons (icons are covered in the next step).
To learn more about the different member values and associated purposes, see the Web App Manifest reference.
Next, fill in the empty
iconsarray with actual image paths by using the PWA Builder App Image Generator.- Using a web browser, download this sample 512x512 PWA image.
- Go to the PWA Builder App Image Generator, and select the
pwa.pngimage you just saved as the Input Image and then choose the Download button. - Open and Extract the zip file.
- In the Visual Studio Solution Explorer, right-click the
publicfolder and Open Folder in File Explorer. Create a New folder namedimages. - Copy all of the platform folders (
android,chrome,windows10, and so on) from your extracted zip to theimagesfolder and close the file explorer window. Add the folders to your Visual Studio project (in Solution Explorer, right-clickimagesfolder and select Add > Existing folder... for each of the folders). - Open (with Visual Studio or any editor) the
icons.jsonfile from the extracted zip and copy the"icons": [...]array into themanifest.jsonfile of your project.
Now you must associate your web app manifest with your app. Open the
layout.pugfile (inviewsfolder) for editing, and add this line right after the stylesheet link. (It is simply the Node pug template shorthand for<link rel='manifest' href='/manifest.json'>).link(rel='manifest', href='/manifest.json')
With all that in place, your web app is now serving up a manifest and homescreen-ready app icons! Try running your app (F5) and loading up the manifest.
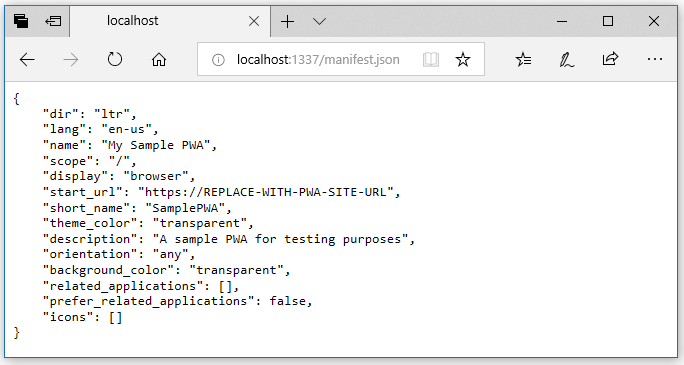
And one of your icons.
![]()
If you publish the app live (with an actual start_url), the Bing search engine now identifies it as a candidate for automatic packaging and submission to the Microsoft Store as an installable Windows 10 app. Ensure that your manifest.json file includes the Quality signals for Progressive Web Apps for which Bing scans including the following items.
namedescription- At least one icon 512px square or larger (to ensure an image source of sufficient resolution for auto-generating the splash screen of your app, store listing, tile image, and so on).
In addition, use HTTPS, service workers, and comply with Microsoft Store Policies.
HTTPS
Service Workers and other key PWA technologies that work with service workers (such as the Cache, Push, and Background Sync APIs) only work across secure connections, which means HTTPS for live sites or localhost for debugging purposes.
If you publish this web app as a live site (for example, by setting up an Azure free account), you must ensure your server is configured for HTTPS. If you use the Microsoft Azure App Service to host your site, it is served over HTTPS by default.
For this guide, continue using http://localhost as a placeholder for a live site served over https://.
Service Workers
Service Workers is the key technology behind PWAs. Service Workers act as a proxy between your PWA and the network to enable your website to function as an installed native app that serves up offline scenarios, responds to server push notifications, and runs background tasks. Service workers also open up new performance strategies. You are not required to implement a full web app to use the service worker cache for fine-tuned page load performance for your website.
Service workers are event-driven background threads that run from JavaScript files served up alongside the regular scripts that power your web app. Because Service workers do not run on the main UI thread, service workers do not have DOM access, though the UI thread and a worker thread is able to communicate using postMessage() and onmessage event handlers.
You associate a service worker with your app by registering it to the URL origin of your site (or a specified path within it). Once registered, the service worker file is then downloaded, installed, and activated on the user machine. For more, MDN web docs has a comprehensive guide on Using Service Workers and a detailed Service Worker API reference.
For this tutorial, use the Offline page service worker script on PWA Builder. Start by customizing the script with more functionality according to your performance requirements, network bandwidth, and so on. Review the Service Worker Cookbook provided by Mozilla for a number of useful service worker caching ideas.
Open https://www.pwabuilder.com/serviceworker and select the (default) Offline page service worker and click the Download service worker button.
Open the download folder and copy the following two files
- ServiceWorker1\pwabuilder-sw-register.js
- ServiceWorker1\pwabuilder-sw.js
Save the files to the
publicfolder of your Visual Studio web app project. (From Visual Studio, useCtrl+Oto open file explorer to your project and navigate to thepublicfolder).In Solution Explorer, open the
public/pwabuilder-sw.jsfile, and change the value ofofflineFallbackPagetooffline.html.const offlineFallbackPage = "offline.html";It is worth reviewing the code in both of these files, to get the gist of how to register a service worker that caches a designated page (
offline.html) and serves it when a network fetch fails. Next, create a simpleoffline.htmlpage as a placeholder for the offline functionality of your app.In Solution Explorer, open the
views/layout.pugfile, and add the following line below your link tags.script(src='/pwabuilder-sw-register.js' type='module')Your site loads and runs your service worker registration script.
In Solution Explorer, right-click on the
publicfolder and select Add > New File.... Name itoffline.html, and add a<title>and some body content, for example the following code.<!DOCTYPE html> <html xmlns="http://www.w3.org/1999/xhtml"> <head> <meta charset="utf-8" /> <title>Offline mode</title> </head> <body> You are now offline. </body> </html>At this point, your
publicfolder should have three new files.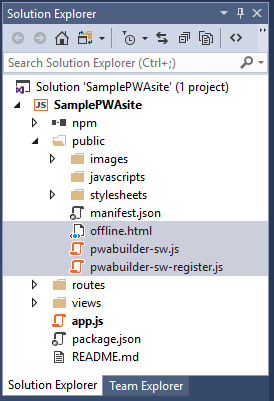
In Solution Explorer, open the
routes\index.jsfile, and add the following code just before the final command (module.exports = router;).router.get('/offline.html', function (req, res) { res.sendFile('public/offline.html'); });This instructs your app to serve the
offline.htmlfile (when your service worker fetches it for the offline cache).Test out your PWA! Build (
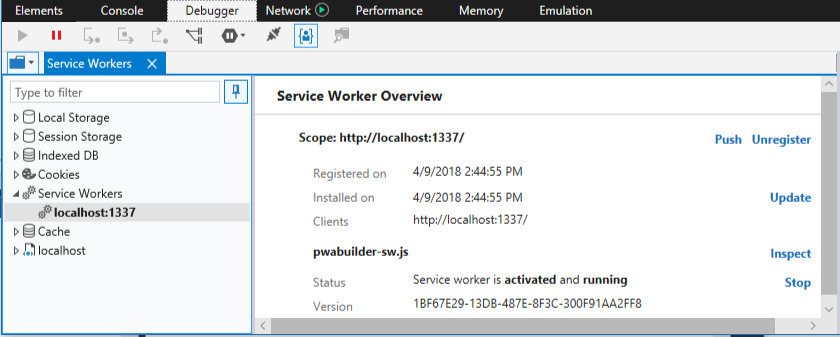
Ctrl+Shift+B) and Run (F5) your web app to launch Microsoft Edge and open yourlocalhostpage. Then complete the following steps.Open the Edge DevTools Console (
Ctrl+Shift+J) and verify the Service worker was registered.In the Debugger panel, expand the Service Workers control and click on your origin. In the Service Worker Overview, verify your service worker is activated and running.
Expand the Cache control and verify that the
offline.htmlpage is cached.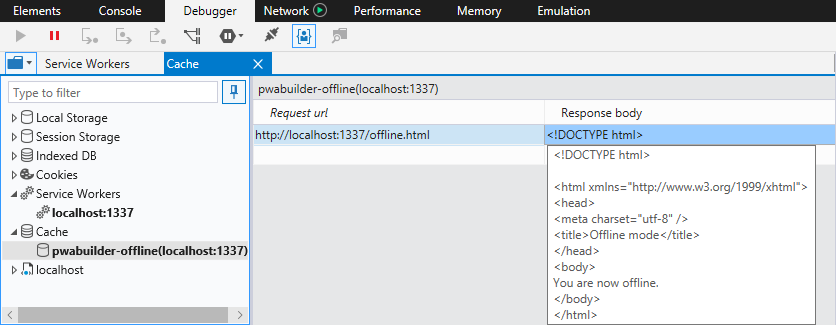
Time to try your PWA as an offline app! In Visual Studio, Stop Debugging (
Shift+F5) your web app, then open Microsoft Edge (or refresh) to the localhost address of your website. It should now load theoffline.htmlpage (thanks to your service worker and offline cache)!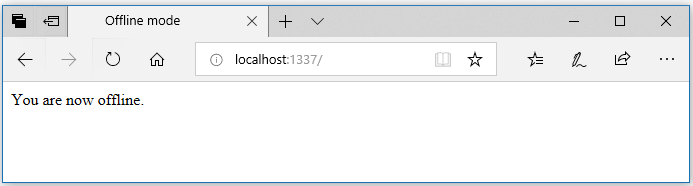
Add push notifications
Make your PWA more app-like by adding client-side support for push notifications using the Push API to subscribe to a messaging service and the Notifications API to display a toast message upon receiving a message. As with Service Workers, these are standards-based APIs that work cross-browser, so you only have to write the code once for it to work everywhere PWAs are supported. On the server side, use the Web-Push open-source library to handle the differences involved in delivering push messages to various browsers.
The following is adapted from the Push Rich Demo in Service Worker Cookbook provided by Mozilla, which is worth checking out for a number of other useful Web Push and service worker recipes.
Step 1 - Install the NPM web-push library
In Visual Studio Solution Explorer, right-click your project and Open Node.js Interactive Window.... In it, type the following code.
.npm install web-push
This installs the Web-Push library. Then, open up your index.js file, and add the following line to the top of your file after the other requirement statements.
var webpush = require('web-push');
Step 2 - Generate VAPID keys for your server
Next you must generate VAPID (Voluntary Application Server Identification) keys for your server to send push messages to the PWA client. You only have to do this once (that is, your server only requires a single pair of VAPID keys). In the Node.js Interactive Window, type the following code.
var webpush = require('web-push');
webpush.generateVAPIDKeys();
The output should result in a JSON object containing a public and private key, which you copy into your server logic.
In your index.js file, just before the final (module.exports = router) line, add the following code.
const vapidKeys = {
    publicKey: '',
    privateKey: ''
};

webpush.setVapidDetails(
    'mailto:pwa@example.com',
    vapidKeys.publicKey,
    vapidKeys.privateKey
);
Copy the publicKey and privateKey values that you just generated. Feel free to customize the mailto address as well (though it is not required in order to run this sample).
The Mozilla Services engineering blog has a nice explainer on VAPID and WebPush if you are interested in the details of how it works behind the scenes.
Step 3 - Handle push-related server requests
Now set up routes for handling push-related requests from the PWA client, including serving up the VAPID public key and registering the client to receive pushes.
In a real scenario, a push notification likely originates from an event in your server logic. To simplify things here, you must add a Push Notification button to our PWA homepage for generating pushes from our server, and a /sendNotification endpoint (server route)for handling those requests.
In your index.js file, append the following routes just after the VAPID initialization code you added in [Step 2][#step-2---generate-vapid-keys-for-your-server].
router.get('/vapidPublicKey', function (req, res) {
res.send(vapidKeys.publicKey);
});
router.post('/register', function (req, res) {
// A real world application stores the subscription info.
res.sendStatus(201);
});
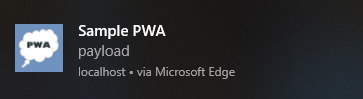
router.post('/sendNotification', function (req, res) {
const subscription = req.body.subscription;
const payload = 'payload';
const options = null;
webpush.sendNotification(subscription, payload, options)
.then(function () {
res.sendStatus(201);
})
.catch(function (error) {
res.sendStatus(500);
console.log(error);
});
});
With the server-side code in place, plumb in push notifications on the PWA client.
Step 4 - Subscribe to push notifications
As part of their role as PWA network proxies, service workers handle push events and toast notification interactions. However, as it is with first setting up (or registering) a service worker, subscribing the PWA to server push notifications happens on the main UI thread of the PWA and requires network connectivity. Subscribing to push notifications requires an active service worker registration, so you must first verify that your service worker is installed and active before trying to subscribe it to push notifications.
Before a new push subscription is created, Microsoft Edge check if the user granted the PWA permission to receive notifications. If not, the user is prompted by the browser for permission. If the permission is denied, the request to registration.pushManager.subscribe throws a DOMException, so you must handle it. For more on permission management, see Push Notifications in Microsoft Edge.
In your pwabuilder-sw-register.js file, append the following code.
// Subscribe this PWA to push notifications from the server
navigator.serviceWorker.ready
    .then(function (registration) {
        // Check if the user has an existing subscription
        return registration.pushManager.getSubscription()
            .then(async function (subscription) {
                if (subscription) {
                    return subscription;
                }

                // Otherwise subscribe with the server public key
                const response = await fetch('./vapidPublicKey');
                const vapidPublicKey = await response.text();
                const convertedVapidKey = urlBase64ToUint8Array(vapidPublicKey);

                return registration.pushManager.subscribe({
                    userVisibleOnly: true,
                    applicationServerKey: convertedVapidKey
                });
            });
    }).then(function (subscription) {
        // Send the subscription details to the server
        fetch('./register', {
            method: 'post',
            headers: {
                'Content-type': 'application/json'
            },
            body: JSON.stringify({
                subscription: subscription
            }),
        });

        // Create a button to mimic server pushes for testing purposes
        var button = document.createElement('input');
        button.type = 'button';
        button.id = 'notify';
        button.value = 'Send Notification';
        document.body.appendChild(button);
        document.getElementById('notify').addEventListener('click', function () {
            fetch('./sendNotification', {
                method: 'post',
                headers: {
                    'Content-type': 'application/json'
                },
                body: JSON.stringify({
                    subscription: subscription
                }),
            });
        });
    });

// Utility function for browser interoperability
function urlBase64ToUint8Array(base64String) {
    var padding = '='.repeat((4 - base64String.length % 4) % 4);
    var base64 = (base64String + padding)
        .replace(/\-/g, '+')
        .replace(/_/g, '/');

    var rawData = window.atob(base64);
    var outputArray = new Uint8Array(rawData.length);

    for (var i = 0; i < rawData.length; ++i) {
        outputArray[i] = rawData.charCodeAt(i);
    }
    return outputArray;
}
Review the MDN documentation on the PushManager interface and NPM docs on the Web-Push library for more details on how the APIs work and various related options.
Step 5 - Set up push and notificationclick event handlers
With our push subscription set up, the remainder of the work happens in the service worker. First you must set up a handler for server-sent push events, and respond with a toast notification (if permission was granted) displaying the push data payload. Next you add a click handler for the toast to dismiss the notification and sort through a list of currently open windows to open, focus, or open and focus the intended PWA client page.
In your pwabuilder-sw.js file, append the following handlers.
//Respond to a server push with a user notification
self.addEventListener('push', function (event) {
    if ("granted" === Notification.permission) {
        var payload = event.data ? event.data.text() : 'no payload';
        const promiseChain = self.registration.showNotification('Sample PWA', {
            body: payload,
            icon: 'images/windows10/Square44x44Logo.scale-100.png'
        });
        //Ensure the toast notification is displayed before exiting this function
        event.waitUntil(promiseChain);
    }
});

//Respond to the user clicking the toast notification
self.addEventListener('notificationclick', function (event) {
    console.log('On notification click: ', event.notification.tag);
    event.notification.close();

    // This looks to see if the current is already open and focuses it
    event.waitUntil(clients.matchAll({
        type: 'window'
    }).then(function (clientList) {
        for (var i = 0; i < clientList.length; i++) {
            var client = clientList[i];
            if (client.url == 'http://localhost:1337/' && 'focus' in client)
                return client.focus();
        }
        if (clients.openWindow)
            return clients.openWindow('/');
    }));
});
Step 6 - Try it out
Time to test push notifications in your PWA!
Run (
F5) your PWA in the browser. Because you modified the service worker code (pwabuilder-sw.js), you must open the DevTools Debugger (F12) to the Service Worker Overview panel and Unregister the service worker and reload (F5) the page to re-register it (or you click Update). In a production scenario, the browser checks regularly check for service worker updates and install the updates in the background. You should force it here for immediate results.As your service worker activates and attempts to subscribe your PWA to push notifications, you should see a permission dialog at the bottom of the page.

Choose Yes to enable toast notifications for your PWA.
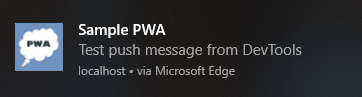
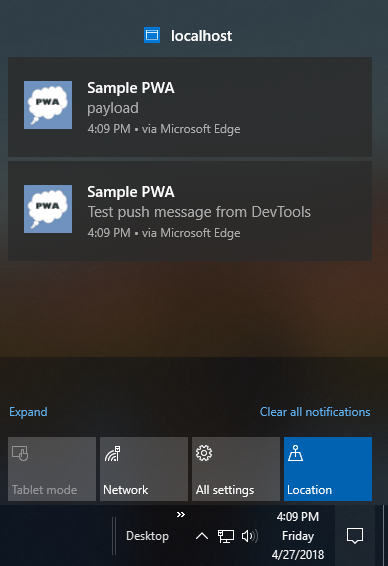
From the Service Worker Overview pane, try choosing the Push button. A toast notification with the (hard-coded "Test push message from DevTools") payload should appear.
Next try choosing the Send Notification button on the homepage of your PWA. This time a toast with the payload from your server appears.
If you do not click (or activate) a toast notification, it is dismissed after several seconds and queue up in your Windows Action Center.
You have the basics of PWA push notifications. In a real app, the next steps are implemented in a way to manage and store push subscriptions and to properly encrypt payload data being sent across the wire.
Going further
This guide demonstrated the basic anatomy of a Progressive Web App and Microsoft PWA development tools including Visual Studio, PWA Builder, and Edge DevTools.
Of course, there is a lot more that goes into making a great PWA beyond what you read here, including responsive design, deep-linking, cross-browser testing and other best practices (not to mention your app functionality!), but hopefully this guide gave you a solid introduction of PWA basics and some ideas on getting started. If you have further questions on PWA development with Windows or with Visual Studio, please leave a comment!
Review the other PWA guides to learn how to increase customer engagement and provide a more seamless, OS-integrated app experience.
- Windows tailoring. Using simple feature detection, you may progressively enhance your PWA for Windows 10 customers through native Windows Runtime (WinRT) APIs, such as those for customizing Windows Start menu tile notifications and taskbar jumplists, and (upon permission) working with user resources, such as photos, music, and calendar.
- PWAs in the Microsoft Store. Learn more about the benefits of app store distribution and how to submit your PWA.
See also
- Progressive Web Apps on MDN web docs - Excellent guide on Progressive Web Apps.
- Progressive Web Apps on web.dev - Excellent guide on Progressive Web Apps.
- Progressive Web Apps rocks - Showcases real-world examples of PWAs.
- Hacker News readers as Progressive Web Apps - Compares different frameworks and performance patterns for implementing a sample (Hacker News reader) PWA.