Aero Glass
Create Special Effects With The Desktop Window Manager
Ron Fosner
This article discusses:
|
This article uses the following technologies: Windows Vista, .NET Framework |
Code download available at: DWM 2007_04.exe(166 KB)
Contents
Technical Overview of the DWM
The Benefits of a Compositing Desktop
Some Common Compositing Functions
Getting Ready for Aero Glass
Programming the DWM
Drawing on Glass
Thumbnails
Wrap-Up
Ialways look forward to new releases of Windows. It's fun to poke around MSDN® and the SDK documentation looking for the latest innovations to play with and build upon, to amaze friends and coworkers and-if you're lucky-your employer. Windows Vista™ contains a lot of goodies in this regard. I've been particularly looking forward to getting my hands on this release ever since I heard that it integrates a 3D/compositing layer into the desktop. I've written a ton of 3D applications over the years, and one thing I always found annoying was being able to provide cool user-interface eye-candy in a 3D application but not in a non-3D app. With Windows Vista and the Desktop Window Manager (DWM), this is starting to change (see Figure 1).
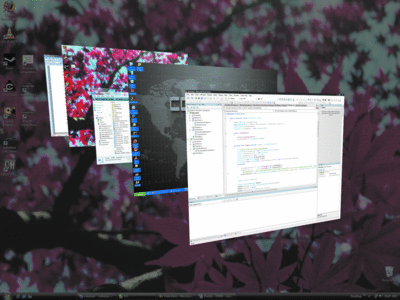
Figure 1** DWM Enables Features Like Flip 3D Task Switching **(Click the image for a larger view)
The DWM is the new interface that manages how the various windows that are running and rendering are merged onto the Windows Vista desktop. Windows® Presentation Foundation (WPF) provides a higher-level layer that controls the rendering to the desktop layer, and the Windows Display Driver Model (WDDM) handles the actual low-level rendering to the display. I'm only going to talk about using the DWM interfaces. Read the MSDN article "Introducing Windows Presentation Foundation" by David Chappell for more on that subject (msdn2.microsoft.com/aa663364.aspx). WDDM is only of interest in the context of this article because of the new effects it makes possible through the DWM interfaces, and the problems it was designed to fix.
Technical Overview of the DWM
The DWM interface, available on all versions of Windows Vista except Windows Vista Home Basic, is housed in dwm.exe. All applications in the system benefit from the DWM without any modifications or recompilations.However, applications that choose to take advantage of specific DWM features can call to interfaces in dwmapi.dll (the public interface of DWM), which will then pass them along to dwm.exe. The interface declarations are found in dwmapi.h.
Windows Vista was designed to use graphics accelerators for every window, not just for 3D DirectX® applications. In order to do this, DWM talks to WDDM, which is the ultimate owner of the graphics processor and video memory. (DWM relies on milcore.dll, a component shared with Windows Presentation Foundation, for output and rendering to DirectX.) Rendering is handled by a separate thread in DWM, inaccessible to the user, that owns the DirectX device. In addition, most applications have their own threads that handle rendering and UI (such as the USER message pump thread in a typical Win32® application), but which don't conflict with DWM's rendering thread. The DWM gets a list of windows and manages their bitmaps in a tree structure, which it then composites onto the final desktop.In other words, each application renders its own bitmaps that are then composited by the DWM.
An application's main window thread renders its scene, the scene is accessed by the DWM render thread, and the render thread updates the desktop through its DirectX interface. The information passed is compacted to just changes (deltas) from the previous render, and large data, like images, are placed in shared memory. This can potentially allow the scene generation to occur on one machine while the final rendering can be done on another machine. 3D programmers who have used OpenGL will be familiar with this architecture, which allows a server to manage a 3D scene and just send deltas to the client machines. You can have a distributed rendering of a 3D scene and have it running with full hardware acceleration on any number of client machines.This architecture allows the DWM to provide first-class support for Remote Desktop scenarios.
While Windows Vista will run with a legacy Windows XP-compatible driver, a WDDM video driver is required to get all the DWM features. Contrary to some speculation, DWM doesn't require DirectX 10, but does require some more video/texture memory and a video card that supports Shader Model 2.0 or better. The biggest change with using WDDM is that it introduces the Video Memory Manager (VidMM), which can swap video memory allocations between system memory and video memory. This means that WDDM can virtualize the video card's resources so that it's possible to do a better job of sharing and swapping video memory, and of context-switching the graphics processor among different threads in disparate applications. It used to be nearly impossible to run multiple 3D applications with any kind of stability, due to drivers that were unable to handle context switches. And prior to WDDM, there was no formal scheduling available, so often one DirectX application would starve others.With WDDM, it's much harder for that to happen. Drivers are also on a much tighter leash for Windows Vista and are forced to be much more robust than for previous versions of Windows.
As an aside, note that DirectX 10 is a Windows Vista-only API. Applications designed for previous version of DirectX will run on a legacy DirectX API implementation expected to be called DirectX 9 L.This will be the last version supported by pre-WDDM drivers. DirectX 9 L apps are expected to run on Windows XP with DirectX 9 L installed as well as on Windows Vista. DirectX 10 contains no legacy interfaces.
The Benefits of a Compositing Desktop
All these new subsystems get you the ability to render windows independently and perform a compositing step on them prior to rendering them onto the desktop. Some cool uses of this are visible in Windows Vista and some of the updated applications that ship with it. The two I'm going to show you how to use are the Aero™ glass effect and thumbnails. The glass effect is available only when running the Aero Glass scheme and compositing is turned on. It isn't available for Aero Basic.
Since each window is created in its own section of video memory, the DWM gets to do the final compositing of that window onto the desktop. This means the DWM has access to the image that's on the desktop and can blend it with your window's rendering, creating a rendering that's a composition of both. This is most noticeable in any areas of a window that are blended with the existing desktop image to create a frosted glass effect. Since each window is rendered to an intermediate off-screen surface, this means the DWM is the only program involved in updating the glass effect. When you move a window with a glass effect, no underlying window needs to be invalidated. The DWM handles updating the visible translucent image to the new coordinates. It's possible to tell the DWM to add some of the client area of a window to be rendered with glass-thus letting you create glass areas for your own use.
This off-screen compositing makes the desktop more responsive. Since each window is now rendered separately from the desktop, the problem you often see in slow-to-update applications like Web browsers is eliminated. In previous version of Windows, it wasn't uncommon to see a display like Figure 2. You could move a window around on top of another application and get this tearing effect because the window underneath took too long to update itself. With desktop composition, you'll no longer see this artifact.
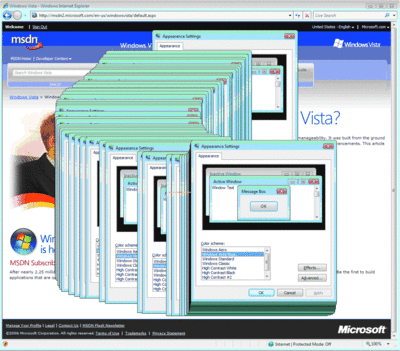
Figure 2** Slow Rendering Causes Tearing **(Click the image for a larger view)
Some of the applications that ship with Windows Vista take advantage of the ability to render glass into the client area. One of the nicest examples is Windows Media® Player, which extends the frame into the bottom of the client area where it draws some custom controls. The minimal version looks like Figure 3.

Figure 3** Glass Effects in Windows Media Player **(Click the image for a larger view)
When I move the window around my desktop, the image I can see through the controls is made up of the part of the desktop that's under the player. If I move the window over some animation, I can see the animation through the window that's on top of it! This is the power of a composited desktop.
If you turn the composition effect off, you'll just get the "aurora" effect on the windows and the window will render opaquely with the default window color as in Figure 4.

Figure 4** Windows Media Player with Glass Effects Turned Off **(Click the image for a larger view)
In essence, the Aero Basic and Aero Glass interfaces are the demarcation between the pre-DWM UI standards and the new. The Aero Basic interface presents the same API to programs to maintain backwards compatibility, but running the Basic interface means you are using the legacy window manager, and DWM is not active. The legacy interface means that the UI layout will behave as expected by programs written prior to Windows Vista. The DWM controls the Aero Glass interface and restricts access to it. If an application draws in the non-client area (the glass frame), the DWM detects this and will switch over to the Aero Basic frame.
Other new features in Windows Vista-available because of a compositing desktop-are the new Windows Flip (Alt+Tab) and Flip 3D (Alt+Windows Key) task switchers. The Flip 3D is of particular interest because its functionality depends upon some code in the DWM that takes each top-level window in the scene graph and renders it onto a series of skewed windows you can scroll through with your keyboard or mouse (see Figure 1).
The DWM controls how windows interact with the desktop composition engine. Being able to integrate your program into the DWM functionality requires that you gain an understanding of how the DWM works and how you can interact with it. While it does much more, the DWM has four primary functional areas in its public API:
- Basic desktop composition settings
- Rendering the glass effect in a client window
- Rendering thumbnails
- Tuning rendering for interaction with multimedia programs
I'll cover the first three sections in this article. The last one is provided for DirectX and video playback applications because the DWM is running asynchronously, which can lead to sampling artifacts if not tightly controlled.
Some Common Compositing Functions
If you want to use the desktop composition functionality in your program, you need to query and set various DWM parameters. For example, if some application switches to full-screen display and then DWM turns off composition and renders in the desktop background color with no transparency, your application should recognize this situation and disable composition-specific features. Here are the basic functions for integrating your program with the DWM:
DwmEnableComposition enables or disables DWM composition. The DWM will maintain this setting for either the duration of the current process or until it is reset. Changing the setting causes a WM_DWMCOMPOSITIONCHANGED notification. Most applications have no need to call this function, but you will likely want to monitor for the resulting Windows message.
DwmIsCompositionEnabled gets the DWM composition-enabled state for the desktop.
DwmSetWindowAttribute sets the value of the specified DWM attribute for a window, controlling how DWM transitions are handled, whether non-client rendering is allowed, and how Flip 3D will treat the window. For example, if non-client rendering is turned off for a window, then later calls to extend the frame or blur behind the window will fail.
DwmGetWindowAttribute retrieves the current value of the specified DWMWINDOWATTRIBUTE for the specified window.
DwmGetColorizationColor retrieves the current color that is being used for DWM glass composition. This value is based on the current color scheme. Changing the setting causes a WM_WMCOLORIZATIONCOLORCHANGED notification.
DwmDefWindowProc enables DWM hit-testing within the non-client area when called with the WM_NCHITTEST notification as well as in certain situations where you might need to process WM_NCCALCSIZE and the like because you have extended the client frame.
Rendering the glass effect in your program is pretty straightforward. The DWM provides two functions for this:
DwmExtendFrameIntoClientArea , a simple function, extends the non-client frame edge into your window.
DwmEnableBlurBehindWindow , a more complicated function, gives you a lot more control over how the glass effect is rendered.
Since all composited windows are rendered to an off-screen window by the DWM for later composition onto the desktop, it's a simple matter to take those images and provide a live thumbnail representation of the application. The DWM provides four functions to let you control how thumbnails get rendered:
DwmQueryThumbnailSourceSize returns the source size of the DWM thumbnail.
DwmRegisterThumbnail creates a thumbnail relationship between the destination and source windows.
DwmUnregisterThumbnail removes a DWM thumbnail relationship created by DwmRegisterThumbnail.
DwmUpdateThumbnailProperties updates the properties for a given thumbnail.
The DWM has five functions for fine-tuning how the DWM renders, but these functions are beyond the scope of this article.
Getting Ready for Aero Glass
To program the DWM interface, you need to be running a version of Windows Vista capable of displaying Aero Glass.While it's easiest to call these new functions from C++ code, I like to write user-interface code in C# if I can. All the code for this article is written in C#, but that does mean that you have to jump through a few hoops. To use the functions discussed in this article, you'll either need to use C++ and link in the correct library, or you'll have to write P/Invoke wrappers for the functions and structures in C#. In the download for this article, I've included a library that provides wrappers for the functions and structures required by the DWM so you can call it from your C# program. Basically, it's just a set of instructions to load the interface from dwmapi.dll. In order to use the DWM functions for the glass effect and thumbnails used in this article, you'll need to create C# declarations of the DWM functions and data structures.The ones I created for this article look like Figure 5.
Figure 5 C# Declarations for DWM
internal class DwmApi
{
    [DllImport("dwmapi.dll", PreserveSig = false)]
    public static extern void DwmEnableBlurBehindWindow(
        IntPtr hWnd, DWM_BLURBEHIND pBlurBehind);

    [DllImport("dwmapi.dll", PreserveSig = false)]
    public static extern void DwmExtendFrameIntoClientArea(
        IntPtr hWnd, MARGINS pMargins);

    [DllImport("dwmapi.dll", PreserveSig = false)]
    public static extern bool DwmIsCompositionEnabled();

    [DllImport("dwmapi.dll", PreserveSig = false)]
    public static extern void DwmEnableComposition(bool bEnable);

    [DllImport("dwmapi.dll", PreserveSig = false)]
    public static extern void DwmGetColorizationColor(
        out int pcrColorization,
        [MarshalAs(UnmanagedType.Bool)]out bool pfOpaqueBlend);

    [DllImport("dwmapi.dll", PreserveSig = false)]
    public static extern IntPtr DwmRegisterThumbnail(
        IntPtr dest, IntPtr source);

    [DllImport("dwmapi.dll", PreserveSig = false)]
    public static extern void DwmUnregisterThumbnail(IntPtr hThumbnail);

    [DllImport("dwmapi.dll", PreserveSig = false)]
    public static extern void DwmUpdateThumbnailProperties(
        IntPtr hThumbnail, DWM_THUMBNAIL_PROPERTIES props);

    [DllImport("dwmapi.dll", PreserveSig = false)]
    public static extern void DwmQueryThumbnailSourceSize(
        IntPtr hThumbnail, out Size size);

    [StructLayout(LayoutKind.Sequential)]
    public class DWM_THUMBNAIL_PROPERTIES
    {
        public uint dwFlags;
        public RECT rcDestination;
        public RECT rcSource;
        public byte opacity;
        [MarshalAs(UnmanagedType.Bool)]
        public bool fVisible;
        [MarshalAs(UnmanagedType.Bool)]
        public bool fSourceClientAreaOnly;
        public const uint DWM_TNP_RECTDESTINATION = 0x00000001;
        public const uint DWM_TNP_RECTSOURCE = 0x00000002;
        public const uint DWM_TNP_OPACITY = 0x00000004;
        public const uint DWM_TNP_VISIBLE = 0x00000008;
        public const uint DWM_TNP_SOURCECLIENTAREAONLY = 0x00000010;
    }

    [StructLayout(LayoutKind.Sequential)]
    public class MARGINS
    {
        public int cxLeftWidth, cxRightWidth,
                   cyTopHeight, cyBottomHeight;

        public MARGINS(int left, int top, int right, int bottom)
        {
            cxLeftWidth = left; cyTopHeight = top;
            cxRightWidth = right; cyBottomHeight = bottom;
        }
    }

    [StructLayout(LayoutKind.Sequential)]
    public class DWM_BLURBEHIND
    {
        public uint dwFlags;
        [MarshalAs(UnmanagedType.Bool)]
        public bool fEnable;
        public IntPtr hRegionBlur;
        [MarshalAs(UnmanagedType.Bool)]
        public bool fTransitionOnMaximized;

        public const uint DWM_BB_ENABLE = 0x00000001;
        public const uint DWM_BB_BLURREGION = 0x00000002;
        public const uint DWM_BB_TRANSITIONONMAXIMIZED = 0x00000004;
    }

    [StructLayout(LayoutKind.Sequential)]
    public struct RECT
    {
        public int left, top, right, bottom;

        public RECT(int left, int top, int right, int bottom)
        {
            this.left = left; this.top = top;
            this.right = right; this.bottom = bottom;
        }
    }
}
You'll need to create something similar to this in your code if you're using C#. Then, assuming you're running Windows Vista, you'll be able to make DWM calls. Of course, your application shouldn't just assume it's running on Windows Vista.In order to be sure, you need to verify that Environment.OSVersion.Version.Major is at least 6.0. Alternatively, you can catch the exceptions that result from trying to call nonexistent functions through P/Invoke.
If you want to use the glass effects, the computer you're using will need to meet three requirements. First, you need to be running the Premium, Business, or Ultimate editions of Windows Vista. Second, you need hardware capable of running the Aero interface. Finally, you need to select the Windows Aero color scheme in Windows Vista.Be willing to use it sparingly, as the effect can be taxing on your computer's GPU and, if overdone, on your users.
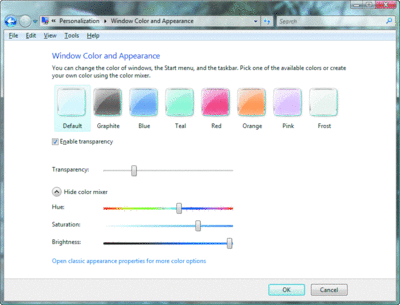
Figure 6** Window Color and Appearance Options **(Click the image for a larger view)
You enable the Aero scheme by opening the Personalization control panel and clicking the Window Color and Appearance option. On this screen (see Figure 6), make sure the Enable Transparency option is selected, then click the "Open classic appearance properties." link. In the Appearance Settings dialog box, under Color scheme, click Windows Aero (see Figure 7). When you click OK, the Aero interface and glass effect will be visible. If you like, you can also customize the window color and the opacity level.
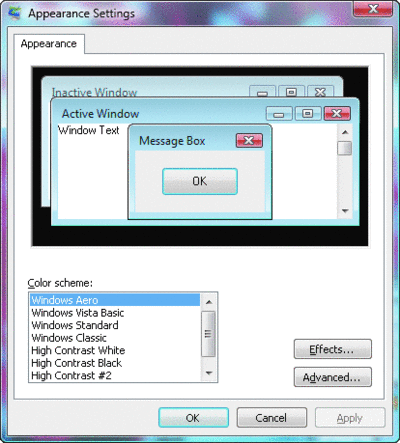
Figure 7** Windows Aero Glass Effects **(Click the image for a larger view)
Programming the DWM
You can check to see if the Aero scheme is enabled in your program by calling DwmIsCompositionEnabled. Be aware, though, that not only can the user change the current Aero scheme at any time, it's also possible for other applications to programmatically enable or disable it.Thus, checking the result of this function once may not be robust enough.
The DwmEnableComposition function allows a program to turn the Aero scheme on or off. For example, if you're writing an application that may encounter compatibility problems, you might want to disable composition while you app is running (if you're writing a full-screen DirectX exclusive application, composition will be automatically disabled). This setting is only maintained for the duration of the process that sets it; when the process ends, the composition flag will be reset to its original value. In general, unless for application compatibility reasons, applications shouldn't use this and should let the system or user make the decision instead.
When the status of desktop composition is changed, a WM_DWMCOMPOSITIONCHANGED message is broadcast. There are no parameters telling you if it's being enabled or disabled, so it's up to you to call DwmIsCompositionEnabled if you're interested. The code to do the check is straightforward-the tricky part is deciding how you want your window to look if composition is disabled.
// Check to see if composition is Enabled
if (DwmIsCompositionEnabled())
{
    // enable glass rendering
}
else
{
    // fallback rendering
}
Finally, even if the Aero scheme is enabled, the user might have changed the glass color and made the composition opaque. I wrote a small app that creates a window that's entirely glass and then I changed the glass properties in the control panel (see Figure 8). The first image shows the default setting for the window color and transparency. Then I turned transparency off, leaving an opaque window. I changed to the red window color and the default transparency where you can still make out some of the underlying window image. On a large enough opaque window, you'll observe the highlighting placed in the glass rendering-it's that streaky diagonal "aurora" effect visible on the window.

Figure 8a** Changing Color and Transparency **

Figure 8b

Figure 8c
You can check to see the composition color and opacity by calling the DwmGetColorizationColor function. If this function succeeds, it will set a GDI+ ARGB color value and a Boolean indicating whether the color is opaque. Just like changing the Aero scheme in the control panel, there's a message broadcast when the composition color has changed. WM_DWMCOLORIZATIONCOLORCHANGED is sent when this happens, but in this case the parameters tell you what the new color and opacity are.
protected override void WndProc(ref Message msg)
{
    switch (msg.Msg)
    {
        case WM_DWMCOLORIZATIONCOLORCHANGED:
            // The color format of currColor is 0xAARRGGBB.
            uint currColor = (uint)msg.WParam.ToInt32();
            bool opacityblend = (msg.LParam.ToInt32() != 0);
            ...
            break;
    }
}
The WM_DWMNCRENDERINGCHANGED message is sent when DWM rendering has changed for the non-client area. The wParam will be true if non-client rendering by the DWM is enabled. You'll also get notification when a DWM composited window is maximized or un-maximized when you get a WM_DWMWINDOWMAXIMIZEDCHANGE message. The wParam will be true if the window has been maximized.
Earlier we noted the two functions you can use to get the glass effect into your program. The first is DwmExtendFrameIntoClientArea. A window with the Aero scheme has glass in the title bar area and in a border around the edges of the window-essentially all of the non-client area of the window. This function allows you to extend each of the sides of the non-client area rendering into the client area, rendering it with the glass effect. In other words, you can extend the top, left, right and bottom edges of the glass window frame into your window seamlessly.
The second function is DwmEnableBlurBehindWindow, which lets you render an arbitrarily shaped region with the glass effect and specify more parameters with greater control over the effect, though I suspect that most users of the glass effect will simply extend the glass from the edge into the client area. With either function, you'll need to closely track the composition status to see if you should render with the glass effect enabled. This means tracking the four WM_DWM* messages or calling DwmIsCompositionEnabled to see if you should render with the glass effect turned on or off.
Let's look at the simpler call first. This function is intended for use on windows without a frame (such as the taskbar, Sidebar, tablet pen input window, and the Start menu); behavior on framed windows is undefined.
The DwmExtendFrameIntoClientArea function takes a window handle and a MARGINS structure. The window handle is the window for which the frame is to be extended from the edge into the client area. You'll need to set up a MARGINS structure that contains the number of pixels to extend the frame into the client area. A C# implementation of the MARGINS structure is shown in Figure 5.
It's a bit confusing at first since there are no other Win32 functions that work like this, but, basically, you control each side independently from the others. Pick the sides you want to extend and specify how far into the client area the effect should be rendered (see Figure 9). If you want more than one side to be extended, they can overlap. If you want the effect to dynamically track the window size, then you'll need to call the DwmExtendFrameIntoClientArea function every time the window size changes. A special case is to set one or more margins to -1, which will then extend the glass effect to your entire window. To reset the margins, just set all of the margin values to 0 and call DwmExtendFrameIntoClientArea again.
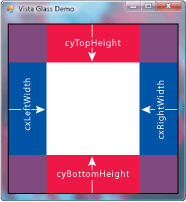
Figure 9** Glass Margins in Client Area **(Click the image for a larger view)
So what do you do if you don't want to extend the glass effect from the frame into the client area? The DwmEnableBlurBehindWindow function gives you a bit more control over how the glass effect is added to your window. Again, it takes a window handle of the window you want to add the glass effect to, but it also takes a DWM_BLURRBEHIND structure that lets you set various parameters regarding how to use the blur effect on your window. The most important one of the parameters is a region, which is a GDI term that describes an arbitrarily shaped area that is usually constructed out of a series of lines and curves.
The DWM_BLURRBEHIND structure, shown in Figure 5, contains the parameters that control how the blur effect is presented.
If you want to turn on the glass effect in the client area, you set the fEnable flag to true. To turn it off you'd set the flag to false. The hRgnBlur parameter is a handle to a region you create that the glass effect appears on. Just like setting a margin value to -1 for Dwm-ExtendFrameIntoClientArea, setting the hRgnBlur parameter to null in the blur structure informs the DWM to apply the glass effect to the entire window.
The final parameter, fTransitionOnMaximized, is a bit misleading. Since the glass effect is turned off on windows that are maximized, you'd think this flag would have something to do with that. This flag actually controls whether or not the window transitions to the maximized color when there is a maximized window on the desktop. Unfortunately, if you set this parameter to true, when you render the window you'll get a region without the transparency, just the aurora effect.
The dwFlags parameter is how you tell the interface which parameters you are setting; when you want to set a parameter, you'll need to turn on the corresponding bit in the dwFlags parameter. This is consistent throughout the DWM interface.
Don't forget that you'll have to render the glass color into the region. Using the same black brush that was used in DwmExtendFrameIntoClientArea will work fine for creating a glass effect on the specified region.
It's easy to see that DWM has provided two interfaces for you-the more complicated one that lets you construct an arbitrarily shaped region, and the simple one that just lets you extend the window frames glass effect into your client area so you can draw additional controls and the like onto something that looks like it's part of the title bar. In both cases, you have to worry about what happens to the region's shape when the window is resized and update the area to render the glass effect in if it's not the entire client area. The source code that accompanies this article will allow you to set both an extended client frame or a region and to toggle the composition flag as well.
Drawing on Glass
Using glass as a background on your window is a bit tricky. If you render anything naturally opaque (such as GDI functions), you'll get your item rendered on glass, though sometimes with unexpected results. If you want to actually blend rendering into the glass surface, you'll need to take advantage of functionality that utilizes the alpha channel of colors, such as GDI+, Windows Presentation Foundation, or the Windows XP Theme API.
One particular gotcha is that rendering a GDI item in black uses the bit pattern 0x00000000-which also happens to be a completely transparent black if you are using an alpha channel. This means that if you draw with a black GDI brush or pen you'll get a transparent color, not a black one. The biggest problem this presents is when you try to use the default text color in a control of a text label that sits on the glass area. Since the default text color is usually black, the DWM will consider this to be transparent and the text will be written in the glass incorrectly. An example can be seen in Figure 10. The first line is written with GDI+, the second is a text label control using the default color. As you can see, it's nearly illegible because it's actually incorrectly rendered text that shows up as gray, not black.
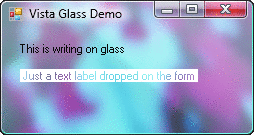
Figure 10** Transparent Dialog Box **
Happily, there are a number of ways around this problem. Using owner-draw controls is one. Rendering to a bitmap that has an alpha channel is another. Fortunately, the easiest way to get text on controls is to let the .NET Framework 2.0 use GDI+ for you. This is easily accomplished by setting the UseCompatibleTextRendering property on your controls. By default, this property is set to false so that controls written for previous versions of the .NET Framework will render the same. But if you set it to true, your text will come out looking correct. You can set the property globally with the Application.SetUseCompatibleTextRenderingDefault method. If you're using Visual Studio® 2005, the template code will include a call to set compatible text-rendering to false in the main routine before your form is created. You can just edit this to set it to true as shown below and all your controls will look correct when written on a glass window.
static void Main()
{
    Application.EnableVisualStyles();
    Application.SetCompatibleTextRenderingDefault(true);
    Application.Run(new GlassForm());
}
You can find more information about this and using the TextRenderer class in the March 2006 MSDN Magazine article, "Build World-Ready Apps Using Complex Scripts In Windows Forms Controls", by Miguel A. Lacouture.
You should enable the glass effect just before you start rendering your window. The composition engine will look at the alpha values of your window and will apply the blur effect to those regions that are not opaque. This can be a problem when using some GDI functions because they don't preserve alpha values. You can use GDI+ when you have to, but you should be careful because GDI+ calls are rendered in software, not hardware, so a high window refresh frequency mixed with GDI+ calls can cause a significant hit to system resources.
Getting the glass effect in DirectX applications is done the same way. All you need to do is to control the alpha value of the render target in addition to using one of the two glass-enabling DWM functions. Wherever you've told the DWM to use glass, it'll use the alpha value of the render target. Anywhere else, the render target should be opaque or you'll get undefined behavior.
Thumbnails
Thumbnails are live display-only windows on open applications rendered by the DWM. Thumbnails are used by the Flip and Alt+Tab task switchers. You can essentially request a thumbnail of an application's window and have it rendered in your application. The thumbnail API will provide you with a live representation of an application's window.
Thumbnails are simple to use, as most of the hard work is done for you by Windows. The hard part is getting hold of an app's HWND. Once you've got the HWNDs you want, you simply register a thumbnail to associate that HWND with the HWND where you want the thumbnail rendered and the location in that window. The OS takes care of updating from then on. Whenever the source window is changed, the change is reflected in the target window.
To use a thumbnail, you must first register a thumbnail using the DwmRegisterThumbnail function. You provide two window handles, the source HWND (that is, the window you want the thumbnail view of) and the target HWND (the window where you want the thumbnail rendered). When you are finished using a thumbnail, you have to let the DWM know that the relationship is ending by calling DwmUnregisterThumbnail. After you have created a thumbnail, the DwmRegisterThumbnail function returns a thumbnail handle and all further thumbnail functions will take this handle as an argument. You'll have to call DwmUpdateThumbnailProperties after you register a thumbnail to get the thumbnail updating. Example code for a form that renders a live thumbnail of another window is shown in Figure 11.
Figure 11 Basic Thumbnail
public partial class Thumbnail : Form
{
    private IntPtr m_hThumbnail;

    public Thumbnail() { InitializeComponent(); }

    public void CreateAndShow(IntPtr sourceWindow)
    {
        m_hThumbnail = DwmApi.DwmRegisterThumbnail(
            Handle, sourceWindow);

        DwmApi.DWM_THUMBNAIL_PROPERTIES m_ThumbnailProperties =
            new DwmApi.DWM_THUMBNAIL_PROPERTIES();
        m_ThumbnailProperties.dwFlags =
            DwmApi.DWM_THUMBNAIL_PROPERTIES.DWM_TNP_VISIBLE +
            DwmApi.DWM_THUMBNAIL_PROPERTIES.DWM_TNP_OPACITY +
            DwmApi.DWM_THUMBNAIL_PROPERTIES.DWM_TNP_RECTDESTINATION +
            DwmApi.DWM_THUMBNAIL_PROPERTIES.
                DWM_TNP_SOURCECLIENTAREAONLY;
        m_ThumbnailProperties.opacity = 255;
        m_ThumbnailProperties.fVisible = true;
        m_ThumbnailProperties.rcSource =
            m_ThumbnailProperties.rcDestination = new DwmApi.RECT(0, 0,
                ClientRectangle.Right, ClientRectangle.Bottom);
        m_ThumbnailProperties.fSourceClientAreaOnly = false;

        DwmApi.DwmUpdateThumbnailProperties(
            m_hThumbnail, m_ThumbnailProperties);

        Show();
    }

    protected override void Dispose(bool disposing)
    {
        if (disposing && (components != null)) components.Dispose();
        base.Dispose(disposing);

        if (m_hThumbnail != IntPtr.Zero)
        {
            if (DwmApi.DwmIsCompositionEnabled())
                DwmApi.DwmUnregisterThumbnail(m_hThumbnail);
            m_hThumbnail = IntPtr.Zero;
        }
    }
}
In addition to the two functions for registering and unregistering a thumbnail, there are two other functions that work with thumbnails. DwmQueryThumbnailSourceSize returns the source size of the specified thumbnail. DwmUpdateThumbnailProperties allows you to update the properties for a given DWM thumbnail. It takes a DWM_THUMBNAIL_PROPERTIES structure, for which a C# implementation is shown in Figure 5.
The DWM_THUMBNAIL_PROPERTIES structure allows you to specify a number of properties such as the destination rectangle in the target window (the rcDestination member) and the rectangular region of the source window to use (the rcSource member) in the event that you don't want to use the entire source window.
You can also specify the opacity of the thumbnail if you don't want it to be totally opaque by using the opacity member, where 0 is transparent and 255 is opaque. If you want the thumbnail to be invisible, you can set the fVisible flag to false. If you want to use just a windows' client area for the thumbnail instead of the entire source window (which will include the non-client areas such as the frame and title bar), you can set the fSourceClientAreaOnly Boolean to true. The dwFlags parameter is how you tell the interface which parameter(s) you are setting. When you set a parameter, you'll need to turn on the corresponding bit in the dwFlags parameter.
Finally, there's no restriction as to the size of the target window-it's perfectly legal to use the thumbnail interface to magnify the source window or to shrink it. There is a restriction about maintaining the aspect ratio. The aspect ratio of the source window is always maintained. If the source window changes size, the thumbnail will change size as well to maintain itself within the boundaries specified.
In the source code that accompanies this article, there's a button that will create a small live thumbnail of the main application window, as seen in Figure 12.
The thumbnail rendering is live, which you can easily see. If you change the main application window, you'll see the thumbnail update. You will find that with a little ingenuity, it's pretty easy to create your own task switcher using thumbnails and the FindWindow and GetWindow Win32 functions.
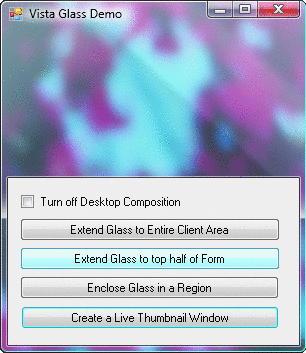
Figure 12a** Create a Live Thumbnail **
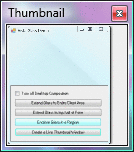
Figure 12b
Wrap-Up
That was a whirlwind tour of the DWM interfaces. I think you'll be able to find some nifty applications for these APIs. In particular, I think we'll be seeing some very slick application of the glass effect in the future as folks get used to applying it to their windows. For more information, I recommend Greg Schechter's blog at blogs.msdn.com/greg_schechter.
Ron Fosner has been writing 3D applications on Windows for 20 years and is starting to get the hang of it. He runs DirectX.com and loves to write fast OpenGL and Direct3D applications. You can reach him at Ron@directx.com. Thanks to Greg Schechter and Jevan Saks of Microsoft for their help with this article.