HTTP ハンドラーとモジュールを ASP.NET Core ミドルウェアに移行する
この記事では、既存の ASP.NET HTTP モジュールとハンドラーを system.webserver から ASP.NET Core ミドルウェアに移行する方法について説明します。
モジュールとハンドラーの再確認
ASP.NET Core ミドルウェアに進む前に、まず HTTP モジュールとハンドラーのしくみについておさらいしておきましょう。
ハンドラーとは:
IHttpHandler を実装するクラス
.report など、指定されたファイル名や拡張子を持つ要求を処理するために使われます
Web.config で構成されます
モジュールとは:
IHttpModule を実装するクラス
すべての要求に対して呼び出されます
ショートカットする (要求の以降の処理を止める) ことができます
HTTP 応答に追加することや、独自のものを作成することができます
Web.config で構成されます
モジュールで受信した要求がを処理される順序は、次のように決まります。
BeginRequest や AuthenticateRequest など、ASP.NET から生成された一連のイベント。 完全な一覧については、「System.Web.HttpApplication」を参照してください。 各モジュールにより、1 つ以上のイベントのハンドラーを作成できます。
同じイベントの場合は、Web.config に構成されている順序。
モジュールに加えて、ライフ サイクル イベントのハンドラーを Global.asax.cs ファイルに追加できます。 これらのハンドラーは、構成されたモジュールのハンドラーの後に実行されます。
ハンドラーとモジュールからミドルウェアへ
ミドルウェアは、HTTP モジュールとハンドラーよりもシンプルです。
モジュール、ハンドラー、
Global.asax.cs、Web.config (IIS 構成を除く) とアプリケーションのライフ サイクルはなくなりましたモジュールとハンドラーの役割はミドルウェアに引き継がれました
ミドルウェアは、Web.config ではなく、コードを使って構成されます
- パイプラインの分岐を使うと、URL だけでなく、要求ヘッダーやクエリ文字列などに基づいて、特定のミドルウェアに要求を送信することができます。
- パイプラインの分岐を使うと、URL だけでなく、要求ヘッダーやクエリ文字列などに基づいて、特定のミドルウェアに要求を送信することができます。
ミドルウェアはモジュールとよく似ています。
原則としてすべての要求に対して呼び出されます
次のミドルウェアに要求を渡さないことで、要求をショートカットすることができます
独自の HTTP 応答を作成できます
ミドルウェアとモジュールは異なる順序で処理されます。
ミドルウェアの順序は要求パイプラインに挿入された順序に基づいていますが、モジュールの順序は主に System.Web.HttpApplication イベントに基づいています。
応答の場合、ミドルウェアの順序は要求の場合と逆になりますが、モジュールの順序は要求と応答で同じです。
「IApplicationBuilder を使用したミドルウェア パイプラインの作成」を参照してください
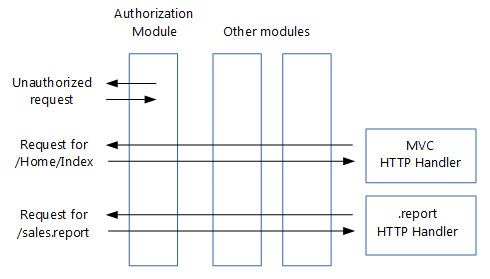
![承認ミドルウェアの場合、承認されていないユーザーからの要求はショートサーキットされます。[インデックス] ページへの要求は、MVC ミドルウェアによって許可され、処理されます。売上レポートの要求は、カスタム レポート ミドルウェアによって許可され、処理されます。](http-modules/_static/middleware.png?view=aspnetcore-5.0)
上の画像で認証ミドルウェアによって要求がどのようにショートサーキットされるかに注目してください。
モジュール コードからミドルウェアへの移行
既存の HTTP モジュールは次のようになります。
// ASP.NET 4 module

using System;
using System.Web;

namespace MyApp.Modules
{
    public class MyModule : IHttpModule
    {
        public void Dispose()
        {
        }

        public void Init(HttpApplication application)
        {
            application.BeginRequest += (new EventHandler(this.Application_BeginRequest));
            application.EndRequest += (new EventHandler(this.Application_EndRequest));
        }

        private void Application_BeginRequest(Object source, EventArgs e)
        {
            HttpContext context = ((HttpApplication)source).Context;

            // Do something with context near the beginning of request processing.
        }

        private void Application_EndRequest(Object source, EventArgs e)
        {
            HttpContext context = ((HttpApplication)source).Context;

            // Do something with context near the end of request processing.
        }
    }
}
ミドルウェアに関するページに示されているように、ASP.NET Core ミドルウェアは、HttpContext を受け取り、Task を返す Invoke メソッドを公開するクラスです。 新しいミドルウェアは次のようになります。
// ASP.NET Core middleware

using Microsoft.AspNetCore.Builder;
using Microsoft.AspNetCore.Http;
using System.Threading.Tasks;

namespace MyApp.Middleware
{
    public class MyMiddleware
    {
        private readonly RequestDelegate _next;

        public MyMiddleware(RequestDelegate next)
        {
            _next = next;
        }

        public async Task Invoke(HttpContext context)
        {
            // Do something with context near the beginning of request processing.

            await _next.Invoke(context);

            // Clean up.
        }
    }

    public static class MyMiddlewareExtensions
    {
        public static IApplicationBuilder UseMyMiddleware(this IApplicationBuilder builder)
        {
            return builder.UseMiddleware<MyMiddleware>();
        }
    }
}
前のミドルウェア テンプレートは、ミドルウェアの作成に関するセクションから引用したものです。
MyMiddlewareExtensions ヘルパー クラスを使うと、Startup クラスでミドルウェアを簡単に構成できます。 UseMyMiddleware メソッドを使って、ミドルウェア クラスを要求パイプラインに追加します。 ミドルウェアに必要なサービスは、ミドルウェアのコンストラクターに挿入されます。
モジュールによって要求が終了されることがあります。たとえば、ユーザーが承認されていない場合などです。
// ASP.NET 4 module that may terminate the request

private void Application_BeginRequest(Object source, EventArgs e)
{
    HttpContext context = ((HttpApplication)source).Context;

    // Do something with context near the beginning of request processing.

    if (TerminateRequest())
    {
        context.Response.End();
        return;
    }
}
ミドルウェアの場合、パイプライン内の次のミドルウェアで Invoke を呼び出さないことでこれを処理します。 ただし、これで要求が完全に終了するわけではないことに注意してください。応答がパイプラインを戻ってくるときに前のミドルウェアがまだ呼び出されるからです。
// ASP.NET Core middleware that may terminate the request

public async Task Invoke(HttpContext context)
{
    // Do something with context near the beginning of request processing.

    if (!TerminateRequest())
        await _next.Invoke(context);

    // Clean up.
}
ASP.NET Core の HttpContext クラスは大幅に変更されたため、モジュールの機能を新しいミドルウェアに移行するときに、コードがコンパイルされないことがあります。 後で、新しい ASP.NET Core HttpContext への移行方法について説明します。
要求パイプラインへのモジュール挿入の移行
通常、HTTP モジュールを要求パイプラインに追加するには、Web.config を使います。
<?xml version="1.0" encoding="utf-8"?>
<!--ASP.NET 4 web.config-->
<configuration>
  <system.webServer>
    <modules>
      <add name="MyModule" type="MyApp.Modules.MyModule"/>
    </modules>
  </system.webServer>
</configuration>
これを変換するには、新しいミドルウェアを Startup クラスの要求パイプラインに追加します。
public void Configure(IApplicationBuilder app, IHostingEnvironment env, ILoggerFactory loggerFactory)
{
    loggerFactory.AddConsole(Configuration.GetSection("Logging"));
    loggerFactory.AddDebug();

    if (env.IsDevelopment())
    {
        app.UseDeveloperExceptionPage();
        app.UseBrowserLink();
    }
    else
    {
        app.UseExceptionHandler("/Home/Error");
    }

    app.UseMyMiddleware();

    app.UseMyMiddlewareWithParams();

    var myMiddlewareOptions = Configuration.GetSection("MyMiddlewareOptionsSection").Get<MyMiddlewareOptions>();
    var myMiddlewareOptions2 = Configuration.GetSection("MyMiddlewareOptionsSection2").Get<MyMiddlewareOptions>();
    app.UseMyMiddlewareWithParams(myMiddlewareOptions);
    app.UseMyMiddlewareWithParams(myMiddlewareOptions2);

    app.UseMyTerminatingMiddleware();

    // Create branch to the MyHandlerMiddleware.
    // All requests ending in .report will follow this branch.
    app.MapWhen(
        context => context.Request.Path.ToString().EndsWith(".report"),
        appBranch => {
            // ... optionally add more middleware to this branch
            appBranch.UseMyHandler();
        });

    app.MapWhen(
        context => context.Request.Path.ToString().EndsWith(".context"),
        appBranch => {
            appBranch.UseHttpContextDemoMiddleware();
        });

    app.UseStaticFiles();

    app.UseMvc(routes =>
    {
        routes.MapRoute(
            name: "default",
            template: "{controller=Home}/{action=Index}/{id?}");
    });
}
新しいミドルウェアを挿入するパイプライン内の正確な位置は、モジュールとして処理されたイベント (BeginRequest、EndRequest など) と、Web.config のモジュール一覧内の順序によって変わります。
前述したように、ASP.NET Core にはアプリケーションのライフ サイクルがありません。また、ミドルウェアによって応答が処理される順序と、モジュールに使われる順序は異なります。 このため、順序の決定が難しくなる可能性があります。
順序が問題になる場合は、モジュールを複数のミドルウェア コンポーネントに分割し、独立して並べ替えられるようにすることができます。
ハンドラー コードのミドルウェアへの移行
HTTP ハンドラーは次のようなものです。
// ASP.NET 4 handler

using System.Web;

namespace MyApp.HttpHandlers
{
    public class MyHandler : IHttpHandler
    {
        public bool IsReusable { get { return true; } }

        public void ProcessRequest(HttpContext context)
        {
            string response = GenerateResponse(context);

            context.Response.ContentType = GetContentType();
            context.Response.Output.Write(response);
        }

        // ...

        private string GenerateResponse(HttpContext context)
        {
            string title = context.Request.QueryString["title"];
            return string.Format("Title of the report: {0}", title);
        }

        private string GetContentType()
        {
            return "text/plain";
        }
    }
}
ASP.NET Core プロジェクトの場合、これを次のようなミドルウェアに変換します。
// ASP.NET Core middleware migrated from a handler

using Microsoft.AspNetCore.Builder;
using Microsoft.AspNetCore.Http;
using System.Threading.Tasks;

namespace MyApp.Middleware
{
    public class MyHandlerMiddleware
    {

        // Must have constructor with this signature, otherwise exception at run time
        public MyHandlerMiddleware(RequestDelegate next)
        {
            // This is an HTTP Handler, so no need to store next
        }

        public async Task Invoke(HttpContext context)
        {
            string response = GenerateResponse(context);

            context.Response.ContentType = GetContentType();
            await context.Response.WriteAsync(response);
        }

        // ...

        private string GenerateResponse(HttpContext context)
        {
            string title = context.Request.Query["title"];
            return string.Format("Title of the report: {0}", title);
        }

        private string GetContentType()
        {
            return "text/plain";
        }
    }

    public static class MyHandlerExtensions
    {
        public static IApplicationBuilder UseMyHandler(this IApplicationBuilder builder)
        {
            return builder.UseMiddleware<MyHandlerMiddleware>();
        }
    }
}
このミドルウェアは、モジュールに対応するミドルウェアとよく似ています。 本当の意味で唯一の違いは、_next.Invoke(context) の呼び出しがないことです。 これは理にかなっています。ハンドラーは要求パイプラインの最後にあるので、次に呼び出すミドルウェアはないからです。
要求パイプラインへのハンドラー挿入の移行
HTTP ハンドラーの構成は Web.config で行われ、次のようになります。
<?xml version="1.0" encoding="utf-8"?>
<!--ASP.NET 4 web.config-->
<configuration>
  <system.webServer>
    <handlers>
      <add name="MyHandler" verb="*" path="*.report" type="MyApp.HttpHandlers.MyHandler" resourceType="Unspecified" preCondition="integratedMode"/>
    </handlers>
  </system.webServer>
</configuration>
これを変換するには、モジュールから変換したミドルウェアと同様に、Startup クラスの要求パイプラインに新しいハンドラー ミドルウェアを追加します。 この方法の問題点は、すべての要求が新しいハンドラー ミドルウェアに送信されることです。 ただし、ミドルウェアに到達するのは、指定した拡張子の要求のみにする必要があります。 そうすると、HTTP ハンドラーと同じ機能を利用できるようになります。
1 つの解決方法は、MapWhen 拡張メソッドを使って特定の拡張子を持つ要求のパイプラインを分岐させることです。 これは、他のミドルウェアを追加したのと同じ Configure メソッドで行います。
public void Configure(IApplicationBuilder app, IHostingEnvironment env, ILoggerFactory loggerFactory)
{
    loggerFactory.AddConsole(Configuration.GetSection("Logging"));
    loggerFactory.AddDebug();

    if (env.IsDevelopment())
    {
        app.UseDeveloperExceptionPage();
        app.UseBrowserLink();
    }
    else
    {
        app.UseExceptionHandler("/Home/Error");
    }

    app.UseMyMiddleware();

    app.UseMyMiddlewareWithParams();

    var myMiddlewareOptions = Configuration.GetSection("MyMiddlewareOptionsSection").Get<MyMiddlewareOptions>();
    var myMiddlewareOptions2 = Configuration.GetSection("MyMiddlewareOptionsSection2").Get<MyMiddlewareOptions>();
    app.UseMyMiddlewareWithParams(myMiddlewareOptions);
    app.UseMyMiddlewareWithParams(myMiddlewareOptions2);

    app.UseMyTerminatingMiddleware();

    // Create branch to the MyHandlerMiddleware.
    // All requests ending in .report will follow this branch.
    app.MapWhen(
        context => context.Request.Path.ToString().EndsWith(".report"),
        appBranch => {
            // ... optionally add more middleware to this branch
            appBranch.UseMyHandler();
        });

    app.MapWhen(
        context => context.Request.Path.ToString().EndsWith(".context"),
        appBranch => {
            appBranch.UseHttpContextDemoMiddleware();
        });

    app.UseStaticFiles();

    app.UseMvc(routes =>
    {
        routes.MapRoute(
            name: "default",
            template: "{controller=Home}/{action=Index}/{id?}");
    });
}
MapWhen は次のパラメーターを受け取ります。
HttpContextを受け取り、要求が分岐される場合はtrueが返されるラムダ。 つまり、拡張子だけでなく、要求ヘッダーやクエリ文字列のパラメーターなどに基づいて、要求を分岐させることができます。IApplicationBuilderを受け取り、そのブランチのすべてのミドルウェアを追加するラムダ。 つまり、ハンドラー ミドルウェアの前に、さらにミドルウェアをブランチに追加することができます。
パイプラインのブランチの前に追加されたミドルウェアは、すべての要求に対して呼び出されます。ブランチはそれらに影響を与えません。
オプション パターンを使ったミドルウェア オプションの読み込み
モジュールやハンドラーの中には、Web.config に格納される構成オプションを持つものがあります。ただし、ASP.NET Core では Web.config ではなく新しい構成モデルが使われます。
この新しい構成システムには、これを解決するための次のオプションが用意されています。
次のセクションで示すように、オプションをミドルウェアに直接挿入します。
オプション パターンを使います。
ミドルウェア オプションを保持するクラスを作成します。次に例を示します。
public class MyMiddlewareOptions
{
    public string Param1 { get; set; }
    public string Param2 { get; set; }
}
オプション値を格納します
構成システムを使うと、オプション値を任意の場所に格納できます。 ただし、ほとんどのサイトには
appsettings.jsonが使われているので、ここではその方法を採用します。{ "MyMiddlewareOptionsSection": { "Param1": "Param1Value", "Param2": "Param2Value" } }この MyMiddlewareOptionsSection はセクション名です。 オプション クラスの名前と同じにする必要はありません。
オプション値をオプション クラスに関連付けます
オプション パターンでは、ASP.NET Core の依存関係の挿入フレームワークを使って、オプションの型 (
MyMiddlewareOptionsなど) を、実際のオプションを持つMyMiddlewareOptionsオブジェクトに関連付けます。Startupクラスを更新します。appsettings.jsonを使っている場合は、Startupコンストラクターの構成ビルダーに追加します。public Startup(IHostingEnvironment env) { var builder = new ConfigurationBuilder() .SetBasePath(env.ContentRootPath) .AddJsonFile("appsettings.json", optional: true, reloadOnChange: true) .AddJsonFile($"appsettings.{env.EnvironmentName}.json", optional: true) .AddEnvironmentVariables(); Configuration = builder.Build(); }オプション サービスを構成します。
public void ConfigureServices(IServiceCollection services)
{
    // Setup options service
    services.AddOptions();

    // Load options from section "MyMiddlewareOptionsSection"
    services.Configure<MyMiddlewareOptions>(
        Configuration.GetSection("MyMiddlewareOptionsSection"));

    // Add framework services.
    services.AddMvc();
}
オプションをオプション クラスに関連付けます。
public void ConfigureServices(IServiceCollection services)
{
    // Setup options service
    services.AddOptions();

    // Load options from section "MyMiddlewareOptionsSection"
    services.Configure<MyMiddlewareOptions>(
        Configuration.GetSection("MyMiddlewareOptionsSection"));

    // Add framework services.
    services.AddMvc();
}
ミドルウェア コンストラクターにオプションを挿入します。 これは、コントローラーにオプションを挿入する場合と似ています。
public class MyMiddlewareWithParams { private readonly RequestDelegate _next; private readonly MyMiddlewareOptions _myMiddlewareOptions; public MyMiddlewareWithParams(RequestDelegate next, IOptions<MyMiddlewareOptions> optionsAccessor) { _next = next; _myMiddlewareOptions = optionsAccessor.Value; } public async Task Invoke(HttpContext context) { // Do something with context near the beginning of request processing // using configuration in _myMiddlewareOptions await _next.Invoke(context); // Do something with context near the end of request processing // using configuration in _myMiddlewareOptions } }IApplicationBuilderにミドルウェアを追加する UseMiddleware 拡張メソッドにより、依存関係の挿入が処理されます。これは
IOptionsオブジェクトに限定されません。 ミドルウェアに必要な他のオブジェクトも、この方法で挿入できます。
直接挿入によるミドルウェア オプション読み込み
オプション パターンには、オプション値とそのコンシューマーの間に疎結合が作成されるという利点があります。 オプション クラスと実際のオプション値を関連付けておけば、依存関係挿入フレームワークを使って他のクラスからオプションにアクセスできます。 オプション値の受け渡しは必要ありません。
ただし、同じミドルウェアを異なるオプションで使いたい場合、この方法は機能しません。 たとえば、承認ミドルウェアを異なるブランチで使い、異なるロールを持たせる場合です。 1 つのオプション クラスに 2 つの異なるオプション オブジェクトを関連付けることはできません。
解決方法は、Startup クラスで実際のオプション値を持つオプション オブジェクトを取得し、それをミドルウェアの各インスタンスに直接渡すことです。
appsettings.jsonに 2 つ目のキーを追加しますappsettings.jsonファイルに 2 つ目のオプション セットを追加するには、新しいキーを使って一意に識別します。{ "MyMiddlewareOptionsSection2": { "Param1": "Param1Value2", "Param2": "Param2Value2" }, "MyMiddlewareOptionsSection": { "Param1": "Param1Value", "Param2": "Param2Value" } }オプション値を取得してミドルウェアに渡します。 (ミドルウェアをパイプラインに追加する)
Use...拡張メソッドは、オプション値を渡すための論理的な場所です。public void Configure(IApplicationBuilder app, IHostingEnvironment env, ILoggerFactory loggerFactory) { loggerFactory.AddConsole(Configuration.GetSection("Logging")); loggerFactory.AddDebug(); if (env.IsDevelopment()) { app.UseDeveloperExceptionPage(); app.UseBrowserLink(); } else { app.UseExceptionHandler("/Home/Error"); } app.UseMyMiddleware(); app.UseMyMiddlewareWithParams(); var myMiddlewareOptions = Configuration.GetSection("MyMiddlewareOptionsSection").Get<MyMiddlewareOptions>(); var myMiddlewareOptions2 = Configuration.GetSection("MyMiddlewareOptionsSection2").Get<MyMiddlewareOptions>(); app.UseMyMiddlewareWithParams(myMiddlewareOptions); app.UseMyMiddlewareWithParams(myMiddlewareOptions2); app.UseMyTerminatingMiddleware(); // Create branch to the MyHandlerMiddleware. // All requests ending in .report will follow this branch. app.MapWhen( context => context.Request.Path.ToString().EndsWith(".report"), appBranch => { // ... optionally add more middleware to this branch appBranch.UseMyHandler(); }); app.MapWhen( context => context.Request.Path.ToString().EndsWith(".context"), appBranch => { appBranch.UseHttpContextDemoMiddleware(); }); app.UseStaticFiles(); app.UseMvc(routes => { routes.MapRoute( name: "default", template: "{controller=Home}/{action=Index}/{id?}"); }); }ミドルウェアがオプション パラメーターを受け取れるようにします。 (オプション パラメーターを受け取り、
UseMiddlewareに渡す)Use...拡張メソッドのオーバーロードを用意します。 パラメーターを使ってUseMiddlewareが呼び出されると、ミドルウェア オブジェクトのインスタンスを作成するときに、ミドルウェア コンストラクターにパラメーターが渡されます。public static class MyMiddlewareWithParamsExtensions { public static IApplicationBuilder UseMyMiddlewareWithParams( this IApplicationBuilder builder) { return builder.UseMiddleware<MyMiddlewareWithParams>(); } public static IApplicationBuilder UseMyMiddlewareWithParams( this IApplicationBuilder builder, MyMiddlewareOptions myMiddlewareOptions) { return builder.UseMiddleware<MyMiddlewareWithParams>( new OptionsWrapper<MyMiddlewareOptions>(myMiddlewareOptions)); } }これでオプション オブジェクトがどのように
OptionsWrapperオブジェクトにラップされるかに注目してください。 これにより、ミドルウェア コンストラクターに想定されているとおりにIOptionsが実装されます。
新しい HttpContext への移行
先ほど、ミドルウェアの Invoke メソッドが型 HttpContext のパラメーターを受け取ることを確認しました。
public async Task Invoke(HttpContext context)
ASP.NET Core では HttpContext が大きく変更されました。 このセクションでは、System.Web.HttpContext の最も一般的に使用されるプロパティを新しい Microsoft.AspNetCore.Http.HttpContext に変換する方法について説明します。
HttpContext
HttpContext.Items は次のように変換されます。
IDictionary<object, object> items = httpContext.Items;
一意の要求 ID (System.Web.HttpContext に対応するものはありません)
各要求に一意の ID を与えます。 ログに含めるのに非常に便利です。
string requestId = httpContext.TraceIdentifier;
HttpContext.Request
HttpContext.Request.HttpMethod は月のように変換されます。
string httpMethod = httpContext.Request.Method;
HttpContext.Request.QueryString は次のように変換されます。
IQueryCollection queryParameters = httpContext.Request.Query;

// If no query parameter "key" used, values will have 0 items
// If single value used for a key (...?key=v1), values will have 1 item ("v1")
// If key has multiple values (...?key=v1&key=v2), values will have 2 items ("v1" and "v2")
IList<string> values = queryParameters["key"];

// If no query parameter "key" used, value will be ""
// If single value used for a key (...?key=v1), value will be "v1"
// If key has multiple values (...?key=v1&key=v2), value will be "v1,v2"
string value = queryParameters["key"].ToString();
HttpContext.Request.Url と HttpContext.Request.RawUrl は次のように変換されます。
// using Microsoft.AspNetCore.Http.Extensions;
var url = httpContext.Request.GetDisplayUrl();
HttpContext.Request.IsSecureConnection は次のように変換されます。
var isSecureConnection = httpContext.Request.IsHttps;
HttpContext.Request.UserHostAddress は次のように変換されます。
var userHostAddress = httpContext.Connection.RemoteIpAddress?.ToString();
HttpContext.Request.Cookies は次のように変換されます。
IRequestCookieCollection cookies = httpContext.Request.Cookies;
string unknownCookieValue = cookies["unknownCookie"]; // will be null (no exception)
string knownCookieValue = cookies["cookie1name"];     // will be actual value
HttpContext.Request.RequestContext.RouteData は次のように変換されます。
var routeValue = httpContext.GetRouteValue("key");
HttpContext.Request.Headers は次のように変換されます。
// using Microsoft.AspNetCore.Http.Headers;
// using Microsoft.Net.Http.Headers;

IHeaderDictionary headersDictionary = httpContext.Request.Headers;

// GetTypedHeaders extension method provides strongly typed access to many headers
var requestHeaders = httpContext.Request.GetTypedHeaders();
CacheControlHeaderValue cacheControlHeaderValue = requestHeaders.CacheControl;

// For unknown header, unknownheaderValues has zero items and unknownheaderValue is ""
IList<string> unknownheaderValues = headersDictionary["unknownheader"];
string unknownheaderValue = headersDictionary["unknownheader"].ToString();

// For known header, knownheaderValues has 1 item and knownheaderValue is the value
IList<string> knownheaderValues = headersDictionary[HeaderNames.AcceptLanguage];
string knownheaderValue = headersDictionary[HeaderNames.AcceptLanguage].ToString();
HttpContext.Request.UserAgent は次のように変換されます。
string userAgent = headersDictionary[HeaderNames.UserAgent].ToString();
HttpContext.Request.UrlReferrer は次のように変換されます。
string urlReferrer = headersDictionary[HeaderNames.Referer].ToString();
HttpContext.Request.ContentType は次のように変換されます。
// using Microsoft.Net.Http.Headers;

MediaTypeHeaderValue mediaHeaderValue = requestHeaders.ContentType;
string contentType = mediaHeaderValue?.MediaType.ToString();   // ex. application/x-www-form-urlencoded
string contentMainType = mediaHeaderValue?.Type.ToString();    // ex. application
string contentSubType = mediaHeaderValue?.SubType.ToString();  // ex. x-www-form-urlencoded

System.Text.Encoding requestEncoding = mediaHeaderValue?.Encoding;
HttpContext.Request.Form は次のように変換されます。
if (httpContext.Request.HasFormContentType)
{
    IFormCollection form;

    form = httpContext.Request.Form; // sync
    // Or
    form = await httpContext.Request.ReadFormAsync(); // async

    string firstName = form["firstname"];
    string lastName = form["lastname"];
}
警告
コンテンツ サブ タイプが x-www-form-urlencoded または form-data の場合にのみ、フォーム値を読み取ります。
HttpContext.Request.InputStream は次のように変換されます。
string inputBody;
using (var reader = new System.IO.StreamReader(
    httpContext.Request.Body, System.Text.Encoding.UTF8))
{
    inputBody = reader.ReadToEnd();
}
警告
このコードは、ハンドラー型のミドルウェアで、パイプラインの最後にのみ使います。
前述のように生の本文を読み取ることができるのは、1 つの要求につき 1 回のみです。 最初の読み取りの後に本文を読み取ろうとするミドルウェアの場合、空の本文が読み取られます。
先ほど示したフォームの読み取りはバッファーから行われるため、これは適用されません。
HttpContext.Response
HttpContext.Response.Status と HttpContext.Response.StatusDescription は次のように変換されます。
// using Microsoft.AspNetCore.Http;
httpContext.Response.StatusCode = StatusCodes.Status200OK;
HttpContext.Response.ContentEncoding と HttpContext.Response.ContentType は次のように変換されます。
// using Microsoft.Net.Http.Headers;
var mediaType = new MediaTypeHeaderValue("application/json");
mediaType.Encoding = System.Text.Encoding.UTF8;
httpContext.Response.ContentType = mediaType.ToString();
HttpContext.Response.ContentType は単独でも次のように変換されます。
httpContext.Response.ContentType = "text/html";
HttpContext.Response.Output は次のように変換されます。
string responseContent = GetResponseContent();
await httpContext.Response.WriteAsync(responseContent);
HttpContext.Response.TransmitFile
ファイルの提供については、「ASP.NET Core の要求機能」を参照してください。
HttpContext.Response.Headers
応答ヘッダーの送信は、応答本文に何かが書き込まれた後に設定すると、送信されないため、複雑になります。
解決方法は、応答への書き込みが始まる直前に呼び出されるコールバック メソッドを設定することです。 これは、ミドルウェアの Invoke メソッドの開始時に行うのが最適です。 応答ヘッダーを設定するのは、このコールバック メソッドです。
次のコードでは、SetHeaders というコールバック メソッドを設定しています。
public async Task Invoke(HttpContext httpContext)
{
    // ...
    httpContext.Response.OnStarting(SetHeaders, state: httpContext);
SetHeaders コールバック メソッドは次のようになります。
// using Microsoft.AspNet.Http.Headers;
// using Microsoft.Net.Http.Headers;

private Task SetHeaders(object context)
{
    var httpContext = (HttpContext)context;

    // Set header with single value
    httpContext.Response.Headers["ResponseHeaderName"] = "headerValue";

    // Set header with multiple values
    string[] responseHeaderValues = new string[] { "headerValue1", "headerValue1" };
    httpContext.Response.Headers["ResponseHeaderName"] = responseHeaderValues;

    // Translating ASP.NET 4's HttpContext.Response.RedirectLocation
    httpContext.Response.Headers[HeaderNames.Location] = "http://www.example.com";
    // Or
    httpContext.Response.Redirect("http://www.example.com");

    // GetTypedHeaders extension method provides strongly typed access to many headers
    var responseHeaders = httpContext.Response.GetTypedHeaders();

    // Translating ASP.NET 4's HttpContext.Response.CacheControl
    responseHeaders.CacheControl = new CacheControlHeaderValue
    {
        MaxAge = new System.TimeSpan(365, 0, 0, 0)
        // Many more properties available
    };

    // If you use .NET Framework 4.6+, Task.CompletedTask will be a bit faster
    return Task.FromResult(0);
}
HttpContext.Response.Cookies
Cookie は、Set-Cookie 応答ヘッダーでブラウザーに送信されます。 そのため、cookie の送信には、応答ヘッダーの送信に使われるものと同じコールバックが必要です。
public async Task Invoke(HttpContext httpContext)
{
    // ...
    httpContext.Response.OnStarting(SetCookies, state: httpContext);
    httpContext.Response.OnStarting(SetHeaders, state: httpContext);
SetCookies コールバック メソッドは次のようになります。
private Task SetCookies(object context)
{
    var httpContext = (HttpContext)context;

    IResponseCookies responseCookies = httpContext.Response.Cookies;

    responseCookies.Append("cookie1name", "cookie1value");
    responseCookies.Append("cookie2name", "cookie2value",
        new CookieOptions { Expires = System.DateTime.Now.AddDays(5), HttpOnly = true });

    // If you use .NET Framework 4.6+, Task.CompletedTask will be a bit faster
    return Task.FromResult(0);
}
その他のリソース
ASP.NET Core
フィードバック
以下は間もなく提供いたします。2024 年を通じて、コンテンツのフィードバック メカニズムとして GitHub の issue を段階的に廃止し、新しいフィードバック システムに置き換えます。 詳細については、「https://aka.ms/ContentUserFeedback」を参照してください。
フィードバックの送信と表示