このセクションでは、EF の Code First Migrations を使用して、テスト データをデータベースにシード処理します。
[ツール] メニューの [NuGet パッケージ マネージャー] を選択し、[パッケージ マネージャー コンソール] を選択します。 [パッケージ マネージャー コンソール] ウィンドウで、次のコマンドを入力します。
Enable-Migrations
このコマンドは、Migrations という名前のフォルダーと、Migrations フォルダーに Configuration.cs という名前のコード ファイルを追加します。

Configuration.cs ファイルを開きます。 次の using ステートメントを 追加します。
using BookService.Models;
次に、 Configuration.Seed メソッドに次のコードを追加します。
protected override void Seed(BookService.Models.BookServiceContext context)
{
    context.Authors.AddOrUpdate(x => x.Id,
        new Author() { Id = 1, Name = "Jane Austen" },
        new Author() { Id = 2, Name = "Charles Dickens" },
        new Author() { Id = 3, Name = "Miguel de Cervantes" }
        );

    context.Books.AddOrUpdate(x => x.Id,
        new Book() { Id = 1, Title = "Pride and Prejudice", Year = 1813, AuthorId = 1,
            Price = 9.99M, Genre = "Comedy of manners" },
        new Book() { Id = 2, Title = "Northanger Abbey", Year = 1817, AuthorId = 1,
            Price = 12.95M, Genre = "Gothic parody" },
        new Book() { Id = 3, Title = "David Copperfield", Year = 1850, AuthorId = 2,
            Price = 15, Genre = "Bildungsroman" },
        new Book() { Id = 4, Title = "Don Quixote", Year = 1617, AuthorId = 3,
            Price = 8.95M, Genre = "Picaresque" }
        );
}
[パッケージ マネージャー コンソール] ウィンドウで、次のコマンドを入力します。
Add-Migration Initial
Update-Database
最初のコマンドはデータベースを作成するコードを生成し、2 番目のコマンドはそのコードを実行します。 データベースは LocalDB を使用してローカルに作成されます。
![[移行の有効化]、[移行の初期追加]、[データベースの更新] の行が赤で囲まれた [パッケージ マネージャー コンソール] ウィンドウのスクリーンショット。](part-3/_static/image2.png)
API の探索 (省略可能)
F5 キーを押してデバッグ モードでアプリケーションを実行します。 Visual Studio によって IIS Express が起動され、Web アプリが実行されます。 その後、Visual Studio によってブラウザーが起動され、アプリのホーム ページが開きます。
Visual Studio が Web プロジェクトを実行すると、ポート番号が割り当てられます。 次の図では、ポート番号は 50524 です。 アプリケーションを実行すると、別のポート番号が表示されます。
![デバッグ モードで Visual Studio から起動されたアプリケーション ウィンドウのスクリーンショット。[A P I] リンクが赤で囲まれており、赤い矢印で強調表示されています。](part-3/_static/image3.png)
ホーム ページは、ASP.NET MVC を使用して実装されます。 ページの上部には、"API" というリンクがあります。 このリンクをクリックすると、Web API の自動生成されたヘルプ ページが表示されます。 (このヘルプ ページの生成方法と、独自のドキュメントをページに追加する方法については、「 ASP.NET Web API のヘルプ ページの作成」を参照してください)。ヘルプ ページのリンクをクリックすると、要求と応答の形式など、API に関する詳細を表示できます。
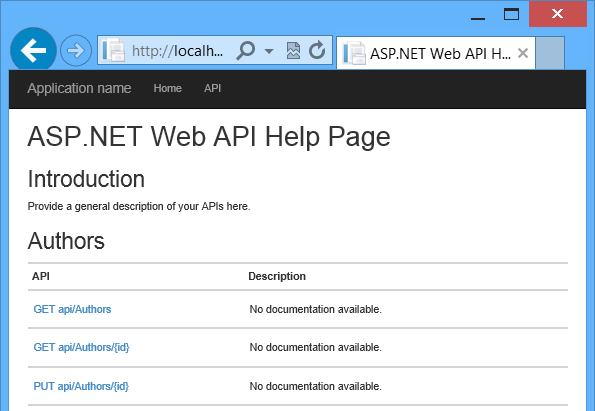
この API により、データベースに対する CRUD 操作が有効になります。 API の概要を次に示します。
| 作者 | 説明 |
|---|---|
| GET api/authors | すべての作成者を取得します。 |
| GET api/authors/{id} | ID で作成者を取得します。 |
| POST /api/authors | 新しい著者を作成します。 |
| PUT /api/authors/{id} | 既存の作成者を更新します。 |
| DELETE /api/authors/{id} | 作成者を削除します。 |
| ブック | 説明 |
|---|---|
| GET /api/books | すべての書籍を取得します。 |
| GET /api/books/{id} | ID で書籍を取得します。 |
| POST /api/books | 新しい書籍を作成します。 |
| PUT /api/books/{id} | 既存の書籍を更新します。 |
| DELETE /api/books/{id} | 書籍を削除します。 |
データベースの表示 (省略可能)
Update-Database コマンドを実行すると、EF によってデータベースが作成され、 Seed メソッドが呼び出されます。 アプリケーションをローカルで実行すると、EF は LocalDB を使用します。 Visual Studio でデータベースを表示できます。
[表示] メニューの [SQL Server オブジェクト エクスプローラー] を選択します。
![S Q L Server オブジェクト エクスプローラーのスクリーンショット。青で強調表示されている S Q L サーバー項目と、[S Q L サーバーの追加] 項目が黄色で強調表示されています。](part-3/_static/image5.png)
[ サーバーへの接続 ] ダイアログの [ サーバー名 ] 編集ボックスに、「(localdb)\v11.0」と入力します。 [認証] オプションは [Windows 認証] のままにします。 [Connect] をクリックします。
![[サーバー名] フィールドにテキスト local d b v 11 dot 0 が表示され、青色で強調表示されている [サーバーへの接続] ダイアログのスクリーンショット。](part-3/_static/image6.png)
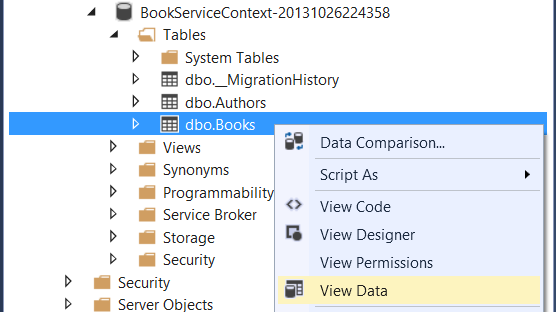
Visual Studio は LocalDB に接続し、SQL Server オブジェクト エクスプローラー ウィンドウに既存のデータベースを表示します。 ノードを展開して、EF によって作成されたテーブルを表示できます。
![[Book Service Context] 項目が青色で強調表示されているフォルダー階層を示す S Q L サーバー オブジェクト エクスプローラーのスクリーンショット。](part-3/_static/image7.png)
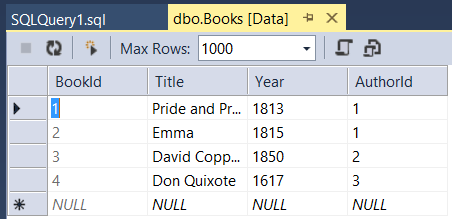
データを表示するには、テーブルを右クリックし、[ データの表示] を選択します。
次のスクリーンショットは、Books テーブルの結果を示しています。 EF によってシード データがデータベースに設定され、テーブルに Authors テーブルの外部キーが含まれていることに注意してください。