作成者: Erik Reitan
Wingtip Toys サンプル プロジェクト (C#) のダウンロードまたは電子書籍 (PDF) のダウンロード
このチュートリアル シリーズでは、ASP.NET 4.5 と Microsoft Visual Studio Express 2013 for Web を使用して ASP.NET Web Forms アプリケーションを構築する方法の基本について説明します。 Visual Studio 2013 の C# ソース コードを含むプロジェクトをこのチュートリアル シリーズに付随して使用できます。
このチュートリアルでは、Wingtip Toys サンプル アプリケーションを、ユーザー認可、登録、PayPal を使用した支払いが含まれるように変更する方法について説明します。 ログインしているユーザーにのみ製品を購入するための認可が与えられます。 ASP.NET 4.5 Web Forms プロジェクト テンプレートの組み込みのユーザー登録機能には、必要な機能の多くが既に含まれています。 ここでは PayPal Express Checkout 機能を追加します。 このチュートリアルでは、実際の資金が転送されることがないように、PayPal 開発者テスト環境を使用します。 このチュートリアルの最後には、ショッピング カートに追加する製品を選択し、[精算] ボタンをクリックし、データを PayPal テスト Web サイトに転送することによってアプリケーションをテストします。 PayPal テスト Web サイトでは、発送と支払いの情報を確認してから、ローカルの Wingtip Toys サンプル アプリケーションに戻り、購入を確認して完了します。
スケーラビリティとセキュリティに対応する、オンライン ショッピングに特化した実績豊富なサード パーティの支払いプロセッサがいくつかあります。 ASP.NET 開発者は、ショッピングおよび購入ソリューションを実装する前に、サード パーティの支払いソリューションを利用する利点を考慮する必要があります。
Note
Wingtip Toys サンプル アプリケーションは、ASP.NET Web 開発者が使用できる ASP.NET の特定の概念や機能を示すように設計されました。 このサンプル アプリケーションは、スケーラビリティとセキュリティに関して考えられるすべての状況に合わせて最適化されたわけではありません。
ここでは、次の内容について学習します。
- フォルダー内の特定のページへのアクセスを制限する方法。
- 匿名ショッピング カートから既知のショッピング カートを作成する方法。
- プロジェクトの SSL を有効にする方法。
- プロジェクトに OAuth プロバイダーを追加する方法。
- PayPal テスト環境を使用して PayPal を使用して製品を購入する方法。
- DetailsView コントロールで PayPal からの詳細を表示する方法。
- PayPal から取得された詳細を使用して Wingtip Toys アプリケーションのデータベースを更新する方法。
注文の追跡の追加
このチュートリアルでは、ユーザーが作成した注文のデータを追跡する 2 つの新しいクラスを作成します。 これらのクラスは、発送情報、購入合計、支払い確認に関連したデータを追跡します。
Order および OrderDetail モデル クラスを追加する
このチュートリアル シリーズの前の方では、Models フォルダー内に Category、Product、CartItem というクラスを作成することによって、カテゴリ、製品、ショッピング カート項目のスキーマを定義しました。 ここでは、製品注文と注文の詳細のスキーマを定義する 2 つの新しいクラスを追加します。
Models フォルダー内に、Order.cs という名前の新しいクラスを追加します。
新しいクラス ファイルがエディターに表示されます。既定のコードを次のコードに置き換えます。
using System;
using System.ComponentModel.DataAnnotations;
using System.Collections.Generic;
using System.ComponentModel;

namespace WingtipToys.Models
{
  public class Order
  {
    public int OrderId { get; set; }

    public DateTime OrderDate { get; set; }

    public string Username { get; set; }

    [Required(ErrorMessage = "First Name is required")]
    [DisplayName("First Name")]
    [StringLength(160)]
    public string FirstName { get; set; }

    [Required(ErrorMessage = "Last Name is required")]
    [DisplayName("Last Name")]
    [StringLength(160)]
    public string LastName { get; set; }

    [Required(ErrorMessage = "Address is required")]
    [StringLength(70)]
    public string Address { get; set; }

    [Required(ErrorMessage = "City is required")]
    [StringLength(40)]
    public string City { get; set; }

    [Required(ErrorMessage = "State is required")]
    [StringLength(40)]
    public string State { get; set; }

    [Required(ErrorMessage = "Postal Code is required")]
    [DisplayName("Postal Code")]
    [StringLength(10)]
    public string PostalCode { get; set; }

    [Required(ErrorMessage = "Country is required")]
    [StringLength(40)]
    public string Country { get; set; }

    [StringLength(24)]
    public string Phone { get; set; }

    [Required(ErrorMessage = "Email Address is required")]
    [DisplayName("Email Address")]
    [RegularExpression(@"[A-Za-z0-9._%+-]+@[A-Za-z0-9.-]+\.[A-Za-z]{2,4}",
        ErrorMessage = "Email is is not valid.")]
    [DataType(DataType.EmailAddress)]
    public string Email { get; set; }

    [ScaffoldColumn(false)]
    public decimal Total { get; set; }

    [ScaffoldColumn(false)]
    public string PaymentTransactionId { get; set; }

    [ScaffoldColumn(false)]
    public bool HasBeenShipped { get; set; }

    public List<OrderDetail> OrderDetails { get; set; }
  }
}
Models フォルダーに OrderDetail.cs クラスを追加します。
既定のコードを以下のコードに置き換えます。
using System.ComponentModel.DataAnnotations;

namespace WingtipToys.Models
{
    public class OrderDetail
    {
        public int OrderDetailId { get; set; }

        public int OrderId { get; set; }

        public string Username { get; set; }

        public int ProductId { get; set; }

        public int Quantity { get; set; }

        public double? UnitPrice { get; set; }

    }
}
Order および OrderDetail クラスには、購入と発送に使用される注文情報を定義するためのスキーマが含まれています。
さらに、エンティティ クラスを管理し、データベースへのデータ アクセスを提供するデータベース コンテキスト クラスを更新する必要があります。 これを行うには、新しく作成された Order および OrderDetail モデル クラスを ProductContext クラスに追加します。
ソリューション エクスプローラーで、ProductContext.cs ファイルを見つけて開きます。
次に示すように、強調表示されたコードを ProductContext.cs ファイルに追加します。
using System.Data.Entity;

namespace WingtipToys.Models
{
  public class ProductContext : DbContext
  {
    public ProductContext()
      : base("WingtipToys")
    {
    }
    public DbSet<Category> Categories { get; set; }
    public DbSet<Product> Products { get; set; }
    public DbSet<CartItem> ShoppingCartItems { get; set; }
    public DbSet<Order> Orders { get; set; }
    public DbSet<OrderDetail> OrderDetails { get; set; }
  }
}
このチュートリアル シリーズで前に説明したように、ProductContext.cs ファイル内のコードでは、ユーザーが Entity Framework のすべてのコア機能にアクセスできるように System.Data.Entity 名前空間を追加します。 この機能には、厳密に型指定されたオブジェクトを操作することによってデータのクエリ、挿入、更新、削除を行う機能が含まれます。 ProductContext クラス内の上記のコードでは、新しく追加された Order および OrderDetail クラスに Entity Framework アクセスを追加します。
精算アクセスの追加
Wingtip Toys サンプル アプリケーションでは、匿名ユーザーは製品を確認したり、ショッピング カートに追加したりできます。 ただし、ショッピング カートに追加した製品を購入することにした場合、匿名ユーザーはそのサイトにログオンする必要があります。 ログオンすると、精算および購入プロセスを処理する Web アプリケーションの制限付きページにアクセスできます。 これらの制限付きページは、このアプリケーションの Checkout フォルダーに含まれています。
Checkout フォルダーとページを追加する
ここでは、Checkout フォルダーと、精算プロセス中に顧客に表示されるそこに含まれるページを作成します。 これらのページは、このチュートリアルの後の方で更新します。
ソリューション エクスプローラーでプロジェクト名 (Wingtip Toys) を右クリックし、[新しいフォルダーの追加] を選択します。
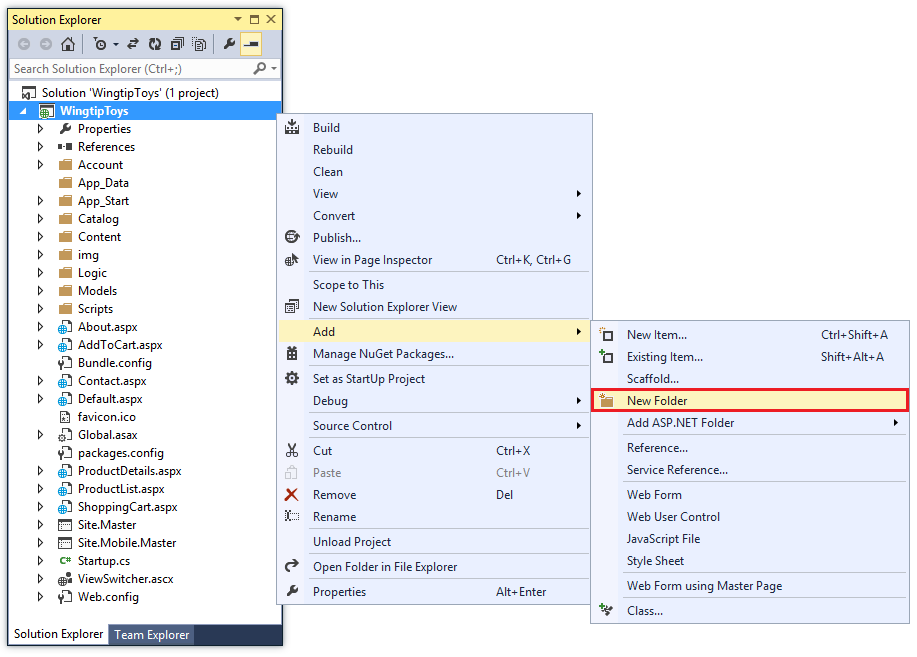
新しいフォルダーに Checkout という名前を付けます。
Checkout フォルダーを右クリックし、[追加] -> [新しい項目] の順に選択します。
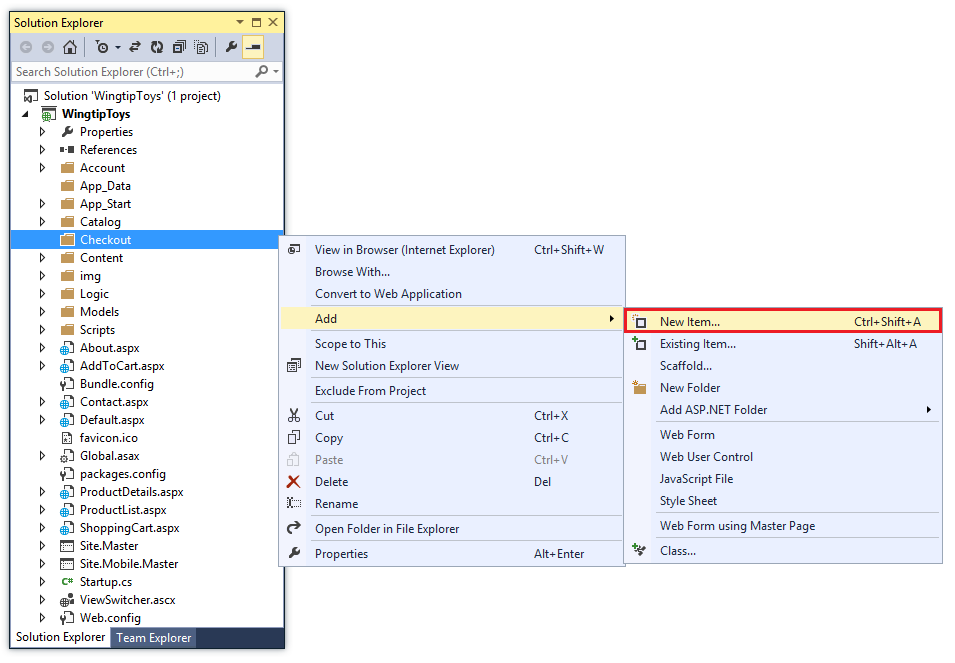
[新しい項目の追加] ダイアログ ボックスが表示されます。
左側にある [Visual C#] -> [Web] テンプレート グループを選択します。 次に、中央のペインから [マスター ページを含む Web フォーム] を選択し、それに CheckoutStart.aspx という名前を付けます。
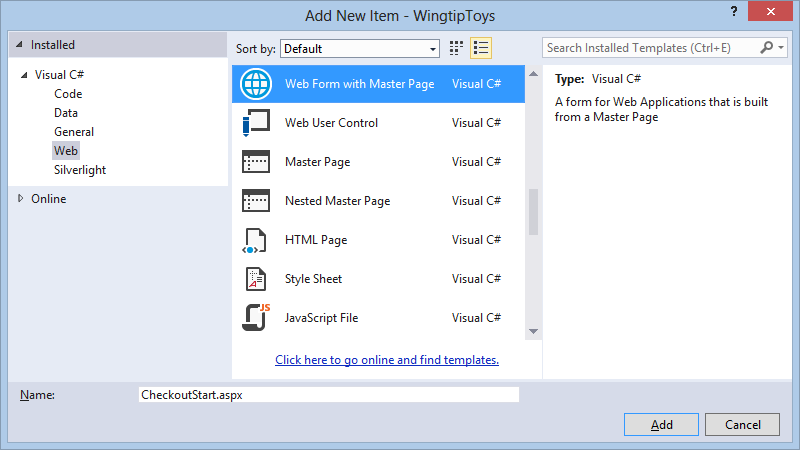
前と同様に、マスター ページとして Site.Master ファイルを選択します。
上記と同じ手順を使用して、Checkout フォルダーに次のページを追加します。
- CheckoutReview.aspx
- CheckoutComplete.aspx
- CheckoutCancel.aspx
- CheckoutError.aspx
Web.config ファイルを追加する
Checkout フォルダーに新しい Web.config ファイルを追加することによって、そのフォルダーに含まれているすべてのページへのアクセスを制限できるようになります。
Checkout フォルダーを右クリックし、[追加] -> [新しい項目] の順に選択します。
[新しい項目の追加] ダイアログ ボックスが表示されます。左側にある [Visual C#] -> [Web] テンプレート グループを選択します。 次に、中央のペインから [Web 構成ファイル] を選択し、Web.config の既定の名前をそのまま使用して [追加] を選択します。
Web.config ファイルの XML の内容を次の内容で置き換えます。
<?xml version="1.0"?>
<configuration>
  <system.web>
    <authorization>
      <deny users="?"/>
    </authorization>
  </system.web>
</configuration>
Web.config ファイルを保存します。
Web.config ファイルは、Web アプリケーションのすべての不明なユーザーが Checkout フォルダーに含まれているページへのアクセスを拒否される必要があることを指定します。 ただし、そのユーザーがアカウントを登録し、かつログオンしている場合は、既知のユーザーになり、Checkout フォルダー内のページにアクセスできます。
ASP.NET 構成は階層に従う点に注意することが重要です。そこでは、各 Web.config ファイルによって、それが含まれているフォルダーとその下にあるすべての子ディレクトリに構成設定が適用されます。
プロジェクトに対して SSL を有効にする
Secure Sockets Layer (SSL) は、Web サーバーと Web クライアント間の通信に定義されたプロトコルで、暗号化によって通信の安全性を強化することができます。 SSL を使わないと、クライアントとサーバー間で送信されるデータが、ネットワークに物理的にアクセスできる第三者によるパケット スニッフィングの標的になります。 また、プレーンな HTTP を使用すると、いくつかの一般的な認証方式の安全性も低下します。 具体的には、基本認証とフォーム認証で送信する資格情報が暗号化されません。 安全性を確保するには、これらの認証方式で SSL を使用する必要があります。
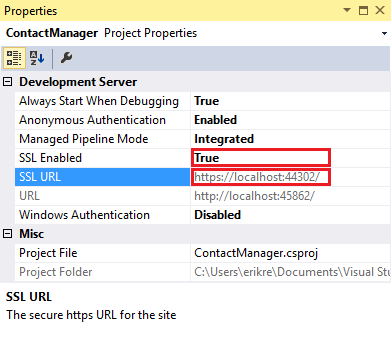
- ソリューション エクスプローラーで、WingtipToys プロジェクトをクリックし、F4 キーを押して [プロパティ] ウィンドウを表示します。
- [SSL 有効] を
trueに変更します。 - 後で使用するための SSL URL をコピーします。
以前に SSL Web サイトを作成していない限り (下記を参照)、[SSL URL] はhttps://localhost:44300/になります。
- ソリューション エクスプローラーで、WingtipToys プロジェクトを右クリックし、[プロパティ] をクリックします。
- 左側のタブで [Web]をクリックします。
- 前に保存した [SSL URL] を使用するように [プロジェクト URL] を変更します。
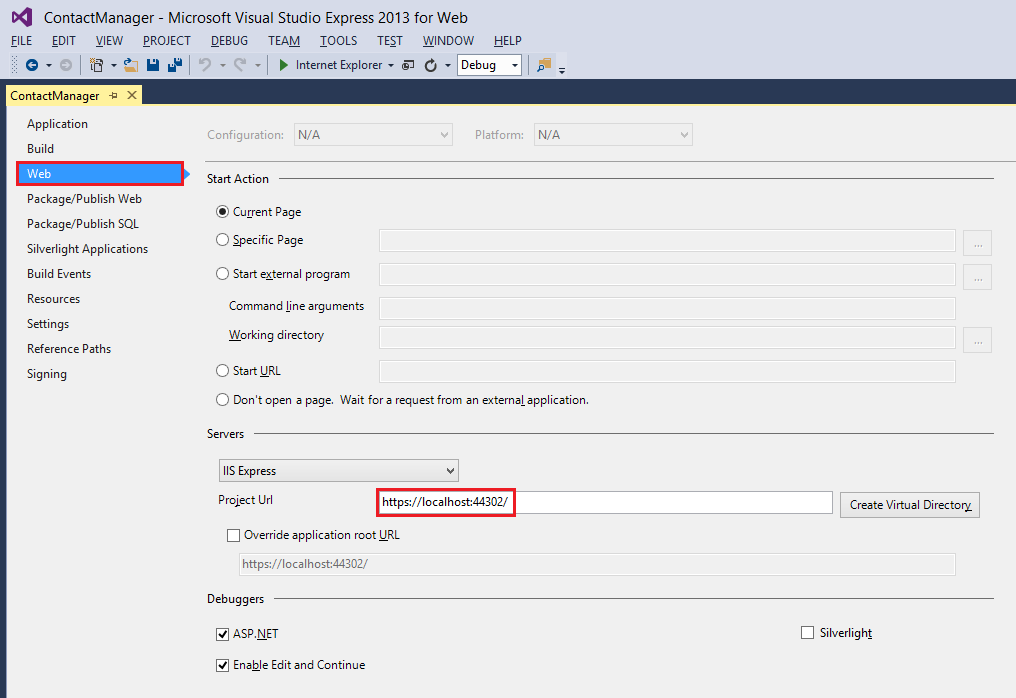
- CTRL + S キーを押してページを保存します。
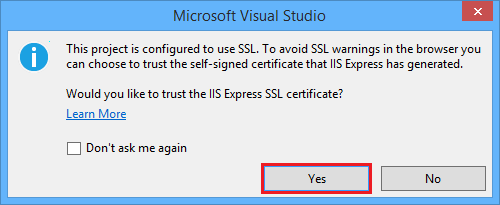
- Ctrl キーを押しながら F5 キーを押して アプリケーションを実行します。 Visual Studio により、SSL の警告を回避するためのオプションが表示されます。
- IIS Express SSL 証明書を信頼する場合は [はい] をクリックして続行します。
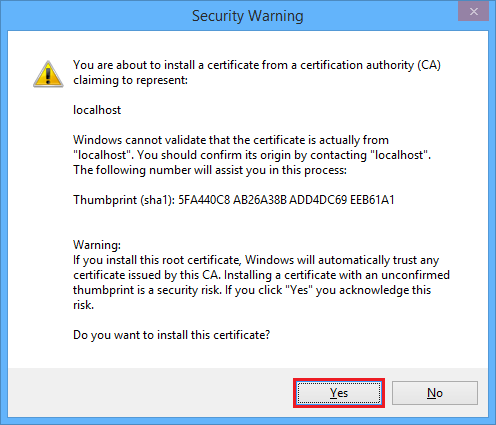
セキュリティ警告が表示されます。 - [はい] をクリックしてローカルホストに証明書をインストールします。
ブラウザー ウィンドウが表示されます。
SSL を使用して Web アプリケーションをローカルで簡単にテストできるようになりました。
OAuth 2.0 プロバイダーを追加する
ASP.NET Web フォームは、メンバーシップと認証のオプションが強化されています。 OAuth もこうした強化点の 1 つです。 OAuth は、Web、モバイル、およびデスクトップのアプリケーションからシンプルで標準的な方法で安全に認証するためのオープン プロトコルです。 ASP.NET Web Forms テンプレートでは、OAuth を使用して Facebook、Twitter、Google、Microsoft を認証プロバイダーとして公開します。 このチュートリアルでは Google のみを認証プロバイダーとして使用しますが、コードを少し変更すれば他のプロバイダーも使用できます。 他のプロバイダーを実装する手順は、このチュートリアルで説明する手順とほとんど同じです。
このチュートリアルでは、認証の他にロールを使用して権限を付与します。 canEdit ロールに追加したユーザーだけが連絡先を変更 (作成、編集、削除) できます。
Note
Windows Live アプリケーションは、動作している Web サイトのライブ URL しか受け入れないため、ローカル Web サイトの URL をログインのテストに使用することはできません。
次の手順を実行することで、Google 認証プロバイダーを追加できます。
App_Start\Startup.Auth.cs ファイルを開きます。
app.UseGoogleAuthentication()メソッドのコメント文字を削除して、メソッドを次のような記述にします。app.UseGoogleAuthentication(new GoogleOAuth2AuthenticationOptions() { ClientId = "", ClientSecret = "" });Google Developers Consoleにアクセスします。 Google デベロッパーの電子メール アカウント (gmail.com) でサインインする必要があります。 Google アカウントを持っていない場合は、 [Create an account] リンクを選択します。
Google Developers Consoleが表示されます。
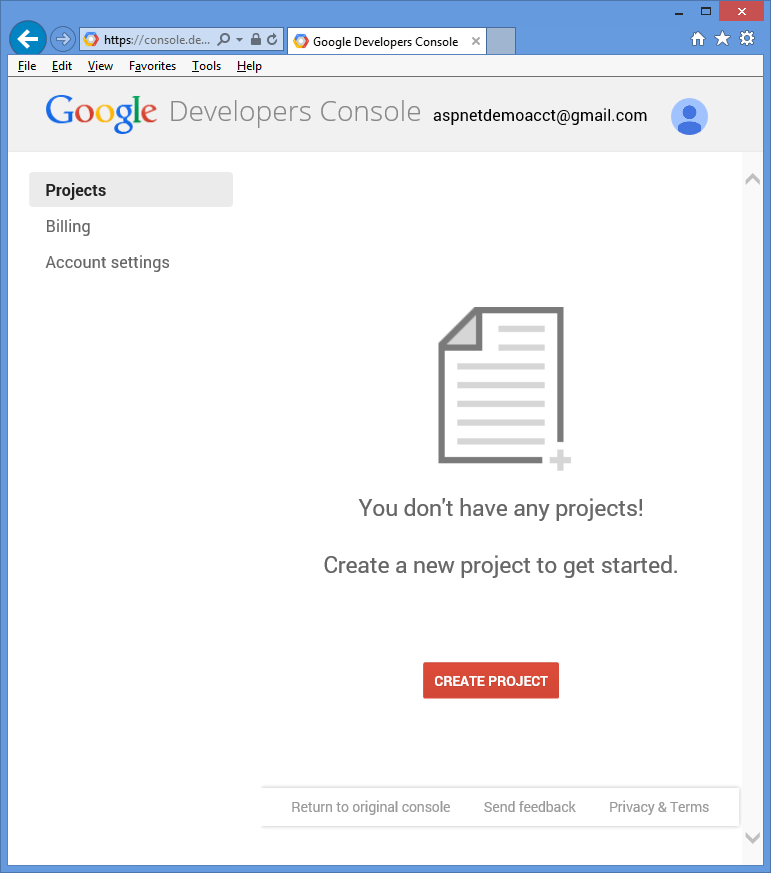
[プロジェクトの作成] ボタンをクリックし、プロジェクト名と ID を入力します (既定値を使用できます)。 次に、同意チェックボックスをクリックして [作成] ボタンをクリックします。
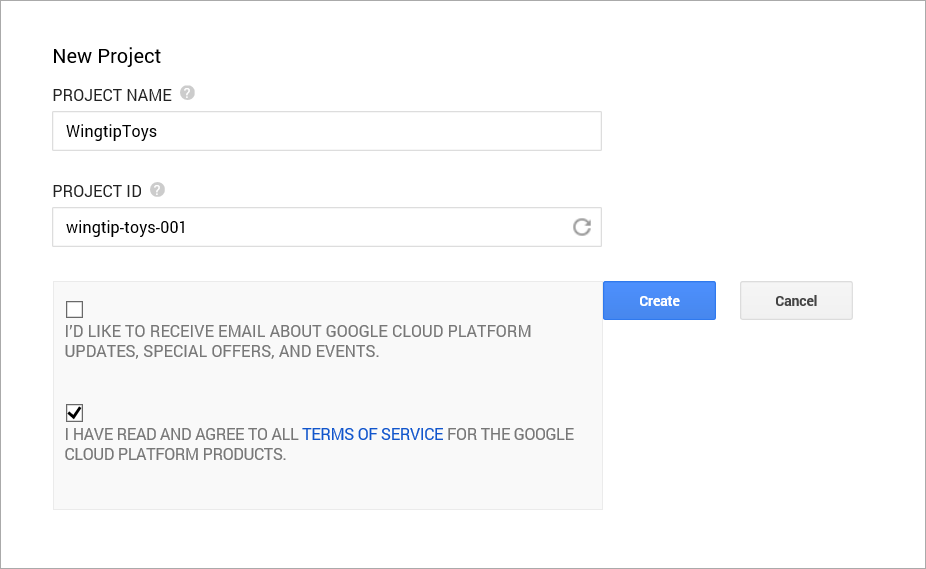
新しいプロジェクトが数秒で作成され、新しいプロジェクトのページがブラウザーに表示されます。
左側のタブで、[API と認証] をクリックし、[資格情報] をクリックします。
[OAuth] の下にある [新しいクライアント ID を作成] をクリックします。
[Create Client ID] ダイアログ ボックスが表示されます。
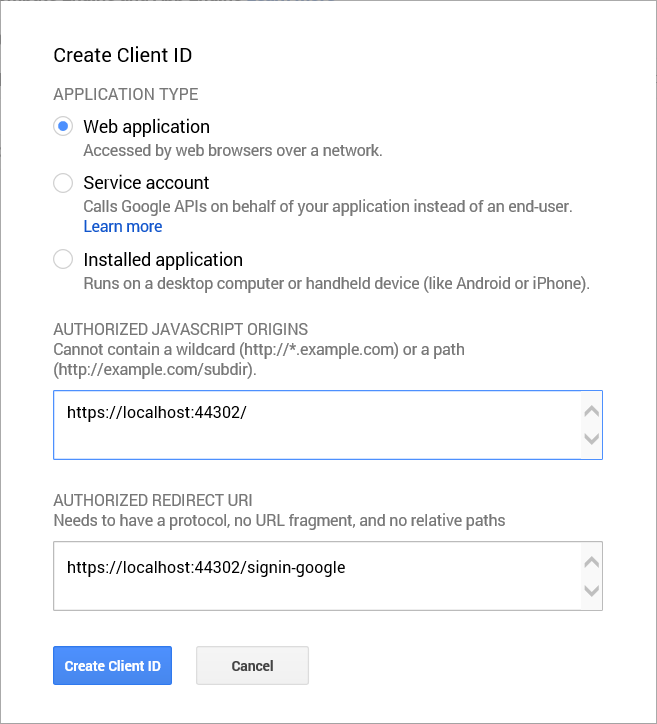
[クライアント ID の作成] ダイアログ内で、[アプリケーションの種類] に既定の [ウェブ アプリケーション] をそのまま使用します。
[承認済みの JavaScript 生成元] を、このチュートリアルで前に使用した SSL URL に設定します (他の SSL プロジェクトを作成していない限り
https://localhost:44300/)。
この URL がアプリケーションの生成元です。 このサンプルでは、localhost のテスト URL のみを入力します。 ただし、localhost と運用環境を考慮した複数の URL を入力できます。[Authorized Redirect URI] には次の値を設定します。
https://localhost:44300/signin-googleこの値は、ASP.NET OAuth ユーザーが Google の OAuth サーバーとの通信に使用する URI です。 前に使用した SSL URL を忘れないでください (他の SSL プロジェクトを作成していない限り
https://localhost:44300/)。[クライアント ID の作成] ボタンをクリックします。
Google Developers Console の左側のメニューで、[同意画面] メニュー項目をクリックし、メール アドレスと製品名を設定します。 フォームの入力を完了したら、[保存] をクリックします。
[API] メニュー項目をクリックして下にスクロールし、[Google+ API] の横にある [オフ] ボタンをクリックします。
このオプションを受け入れると、Google+ API が有効になります。Microsoft.Owin NuGet パッケージをバージョン 3.0.0 に更新することも必要です。
[ツール] メニューから、[NuGet パッケージ マネージャー]、[ソリューションの NuGet パッケージの管理] の順に選択します。
[NuGet パッケージの管理] ウィンドウから、Microsoft.Owin パッケージを見つけてバージョン 3.0.0 に更新します。Visual Studio で、[クライアント ID] と [クライアント シークレット] をコピーし、Startup.Auth.cs ページの
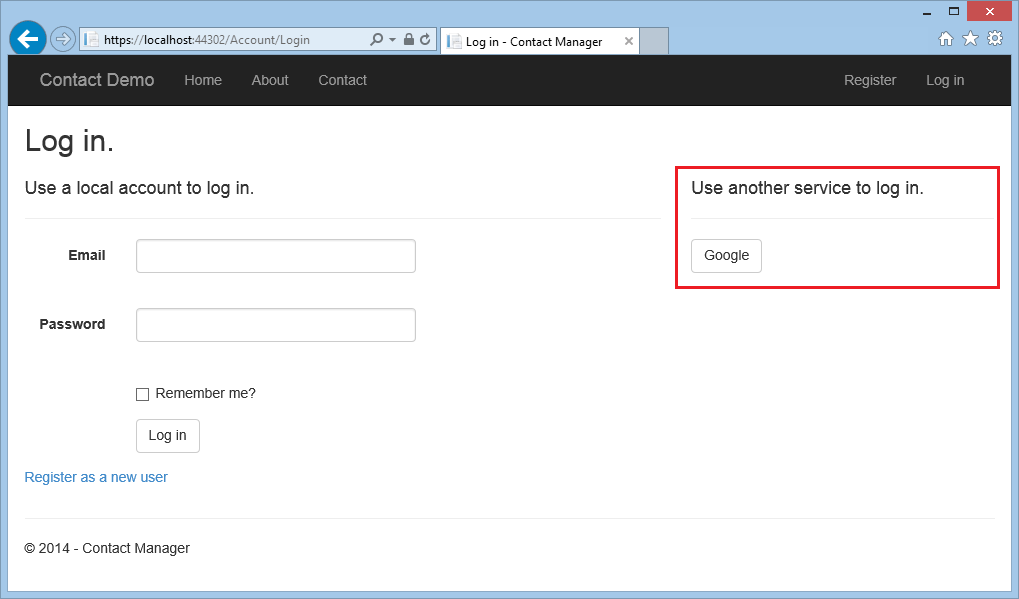
UseGoogleAuthenticationメソッドに貼り付けることによって、このメソッドを更新します。 次に示されている [クライアント ID] と [クライアント シークレット] の値はサンプルであり、機能しません。using System; using Microsoft.AspNet.Identity; using Microsoft.AspNet.Identity.EntityFramework; using Microsoft.AspNet.Identity.Owin; using Microsoft.Owin; using Microsoft.Owin.Security.Cookies; using Microsoft.Owin.Security.DataProtection; using Microsoft.Owin.Security.Google; using Owin; using WingtipToys.Models; namespace WingtipToys { public partial class Startup { // For more information on configuring authentication, please visit https://go.microsoft.com/fwlink/?LinkId=301883 public void ConfigureAuth(IAppBuilder app) { // Configure the db context, user manager and signin manager to use a single instance per request app.CreatePerOwinContext(ApplicationDbContext.Create); app.CreatePerOwinContext<ApplicationUserManager>(ApplicationUserManager.Create); app.CreatePerOwinContext<ApplicationSignInManager>(ApplicationSignInManager.Create); // Enable the application to use a cookie to store information for the signed in user // and to use a cookie to temporarily store information about a user logging in with a third party login provider // Configure the sign in cookie app.UseCookieAuthentication(new CookieAuthenticationOptions { AuthenticationType = DefaultAuthenticationTypes.ApplicationCookie, LoginPath = new PathString("/Account/Login"), Provider = new CookieAuthenticationProvider { OnValidateIdentity = SecurityStampValidator.OnValidateIdentity<ApplicationUserManager, ApplicationUser>( validateInterval: TimeSpan.FromMinutes(30), regenerateIdentity: (manager, user) => user.GenerateUserIdentityAsync(manager)) } }); // Use a cookie to temporarily store information about a user logging in with a third party login provider app.UseExternalSignInCookie(DefaultAuthenticationTypes.ExternalCookie); // Enables the application to temporarily store user information when they are verifying the second factor in the two-factor authentication process. app.UseTwoFactorSignInCookie(DefaultAuthenticationTypes.TwoFactorCookie, TimeSpan.FromMinutes(5)); // Enables the application to remember the second login verification factor such as phone or email. // Once you check this option, your second step of verification during the login process will be remembered on the device where you logged in from. // This is similar to the RememberMe option when you log in. app.UseTwoFactorRememberBrowserCookie(DefaultAuthenticationTypes.TwoFactorRememberBrowserCookie); // Uncomment the following lines to enable logging in with third party login providers //app.UseMicrosoftAccountAuthentication( // clientId: "", // clientSecret: ""); //app.UseTwitterAuthentication( // consumerKey: "", // consumerSecret: ""); //app.UseFacebookAuthentication( // appId: "", // appSecret: ""); app.UseGoogleAuthentication(new GoogleOAuth2AuthenticationOptions() { ClientId = "000000000000.apps.googleusercontent.com", ClientSecret = "00000000000" }); } } }Ctrl キーを押しながら F5 キーを押して アプリケーションをビルドし、実行します。 [Log in] リンクをクリックします。
[別のサービスを使用してログインします] の下にある [Google] をクリックします。
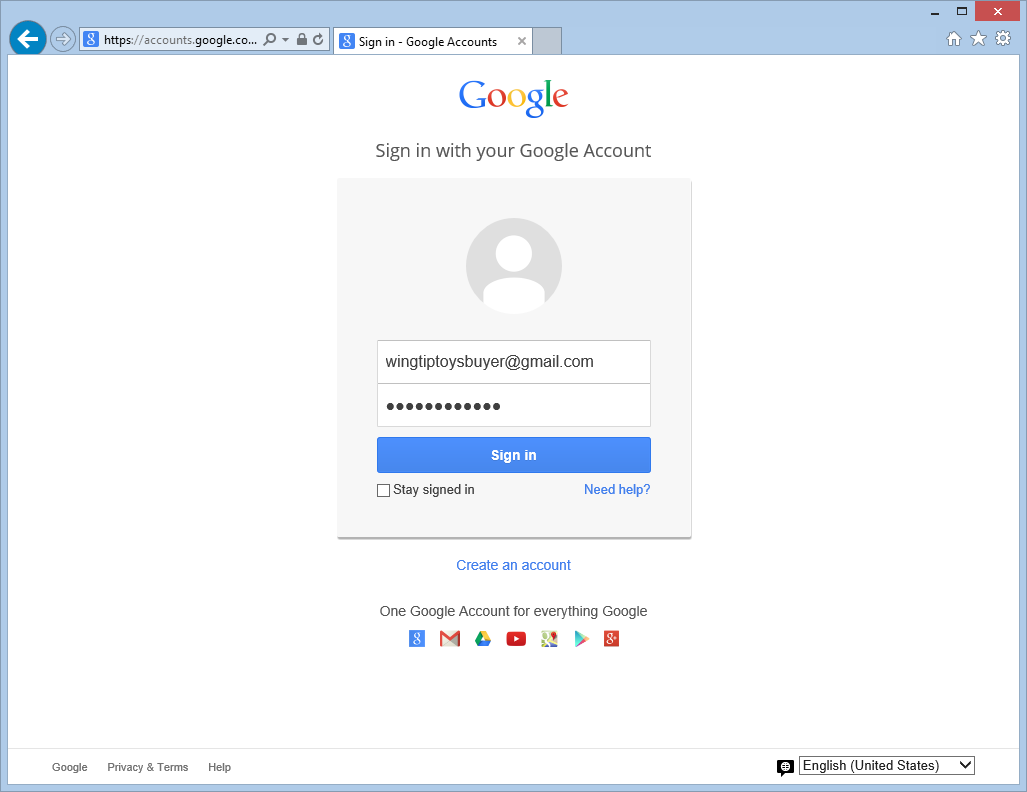
資格情報の入力が必要な場合、Google のサイトにリダイレクトされるので、リダイレクト先のサイトで資格情報を入力します。
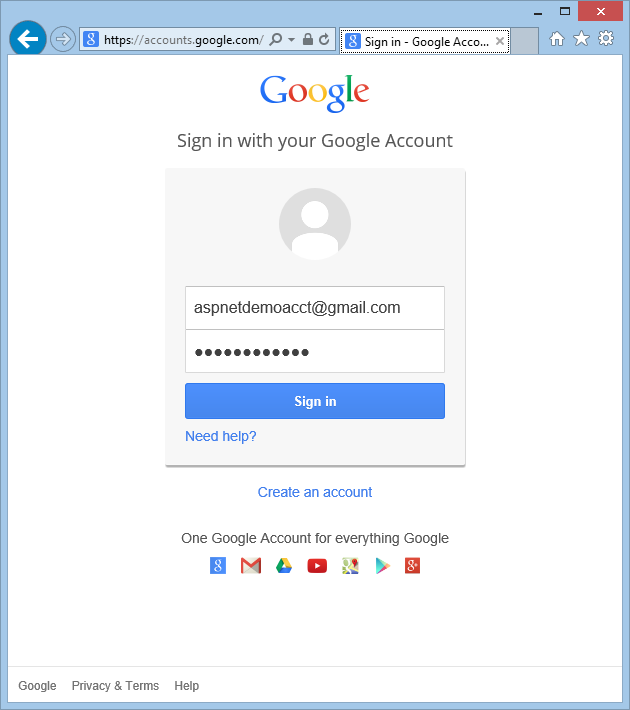
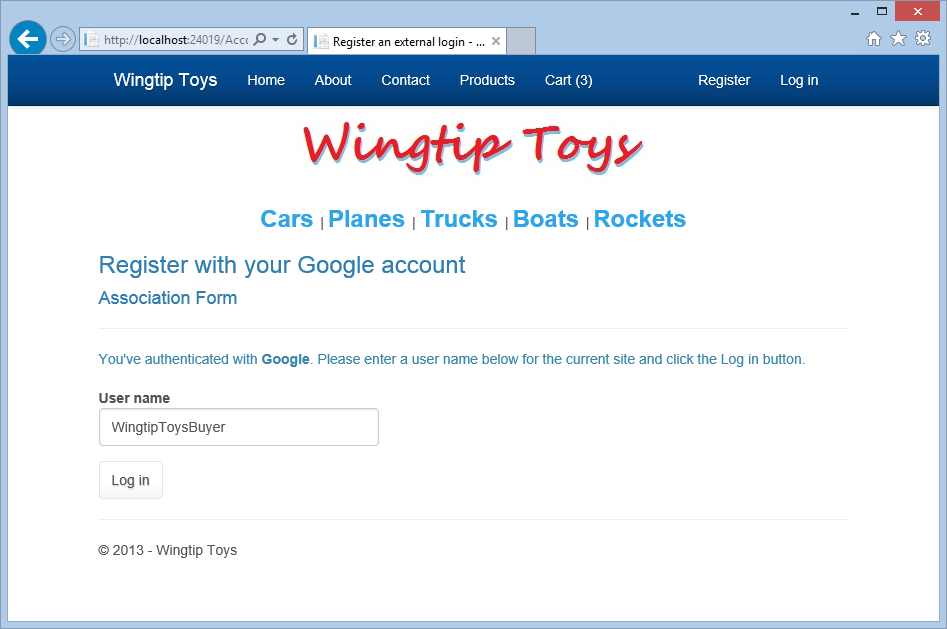
資格情報を入力すると、今作成した Web アプリケーションにアクセス許可を付与するよう求められます。
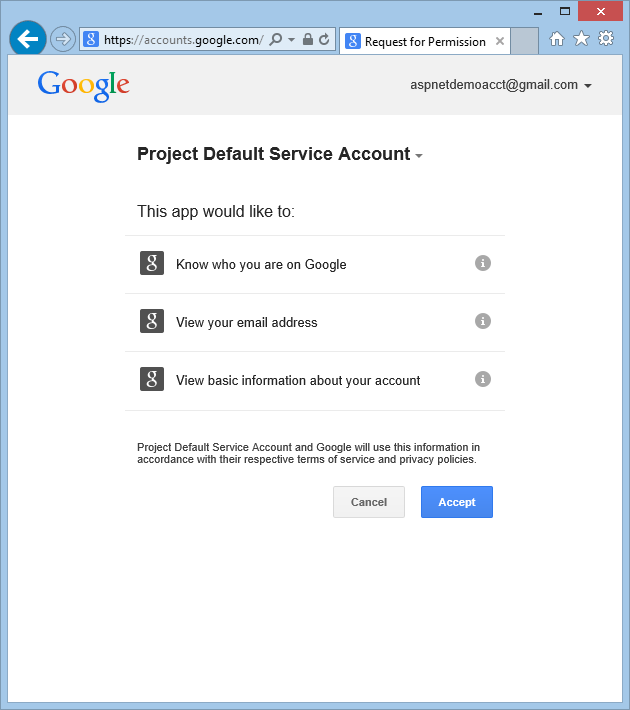
承諾をクリックします。 これで、Google アカウントを登録できる WingtipToys アプリケーションの [登録] ページに再びリダイレクトされるようになりました。
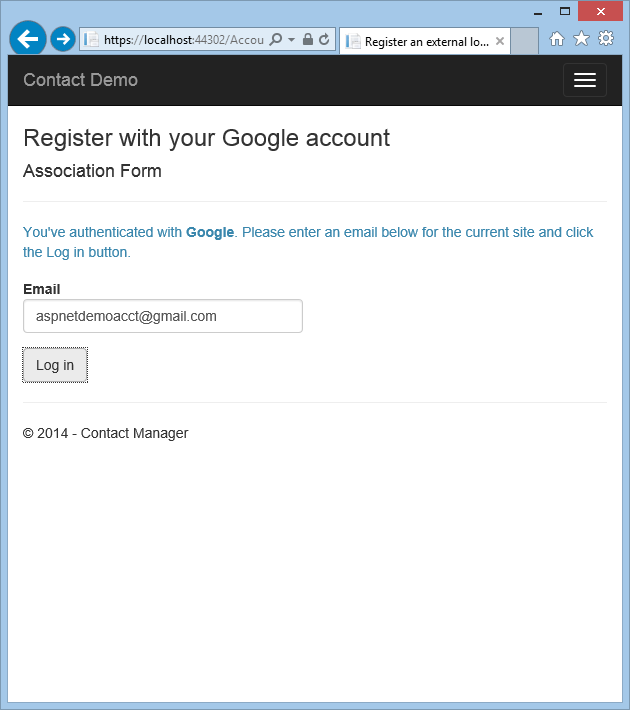
Google アカウントに使用するローカルの電子メール登録名を変更できますが、通常は既定の電子メール エイリアス (認証に使用したエイリアス) を変更しません。 上記のように、[ログイン] をクリックします。
ログイン機能の変更
このチュートリアル シリーズで前に説明したように、ASP.NET Web Forms テンプレートには、ユーザー登録機能の多くが既定で含まれています。 ここでは、既定の Login.aspx および Register.aspx ページを MigrateCart メソッドを呼び出すように変更します。 MigrateCart メソッドは、新しくログインしたユーザーを匿名ショッピング カートに関連付けます。 ユーザーとショッピング カートを関連付けることにより、Wingtip Toys サンプル アプリケーションは、ユーザーのショッピング カートを次回のアクセス時まで保持できるようになります。
ソリューション エクスプローラーで、Account フォルダーを見つけて開きます。
Login.aspx.cs という名前の分離コード ページを黄色で強調表示されたコードが含まれるように変更して、次のように表示されるようにします。
using System;
using System.Web;
using System.Web.UI;
using Microsoft.AspNet.Identity;
using Microsoft.AspNet.Identity.Owin;
using Owin;
using WingtipToys.Models;

namespace WingtipToys.Account
{
    public partial class Login : Page
    {
        protected void Page_Load(object sender, EventArgs e)
        {
            RegisterHyperLink.NavigateUrl = "Register";
            // Enable this once you have account confirmation enabled for password reset functionality
            //ForgotPasswordHyperLink.NavigateUrl = "Forgot";
            OpenAuthLogin.ReturnUrl = Request.QueryString["ReturnUrl"];
            var returnUrl = HttpUtility.UrlEncode(Request.QueryString["ReturnUrl"]);
            if (!String.IsNullOrEmpty(returnUrl))
            {
                RegisterHyperLink.NavigateUrl += "?ReturnUrl=" + returnUrl;
            }
        }

        protected void LogIn(object sender, EventArgs e)
        {
            if (IsValid)
            {
                // Validate the user password
                var manager = Context.GetOwinContext().GetUserManager<ApplicationUserManager>();
                var signinManager = Context.GetOwinContext().GetUserManager<ApplicationSignInManager>();

                // This doen't count login failures towards account lockout
                // To enable password failures to trigger lockout, change to shouldLockout: true
                var result = signinManager.PasswordSignIn(Email.Text, Password.Text, RememberMe.Checked, shouldLockout: false);

                switch (result)
                {
                    case SignInStatus.Success:
                        WingtipToys.Logic.ShoppingCartActions usersShoppingCart = new WingtipToys.Logic.ShoppingCartActions();
                        String cartId = usersShoppingCart.GetCartId();
                        usersShoppingCart.MigrateCart(cartId, Email.Text);

                        IdentityHelper.RedirectToReturnUrl(Request.QueryString["ReturnUrl"], Response);
                        break;
                    case SignInStatus.LockedOut:
                        Response.Redirect("/Account/Lockout");
                        break;
                    case SignInStatus.RequiresVerification:
                        Response.Redirect(String.Format("/Account/TwoFactorAuthenticationSignIn?ReturnUrl={0}&RememberMe={1}",
                                                        Request.QueryString["ReturnUrl"],
                                                        RememberMe.Checked),
                                          true);
                        break;
                    case SignInStatus.Failure:
                    default:
                        FailureText.Text = "Invalid login attempt";
                        ErrorMessage.Visible = true;
                        break;
                }
            }
        }
    }
}
Login.aspx.cs ファイルを保存します。
今のところ、MigrateCart メソッドの定義が存在しないという警告は無視できます。 これは、このチュートリアルの少し後の方で追加します。
Login.aspx.cs 分離コード ファイルは、ログイン方法をサポートします。 Login.aspx ページを調べると、このページには、クリックされると分離コードで LogIn ハンドラーをトリガーする [ログイン] ボタンが含まれていることがわかります。
Login.aspx.cs 上の Login メソッドが呼び出されると、usersShoppingCart という名前のショッピング カートの新しいインスタンスが作成されます。 ショッピング カートの ID (GUID) が取得され、cartId 変数に設定されます。 その後、MigrateCart メソッドが呼び出され、cartId とログイン ユーザーの名前の両方がこのメソッドに渡されます。 ショッピング カートが移行されるときは、匿名ショッピング カートを識別するために使用される GUID がユーザー名に置き換えられます。
ユーザーがログインしたときにショッピング カートを移行するための Login.aspx.cs 分離コード ファイルの変更に加えて、ユーザーが新しいアカウントを作成してログインしたときにショッピング カートを移行するための Register.aspx.cs 分離コード ファイルの変更も必要です。
Account フォルダーで、Register.aspx.cs という名前の分離コード ファイルを開きます。
その分離コード ファイルを黄色のコードが含まれるように変更して、次のように表示されるようにします。
using System;
using System.Linq;
using System.Web;
using System.Web.UI;
using Microsoft.AspNet.Identity;
using Microsoft.AspNet.Identity.Owin;
using Owin;
using WingtipToys.Models;

namespace WingtipToys.Account
{
    public partial class Register : Page
    {
        protected void CreateUser_Click(object sender, EventArgs e)
        {
            var manager = Context.GetOwinContext().GetUserManager<ApplicationUserManager>();
            var user = new ApplicationUser() { UserName = Email.Text, Email = Email.Text };
            IdentityResult result = manager.Create(user, Password.Text);
            if (result.Succeeded)
            {
                // For more information on how to enable account confirmation and password reset please visit https://go.microsoft.com/fwlink/?LinkID=320771
                //string code = manager.GenerateEmailConfirmationToken(user.Id);
                //string callbackUrl = IdentityHelper.GetUserConfirmationRedirectUrl(code, user.Id, Request);
                //manager.SendEmail(user.Id, "Confirm your account", "Please confirm your account by clicking <a href=\"" + callbackUrl + "\">here</a>.");

                IdentityHelper.SignIn(manager, user, isPersistent: false);

                using (WingtipToys.Logic.ShoppingCartActions usersShoppingCart = new WingtipToys.Logic.ShoppingCartActions())
                {
                  String cartId = usersShoppingCart.GetCartId();
                  usersShoppingCart.MigrateCart(cartId, user.Id);
                }

                IdentityHelper.RedirectToReturnUrl(Request.QueryString["ReturnUrl"], Response);
            }
            else
            {
                ErrorMessage.Text = result.Errors.FirstOrDefault();
            }
        }
    }
}
Register.aspx.cs ファイルを保存します。 この場合も、
MigrateCartメソッドに関する警告は無視します。
CreateUser_Click イベント ハンドラーで使用したコードが LogIn メソッドで使用したコードに非常に似ていることに注意してください。 ユーザーがサイトに登録またはログインすると、MigrateCart メソッドの呼び出しが行われます。
ショッピング カートの移行
これでログインおよび登録プロセスが更新されたので、MigrateCart メソッドを使用して、ショッピング カートを移行するためのコードを追加できます。
ソリューション エクスプローラーで、Logic フォルダーを見つけ、ShoppingCartActions.cs クラス ファイルを開きます。
ShoppingCartActions.cs ファイル内の既存のコードに黄色で強調表示されたコードを追加して、ShoppingCartActions.cs ファイル内のコードが次のように表示されるようにします。
using System;
using System.Collections.Generic;
using System.Linq;
using System.Web;
using WingtipToys.Models;

namespace WingtipToys.Logic
{
  public class ShoppingCartActions : IDisposable
  {
    public string ShoppingCartId { get; set; }

    private ProductContext _db = new ProductContext();

    public const string CartSessionKey = "CartId";

    public void AddToCart(int id)
    {
      // Retrieve the product from the database.
      ShoppingCartId = GetCartId();

      var cartItem = _db.ShoppingCartItems.SingleOrDefault(
          c => c.CartId == ShoppingCartId
          && c.ProductId == id);
      if (cartItem == null)
      {
        // Create a new cart item if no cart item exists.
        cartItem = new CartItem
        {
          ItemId = Guid.NewGuid().ToString(),
          ProductId = id,
          CartId = ShoppingCartId,
          Product = _db.Products.SingleOrDefault(
           p => p.ProductID == id),
          Quantity = 1,
          DateCreated = DateTime.Now
        };

        _db.ShoppingCartItems.Add(cartItem);
      }
      else
      {
        // If the item does exist in the cart,
        // then add one to the quantity.
        cartItem.Quantity++;
      }
      _db.SaveChanges();
    }

    public void Dispose()
    {
      if (_db != null)
      {
        _db.Dispose();
        _db = null;
      }
    }

    public string GetCartId()
    {
      if (HttpContext.Current.Session[CartSessionKey] == null)
      {
        if (!string.IsNullOrWhiteSpace(HttpContext.Current.User.Identity.Name))
        {
          HttpContext.Current.Session[CartSessionKey] = HttpContext.Current.User.Identity.Name;
        }
        else
        {
          // Generate a new random GUID using System.Guid class.
          Guid tempCartId = Guid.NewGuid();
          HttpContext.Current.Session[CartSessionKey] = tempCartId.ToString();
        }
      }
      return HttpContext.Current.Session[CartSessionKey].ToString();
    }

    public List<CartItem> GetCartItems()
    {
      ShoppingCartId = GetCartId();

      return _db.ShoppingCartItems.Where(
          c => c.CartId == ShoppingCartId).ToList();
    }

    public decimal GetTotal()
    {
      ShoppingCartId = GetCartId();
      // Multiply product price by quantity of that product to get
      // the current price for each of those products in the cart.
      // Sum all product price totals to get the cart total.
      decimal? total = decimal.Zero;
      total = (decimal?)(from cartItems in _db.ShoppingCartItems
                         where cartItems.CartId == ShoppingCartId
                         select (int?)cartItems.Quantity *
                         cartItems.Product.UnitPrice).Sum();
      return total ?? decimal.Zero;
    }

    public ShoppingCartActions GetCart(HttpContext context)
    {
      using (var cart = new ShoppingCartActions())
      {
        cart.ShoppingCartId = cart.GetCartId();
        return cart;
      }
    }

    public void UpdateShoppingCartDatabase(String cartId, ShoppingCartUpdates[] CartItemUpdates)
    {
      using (var db = new WingtipToys.Models.ProductContext())
      {
        try
        {
          int CartItemCount = CartItemUpdates.Count();
          List<CartItem> myCart = GetCartItems();
          foreach (var cartItem in myCart)
          {
            // Iterate through all rows within shopping cart list
            for (int i = 0; i < CartItemCount; i++)
            {
              if (cartItem.Product.ProductID == CartItemUpdates[i].ProductId)
              {
                if (CartItemUpdates[i].PurchaseQuantity < 1 || CartItemUpdates[i].RemoveItem == true)
                {
                  RemoveItem(cartId, cartItem.ProductId);
                }
                else
                {
                  UpdateItem(cartId, cartItem.ProductId, CartItemUpdates[i].PurchaseQuantity);
                }
              }
            }
          }
        }
        catch (Exception exp)
        {
          throw new Exception("ERROR: Unable to Update Cart Database - " + exp.Message.ToString(), exp);
        }
      }
    }

    public void RemoveItem(string removeCartID, int removeProductID)
    {
      using (var _db = new WingtipToys.Models.ProductContext())
      {
        try
        {
          var myItem = (from c in _db.ShoppingCartItems where c.CartId == removeCartID && c.Product.ProductID == removeProductID select c).FirstOrDefault();
          if (myItem != null)
          {
            // Remove Item.
            _db.ShoppingCartItems.Remove(myItem);
            _db.SaveChanges();
          }
        }
        catch (Exception exp)
        {
          throw new Exception("ERROR: Unable to Remove Cart Item - " + exp.Message.ToString(), exp);
        }
      }
    }

    public void UpdateItem(string updateCartID, int updateProductID, int quantity)
    {
      using (var _db = new WingtipToys.Models.ProductContext())
      {
        try
        {
          var myItem = (from c in _db.ShoppingCartItems where c.CartId == updateCartID && c.Product.ProductID == updateProductID select c).FirstOrDefault();
          if (myItem != null)
          {
            myItem.Quantity = quantity;
            _db.SaveChanges();
          }
        }
        catch (Exception exp)
        {
          throw new Exception("ERROR: Unable to Update Cart Item - " + exp.Message.ToString(), exp);
        }
      }
    }

    public void EmptyCart()
    {
      ShoppingCartId = GetCartId();
      var cartItems = _db.ShoppingCartItems.Where(
          c => c.CartId == ShoppingCartId);
      foreach (var cartItem in cartItems)
      {
        _db.ShoppingCartItems.Remove(cartItem);
      }
      // Save changes.
      _db.SaveChanges();
    }

    public int GetCount()
    {
      ShoppingCartId = GetCartId();

      // Get the count of each item in the cart and sum them up
      int? count = (from cartItems in _db.ShoppingCartItems
                    where cartItems.CartId == ShoppingCartId
                    select (int?)cartItems.Quantity).Sum();
      // Return 0 if all entries are null
      return count ?? 0;
    }

    public struct ShoppingCartUpdates
    {
      public int ProductId;
      public int PurchaseQuantity;
      public bool RemoveItem;
    }

    public void MigrateCart(string cartId, string userName)
    {
      var shoppingCart = _db.ShoppingCartItems.Where(c => c.CartId == cartId);
      foreach (CartItem item in shoppingCart)
      {
        item.CartId = userName;
      }
      HttpContext.Current.Session[CartSessionKey] = userName;
      _db.SaveChanges();
    }
  }
}
MigrateCart メソッドは、既存の cartId を使用してユーザーのショッピング カートを見つけます。 次に、このコードはすべてのショッピング カート項目をループ処理し、CartId プロパティ (CartItem スキーマで指定されます) をログイン ユーザー名に置き換えます。
データベース接続の更新
事前構築済みの Wingtip Toys サンプル アプリケーションを使用してこのチュートリアルに従っている場合は、既定のメンバーシップ データベースを再作成する必要があります。 既定の接続文字列を変更すると、このアプリケーションが次回実行されたときにメンバーシップ データベースが作成されます。
プロジェクトのルートにある Web.config ファイルを開きます。
既定の接続文字列を更新して、次のように表示されるようにします。
<add name="DefaultConnection" connectionString="Data Source=(LocalDb)\MSSQLLocalDB;Initial Catalog=aspnet-WingtipToys;Integrated Security=True" providerName="System.Data.SqlClient" />
PayPal の統合
PayPal は、オンライン マーチャントによる支払いを受け付ける Web ベースの課金プラットフォームです。 このチュートリアルでは、次に PayPal の Express Checkout 機能をアプリケーションに統合する方法について説明します。 Express Checkout を使用すると、顧客は PayPal を使用して、自分のショッピング カートに追加した項目の支払いを行うことができます。
PayPal テスト アカウントを作成する
PayPal テスト環境を使用するには、開発者テスト アカウントを作成して検証する必要があります。 この開発者テスト アカウントを使用して、購入者テスト アカウントと販売者テスト アカウントを作成します。 また、開発者テスト アカウントの資格情報を使用すると、Wingtip Toys サンプル アプリケーションから PayPal テスト環境にアクセスすることもできます。
ブラウザーで、PayPal 開発者テスト サイトに移動します。
https://developer.paypal.comPayPal 開発者アカウントがない場合は、[サインアップ] をクリックし、サインアップ手順に従って新しいアカウントを作成します。 既存の PayPal 開発者アカウントがある場合は、[ログイン] をクリックしてサインインします。 PayPal 開発者アカウントは、このチュートリアルの後の方で Wingtip Toys サンプル アプリケーションをテストするために必要になります。
PayPal 開発者アカウントにサインアップしたばかりの場合は、PayPal で PayPal 開発者アカウントを検証することが必要になる場合があります。 PayPal からメール アカウントに送信された手順に従ってアカウントを検証できます。 PayPal 開発者アカウントを検証したら、PayPal 開発者テスト サイトにログインし直します。
PayPal 開発者アカウントを使用して PayPal 開発者サイトにログインした後、PayPal 購入者テスト アカウントがまだない場合は作成する必要があります。 購入者テスト アカウントを作成するには、PayPal サイトで [アプリケーション] タブをクリックしてから、[サンドボックス アカウント] をクリックします。
[サンドボックス テスト アカウント] ページが表示されます。Note
PayPal 開発者サイトには、マーチャント テスト アカウントが既に用意されています。
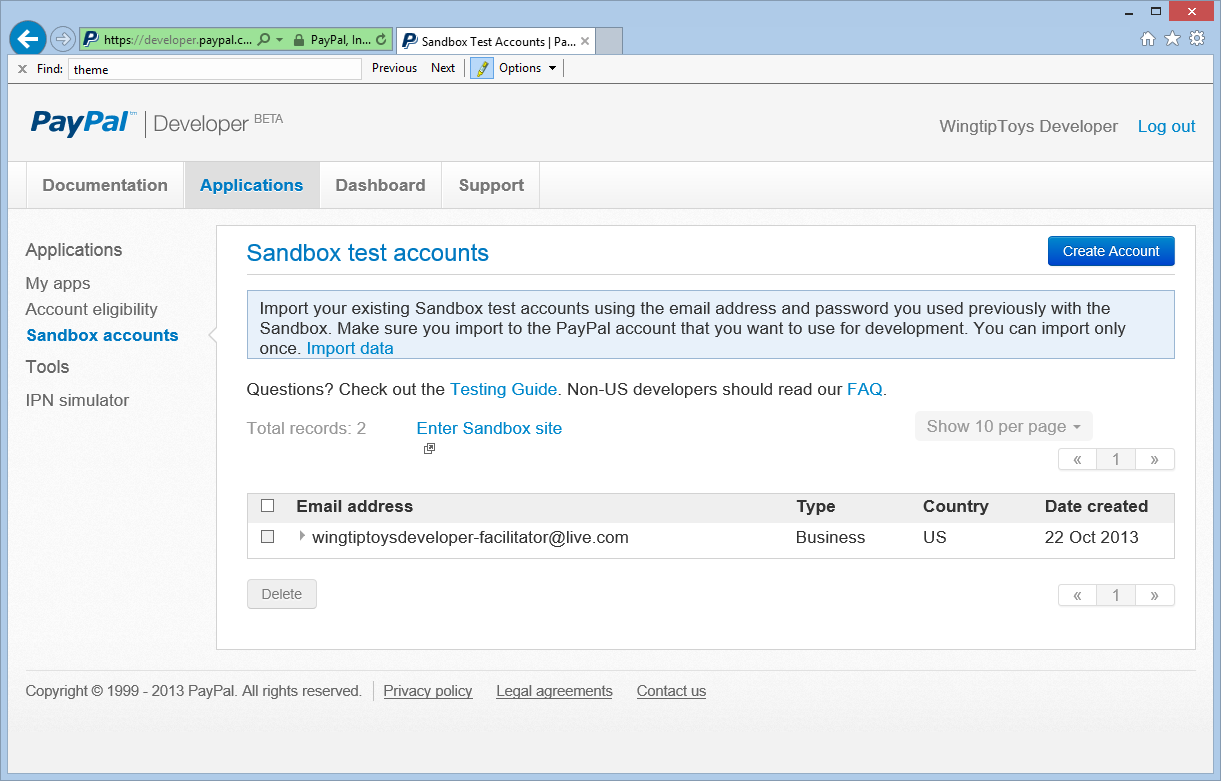
[サンドボックス テスト アカウント] ページで、[アカウントの作成] をクリックします。
[テスト アカウントの作成] ページで、希望する購入者テスト アカウントのメールとパスワードを選択します。
Note
このチュートリアルの最後に Wingtip Toys サンプル アプリケーションをテストするには、購入者のメール アドレスとパスワードが必要になります。
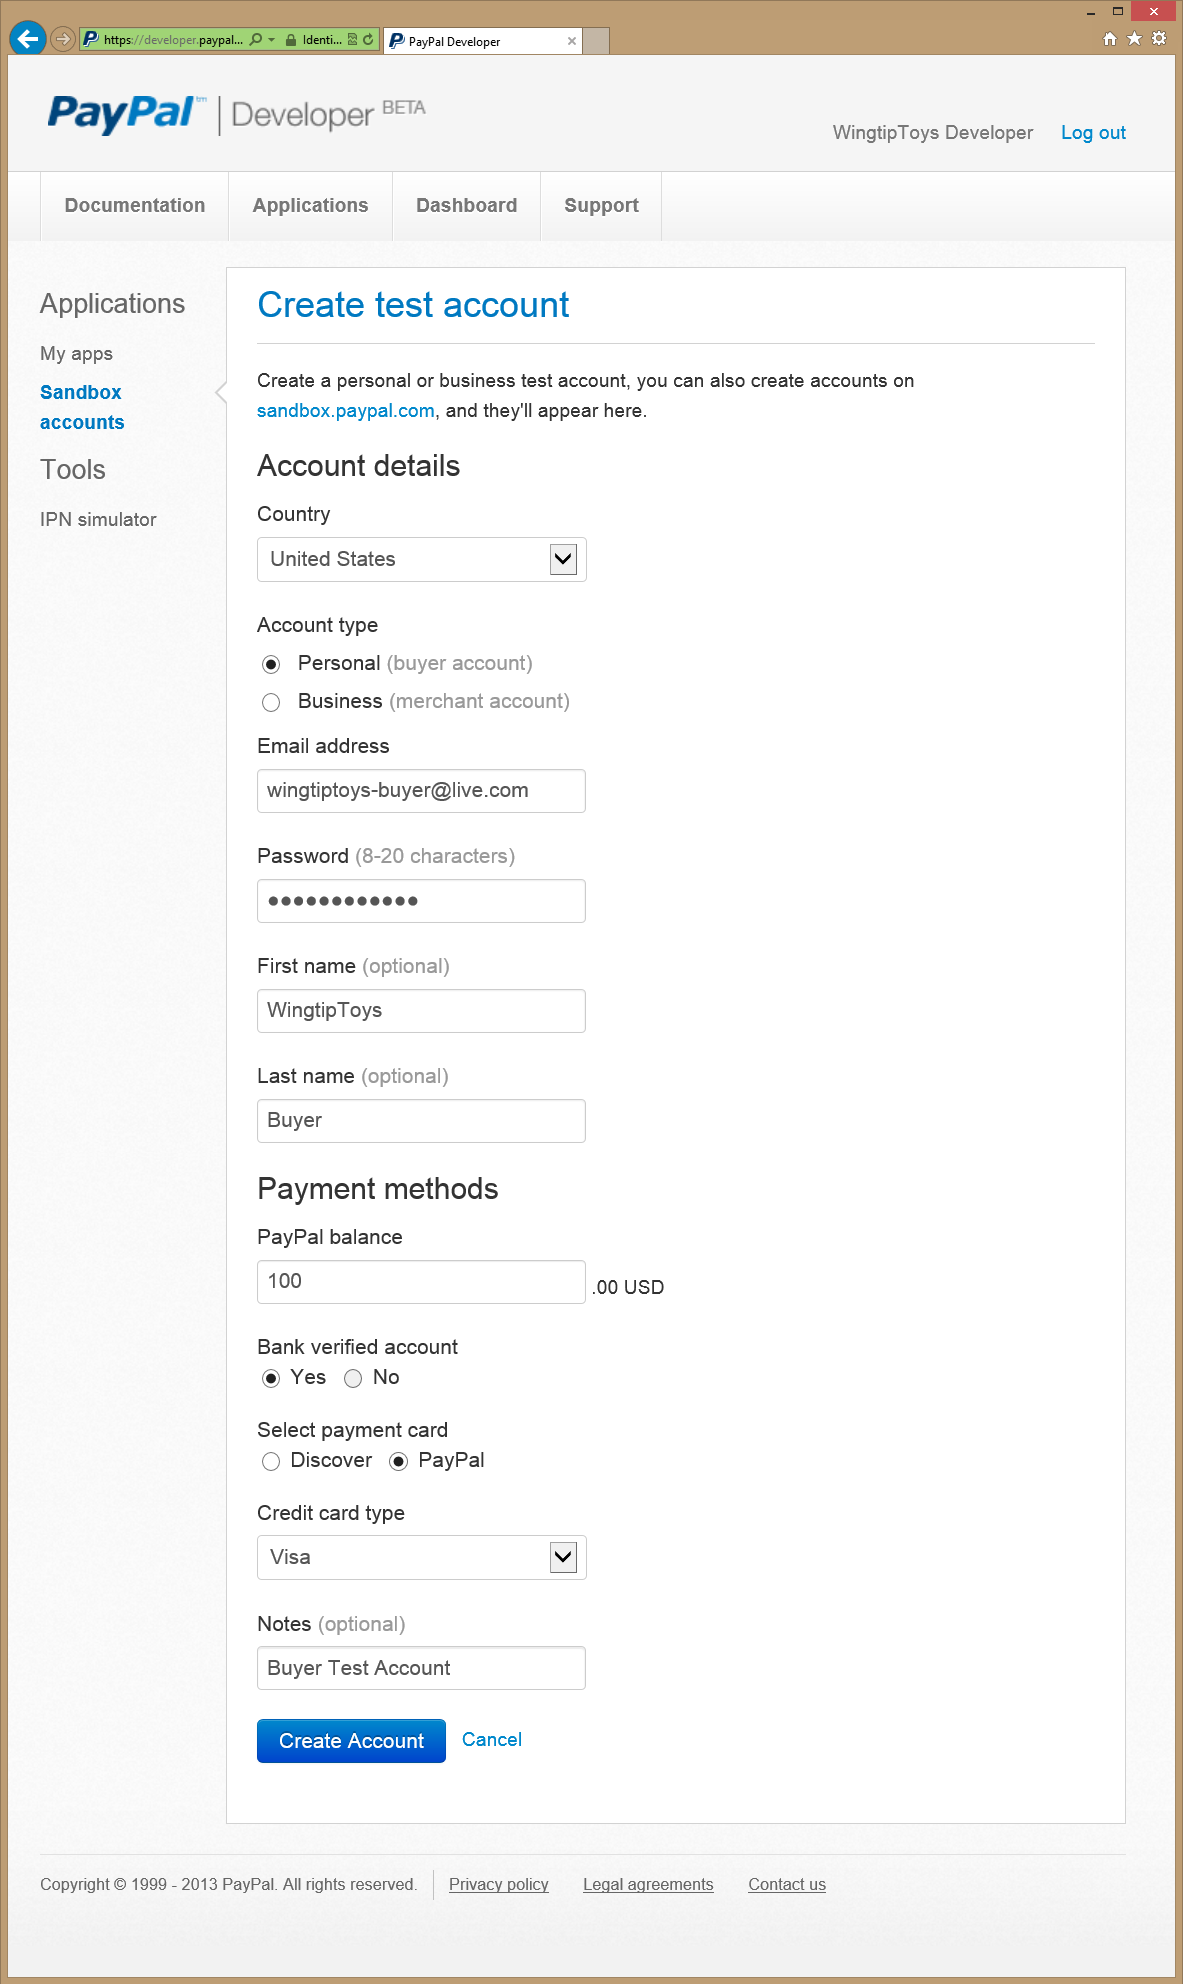
[アカウントの作成] ボタンをクリックして、購入者テスト アカウントを作成します。
[サンドボックス テスト アカウント] ページが表示されます。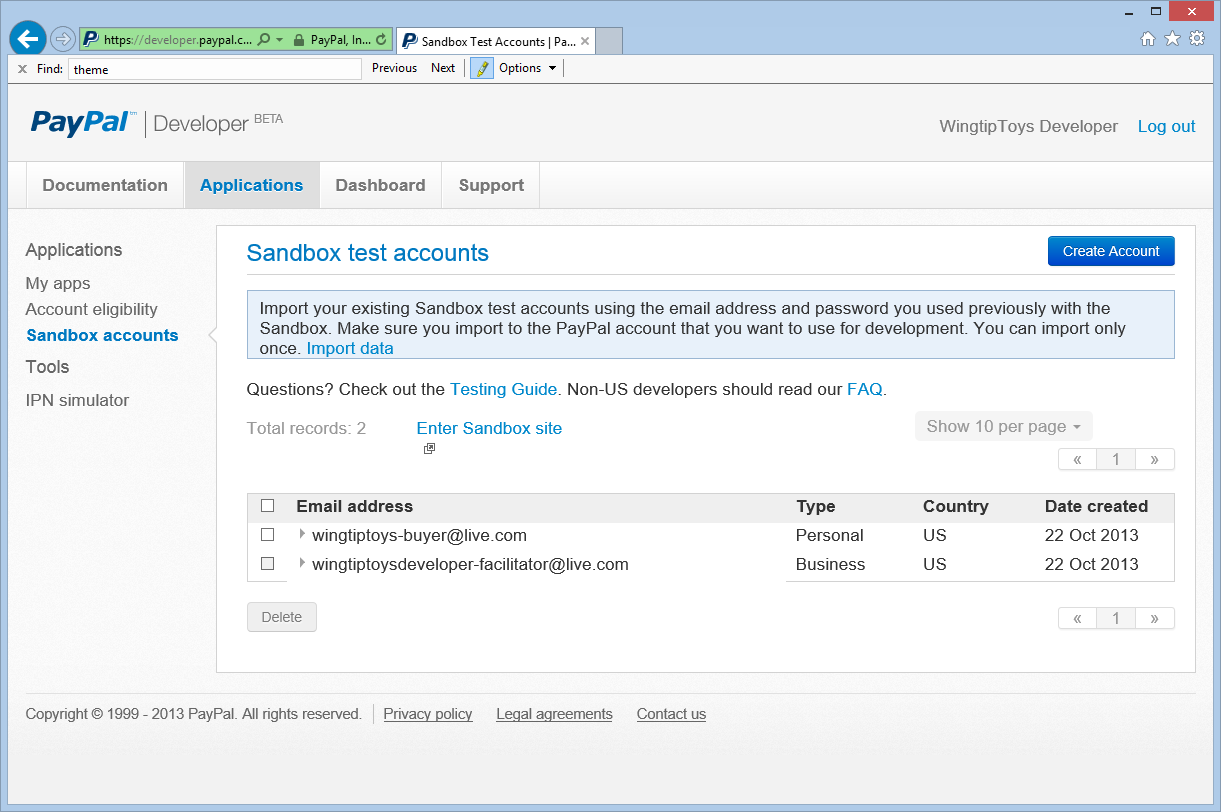
[サンドボックス テスト アカウント] ページで、ファシリテーターのメール アカウントをクリックします。
[プロファイル] と [通知] のオプションが表示されます。[プロファイル] オプションを選択し、[API 資格情報] をクリックして、マーチャント テスト アカウントの API 資格情報を表示します。
TEST API 資格情報をメモ帳にコピーします。
Wingtip Toys サンプル アプリケーションから PayPal テスト環境への API 呼び出しを行うには、表示されたクラシック TEST API 資格情報 (ユーザー名、パスワード、署名) が必要になります。 これらの資格情報は、次の手順で追加します。
PayPal クラスと API 資格情報を追加する
PayPal コードは、その大部分を 1 つのクラスに配置します。 このクラスには、PayPal と通信するために使用されるメソッドが含まれています。 また、PayPal 資格情報もこのクラスに追加します。
Visual Studio 内の Wingtip Toys サンプル アプリケーションで、Logic フォルダーを右クリックし、[追加] -> [新しい項目] の順に選択します。
[新しい項目の追加] ダイアログ ボックスが表示されます。左側にある [インストール済み] ペインで、[Visual C#] の [コード] を選択します。
中央のペインから [クラス] を選択します。 この新しいクラスに PayPalFunctions.cs という名前を付けます。
追加をクリックします。
新しいクラス ファイルがエディターに表示されます。既定のコードを以下のコードに置き換えます。
using System;
using System.Collections;
using System.Collections.Specialized;
using System.IO;
using System.Net;
using System.Text;
using System.Data;
using System.Configuration;
using System.Web;
using WingtipToys;
using WingtipToys.Models;
using System.Collections.Generic;
using System.Linq;

public class NVPAPICaller
{
  //Flag that determines the PayPal environment (live or sandbox)
  private const bool bSandbox = true;
  private const string CVV2 = "CVV2";

  // Live strings.
  private string pEndPointURL = "https://api-3t.paypal.com/nvp";
  private string host = "www.paypal.com";

  // Sandbox strings.
  private string pEndPointURL_SB = "https://api-3t.sandbox.paypal.com/nvp";
  private string host_SB = "www.sandbox.paypal.com";

  private const string SIGNATURE = "SIGNATURE";
  private const string PWD = "PWD";
  private const string ACCT = "ACCT";

  //Replace <Your API Username> with your API Username
  //Replace <Your API Password> with your API Password
  //Replace <Your Signature> with your Signature
  public string APIUsername = "<Your API Username>";
  private string APIPassword = "<Your API Password>";
  private string APISignature = "<Your Signature>";
  private string Subject = "";
  private string BNCode = "PP-ECWizard";

  //HttpWebRequest Timeout specified in milliseconds
  private const int Timeout = 15000;
  private static readonly string[] SECURED_NVPS = new string[] { ACCT, CVV2, SIGNATURE, PWD };

  public void SetCredentials(string Userid, string Pwd, string Signature)
  {
    APIUsername = Userid;
    APIPassword = Pwd;
    APISignature = Signature;
  }

  public bool ShortcutExpressCheckout(string amt, ref string token, ref string retMsg)
  {
    if (bSandbox)
    {
      pEndPointURL = pEndPointURL_SB;
      host = host_SB;
    }

    string returnURL = "https://localhost:44300/Checkout/CheckoutReview.aspx";
    string cancelURL = "https://localhost:44300/Checkout/CheckoutCancel.aspx";

    NVPCodec encoder = new NVPCodec();
    encoder["METHOD"] = "SetExpressCheckout";
    encoder["RETURNURL"] = returnURL;
    encoder["CANCELURL"] = cancelURL;
    encoder["BRANDNAME"] = "Wingtip Toys Sample Application";
    encoder["PAYMENTREQUEST_0_AMT"] = amt;
    encoder["PAYMENTREQUEST_0_ITEMAMT"] = amt;
    encoder["PAYMENTREQUEST_0_PAYMENTACTION"] = "Sale";
    encoder["PAYMENTREQUEST_0_CURRENCYCODE"] = "USD";

    // Get the Shopping Cart Products
    using (WingtipToys.Logic.ShoppingCartActions myCartOrders = new WingtipToys.Logic.ShoppingCartActions())
    {
      List<CartItem> myOrderList = myCartOrders.GetCartItems();

      for (int i = 0; i < myOrderList.Count; i++)
      {
        encoder["L_PAYMENTREQUEST_0_NAME" + i] = myOrderList[i].Product.ProductName.ToString();
        encoder["L_PAYMENTREQUEST_0_AMT" + i] = myOrderList[i].Product.UnitPrice.ToString();
        encoder["L_PAYMENTREQUEST_0_QTY" + i] = myOrderList[i].Quantity.ToString();
      }
    }

    string pStrrequestforNvp = encoder.Encode();
    string pStresponsenvp = HttpCall(pStrrequestforNvp);

    NVPCodec decoder = new NVPCodec();
    decoder.Decode(pStresponsenvp);

    string strAck = decoder["ACK"].ToLower();
    if (strAck != null && (strAck == "success" || strAck == "successwithwarning"))
    {
      token = decoder["TOKEN"];
      string ECURL = "https://" + host + "/cgi-bin/webscr?cmd=_express-checkout" + "&token=" + token;
      retMsg = ECURL;
      return true;
    }
    else
    {
      retMsg = "ErrorCode=" + decoder["L_ERRORCODE0"] + "&" +
          "Desc=" + decoder["L_SHORTMESSAGE0"] + "&" +
          "Desc2=" + decoder["L_LONGMESSAGE0"];
      return false;
    }
  }

  public bool GetCheckoutDetails(string token, ref string PayerID, ref NVPCodec decoder, ref string retMsg)
  {
    if (bSandbox)
    {
      pEndPointURL = pEndPointURL_SB;
    }

    NVPCodec encoder = new NVPCodec();
    encoder["METHOD"] = "GetExpressCheckoutDetails";
    encoder["TOKEN"] = token;

    string pStrrequestforNvp = encoder.Encode();
    string pStresponsenvp = HttpCall(pStrrequestforNvp);

    decoder = new NVPCodec();
    decoder.Decode(pStresponsenvp);

    string strAck = decoder["ACK"].ToLower();
    if (strAck != null && (strAck == "success" || strAck == "successwithwarning"))
    {
      PayerID = decoder["PAYERID"];
      return true;
    }
    else
    {
      retMsg = "ErrorCode=" + decoder["L_ERRORCODE0"] + "&" +
          "Desc=" + decoder["L_SHORTMESSAGE0"] + "&" +
          "Desc2=" + decoder["L_LONGMESSAGE0"];

      return false;
    }
  }

  public bool DoCheckoutPayment(string finalPaymentAmount, string token, string PayerID, ref NVPCodec decoder, ref string retMsg)
  {
    if (bSandbox)
    {
      pEndPointURL = pEndPointURL_SB;
    }

    NVPCodec encoder = new NVPCodec();
    encoder["METHOD"] = "DoExpressCheckoutPayment";
    encoder["TOKEN"] = token;
    encoder["PAYERID"] = PayerID;
    encoder["PAYMENTREQUEST_0_AMT"] = finalPaymentAmount;
    encoder["PAYMENTREQUEST_0_CURRENCYCODE"] = "USD";
    encoder["PAYMENTREQUEST_0_PAYMENTACTION"] = "Sale";

    string pStrrequestforNvp = encoder.Encode();
    string pStresponsenvp = HttpCall(pStrrequestforNvp);

    decoder = new NVPCodec();
    decoder.Decode(pStresponsenvp);

    string strAck = decoder["ACK"].ToLower();
    if (strAck != null && (strAck == "success" || strAck == "successwithwarning"))
    {
      return true;
    }
    else
    {
      retMsg = "ErrorCode=" + decoder["L_ERRORCODE0"] + "&" +
          "Desc=" + decoder["L_SHORTMESSAGE0"] + "&" +
          "Desc2=" + decoder["L_LONGMESSAGE0"];

      return false;
    }
  }

  public string HttpCall(string NvpRequest)
  {
    string url = pEndPointURL;

    string strPost = NvpRequest + "&" + buildCredentialsNVPString();
    strPost = strPost + "&BUTTONSOURCE=" + HttpUtility.UrlEncode(BNCode);

    HttpWebRequest objRequest = (HttpWebRequest)WebRequest.Create(url);
    objRequest.Timeout = Timeout;
    objRequest.Method = "POST";
    objRequest.ContentLength = strPost.Length;

    try
    {
      using (StreamWriter myWriter = new StreamWriter(objRequest.GetRequestStream()))
      {
        myWriter.Write(strPost);
      }
    }
    catch (Exception)
    {
      // No logging for this tutorial.
    }

    //Retrieve the Response returned from the NVP API call to PayPal.
    HttpWebResponse objResponse = (HttpWebResponse)objRequest.GetResponse();
    string result;
    using (StreamReader sr = new StreamReader(objResponse.GetResponseStream()))
    {
      result = sr.ReadToEnd();
    }

    return result;
  }

  private string buildCredentialsNVPString()
  {
    NVPCodec codec = new NVPCodec();

    if (!IsEmpty(APIUsername))
      codec["USER"] = APIUsername;

    if (!IsEmpty(APIPassword))
      codec[PWD] = APIPassword;

    if (!IsEmpty(APISignature))
      codec[SIGNATURE] = APISignature;

    if (!IsEmpty(Subject))
      codec["SUBJECT"] = Subject;

    codec["VERSION"] = "88.0";

    return codec.Encode();
  }

  public static bool IsEmpty(string s)
  {
    return s == null || s.Trim() == string.Empty;
  }
}

public sealed class NVPCodec : NameValueCollection
{
  private const string AMPERSAND = "&";
  private const string EQUALS = "=";
  private static readonly char[] AMPERSAND_CHAR_ARRAY = AMPERSAND.ToCharArray();
  private static readonly char[] EQUALS_CHAR_ARRAY = EQUALS.ToCharArray();

  public string Encode()
  {
    StringBuilder sb = new StringBuilder();
    bool firstPair = true;
    foreach (string kv in AllKeys)
    {
      string name = HttpUtility.UrlEncode(kv);
      string value = HttpUtility.UrlEncode(this[kv]);
      if (!firstPair)
      {
        sb.Append(AMPERSAND);
      }
      sb.Append(name).Append(EQUALS).Append(value);
      firstPair = false;
    }
    return sb.ToString();
  }

  public void Decode(string nvpstring)
  {
    Clear();
    foreach (string nvp in nvpstring.Split(AMPERSAND_CHAR_ARRAY))
    {
      string[] tokens = nvp.Split(EQUALS_CHAR_ARRAY);
      if (tokens.Length >= 2)
      {
        string name = HttpUtility.UrlDecode(tokens[0]);
        string value = HttpUtility.UrlDecode(tokens[1]);
        Add(name, value);
      }
    }
  }

  public void Add(string name, string value, int index)
  {
    this.Add(GetArrayName(index, name), value);
  }

  public void Remove(string arrayName, int index)
  {
    this.Remove(GetArrayName(index, arrayName));
  }

  public string this[string name, int index]
  {
    get
    {
      return this[GetArrayName(index, name)];
    }
    set
    {
      this[GetArrayName(index, name)] = value;
    }
  }

  private static string GetArrayName(int index, string name)
  {
    if (index < 0)
    {
      throw new ArgumentOutOfRangeException("index", "index cannot be negative : " + index);
    }
    return name + index;
  }
}
PayPal テスト環境への関数呼び出しを行うことができるように、このチュートリアルで前に表示したマーチャント API 資格情報 (ユーザー名、パスワード、署名) を追加します。
public string APIUsername = "<Your API Username>";
private string APIPassword = "<Your API Password>";
private string APISignature = "<Your Signature>";
Note
このサンプル アプリケーションでは、資格情報を単純に C# ファイル (.cs) に追加しています。 ただし、実装されたソリューションでは、資格情報を構成ファイル内で暗号化することを検討する必要があります。
NVPAPICaller クラスには、PayPal 機能の大部分が含まれています。 このクラス内のコードは、PayPal テスト環境からのテスト購入を行うために必要なメソッドを提供します。 購入を行うために、次の 3 つの PayPal 関数が使用されます。
SetExpressCheckout関数GetExpressCheckoutDetails関数DoExpressCheckoutPayment関数
ShortcutExpressCheckout メソッドは、ショッピング カートからテスト購入の情報と製品の詳細を収集し、SetExpressCheckout PayPal 関数を呼び出します。 GetCheckoutDetails メソッドは、テスト購入を行う前に購入の詳細を確認し、GetExpressCheckoutDetails PayPal 関数を呼び出します。 DoCheckoutPayment メソッドは、DoExpressCheckoutPayment PayPal 関数を呼び出して、テスト環境からのテスト購入を完了します。 残りのコードは、PayPal のメソッドやプロセスをサポートします (文字列のエンコード、文字列のデコード、配列の処理、資格情報の特定など)。
Note
PayPal では、PayPal の API 仕様に基づいて、オプションの購入の詳細を含めることができます。 Wingtip Toys サンプル アプリケーション内のコードを拡張することにより、ローカライズの詳細、製品の説明、税金、顧客サービス番号、その他の多くのオプション フィールドを含めることができます。
ShortcutExpressCheckout メソッドで指定される戻り URL と取り消し URL ではポート番号が使用されることに注意してください。
string returnURL = "https://localhost:44300/Checkout/CheckoutReview.aspx";
       string cancelURL = "https://localhost:44300/Checkout/CheckoutCancel.aspx";
Visual Web Developer で SSL を使用して Web プロジェクトを実行する場合は一般に、ポート 44300 が Web サーバーに使用されます。 上記のように、ポート番号は 44300 です。 アプリケーションを実行した場合、別のポート番号が表示される可能性があります。 このチュートリアルの最後に Wingtip Toys サンプル アプリケーションを正常に実行できるように、ポート番号をコードで正しく設定する必要があります。 このチュートリアルの次のセクションでは、ローカル ホストのポート番号を取得し、PayPal クラスを更新する方法について説明します。
PayPal クラス内のローカル ホストのポート番号を更新する
Wingtip Toys サンプル アプリケーションでは、PayPal テスト サイトに移動し、Wingtip Toys サンプル アプリケーションのローカル インスタンスに戻ることによって製品を購入します。 PayPal が正しい URL に戻るようにするには、上記の PayPal コード内でローカルで実行されるサンプル アプリケーションのポート番号を指定する必要があります。
ソリューション エクスプローラーでプロジェクト名 (WingtipToys) を右クリックし、[プロパティ] を選択します。
左の列で、[Web] タブを選択します。
[プロジェクト URL] ボックスからポート番号を取得します。
必要に応じて、PayPalFunctions.cs ファイルにある PayPal クラス (
NVPAPICaller) 内のreturnURLとcancelURLを更新して Web アプリケーションのポート番号を使用するようにします。string returnURL = "https://localhost:<Your Port Number>/Checkout/CheckoutReview.aspx"; string cancelURL = "https://localhost:<Your Port Number>/Checkout/CheckoutCancel.aspx";
これで、追加したコードがローカル Web アプリケーションの予期されるポートと一致するようになりました。 PayPal は、ローカル マシン上の正しい URL に戻ることができます。
PayPal の [精算] ボタンを追加する
これで、主要な PayPal 関数がサンプル アプリケーションに追加されたので、これらの関数を呼び出すために必要なマークアップとコードの追加を開始できます。 最初に、ショッピング カート ページでユーザーに表示される [精算] ボタンを追加する必要があります。
ShoppingCart.aspx ファイルを開きます。
ファイルの一番下までスクロールし、
<!--Checkout Placeholder -->というコメントを見つけます。このコメントを
ImageButtonコントロールに置き換えて、マークアップが次のように置き換えられるようにします。<asp:ImageButton ID="CheckoutImageBtn" runat="server" ImageUrl="https://www.paypal.com/en_US/i/btn/btn_xpressCheckout.gif" Width="145" AlternateText="Check out with PayPal" OnClick="CheckoutBtn_Click" BackColor="Transparent" BorderWidth="0" />ShoppingCart.aspx.cs ファイルで、このファイルの最後の近くにある
UpdateBtn_Clickイベント ハンドラーの後にCheckOutBtn_Clickイベント ハンドラーを追加します。protected void CheckoutBtn_Click(object sender, ImageClickEventArgs e) { using (ShoppingCartActions usersShoppingCart = new ShoppingCartActions()) { Session["payment_amt"] = usersShoppingCart.GetTotal(); } Response.Redirect("Checkout/CheckoutStart.aspx"); }また、ShoppingCart.aspx.cs ファイルで、新しいイメージ ボタンが参照されるように、次のように
CheckoutBtnへの参照も追加します。protected void Page_Load(object sender, EventArgs e) { using (ShoppingCartActions usersShoppingCart = new ShoppingCartActions()) { decimal cartTotal = 0; cartTotal = usersShoppingCart.GetTotal(); if (cartTotal > 0) { // Display Total. lblTotal.Text = String.Format("{0:c}", cartTotal); } else { LabelTotalText.Text = ""; lblTotal.Text = ""; ShoppingCartTitle.InnerText = "Shopping Cart is Empty"; UpdateBtn.Visible = false; CheckoutImageBtn.Visible = false; } } }変更内容を ShoppingCart.aspx ファイルと ShoppingCart.aspx.cs ファイルの両方に保存します。
メニューから、[デバッグ] -> [WingtipToys のビルド] の順に選択します。
プロジェクトが新しく追加された ImageButton コントロールを使用してリビルドされます。
購入の詳細を PayPal に送信する
ユーザーがショッピング カート ページ (ShoppingCart.aspx) で [精算] ボタンをクリックすると、購入プロセスが開始されます。 次のコードは、製品を購入するために必要な最初の PayPal 関数を呼び出します。
Checkout フォルダーから、CheckoutStart.aspx.cs という名前の分離コード ファイルを開きます。
必ず分離コード ファイルを開くようにしてください。既存のコードを次のコードに置き換えます。
using System;
using System.Collections.Generic;
using System.Linq;
using System.Web;
using System.Web.UI;
using System.Web.UI.WebControls;

namespace WingtipToys.Checkout
{
    public partial class CheckoutStart : System.Web.UI.Page
    {
        protected void Page_Load(object sender, EventArgs e)
        {
            NVPAPICaller payPalCaller = new NVPAPICaller();
            string retMsg = "";
            string token = "";

            if (Session["payment_amt"] != null)
            {
                string amt = Session["payment_amt"].ToString();

                bool ret = payPalCaller.ShortcutExpressCheckout(amt, ref token, ref retMsg);
                if (ret)
                {
                    Session["token"] = token;
                    Response.Redirect(retMsg);
                }
                else
                {
                    Response.Redirect("CheckoutError.aspx?" + retMsg);
                }
            }
            else
            {
                Response.Redirect("CheckoutError.aspx?ErrorCode=AmtMissing");
            }
        }
    }
}
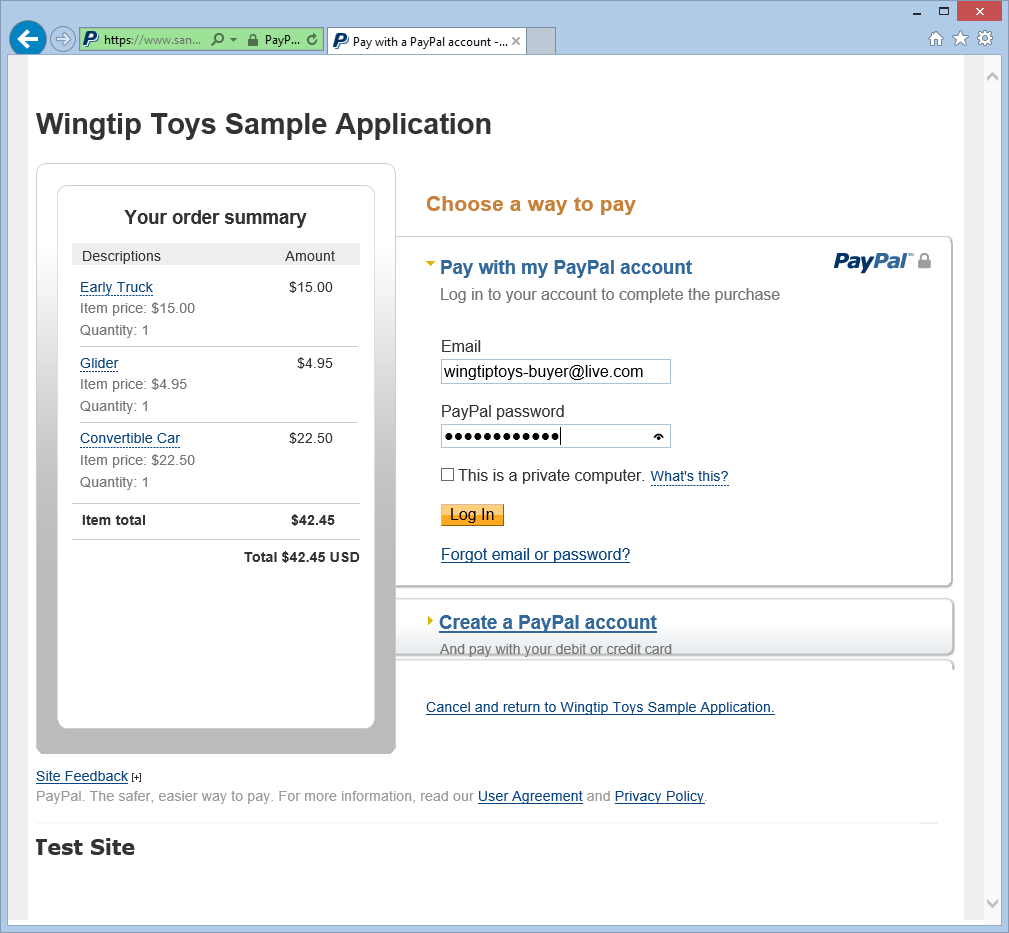
アプリケーションのユーザーがショッピング カート ページで [精算] ボタンをクリックすると、ブラウザーは CheckoutStart.aspx ページに移動します。 CheckoutStart.aspx ページが読み込まれると、ShortcutExpressCheckout メソッドが呼び出されます。 この時点で、ユーザーは PayPal テスト Web サイトに転送されます。 PayPal サイトで、ユーザーは自分の PayPal 資格情報を入力して購入の詳細を確認し、PayPal 契約に同意して Wingtip Toys サンプル アプリケーションに戻ります。ここで、ShortcutExpressCheckout メソッドは完了します。 ShortcutExpressCheckout メソッドが完了すると、ユーザーは ShortcutExpressCheckout メソッドで指定される CheckoutReview.aspx ページにリダイレクトされます。 これにより、ユーザーは Wingtip Toys サンプル アプリケーション内から注文の詳細を確認できます。
注文の詳細を確認する
PayPal から戻ると、Wingtip Toys サンプル アプリケーションの CheckoutReview.aspx ページに注文の詳細が表示されます。 このページでは、ユーザーは製品を購入する前に注文の詳細を確認できます。 CheckoutReview.aspx ページは、次のように作成する必要があります。
Checkout フォルダーで、CheckoutReview.aspx という名前のページを開きます。
既存のマークアップを次に置き換えます。
<%@ Page Title="" Language="C#" MasterPageFile="~/Site.Master" AutoEventWireup="true" CodeBehind="CheckoutReview.aspx.cs" Inherits="WingtipToys.Checkout.CheckoutReview" %>
<asp:Content ID="Content1" ContentPlaceHolderID="MainContent" runat="server">
    <h1>Order Review</h1>
    <p></p>
    <h3 style="padding-left: 33px">Products:</h3>
    <asp:GridView ID="OrderItemList" runat="server" AutoGenerateColumns="False" GridLines="Both" CellPadding="10" Width="500" BorderColor="#efeeef" BorderWidth="33">
        <Columns>
            <asp:BoundField DataField="ProductId" HeaderText=" Product ID" />
            <asp:BoundField DataField="Product.ProductName" HeaderText=" Product Name" />
            <asp:BoundField DataField="Product.UnitPrice" HeaderText="Price (each)" DataFormatString="{0:c}"/>
            <asp:BoundField DataField="Quantity" HeaderText="Quantity" />
        </Columns>
    </asp:GridView>
    <asp:DetailsView ID="ShipInfo" runat="server" AutoGenerateRows="false" GridLines="None" CellPadding="10" BorderStyle="None" CommandRowStyle-BorderStyle="None">
        <Fields>
        <asp:TemplateField>
            <ItemTemplate>
                <h3>Shipping Address:</h3>
                <br />
                <asp:Label ID="FirstName" runat="server" Text='<%#: Eval("FirstName") %>'></asp:Label>
                <asp:Label ID="LastName" runat="server" Text='<%#: Eval("LastName") %>'></asp:Label>
                <br />
                <asp:Label ID="Address" runat="server" Text='<%#: Eval("Address") %>'></asp:Label>
                <br />
                <asp:Label ID="City" runat="server" Text='<%#: Eval("City") %>'></asp:Label>
                <asp:Label ID="State" runat="server" Text='<%#: Eval("State") %>'></asp:Label>
                <asp:Label ID="PostalCode" runat="server" Text='<%#: Eval("PostalCode") %>'></asp:Label>
                <p></p>
                <h3>Order Total:</h3>
                <br />
                <asp:Label ID="Total" runat="server" Text='<%#: Eval("Total", "{0:C}") %>'></asp:Label>
            </ItemTemplate>
            <ItemStyle HorizontalAlign="Left" />
        </asp:TemplateField>
          </Fields>
    </asp:DetailsView>
    <p></p>
    <hr />
    <asp:Button ID="CheckoutConfirm" runat="server" Text="Complete Order" OnClick="CheckoutConfirm_Click" />
</asp:Content>
CheckoutReview.aspx.cs という名前の分離コード ページを開き、既存のコードを次のコードに置き換えます。
using System;
using System.Collections.Generic;
using System.Linq;
using System.Web;
using System.Web.UI;
using System.Web.UI.WebControls;
using WingtipToys.Models;

namespace WingtipToys.Checkout
{
  public partial class CheckoutReview : System.Web.UI.Page
  {
    protected void Page_Load(object sender, EventArgs e)
    {
      if (!IsPostBack)
      {
        NVPAPICaller payPalCaller = new NVPAPICaller();

        string retMsg = "";
        string token = "";
        string PayerID = "";
        NVPCodec decoder = new NVPCodec();
        token = Session["token"].ToString();

        bool ret = payPalCaller.GetCheckoutDetails(token, ref PayerID, ref decoder, ref retMsg);
        if (ret)
        {
          Session["payerId"] = PayerID;

          var myOrder = new Order();
          myOrder.OrderDate = Convert.ToDateTime(decoder["TIMESTAMP"].ToString());
          myOrder.Username = User.Identity.Name;
          myOrder.FirstName = decoder["FIRSTNAME"].ToString();
          myOrder.LastName = decoder["LASTNAME"].ToString();
          myOrder.Address = decoder["SHIPTOSTREET"].ToString();
          myOrder.City = decoder["SHIPTOCITY"].ToString();
          myOrder.State = decoder["SHIPTOSTATE"].ToString();
          myOrder.PostalCode = decoder["SHIPTOZIP"].ToString();
          myOrder.Country = decoder["SHIPTOCOUNTRYCODE"].ToString();
          myOrder.Email = decoder["EMAIL"].ToString();
          myOrder.Total = Convert.ToDecimal(decoder["AMT"].ToString());

          // Verify total payment amount as set on CheckoutStart.aspx.
          try
          {
            decimal paymentAmountOnCheckout = Convert.ToDecimal(Session["payment_amt"].ToString());
            decimal paymentAmoutFromPayPal = Convert.ToDecimal(decoder["AMT"].ToString());
            if (paymentAmountOnCheckout != paymentAmoutFromPayPal)
            {
              Response.Redirect("CheckoutError.aspx?" + "Desc=Amount%20total%20mismatch.");
            }
          }
          catch (Exception)
          {
            Response.Redirect("CheckoutError.aspx?" + "Desc=Amount%20total%20mismatch.");
          }

          // Get DB context.
          ProductContext _db = new ProductContext();

          // Add order to DB.
          _db.Orders.Add(myOrder);
          _db.SaveChanges();

          // Get the shopping cart items and process them.
          using (WingtipToys.Logic.ShoppingCartActions usersShoppingCart = new WingtipToys.Logic.ShoppingCartActions())
          {
            List<CartItem> myOrderList = usersShoppingCart.GetCartItems();

            // Add OrderDetail information to the DB for each product purchased.
            for (int i = 0; i < myOrderList.Count; i++)
            {
              // Create a new OrderDetail object.
              var myOrderDetail = new OrderDetail();
              myOrderDetail.OrderId = myOrder.OrderId;
              myOrderDetail.Username = User.Identity.Name;
              myOrderDetail.ProductId = myOrderList[i].ProductId;
              myOrderDetail.Quantity = myOrderList[i].Quantity;
              myOrderDetail.UnitPrice = myOrderList[i].Product.UnitPrice;

              // Add OrderDetail to DB.
              _db.OrderDetails.Add(myOrderDetail);
              _db.SaveChanges();
            }

            // Set OrderId.
            Session["currentOrderId"] = myOrder.OrderId;

            // Display Order information.
            List<Order> orderList = new List<Order>();
            orderList.Add(myOrder);
            ShipInfo.DataSource = orderList;
            ShipInfo.DataBind();

            // Display OrderDetails.
            OrderItemList.DataSource = myOrderList;
            OrderItemList.DataBind();
          }
        }
        else
        {
          Response.Redirect("CheckoutError.aspx?" + retMsg);
        }
      }
    }

    protected void CheckoutConfirm_Click(object sender, EventArgs e)
    {
      Session["userCheckoutCompleted"] = "true";
      Response.Redirect("~/Checkout/CheckoutComplete.aspx");
    }
  }
}
DetailsView コントロールは、PayPal から返された注文の詳細を表示するために使用されます。 また、上記のコードは、注文の詳細を OrderDetail オブジェクトとして Wingtip Toys データベースに保存します。 ユーザーが [注文の完了] ボタンをクリックすると、CheckoutComplete.aspx ページにリダイレクトされます。
Note
ヒント
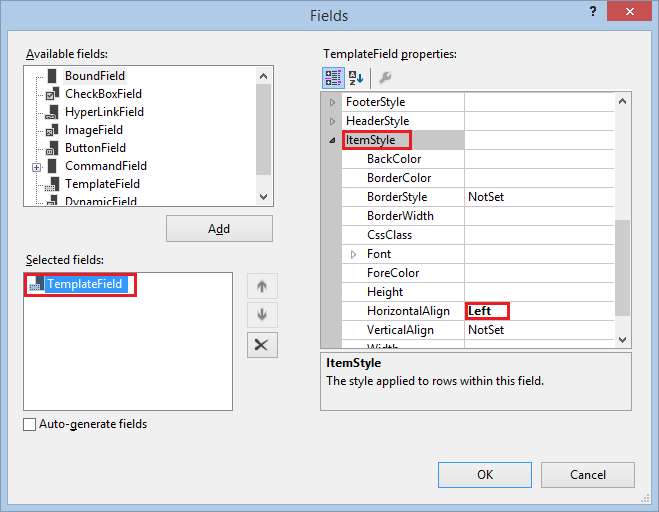
CheckoutReview.aspx ページのマークアップで、ページの一番下の近くにある DetailsView コントロール内で項目のスタイルを変更するために <ItemStyle> タグが使用されていることに注意してください。 デザイン ビューでページを表示 (Visual Studio の左下隅にある [デザイン] を選択) してから DetailsView コントロールを選択し、[スマート タグ] (このコントロールの右上にある矢印アイコン) を選択すると、[DetailsView タスク] を表示できるようになります。
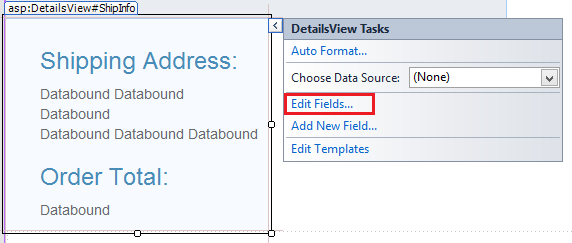
[フィールドの編集] を選択すると、[フィールド] ダイアログ ボックスが表示されます。 このダイアログ ボックスでは、DetailsView コントロールの視覚化プロパティ (ItemStyle など) を簡単に制御できます。
購入を完了する
CheckoutComplete.aspx ページでは、PayPal からの購入を行います。 前に説明したように、ユーザーは、アプリケーションが CheckoutComplete.aspx ページに移動する前に [注文の完了] ボタンをクリックする必要があります。
Checkout フォルダーで、CheckoutComplete.aspx という名前のページを開きます。
既存のマークアップを次に置き換えます。
<%@ Page Title="" Language="C#" MasterPageFile="~/Site.Master" AutoEventWireup="true" CodeBehind="CheckoutComplete.aspx.cs" Inherits="WingtipToys.Checkout.CheckoutComplete" %>
<asp:Content ID="Content1" ContentPlaceHolderID="MainContent" runat="server">
    <h1>Checkout Complete</h1>
    <p></p>
    <h3>Payment Transaction ID:</h3> <asp:Label ID="TransactionId" runat="server"></asp:Label>
    <p></p>
    <h3>Thank You!</h3>
    <p></p>
    <hr />
    <asp:Button ID="Continue" runat="server" Text="Continue Shopping" OnClick="Continue_Click" />
</asp:Content>
CheckoutComplete.aspx.cs という名前の分離コード ページを開き、既存のコードを次のコードに置き換えます。
using System;
using System.Collections.Generic;
using System.Linq;
using System.Web;
using System.Web.UI;
using System.Web.UI.WebControls;
using WingtipToys.Models;

namespace WingtipToys.Checkout
{
  public partial class CheckoutComplete : System.Web.UI.Page
  {
    protected void Page_Load(object sender, EventArgs e)
    {
      if (!IsPostBack)
      {
        // Verify user has completed the checkout process.
        if ((string)Session["userCheckoutCompleted"] != "true")
        {
          Session["userCheckoutCompleted"] = string.Empty;
          Response.Redirect("CheckoutError.aspx?" + "Desc=Unvalidated%20Checkout.");
        }

        NVPAPICaller payPalCaller = new NVPAPICaller();

        string retMsg = "";
        string token = "";
        string finalPaymentAmount = "";
        string PayerID = "";
        NVPCodec decoder = new NVPCodec();

        token = Session["token"].ToString();
        PayerID = Session["payerId"].ToString();
        finalPaymentAmount = Session["payment_amt"].ToString();

        bool ret = payPalCaller.DoCheckoutPayment(finalPaymentAmount, token, PayerID, ref decoder, ref retMsg);
        if (ret)
        {
          // Retrieve PayPal confirmation value.
          string PaymentConfirmation = decoder["PAYMENTINFO_0_TRANSACTIONID"].ToString();
          TransactionId.Text = PaymentConfirmation;

          ProductContext _db = new ProductContext();
          // Get the current order id.
          int currentOrderId = -1;
          if (Session["currentOrderId"] != string.Empty)
          {
            currentOrderId = Convert.ToInt32(Session["currentOrderID"]);
          }
          Order myCurrentOrder;
          if (currentOrderId >= 0)
          {
            // Get the order based on order id.
            myCurrentOrder = _db.Orders.Single(o => o.OrderId == currentOrderId);
            // Update the order to reflect payment has been completed.
            myCurrentOrder.PaymentTransactionId = PaymentConfirmation;
            // Save to DB.
            _db.SaveChanges();
          }

          // Clear shopping cart.
          using (WingtipToys.Logic.ShoppingCartActions usersShoppingCart =
              new WingtipToys.Logic.ShoppingCartActions())
          {
            usersShoppingCart.EmptyCart();
          }

          // Clear order id.
          Session["currentOrderId"] = string.Empty;
        }
        else
        {
          Response.Redirect("CheckoutError.aspx?" + retMsg);
        }
      }
    }

    protected void Continue_Click(object sender, EventArgs e)
    {
      Response.Redirect("~/Default.aspx");
    }
  }
}
CheckoutComplete.aspx ページが読み込まれると、DoCheckoutPayment メソッドが呼び出されます。 前に説明したように、DoCheckoutPayment メソッドは PayPal テスト環境からの購入を完了します。 PayPal が注文の購入を完了すると、CheckoutComplete.aspx ページに、購入者への支払いトランザクション ID が表示されます。
購入の取り消しを処理する
ユーザーが購入を取り消すことにした場合は、CheckoutCancel.aspx ページに転送され、そこで注文が取り消されたことを確認できます。
Checkout フォルダーで、CheckoutCancel.aspx という名前のページを開きます。
既存のマークアップを次に置き換えます。
<%@ Page Title="" Language="C#" MasterPageFile="~/Site.Master" AutoEventWireup="true" CodeBehind="CheckoutCancel.aspx.cs" Inherits="WingtipToys.Checkout.CheckoutCancel" %>
<asp:Content ID="Content1" ContentPlaceHolderID="MainContent" runat="server">
    <h1>Checkout Cancelled</h1>
    <p></p>
    <h3>Your purchase has been cancelled.</h3>
</asp:Content>
購入エラーを処理する
購入プロセス中のエラーは、CheckoutError.aspx ページによって処理されます。 エラーが発生した場合、CheckoutStart.aspx ページ、CheckoutReview.aspx ページ、CheckoutComplete.aspx ページの分離コードは、それぞれ CheckoutError.aspx ページにリダイレクトされます。
Checkout フォルダーで、CheckoutError.aspx という名前のページを開きます。
既存のマークアップを次に置き換えます。
<%@ Page Title="" Language="C#" MasterPageFile="~/Site.Master" AutoEventWireup="true" CodeBehind="CheckoutError.aspx.cs" Inherits="WingtipToys.Checkout.CheckoutError" %>
<asp:Content ID="Content1" ContentPlaceHolderID="MainContent" runat="server">
    <h1>Checkout Error</h1>
    <p></p>
<table id="ErrorTable">
    <tr>
        <td class="field"></td>
        <td><%=Request.QueryString.Get("ErrorCode")%></td>
    </tr>
    <tr>
        <td class="field"></td>
        <td><%=Request.QueryString.Get("Desc")%></td>
    </tr>
    <tr>
        <td class="field"></td>
        <td><%=Request.QueryString.Get("Desc2")%></td>
    </tr>
</table>
    <p></p>
</asp:Content>
精算プロセス中にエラーが発生した場合は、エラーの詳細を含む CheckoutError.aspx ページが表示されます。
アプリケーションの実行
アプリケーションを実行して、製品を購入する方法を確認します。 PayPal テスト環境で実行されることに注意してください。 実際のお金が交換されるわけではありません。
Visual Studio で、すべてのファイルが保存されていることを確認します。
Web ブラウザーを開き、https://developer.paypal.com に移動します。
このチュートリアルで前に作成した PayPal 開発者アカウントでログインします。
PayPal の開発者サンドボックスの場合、Express Checkout をテストするには https://developer.paypal.com でログインする必要があります。 これは、PayPal のライブ環境ではなく、PayPal のサンドボックス テストにのみ適用されます。Visual Studio で、F5 キーを押して Wingtip Toys サンプル アプリケーションを実行します。
データベースが再構築されると、ブラウザーが開き、Default.aspx ページが表示されます。製品カテゴリ ([自動車] など) を選択し、各製品の横にある [カートに追加] をクリックして、3 つの異なる製品をショッピング カートに追加します。
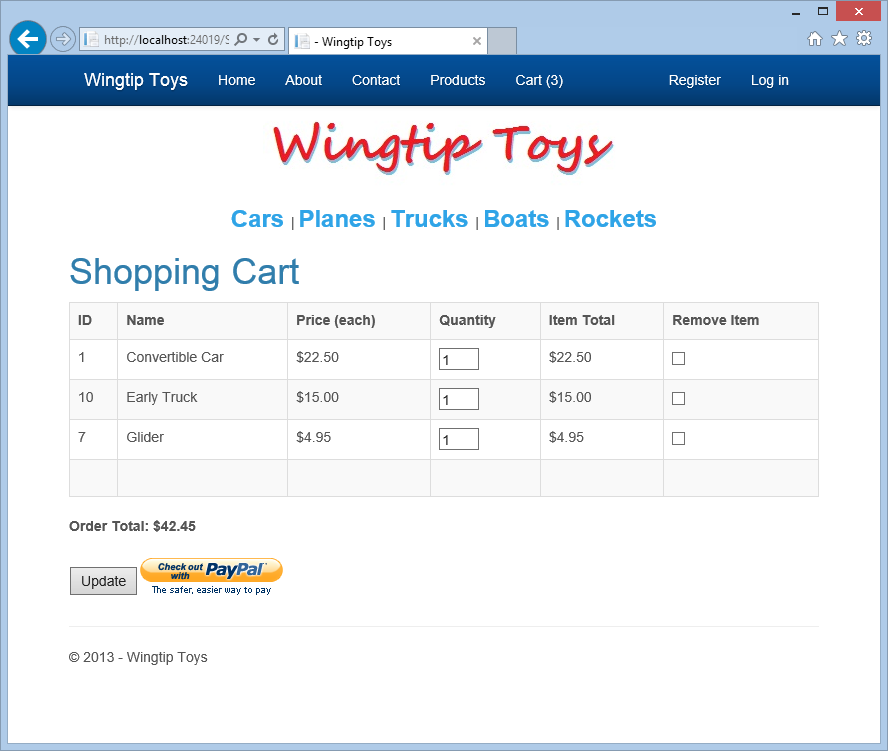
ショッピング カートに、選択した製品が表示されます。[PayPal] ボタンをクリックして精算します。
精算には、Wingtip Toys サンプル アプリケーションのユーザー アカウントが必要です。
ページの右側にある [Google] リンクをクリックして、既存の gmail.com メール アカウントでログインします。
gmail.com アカウントがない場合は、www.gmail.com でテストのためのアカウントを作成できます。 また、[登録] をクリックして、標準のローカル アカウントを使用することもできます。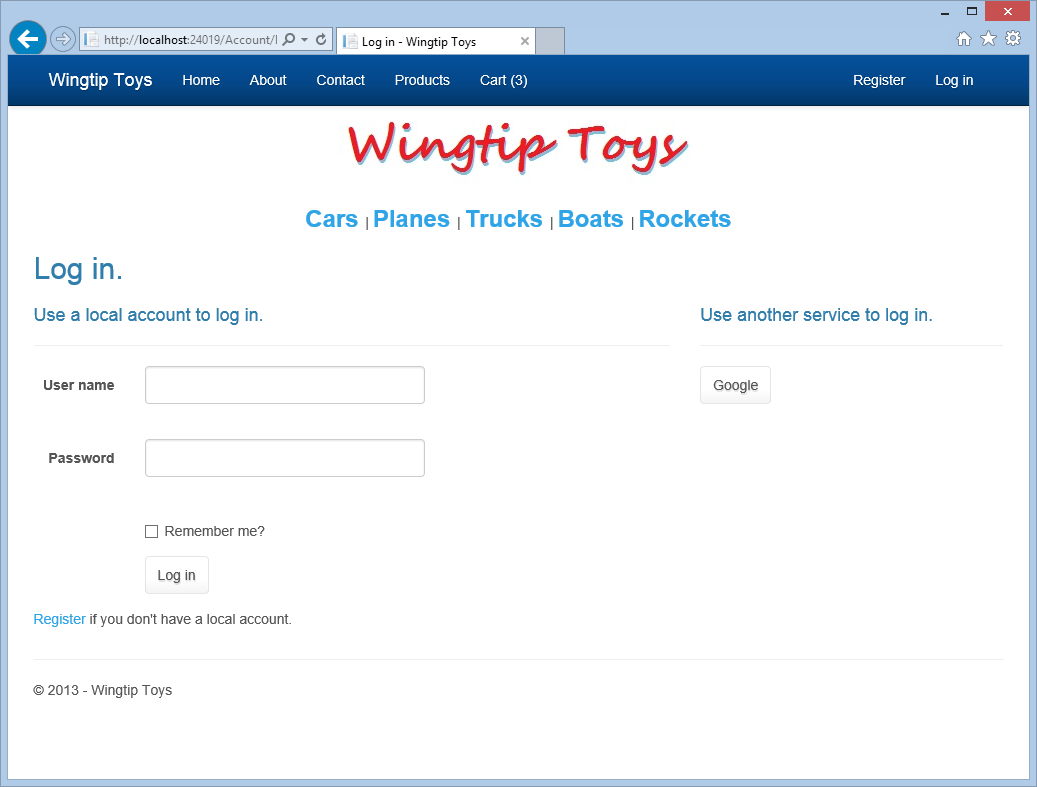
gmail アカウントとパスワードでサインインします。
[ログイン] ボタンをクリックして、Wingtip Toys サンプル アプリケーションのユーザー名で gmail アカウントを登録します。
PayPal テスト サイトで、このチュートリアルで前に作成した購入者のメール アドレスとパスワードを追加し、[ログイン] ボタンをクリックします。
PayPal ポリシーに同意し、[同意して続行] ボタンをクリックします。
このページは、この PayPal アカウントを初めて使用するときにのみ表示されることに注意してください。 この場合も、これはテスト アカウントであり、実際のお金が交換されるわけではないことに注意してください。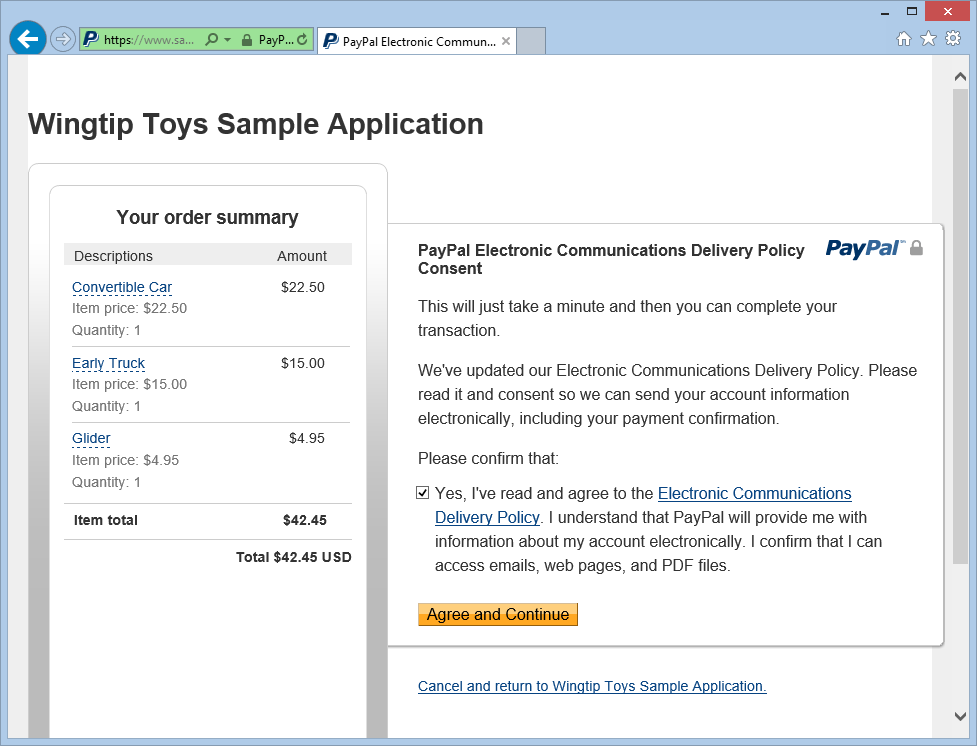
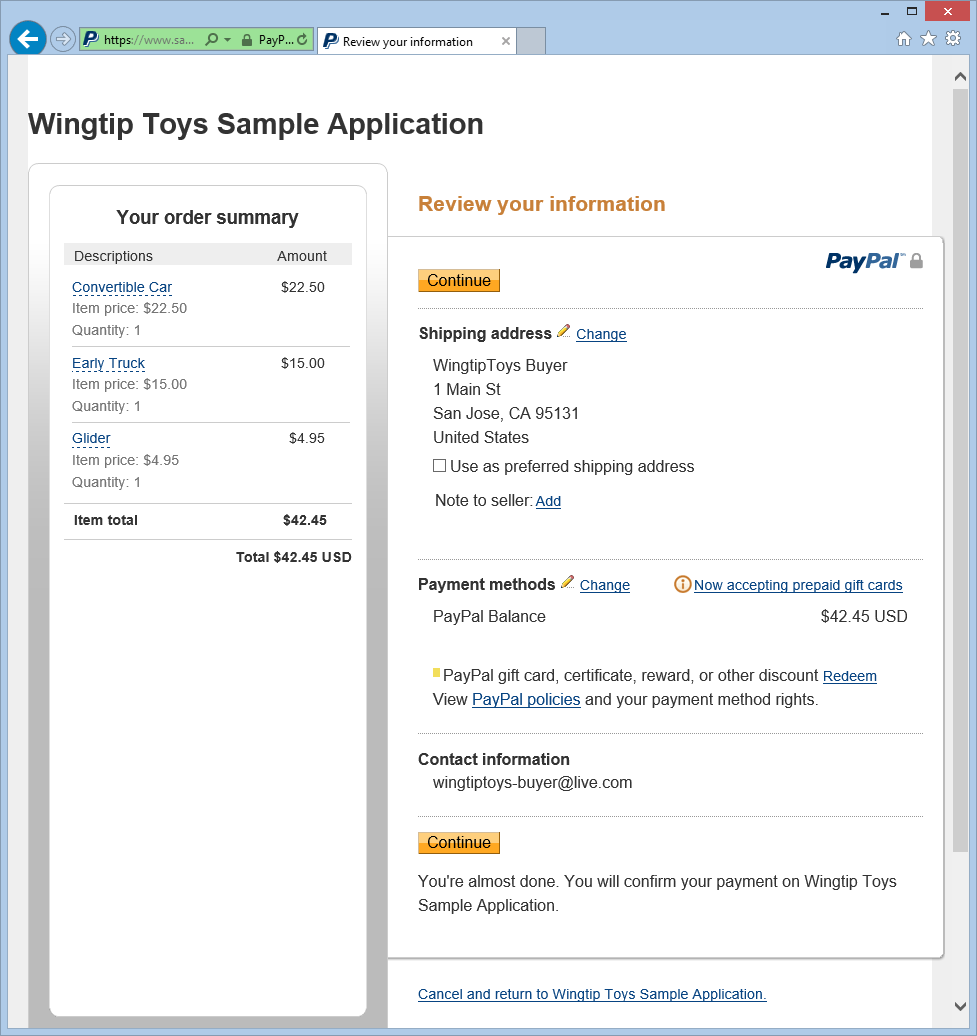
PayPal テスト環境の確認ページで注文情報を確認し、[続行] をクリックします。
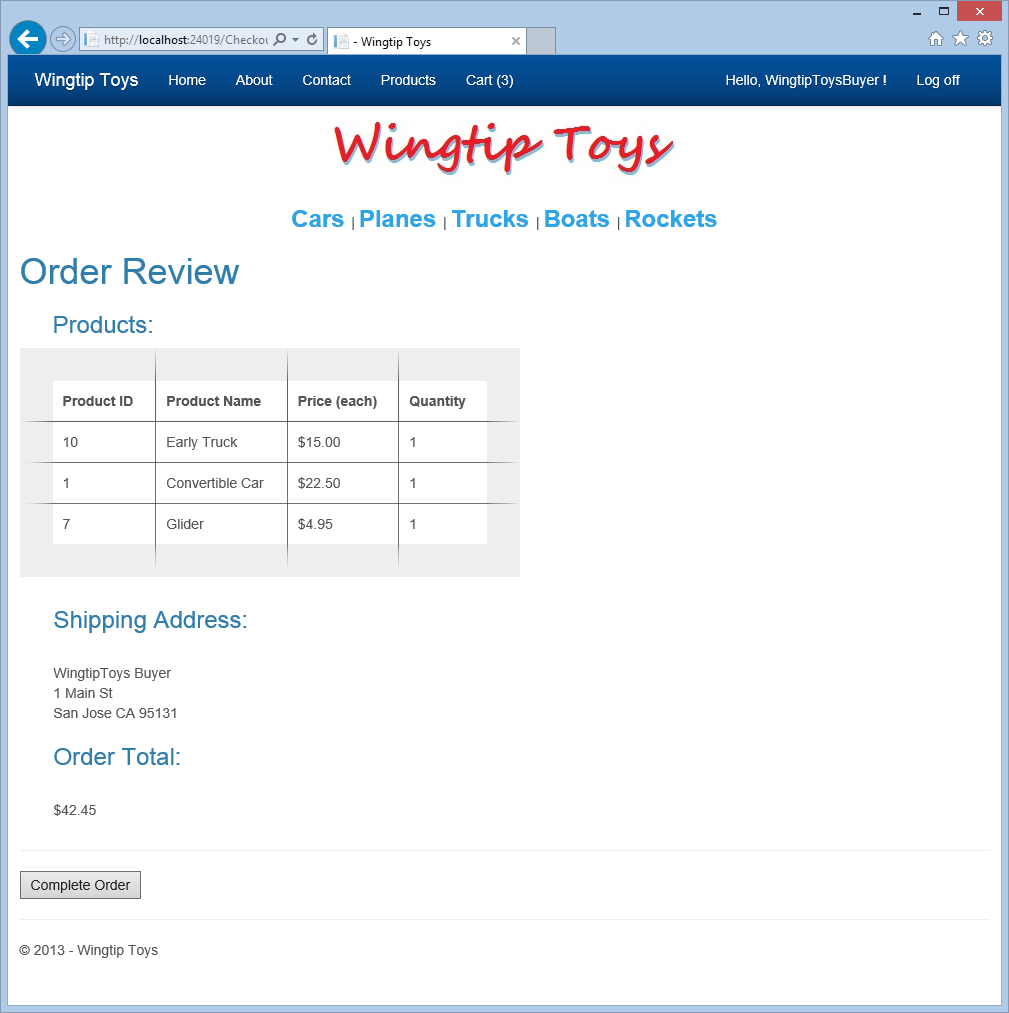
CheckoutReview.aspx ページで、注文金額を確認し、生成された配送先住所を表示します。 次に、[注文の完了] ボタンをクリックします。
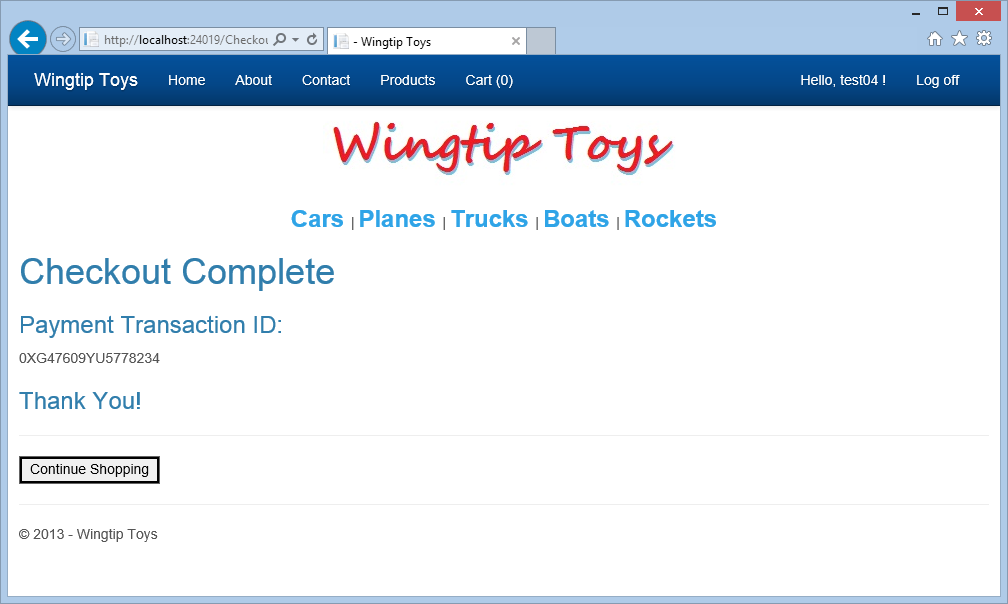
支払いトランザクション ID を含む CheckoutComplete.aspx ページが表示されます。
データベースの確認
アプリケーションを実行した後に Wingtip Toys サンプル アプリケーション データベース内の更新されたデータを確認することにより、アプリケーションで製品の購入が正常に記録されたことがわかります。
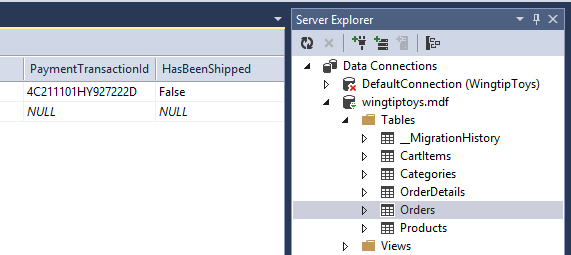
Wingtiptoys.mdf データベース ファイルに含まれているデータは、このチュートリアル シリーズで前に行ったように、[データベース エクスプローラー] ウィンドウ (Visual Studio の [サーバー エクスプローラー] ウィンドウ) を使用して調べることができます。
ブラウザー ウィンドウがまだ開いている場合は閉じます。
Visual Studio で、ソリューション エクスプローラーの上部にある [すべてのファイルを表示] アイコンを選択して、App_Data フォルダーを展開できるようにします。
App_Data フォルダーを展開します。
このフォルダーの [すべてのファイルを表示] アイコンを選択することが必要になる場合があります。Wingtiptoys.mdf データベース ファイルを右クリックし、[開く] を選択します。
サーバー エクスプローラーが表示されます。[テーブル] フォルダーを展開します。
Orders テーブルを右クリックし、[テーブル データの表示] を選択します。
Orders テーブルが表示されます。PaymentTransactionID 列を確認して、トランザクションが成功したことを確認します。
Orders テーブル ウィンドウを閉じます。
サーバー エクスプローラーで、OrderDetails テーブルを右クリックし、[テーブル データの表示] を選択します。
OrderDetails テーブル内の
OrderIdとUsernameの値を確認します。 これらの値が Orders テーブルに含まれているOrderIdとUsernameの値と一致していることに注意してください。OrderDetails テーブル ウィンドウを閉じます。
Wingtip Toys データベース ファイル (Wingtiptoys.mdf) を右クリックし、[接続を閉じる] を選択します。
[ソリューション エクスプローラー] ウィンドウが表示されない場合は、[サーバー エクスプローラー] ウィンドウの下部にある [ソリューション エクスプローラー] をクリックして、ソリューション エクスプローラーを再び表示します。
まとめ
このチュートリアルでは、注文と注文の詳細のスキーマを追加して製品の購入を追跡しました。 また、Wingtip Toys サンプル アプリケーションに PayPal 機能を統合しました。
その他のリソース
ASP.NET 構成の概要
メンバーシップ、OAuth、SQL Database を使用したセキュリティで保護された ASP.NET Web Forms アプリを Azure App Service にデプロイする
Microsoft Azure - 無料試用版
免責情報
このチュートリアルには、サンプル コードが含まれています。 このようなサンプル コードは、いかなる種類の保証もなく "現状のまま" 提供されます。 したがって、Microsoft はサンプル コードの正確性、整合性、または品質を保証しません。 お客様は、自己責任でサンプル コードを使用することに同意するものとします。 いかなる状況においても、Microsoft は、すべてのサンプル コード、コンテンツ (サンプル コード、コンテンツのエラーまたは漏れ、あるいはサンプル コードの使用の結果として生じたあらゆる種類の損失または損害が含まれますが、これらに限定されません) について、お客様に一切の責任を負いません。 お客様は、ここに通知を受け、ここに Microsoft をあらゆる損失、損失の申し立て、あらゆる種類のけがまたは損害から保護するように免責、保存、および保持することに同意します。これには、お客様が投稿、送信、使用、または依存する資料によって生じたもの (その中で表現された見解が含まれますが、これらに限定されません) が制限なく含まれます。