Azure Stack Hub または Azure Stack Development Kit の Azure CLI 用の証明書の設定
この記事の手順に従って、Linux、Mac、Windows クライアントのプラットフォームから Azure Stack Development Kit (ASDK) のリソースを管理するように Azure コマンド ライン インターフェイス (CLI) を設定します。 また、切断された環境で統合システム Azure Stack Hub を使用している場合や、証明書が信頼されたルート プログラムの CA によって発行されていない場合は、次の手順に従うこともできます。
この記事では、リモート管理コンピューターで証明書を取得して信頼する方法について説明します。 Azure CLI をインストールして、お使いの環境に接続するには、Azure Stack Hub への Azure CLI のインストールに関するページをご覧ください。
Azure CLI の準備
開発用マシン上で Azure CLI を使用するには、Azure Stack Hub の CA ルート証明書が必要です。 CLI を使用してリソースを管理する場合に、この証明書を使用します。
Azure Stack Hub の CA ルート証明書は、Azure Stack Hub 環境の外部のワークステーションから CLI を使用する場合に必要です。
仮想マシンのエイリアス エンドポイントでは、"UbuntuLTS" または "Win2012Datacenter" などのエイリアスが提供されます。このエイリアスは、VM をデプロイするときに、イメージ発行者、プラン、SKU、バージョン を 1 つのパラメーターとして参照します。
これらの値の取得方法については、以下のセクションで説明します。
Azure Stack Hub の CA ルート証明書をエクスポートする
CA ルート証明書をエクスポートします。 ASDK ルート証明書を PEM 形式でエクスポートするには:
Azure Stack Hub のルート証明書の名前を取得します。
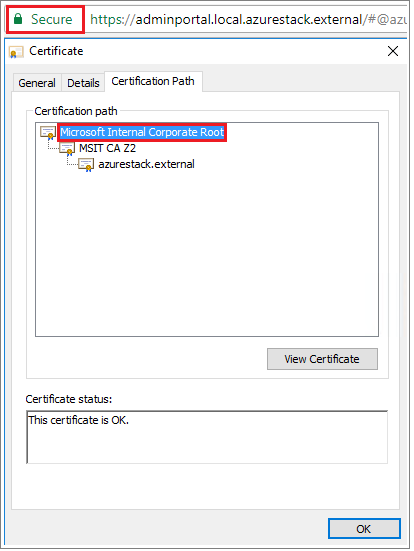
- Azure Stack Hub ユーザーまたは Azure Stack Hub 管理者ポータルにサインインします。
- ブラウザーのアドレス バーでロックを選びます。
- ポップアップウィンドウで、[Connection is secure]\(接続はセキュリティで保護されています\) を選びます。
- [証明書] ウィンドウで、[証明のパス] タブを選択します。
- Azure Stack Hub のルート証明書の名前を書き留めます。例:
*.<locale>.<FQDN>
この VM にサインインし、管理者特権の PowerShell プロンプトを開き、次のスクリプトを実行します。
  $label = "*.<locale>.<FQDN> from step 1"
  Write-Host "Getting certificate from the current user trusted store with subject CN=$label"
  $root = Get-ChildItem Cert:\CurrentUser\Root | Where-Object Subject -eq "CN=$label" | select -First 1
  if (-not $root)
  {
      Write-Error "Certificate with subject CN=$label not found"
      return
  }

Write-Host "Exporting certificate"
Export-Certificate -Type CERT -FilePath root.cer -Cert $root
Linux の場合は、次のコマンドも必要です。
export REQUESTS_CA_BUNDLE=~/.local/lib/python3.9/site-packages/certifi/cacert.pem
# RECOMMENDED: set the env var automatically for your subsequent sessions
echo 'export REQUESTS_CA_BUNDLE=~/.local/lib/python3.9/site-packages/certifi/cacert.pem' >> ~/.bash_profile
ローカル マシンに証明書をコピーします。
仮想マシンのエイリアス エンドポイントを設定する
VM のエイリアス ファイルをホストする、パブリックにアクセス可能なエンドポイントを設定できます。 VM のエイリアス ファイルは、イメージの共通名が指定された JSON ファイルです。 この名前は、Azure CLI パラメーターとして VM をデプロイするときに使用します。
カスタム イメージを発行する場合は、発行時に指定した発行者、プラン、SKU、およびバージョン情報をメモしておいてください。 Marketplace のイメージである場合は、
Get-AzureVMImageコマンドレットを使用して情報を表示できます。GitHub からサンプル ファイルをダウンロードします。
Azure Stack Hub にストレージ アカウントを作成します。 完了したら、BLOB コンテナーを作成します。 アクセス ポリシーを [パブリック] に設定します。
その新しいコンテナーに JSON ファイルをアップロードします。 完了すると、BLOB の URL を表示できるようになります。 BLOB 名を選択してから、BLOB プロパティから URL を選択します。
証明書を信頼する
ASDK で Azure CLI を使用する場合は、リモート マシン上で CA ルート証明書を信頼する必要があります。
マシンで証明書の場所を探します。 この場所は、Python をインストールした場所に応じて異なる場合があります。
場所を見つけるには、コマンド プロンプトまたは管理者特権の PowerShell プロンプトを開き、「
az --version」と入力します。 プロンプトにバージョンと python の場所が表示されます。azure-cli 2.30.0 core 2.30.0 telemetry 1.0.6 Python location 'C:\Program Files (x86)\Microsoft SDKs\Azure\CLI2\python.exe' Extensions directory 'C:\Users\username\.azure\cliextensions' Python (Windows) 3.8.9 (tags/v3.8.9:a743f81, Apr 6 2021, 13:22:56) [MSC v.1928 32 bit (Intel)] Legal docs and information: aka.ms/AzureCliLegal Your CLI is up-to-date. Please let us know how we are doing: https://aka.ms/azureclihats and let us know if you're interested in trying out our newest features: https://aka.ms/CLIUXstudyAzure CLI で Python をインストールしたディレクトリに変更します。 たとえば、手順 2 の場所を使用すると、
cd "C:\Program Files (x86)\Microsoft SDKs\Azure\CLI2\となります。次のコマンドを入力します。
.\python -c "import certifi; print(certifi.where())"これにより、お使いのマシン上の証明書の場所のパスが返されます。 特定のパスは、お使いの OS やインストールした Python のバージョンによって異なります。 次に例を示します。
C:\Program Files (x86)\Microsoft SDKs\Azure\CLI2\lib\site-packages\certifi\cacert.pem証明書の場所を書き留めておきます。 このパスは、次の手順で使用します。
Azure Stack Hub の CA ルート証明書を Python の既存の証明書に追加して信頼します。
$cerFile = "<Fully qualified path to the cer certificate exported from `
your Azure Stack Hub and saved. For example: C:\Users\user1\Downloads\root.cer"
$pythonCertStore = <result from step 4>

$cerDir = Split-Path -Parent $cerFile
$pemFile = "$cerDir\root.pem"
Write-Host "Converting certificate to PEM format at $pemFile"
certutil -encode $cerFile $pemFile
$root = New-Object System.Security.Cryptography.X509Certificates.X509Certificate2
$root.Import($pemFile)

# X509Certificate2.Thumbprint calculates SHA1 hash of the public key. You can get sha1 of the pem file by using openssl,
# e.g. openssl x509 -noout -fingerprint -sha1 -inform pem -in ./root.pem
# Alternatively, 'Get-FileHash' gives the same value (without ':') for the corresponding cer file
# Since the thumbprint is a unique value for the certificate, it is commonly used to find a particular certificate in a certificate store
Write-Host "Extracting required information from the cert file"
$md5Hash    = (Get-FileHash -Path $cerFile -Algorithm MD5).Hash.ToLower()
$sha1Hash   = (Get-FileHash -Path $cerFile -Algorithm SHA1).Hash.ToLower()
$sha256Hash = (Get-FileHash -Path $cerFile -Algorithm SHA256).Hash.ToLower()

$issuerEntry  = [string]::Format("# Issuer: {0}", $root.Issuer)
$subjectEntry = [string]::Format("# Subject: {0}", $root.Subject)
$labelEntry   = [string]::Format("# Label: {0}", $root.Subject.Split('=')[-1])
$serialEntry  = [string]::Format("# Serial: {0}", $root.GetSerialNumberString().ToLower())
$md5Entry     = [string]::Format("# MD5 Fingerprint: {0}", $md5Hash)
$sha1Entry    = [string]::Format("# SHA1 Fingerprint: {0}", $sha1Hash)
$sha256Entry  = [string]::Format("# SHA256 Fingerprint: {0}", $sha256Hash)
$certText = (Get-Content -Path $pemFile -Raw).ToString().Replace("`r`n","`n")

$rootCertEntry = "`n" + $issuerEntry + "`n" + $subjectEntry + "`n" + $labelEntry + "`n" + `
$serialEntry + "`n" + $md5Entry + "`n" + $sha1Entry + "`n" + $sha256Entry + "`n" + $certText

Write-Host "Adding the certificate content to Python Cert store"
Add-Content $pythonCertStore $rootCertEntry

Write-Host "Python Cert store was updated to allow the Azure Stack Hub CA root certificate"
Azure CLI を使用してインストールおよび接続する手順については、Azure Stack Hub への Azure CLI のインストールに関するページをご覧ください。
次のステップ
フィードバック
以下は間もなく提供いたします。2024 年を通じて、コンテンツのフィードバック メカニズムとして GitHub の issue を段階的に廃止し、新しいフィードバック システムに置き換えます。 詳細については、「https://aka.ms/ContentUserFeedback」を参照してください。
フィードバックの送信と表示