重要
2025 年 5 月 1 日より、Azure AD B2C は新規のお客様向けに購入できなくなります。 詳細については、FAQ を参照してください。
開始する前にこのページの上部にある ポリシーの種類 セレクターを使用して、設定するポリシーの種類を選択します。 Azure Active Directory B2C には、ユーザーがアプリケーションを操作する方法を定義する 2 つの方法 (定義済みのユーザー フローを使用する、または完全に構成可能なカスタム ポリシーを使用する) があります。 この記事で必要な手順は、方法ごとに異なります。
Azure Active Directory B2C (Azure AD B2C) を構成して、ローカル アカウントでサインインしているユーザーが、電子メールの検証を使用せずに自分の ID を証明せずにパスワードを変更できるようにすることができます。
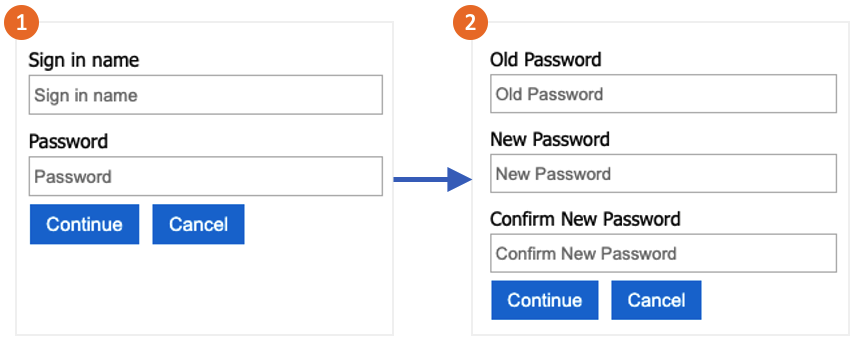
パスワード変更フローには、次の手順が含まれます。
ユーザーはローカル アカウントにサインインします。 セッションがまだアクティブな場合、Azure AD B2C はユーザーを承認し、次の手順に進みます。
古いパスワードでは、ユーザーは古いパスワードを確認します。 [新しいパスワード] で、新しいパスワードを作成して確認します。

ヒント
ユーザーは、この記事で説明されているパスワード変更フローは、ユーザーが自分のパスワードを知っており、パスワードを変更する場合にのみ使用できます。 ユーザーが自分のパスワードを忘れた場合をサポートするために、 セルフサービスパスワードリセット も有効にすることをお勧めします。
この機能は、カスタム ポリシーでのみ使用できます。 セットアップ手順については、前のセレクターで [カスタム ポリシー] を選択します。
[前提条件]
要素を追加する
TrustFrameworkExtensions.xml ファイルを開きます。 次の ClaimType 要素を ClaimsSchema 要素に追加し、
oldPasswordの識別子を指定します。<BuildingBlocks> <ClaimsSchema> <ClaimType Id="oldPassword"> <DisplayName>Old Password</DisplayName> <DataType>string</DataType> <UserHelpText>Enter your old password</UserHelpText> <UserInputType>Password</UserInputType> </ClaimType> </ClaimsSchema> </BuildingBlocks>ClaimsProvider 要素には、ユーザーを認証する技術プロファイルが含まれています。 ClaimsProviders 要素に次のクレーム プロバイダーを追加します。
<ClaimsProviders>
  <ClaimsProvider>
    <DisplayName>Local Account SignIn</DisplayName>
    <TechnicalProfiles>
      <TechnicalProfile Id="login-NonInteractive-PasswordChange">
        <DisplayName>Local Account SignIn</DisplayName>
        <InputClaims>
          <InputClaim ClaimTypeReferenceId="oldPassword" PartnerClaimType="password" Required="true" />
          </InputClaims>
        <IncludeTechnicalProfile ReferenceId="login-NonInteractive" />
      </TechnicalProfile>
    </TechnicalProfiles>
  </ClaimsProvider>
  <ClaimsProvider>
    <DisplayName>Local Account Password Change</DisplayName>
    <TechnicalProfiles>
      <TechnicalProfile Id="LocalAccountWritePasswordChangeUsingObjectId">
        <DisplayName>Change password (username)</DisplayName>
        <Protocol Name="Proprietary" Handler="Web.TPEngine.Providers.SelfAssertedAttributeProvider, Web.TPEngine, Version=1.0.0.0, Culture=neutral, PublicKeyToken=null" />
        <Metadata>
          <Item Key="ContentDefinitionReferenceId">api.selfasserted</Item>
        </Metadata>
        <InputClaims>
          <InputClaim ClaimTypeReferenceId="objectId" />
        </InputClaims>
        <OutputClaims>
          <OutputClaim ClaimTypeReferenceId="oldPassword" Required="true" />
          <OutputClaim ClaimTypeReferenceId="newPassword" Required="true" />
          <OutputClaim ClaimTypeReferenceId="reenterPassword" Required="true" />
        </OutputClaims>
        <ValidationTechnicalProfiles>
          <ValidationTechnicalProfile ReferenceId="login-NonInteractive-PasswordChange" />
          <ValidationTechnicalProfile ReferenceId="AAD-UserWritePasswordUsingObjectId" />
        </ValidationTechnicalProfiles>
      </TechnicalProfile>
    </TechnicalProfiles>
  </ClaimsProvider>
</ClaimsProviders>
UserJourneys 要素は、ユーザーがアプリケーションと対話するときに実行するパスを定義します。 UserJourneys 要素が存在しない場合は、userJourney 識別子を
PasswordChangeして追加します。<UserJourneys> <UserJourney Id="PasswordChange"> <OrchestrationSteps> <OrchestrationStep Order="1" Type="ClaimsProviderSelection" ContentDefinitionReferenceId="api.signuporsignin"> <ClaimsProviderSelections> <ClaimsProviderSelection TargetClaimsExchangeId="LocalAccountSigninEmailExchange" /> </ClaimsProviderSelections> </OrchestrationStep> <OrchestrationStep Order="2" Type="ClaimsExchange"> <ClaimsExchanges> <ClaimsExchange Id="LocalAccountSigninEmailExchange" TechnicalProfileReferenceId="SelfAsserted-LocalAccountSignin-Email" /> </ClaimsExchanges> </OrchestrationStep> <OrchestrationStep Order="3" Type="ClaimsExchange"> <ClaimsExchanges> <ClaimsExchange Id="NewCredentials" TechnicalProfileReferenceId="LocalAccountWritePasswordChangeUsingObjectId" /> </ClaimsExchanges> </OrchestrationStep> <OrchestrationStep Order="4" Type="ClaimsExchange"> <ClaimsExchanges> <ClaimsExchange Id="AADUserReadWithObjectId" TechnicalProfileReferenceId="AAD-UserReadUsingObjectId" /> </ClaimsExchanges> </OrchestrationStep> <OrchestrationStep Order="5" Type="SendClaims" CpimIssuerTechnicalProfileReferenceId="JwtIssuer" /> </OrchestrationSteps> <ClientDefinition ReferenceId="DefaultWeb" /> </UserJourney> </UserJourneys>TrustFrameworkExtensions.xml ポリシー ファイルを保存します。
スターター パックでダウンロードした ProfileEdit.xml ファイルをコピーし、 ProfileEditPasswordChange.xml名前を付けます。
新しいファイルを開き、 PolicyId 属性を一意の値で更新します。 この値は、ポリシーの名前です。 たとえば、B2C_1A_profile_edit_password_change です。
DefaultUserJourney の ReferenceId 属性を、作成した新しいユーザー体験の ID と一致するように変更します。 たとえば、 PasswordChange です。
変更を保存します。
ポリシーをアップロードしてテストする
- Azure portal にサインインします。
- 複数のテナントにアクセスできる場合、上部のメニューの [設定] アイコンを選択し、[ディレクトリとサブスクリプション] メニューからお使いの Azure AD B2C テナントに切り替えます。
- Azure portal の左上隅にある [すべてのサービス] を選択してから、[Azure AD B2C] を検索して選択します。
- [Identity Experience Framework] を選択します。
- [カスタム ポリシー] で、[ポリシーのアップロード] を選択します。
- [ポリシーが存在する場合は上書きする] を選択し、TrustFrameworkExtensions.xml ファイルを検索して選択します。
- [アップロード] を選択します。
- 証明書利用者ファイルに対して手順 5 から 7 を繰り返します ( 例:ProfileEditPasswordChange.xml)。
ポリシーを実行する
- 変更したポリシーを開きます。 たとえば、B2C_1A_profile_edit_password_change です。
- [ アプリケーション] で、先ほど登録したアプリケーションを選択します。 トークンを表示するには、 応答 URL に
https://jwt.msが表示されます。 - [今すぐ実行] を選択します。 開いた新しいタブで、URL から ">prompt=login" を削除し、タブを更新します。次に、先ほど作成したアカウントでサインインします。 パスワード変更ダイアログには、パスワードを変更するオプションが表示されます。
関連コンテンツ
- GitHub でサンプル ポリシーを見つけます。
- Azure AD B2C でパスワードの複雑さを構成する方法について説明します。
- パスワード リセット フローを設定します。