チュートリアル: Microsoft Entra SSO と Akamai の統合
このチュートリアルでは、Akamai と Microsoft Entra ID を統合する方法について説明します。 Akamai と Microsoft Entra ID を統合すると、次のことができます。
- Akamai にアクセスできるユーザーを Microsoft Entra ID で制御する。
- ユーザーが自分の Microsoft Entra アカウントを使用して Akamai に自動的にサインインできるようにする。
- 1 つの場所でアカウントを管理します。
Microsoft Entra ID と Akamai Enterprise Application Access の統合により、クラウドまたはオンプレミスでホストされているレガシ アプリケーションにシームレスにアクセスできます。 この統合ソリューションでは、レガシ アプリケーションにアクセスするために Microsoft Entra 条件付きアクセス、Microsoft Entra ID Protection、Microsoft Entra ID Governance など、Azure Active Directory の最新機能をすべて活用できます。その際、アプリの変更やエージェントのインストールは不要です。
次の図は、Akamai EAA が安全なハイブリッド アクセスの広範なシナリオに適しているようすを示しています。
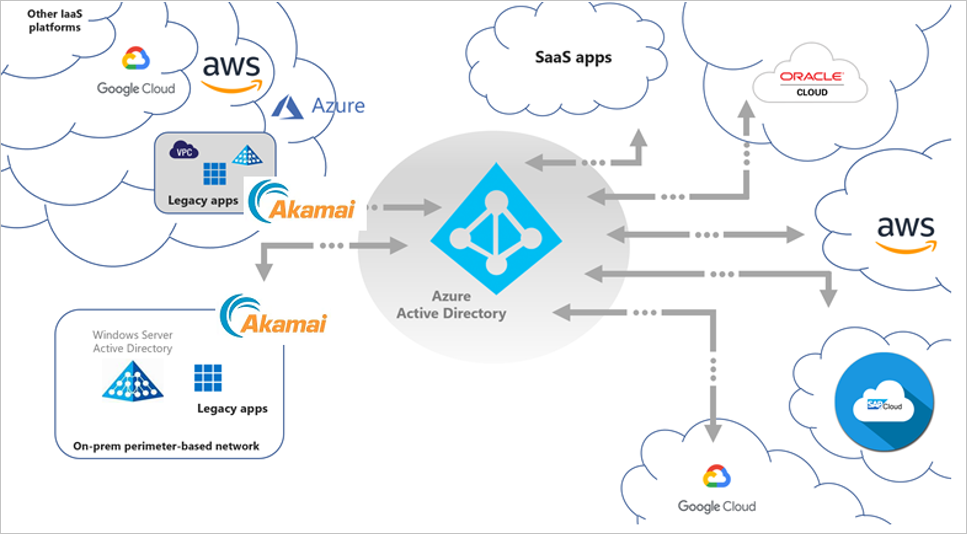
キー認証のシナリオ
先進認証プロトコル (Open ID Connect、SAML、WS-Fed など) に対する Azure Active Directory のネイティブ統合のサポートとは別に、Akamai EAA は、Microsoft Entra ID を使用することで、内部と外部の両方のアクセスに関してレガシベース認証アプリの安全なアクセスを拡張し、それらのアプリケーションへの最新のシナリオ (パスワードレス アクセスなど) を実現します。 これには、次のものが含まれます。
- ヘッダーベースの認証アプリ
- リモート デスクトップ
- SSH (Secure Shell)
- Kerberos 認証アプリ
- VNC (Virtual Network Computing)
- 匿名認証または非ビルトイン認証アプリ
- NTLM 認証アプリ (ユーザーに対する二重プロンプトでの保護)
- フォームベースのアプリケーション (ユーザーに対する二重プロンプトでの保護)
統合シナリオ
Microsoft と Akamai EAA のパートナーシップにより、ビジネス要件に基づく複数の統合シナリオがサポートされるため、柔軟にビジネス要件を満たすことができます。 これらを使用することで、すべてのアプリケーションにわたるカバレッジをゼロデイで実現し、適切なポリシー分類を段階的に分類および構成できます。
統合シナリオ 1
Akamai EAA が Microsoft Entra ID 上で単一のアプリケーションとして構成されます。 管理者はそのアプリケーション上で条件付きアクセス ポリシーを構成することができ、条件が満たされると、ユーザーは Akamai EAA ポータルにアクセスできます。
長所: :
- IDP の構成が 1 回だけで済む。
短所:
ユーザーは最終的に 2 つのアプリケーション ポータルを持つことになる。
すべてのアプリケーションを対象とする、共通する 1 つの条件付きアクセス ポリシー。
統合シナリオ 2
Akamai EAA アプリケーションが Azure portal 上で個別に設定されます。 管理者はアプリケーションに対して個々の条件付きアクセス ポリシーを構成でき、条件が満たされると、ユーザーは特定のアプリケーションに直接リダイレクトされます。
長所: :
個々の条件付きアクセス ポリシーを定義できます。
すべてのアプリが O365 のワッフルと myApps.microsoft.com パネルに表示される。
短所:
- 複数の IDP を構成する必要がある。

前提条件
開始するには、次が必要です。
- Microsoft Entra サブスクリプション。 サブスクリプションがない場合は、無料アカウントを取得できます。
- Akamai でのシングル サインオン (SSO) が有効なサブスクリプション。
シナリオの説明
このチュートリアルでは、テスト環境で Microsoft Entra の SSO を構成してテストします。
- Akamai では、IDP Initiated SSO がサポートされます。
重要
以下に示す設定はすべて、統合シナリオ 1 とシナリオ 2 で同じです。 統合シナリオ 2 では、Akamai EAA で個々の IDP を設定する必要があり、URL プロパティはアプリケーション URL を指すように変更する必要があります。
![Akamai Enterprise Application Access の [AZURESSO-SP] の [General]\(全般\) タブのスクリーンショット。[Authentication configuration]\(認証構成\) の [URL] フィールドが強調表示されている。](media/header-akamai-tutorial/important.png)
ギャラリーからの Akamai の追加
Microsoft Entra ID への Akamai の統合を構成するには、ギャラリーからマネージド SaaS アプリの一覧に Akamai を追加する必要があります。
- クラウド アプリケーション管理者以上として Microsoft Entra 管理センターにサインインします。
- [ID]>[アプリケーション]>[エンタープライズ アプリケーション]>[新しいアプリケーション] に移動します。
- [ギャラリーから追加する] セクションで、検索ボックスに「Akamai」と入力します。
- 結果のパネルから [Akamai] を選択し、アプリを追加します。 お使いのテナントにアプリが追加されるのを数秒待機します。
または、Enterprise App Configuration ウィザードを使用することもできます。 このウィザードでは、SSO の構成に加えて、テナントへのアプリケーションの追加、アプリへのユーザーとグループの追加、ロールの割り当てを行うことができます。 Microsoft 365 ウィザードの詳細をご覧ください。
Akamai 用の Microsoft Entra SSO の構成とテスト
B.Simon というテスト ユーザーを使用して、Akamai に対する Microsoft Entra SSO を構成してテストします。 SSO が機能するためには、Microsoft Entra ユーザーと Akamai の関連ユーザーとの間にリンク関係を確立する必要があります。
Akamai との Microsoft Entra SSO を構成してテストするには、次の手順を実行します:
- Microsoft Entra SSO を構成する - ユーザーがこの機能を使用できるようにします。
- Microsoft Entra のテスト ユーザーの作成 - B.Simon を使用して Microsoft Entra シングル サインオンをテストします。
- Microsoft Entra テスト ユーザーを割り当てる - B.Simon が Microsoft Entra シングル サインオンを使用できるようにします。
- Akamai の SSO の構成 - アプリケーション側でシングル サインオン設定を構成します。
- IDP の設定
- ヘッダー ベースの認証
- リモート デスクトップ
- SSH
- Kerberos 認証
- Akamai のテスト ユーザーの作成 - Akamai で B.Simon に対応するユーザーを作成し、Microsoft Entra の B.Simon にリンクさせます。
- SSO のテスト - 構成が機能するかどうかを確認します。
Microsoft Entra SSO の構成
次の手順に従って Microsoft Entra SSO を有効にします。
クラウド アプリケーション管理者以上として Microsoft Entra 管理センターにサインインします。
[ID]>[アプリケーション]>[エンタープライズ アプリケーション]>[Akamai]>[シングル サインオン] の順に移動します。
[シングル サインオン方式の選択] ページで、 [SAML] を選択します。
[SAML によるシングル サインオンのセットアップ] ページで、 [基本的な SAML 構成] の鉛筆アイコンをクリックして設定を編集します。
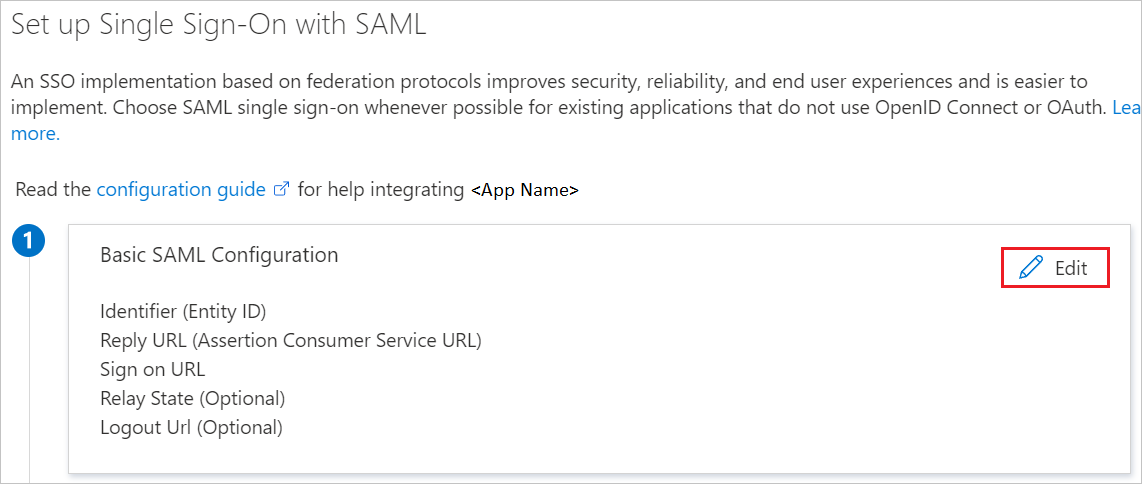
[基本的な SAML 構成] セクションで、アプリケーションを IDP 開始モードで構成する場合は、次のフィールドの値を入力します。
a. [識別子] ボックスに、
https://<Yourapp>.login.go.akamai-access.com/saml/sp/responseの形式で URL を入力します。b. [応答 URL] ボックスに、
https:// <Yourapp>.login.go.akamai-access.com/saml/sp/responseのパターンを使用して URL を入力します注意
これらは実際の値ではありません。 実際の識別子と応答 URL でこれらの値を更新します。 この値を取得するには、Akamai クライアント サポート チームにお問い合わせください。 [基本的な SAML 構成] セクションに示されているパターンを参照することもできます。
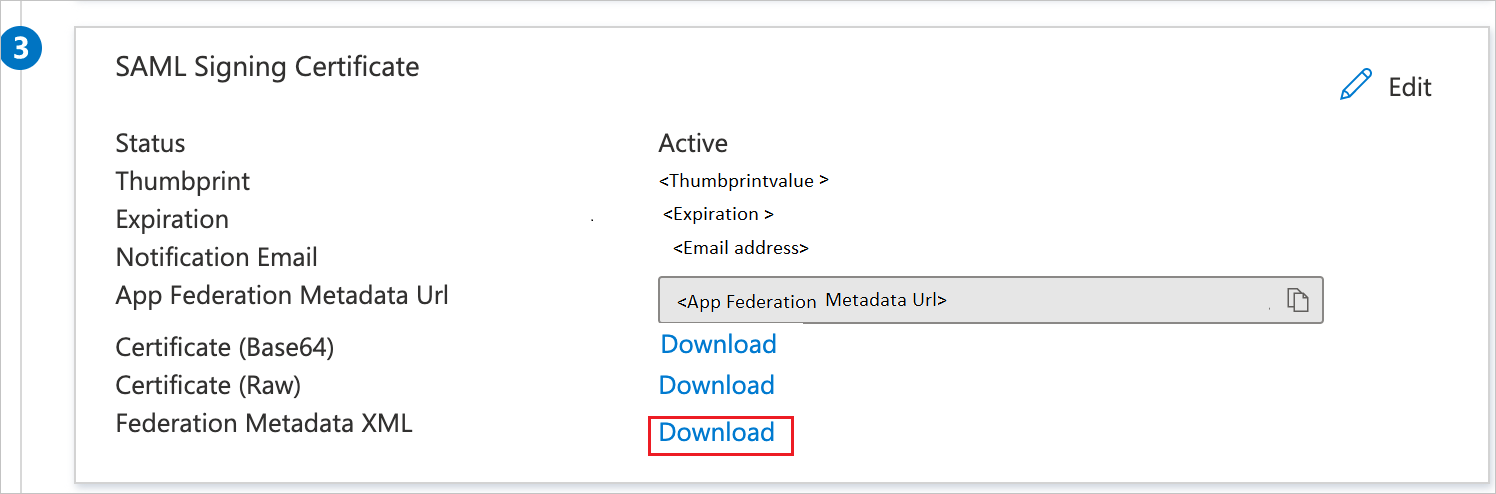
[SAML によるシングル サインオンのセットアップ] ページの [SAML 署名証明書] セクションで、 [フェデレーション メタデータ XML] を探して [ダウンロード] を選択し、証明書をダウンロードして、お使いのコンピューターに保存します。
[Set up Akamai](Akamai の設定) セクションで、要件に基づいて適切な URL をコピーします。

Microsoft Entra テスト ユーザーを作成する
このセクションでは、B.Simon というテスト ユーザーを作成します。
- Microsoft Entra 管理センターにユーザー管理者以上でサインインしてください。
- [ID]>[ユーザー]>[すべてのユーザー] の順に移動します。
- 画面の上部で [新しいユーザー]>[新しいユーザーの作成] を選択します。
- [ユーザー] プロパティで、以下の手順を実行します。
- "表示名" フィールドに「
B.Simon」と入力します。 - [ユーザー プリンシパル名] フィールドに「username@companydomain.extension」と入力します。 たとえば、「
B.Simon@contoso.com」のように入力します。 - [パスワードを表示] チェック ボックスをオンにし、 [パスワード] ボックスに表示された値を書き留めます。
- [Review + create](レビュー + 作成) を選択します。
- "表示名" フィールドに「
- [作成] を選択します。
Microsoft Entra テスト ユーザーを割り当てる
このセクションでは、Akamai へのアクセスを許可することで、B.Simon がシングル サインオンを使用できるようにします。
- クラウド アプリケーション管理者以上として Microsoft Entra 管理センターにサインインします。
- [ID]>[アプリケーション]>[エンタープライズ アプリケーション]>[Akamai] の順に移動します。
- アプリの概要ページで、[ユーザーとグループ] を選択します。
- [ユーザーまたはグループの追加] を選択し、 [割り当ての追加] ダイアログで [ユーザーとグループ] を選択します。
- [ユーザーとグループ] ダイアログの [ユーザー] の一覧から [B.Simon] を選択し、画面の下部にある [選択] ボタンをクリックします。
- ユーザーにロールが割り当てられることが想定される場合は、 [ロールの選択] ドロップダウンからそれを選択できます。 このアプリに対してロールが設定されていない場合は、[既定のアクセス] ロールが選択されていることを確認します。
- [割り当ての追加] ダイアログで、 [割り当て] をクリックします。
Akamai の SSO の構成
IDP の設定
AKAMAI EAA IDP の構成
Akamai Enterprise Application Access コンソールにサインインします。
Akamai EAA コンソールで、 [Identity](ID)>[Identity Providers](ID プロバイダー) の順に選択し、 [Add Identity Provider](ID プロバイダーの追加) をクリックします。
![Akamai EAA コンソールの [Identity Providers]\(ID プロバイダー\) ウィンドウのスクリーンショット。[Identity]\(ID\) メニューの [Identity Providers]\(ID プロバイダー\) を選択し、[Add Identity Provider]\(ID プロバイダーの追加\) を選択する。](media/header-akamai-tutorial/configure-1.png)
[Create New Identity Provider](新しい ID プロバイダーの作成) で、次の手順を実行します。
![Akamai EAA コンソールの [Create New Identity Providers]\(新しい ID プロバイダーの作成\) ダイアログのスクリーンショット。](media/header-akamai-tutorial/configure-2.png)
a. 一意の名前を指定します。
b. [Third Party SAML](サード パーティの SAML) を選択し、 [Create Identity Provider and Configure](ID プロバイダーを作成して構成する) をクリックします。
全般設定
[Identity Intercept](ID のインターセプト) - SP ベース URL の名前を指定します (Microsoft Entra 構成に使用されます)。
Note
カスタム ドメインを使用することもできます (DNS エントリと証明書が必要です)。 この例では、Akamai ドメインを使用します。
[Akamai Cloud Zone](Akamai クラウド ゾーン) - 適切なクラウド ゾーンを選択します。
[Certificate Validation](証明書の検証) - Akamai ドキュメントをチェックします (省略可)。
![Akamai EAA コンソールの [General]\(全般\) タブのスクリーンショット。[Identity Intercept]\(ID インターセプト\)、[Akamai Cloud Zone]\(Akamai クラウド ゾーン\)、[Certificate Validation]\(証明書の検証\) の各設定が表示されている。](media/header-akamai-tutorial/configure-3.png)
認証の構成
[URL] - ID インターセプトと同じ URL を指定します (認証後、ユーザーはここにリダイレクトされます)。
[Logout URL](ログアウト URL): ログアウト URL を更新します。
[Sign SAML Request](SAML 要求に署名する): 既定ではオフです。
IDP メタデータ ファイルには、Microsoft Entra ID コンソールでアプリケーションを追加します。
![Akamai EAA コンソールの [Authentication configuration]\(認証構成\) のスクリーンショット。[URL]、[Logout URL]\(ログアウト URL\)、[Sign SAML Request]\(SAML 要求に署名する\)、[IDP Metadata File]\(IDP メタデータ ファイル\) の各設定が表示されている。](media/header-akamai-tutorial/configure-4.png)
セッションの設定
設定は既定値のままにします。
![Akamai EAA コンソールの [Session settings]\(セッション設定\) ダイアログのスクリーンショット。](media/header-akamai-tutorial/session-settings.png)
ディレクトリ
ディレクトリの構成はスキップします。
![Akamai EAA コンソールの [Directories]\(ディレクトリ\) タブのスクリーンショット。](media/header-akamai-tutorial/directories.png)
カスタマイズ UI
IDP に対するカスタマイズを追加できます。
![Akamai EAA コンソールの [Customization]\(カスタマイズ\) タブのスクリーンショット。[Customize UI]\(UI のカスタマイズ\)、[Language settings]\(言語設定\)、[Themes]\(テーマ\) の各設定が表示されている。](media/header-akamai-tutorial/customization.png)
詳細設定
詳細設定をスキップするか、Akamai のドキュメントで詳細を確認してください。
![Akamai EAA コンソールの [Advanced Settings]\(詳細設定\) タブのスクリーンショット。[EAA Client]\(EAA クライアント\)、[Advanced]\(詳細\)、[OIDC to SAML bridging]\(OIDC から SAML へのブリッジ\) の各設定が表示されている。](media/header-akamai-tutorial/advance-settings.png)
デプロイ
[Deploy Identity Provider](ID プロバイダーのデプロイ) をクリックします。
![Akamai EAA コンソールの [Deployment]\(デプロイ\) タブのスクリーンショット。[Deploy Identity provider]\(ID プロバイダーのデプロイ\) ボタンが表示されている。](media/header-akamai-tutorial/deployment.png)
デプロイが成功したことを確認します。
ヘッダー ベースの認証
Akamai ヘッダー ベースの認証
アプリケーションの追加ウィザードから [Custom HTTP](カスタム HTTP) を選択します。
![Akamai EAA コンソールのアプリケーションの追加ウィザードのスクリーンショット。[Access Apps]\(アプリへのアクセス\) セクションに [Custom HTTP]\(カスタム HTTP\) が表示されている。](media/header-akamai-tutorial/configure-5.png)
[Application Name](アプリケーション名) と [Description](説明) を入力します。
![[Custom HTTP App]\(カスタム HTTP アプリ\) ダイアログのスクリーンショット。[Application Name]\(アプリケーション名\) と [Description]\(説明\) の各設定が表示されている。](media/header-akamai-tutorial/configure-6.png)
![Akamai EAA コンソールの [General]\(全般\) タブのスクリーンショット。MYHEADERAPP の全般設定が表示されている。](media/header-akamai-tutorial/configure-7.png)
![Akamai EAA コンソールのスクリーンショット。[Certificate]\(証明書\) と [Location]\(場所\) の各設定が表示されている。](media/header-akamai-tutorial/configure-8.png)
認証
[Authentication](認証) タブを選択します。
![Akamai EAA コンソールのスクリーンショット。[Authentication]\(認証\) タブが選択されている。](media/header-akamai-tutorial/configure-9.png)
ID プロバイダーを割り当てます。
![Akamai EAA コンソールの MYHEADERAPP の [Authentication]\(認証\) タブのスクリーンショット。[Identity provider]\(ID プロバイダー\) が [Microsoft Entra SSO]\(Microsoft Entra SSO\) に設定されている。](media/header-akamai-tutorial/configure-10.png)
サービス
[Save and Go to Authentication](保存して認証に移動) をクリックします。
![Akamai EAA コンソールの MYHEADERAPP の [Services]\(サービス\) タブのスクリーンショット。右下隅に [Save and go to Advanced Settings]\(保存して詳細設定に移動\) ボタンが表示されている。](media/header-akamai-tutorial/configure-11.png)
詳細設定
[Customer HTTP Headers](カスタマー HTTP ヘッダー) で、カスタマー ヘッダーと SAML 属性を指定します。
![Akamai EAA コンソールの [Advanced Settings]\(詳細設定\) タブのスクリーンショット。[Authentication]\(認証\) の [SSO Logged URL]\(SSO ログ URL\) フィールドが強調表示されている。](media/header-akamai-tutorial/configure-12.png)
[Save and go to Deployment](保存してデプロイに移動) ボタンをクリックします。
![Akamai EAA コンソールの [Advanced Settings]\(詳細設定\) タブのスクリーンショット。右下隅に [Save and go to Deployment]\(保存してデプロイに移動\) ボタンが表示されている。](media/header-akamai-tutorial/configure-13.png)
アプリケーションのデプロイ
[Deploy Application](アプリケーションのデプロイ) ボタンをクリックします。
![Akamai EAA コンソールの [Deployment]\(デプロイ\) タブのスクリーンショット。[Deploy Application]\(アプリケーションのデプロイ\) ボタンが表示されている。](media/header-akamai-tutorial/configure-14.png)
アプリケーションが正しくデプロイされたことを確認します。
![Akamai EAA コンソールの [Deployment]\(デプロイ\) タブのスクリーンショット。[Application status]\(アプリケーションの状態\) に、](media/header-akamai-tutorial/configure-15.png)
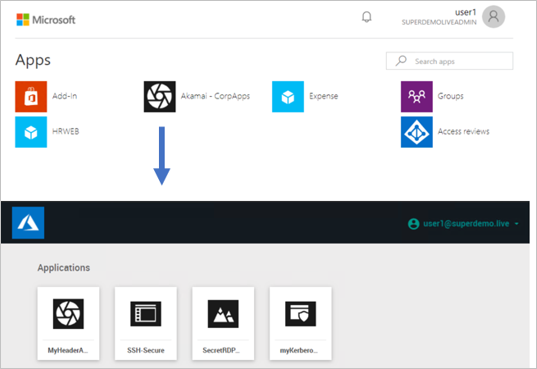
エンドユーザー エクスペリエンス。
![myapps.microsoft.com の開始画面のスクリーンショット。背景画像と [サインイン] ダイアログが表示されている。](media/header-akamai-tutorial/end-user-1.png)
![[アプリ] ウィンドウの一部を表示するスクリーンショット。[アドイン]、[HRWEB]、[Akamai - CorpApps]、[経費]、[グループ]、[アクセス レビュー] のアイコンが表示されている。](media/header-akamai-tutorial/end-user-2.png)
条件付きアクセス。
![MyHeaderApp のアイコンを表示する [アプリケーション] 画面のスクリーンショット。](media/header-akamai-tutorial/conditional-access-2.png)
リモート デスクトップ
ADD Applications ウィザードから [RDP] を選択します。
![Akamai EAA コンソールのアプリケーションの追加ウィザードのスクリーンショット。[Access Apps]\(アプリへのアクセス\) セクションの一連のアプリの中に [RDP] が表示されている。](media/header-akamai-tutorial/configure-16.png)
[Application Name](アプリケーション名) と [Description](説明) を入力します。
![[RDP App]\(RDP アプリ\) ダイアログのスクリーンショット。[Application Name]\(アプリケーション名\) と [Description]\(説明\) の各設定が表示されている。](media/header-akamai-tutorial/configure-17.png)
![Akamai EAA コンソールの [General]\(全般\) タブのスクリーンショット。SECRETRDPAPP の [Application identity]\(アプリケーション ID\) 設定が表示されている。](media/header-akamai-tutorial/configure-18.png)
このサービスを提供するコネクタを指定します。
![Akamai EAA コンソールのスクリーンショット。[Certificate]\(証明書\) と [Location]\(場所\) の各設定が表示されている。関連するコネクタが USWST-CON1 に設定されている。](media/header-akamai-tutorial/configure-19.png)
認証
[Save and go to Services](保存してサービスに移動) をクリックします。
![Akamai EAA コンソールの SECRETRDPAPP の [Authentication]\(認証\) タブのスクリーンショット。右下隅に [Save and go to Services]\(保存してサービスに移動\) ボタンが表示されている。](media/header-akamai-tutorial/configure-20.png)
サービス
[Save and go to Advanced Settings](保存して詳細設定に移動) をクリックします。
![Akamai EAA コンソールの SECRETRDPAPP の [Services]\(サービス\) タブのスクリーンショット。右下隅に [Save and go to Advanced Settings]\(保存して詳細設定に移動\) ボタンが表示されている。](media/header-akamai-tutorial/configure-21.png)
詳細設定
[Save and go to Deployment](保存してデプロイに移動) をクリックします。
![Akamai EAA コンソールの SECRETRDPAPP の [Advanced Settings]\(詳細設定\) タブのスクリーンショット。[Remote desktop configuration]\(リモート デスクトップ構成\) の設定が表示されている。](media/header-akamai-tutorial/configure-22.png)
![Akamai EAA コンソールの SECRETRDPAPP の [Advanced Settings]\(詳細設定\) タブのスクリーンショット。[Authentication]\(認証\) と [Health check configuration]\(正常性チェック構成\) の各設定が表示されている。](media/header-akamai-tutorial/configure-23.png)
![Akamai EAA コンソールの SECRETRDPAPP の [Custom HTTP headers]\(カスタム HTTP ヘッダー\) 設定のスクリーンショット。右下隅に [Save and go to Deployment]\(保存してデプロイに移動\) ボタンが表示されている。](media/header-akamai-tutorial/configure-24.png)
エンド ユーザー エクスペリエンス
![[myapps.microsoft.com] ウィンドウのスクリーンショット。背景画像と [サインイン] ダイアログが表示されている。](media/header-akamai-tutorial/end-user-3.png)
条件付きアクセス
![MyHeaderApp と SecretRDPApp のアイコンを表示する [アプリケーション] 画面のスクリーンショット。](media/header-akamai-tutorial/conditional-access-5.png)
または、RDP アプリケーションの URL を直接入力することもできます。
SSH
[Add Applications](アプリケーションの追加) に移動し、 [SSH] を選択します。
![Akamai EAA コンソールのアプリケーションの追加ウィザードのスクリーンショット。[Access Apps]\(アプリへのアクセス\) セクションの一連のアプリの中に [SSH] が表示されている。](media/header-akamai-tutorial/configure-25.png)
[Application Name](アプリケーション名) と [Description](説明) を入力します。
![[SSH App]\(SSH アプリ\) ダイアログのスクリーンショット。[Application Name]\(アプリケーション名\) と [Description]\(説明\) の各設定が表示されている。](media/header-akamai-tutorial/configure-26.png)
アプリケーション ID を構成します。
![Akamai EAA コンソールの [General]\(全般\) タブのスクリーンショット。SSH-SECURE の [Application identity]\(アプリケーション ID\) 設定が表示されている。](media/header-akamai-tutorial/configure-27.png)
a. 名前と説明を指定します。
b. アプリケーション サーバーの IP (または FQDN) と SSH のポートを指定します。
c. SSH ユーザー名とパスフレーズを指定します (Akamai EAA を確認してください)。
d. 外部ホスト名を指定します。
e. コネクタの場所を指定し、コネクタを選択します。
認証
[Save and go to Services](保存してサービスに移動) をクリックします。
![Akamai EAA コンソールの SSH-SECURE の [Authentication]\(認証\) タブのスクリーンショット。右下隅に [Save and go to Services]\(保存してサービスに移動\) ボタンが表示されている。](media/header-akamai-tutorial/configure-28.png)
サービス
[Save and go to Advanced Settings](保存して詳細設定に移動) をクリックします。
![Akamai EAA コンソールの SSH-SECURE の [Services]\(サービス\) タブのスクリーンショット。右下隅に [Save and go to Advanced Settings]\(保存して詳細設定に移動\) ボタンが表示されている。](media/header-akamai-tutorial/configure-29.png)
詳細設定
[Save and go to Deployment](保存してデプロイに移動) をクリックします。
![Akamai EAA コンソールの SSH-SECURE の [Advanced Settings]\(詳細設定\) タブのスクリーンショット。[Authentication]\(認証\) と [Health check configuration]\(正常性チェック構成\) の各設定が表示されている。](media/header-akamai-tutorial/configure-30.png)
![Akamai EAA コンソールの SSH-SECURE の [Custom HTTP headers]\(カスタム HTTP ヘッダー\) のスクリーンショット。右下隅に [Save and go to Deployment]\(保存してデプロイに移動\) ボタンが表示されている。](media/header-akamai-tutorial/configure-31.png)
デプロイ
[Deploy application](アプリケーションのデプロイ) をクリックします。
![Akamai EAA コンソールの SSH-SECURE の [Deployment]\(デプロイ\) タブのスクリーンショット。[Deploy Application]\(アプリケーションのデプロイ\) ボタンが表示されている。](media/header-akamai-tutorial/configure-32.png)
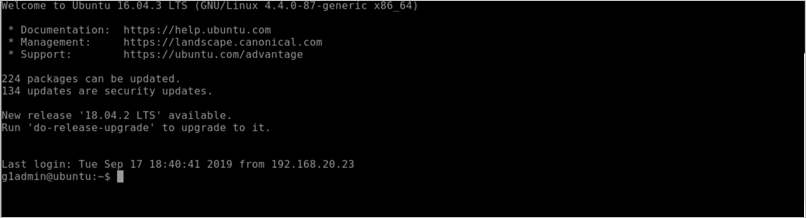
エンド ユーザー エクスペリエンス
![myapps.microsoft.com の [アプリ] ウィンドウのスクリーンショット。[アドイン]、[HRWEB]、[Akamai - CorpApps]、[経費]、[グループ]、[アクセス レビュー] のアイコンが表示されている。](media/header-akamai-tutorial/end-user-4.png)
条件付きアクセス
![MyHeaderApp、SSH Secure、SecretRDPApp のアイコンを表示する [アプリケーション] 画面のスクリーンショット。](media/header-akamai-tutorial/conditional-access-7.png)
![ssh-secure-go.akamai-access.com のコマンド ウィンドウのスクリーンショット。[Password]\(パスワード\) プロンプトが表示されている。](media/header-akamai-tutorial/conditional-access-8.png)
Kerberos 認証
次の例では、http://frp-app1.superdemo.live の内部 Web サーバーを発行し、KCD を使って SSO を有効にしています。
[全般] タブ
![Akamai EAA コンソールの MYKERBOROSAPP の [General]\(全般\) タブのスクリーンショット。](media/header-akamai-tutorial/general-tab.png)
[認証] タブ
ID プロバイダーを割り当てます。
![Akamai EAA コンソールの MYKERBOROSAPP の [Authentication]\(認証\) タブのスクリーンショット。[Identity provider]\(ID プロバイダー\) が [Microsoft Entra SSO]\(Microsoft Entra SSO\) に設定されている。](media/header-akamai-tutorial/authentication-tab.png)
[Services](サービス) タブ
![Akamai EAA コンソールの MYKERBOROSAPP の [Services]\(サービス\) タブのスクリーンショット。](media/header-akamai-tutorial/services-tab.png)
詳細設定
![Akamai EAA コンソールの MYKERBOROSAPP の [Advanced Settings]\(詳細設定\) タブのスクリーンショット。[Related Applications]\(関連アプリケーション\) と [Authentication]\(認証\) の各設定が表示されている。](media/header-akamai-tutorial/advance-settings-2.png)
注意
このデモでは、Web サーバーの SPN は SPN@Domain 形式 (例: HTTP/frp-app1.superdemo.live@SUPERDEMO.LIVE) にする必要があります。 残りの設定は既定値のままにします。
[Deployment](デプロイ) タブ
![Akamai EAA コンソールの MYKERBOROSAPP の [Deployment]\(デプロイ\) タブのスクリーンショット。[Deploy Application]\(アプリケーションのデプロイ\) ボタンが表示されている。](media/header-akamai-tutorial/deployment-tab.png)
ディレクトリの追加
ドロップダウン リストから [AD] を選択します。
![Akamai EAA コンソールの [Directories]\(ディレクトリ\) ウィンドウのスクリーンショット。[Create New Directory]\(新しいディレクトリの作成\) ダイアログが表示され、[Directory Type]\(ディレクトリ タイプ\) のボックスの一覧では [AD] が選択されている。](media/header-akamai-tutorial/configure-33.png)
必要なデータを入力します。
![Akamai EAA コンソールの [SUPERDEMOLIVE] ウィンドウのスクリーンショット。[DirectoryName]\(ディレクトリ名\)、[Directory Service]\(ディレクトリ サービス\)、[Connector]\(コネクタ\)、[Attribute mapping]\(属性マッピング\) の各設定が表示されている。](media/header-akamai-tutorial/configure-34.png)
ディレクトリの作成を確認します。
![Akamai EAA コンソールの [Directories]\(ディレクトリ\) ウィンドウのスクリーンショット。ディレクトリ superdemo.live が追加されていることがわかる。](media/header-akamai-tutorial/directory-domain.png)
アクセスを必要とするグループまたは OU を追加します。
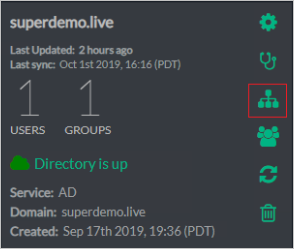
以下では、グループが EAAGroup と呼ばれ、1 名のメンバーが含まれています。
![Akamai EAA コンソールの [GROUPS ON SUPERDEMOLIVE DIRECTORY]\(SUPERDEMOLIVE ディレクトリ上のグループ\) ウィンドウのスクリーンショット。1 名のユーザーが含まれている EAAGroup が [Groups]\(グループ\) の下にリストされている。](media/header-akamai-tutorial/eaagroup.png)
使用する ID プロバイダーにディレクトリを追加するには、 [Identity](ID)>[Identity Providers](ID プロバイダー) の順にクリックし、 [Directories](ディレクトリ) タブをクリックして、 [Assign directory](ディレクトリの割り当て) をクリックします。
![Akamai EAA コンソールの Microsoft Entra SSO の [Directories]\(ディレクトリ\) タブのスクリーンショット。[Currently assigned directories]\(現在割り当てられているディレクトリ\) の一覧に superdemo.live が表示されている。](media/header-akamai-tutorial/assign-directory.png)
EAA チュートリアル用の KCD 委任の構成
手順 1:アカウントの作成
この例では EAADelegation というアカウントを使用します。 これを行うには、 [Active Directory ユーザーとコンピューター] スナップインを使用します。
Note
このユーザー名は ID インターセプト名に基づく特定の形式にする必要があります。 図 1 から、corpapps.login.go.akamai-access.com であることがわかります。
ユーザーログオン名は
HTTP/corpapps.login.go.akamai-access.comになります。![[EAADelegation Properties]\(EAADelegation のプロパティ\) を示すスクリーンショット。[名] が](media/header-akamai-tutorial/eaadelegation.png)
手順 2:このアカウントの SPN の構成
このサンプルに基づき、SPN は次のようになります。
setspn -s Http/corpapps.login.go.akamai-access.com eaadelegation

手順 3:委任の構成
EAADelegation アカウントについては、[委任] タブをクリックします。
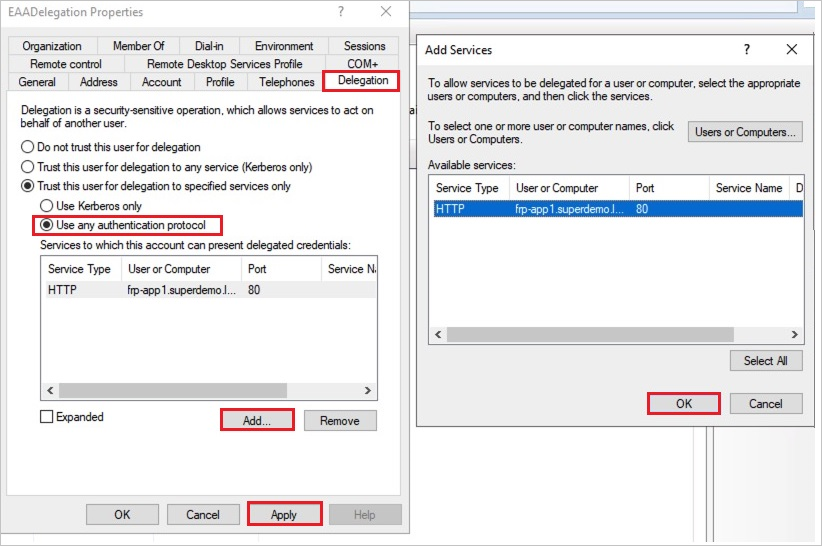
- [任意の認証プロトコルを使う] を選択します。
- [追加] をクリックし、Kerberos Web サイトのアプリケーション プール アカウントを追加します。 正しく構成されていれば、自動的に正しい SPN に解決されます。
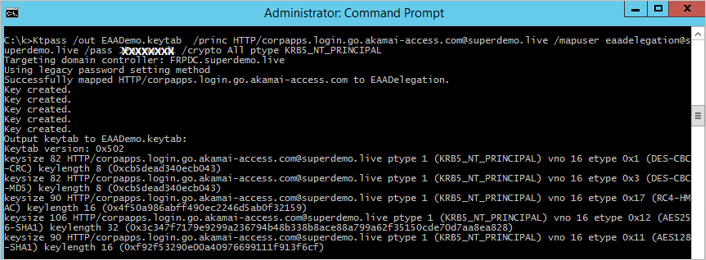
手順 4:AKAMAI EAA 用の keytab ファイルの作成
一般的な構文を次に示します。
ktpass /out ActiveDirectorydomain.keytab /princ
HTTP/yourloginportalurl@ADDomain.com/mapuser serviceaccount@ADdomain.com /pass +rdnPass /crypto All /ptype KRB5_NT_PRINCIPAL例の説明は次のとおりです。
スニペット 説明 Ktpass /out EAADemo.keytab // 出力 keytab ファイルの名前 /princ HTTP/corpapps.login.go.akamai-access.com@superdemo.live // HTTP/yourIDPName@YourdomainName /mapuser eaadelegation@superdemo.live // EAA 委任アカウント /pass RANDOMPASS // EAA 委任アカウントのパスワード /crypto All ptype KRB5_NT_PRINCIPAL // Akamai EAA のドキュメントを参照してください Ktpass /out EAADemo.keytab /princ HTTP/corpapps.login.go.akamai-access.com@superdemo.live /mapuser eaadelegation@superdemo.live /pass RANDOMPASS /crypto All ptype KRB5_NT_PRINCIPAL
手順 5:Akamai EAA コンソールでの keytab のインポート
[System](システム)>[Keytabs](keytab) の順にクリックします。
![Akamai EAA コンソールのスクリーンショット。[System]\(システム\) メニューから [Keytabs]\(keytab\) を選択したところ。](media/header-akamai-tutorial/keytabs.png)
[Keytab Type](keytab の種類) で [Kerberos Delegation](Kerberos 委任) を選択します。
![Akamai EAA コンソールの [EAAKEYTAB] 画面のスクリーンショット。keytab の設定が表示されている。[Keytab Type]\(keytab の種類\) が [Kerberos Delegation]\(Kerberos 委任\) に設定されている。](media/header-akamai-tutorial/keytab-delegation.png)
keytab がデプロイ済みおよび確認済みとして表示されていることを確認します。
![Akamai EAA コンソールの [KEYTABS] 画面のスクリーンショット。[Keytab deployed and verified]\(keytab がデプロイ済みおよび確認済み\) として EAA keytab が表示されている。](media/header-akamai-tutorial/keytabs-2.png)
ユーザーの作業
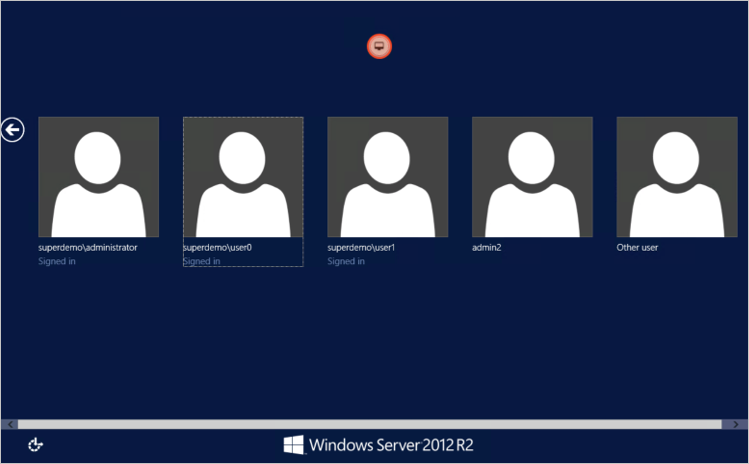
条件付きアクセス
![MyHeaderApp、SSH Secure、SecretRDPApp、myKerberosApp のアイコンを表示する [アプリケーション] 画面のスクリーンショット。](media/header-akamai-tutorial/conditional-access-10.png)

Akamai のテスト ユーザーの作成
このセクションでは、Akamai で B.Simon というユーザーを作成します。 Akamai クライアント サポート チームと連携し、Akamai プラットフォームにユーザーを追加してください。 シングル サインオンを使用する前に、ユーザーを作成し、有効化する必要があります。
SSO のテスト
このセクションでは、次のオプションを使用して Microsoft Entra のシングル サインオン構成をテストします。
[このアプリケーションをテストします] をクリックすると、SSO を設定した Akamai に自動的にサインインされます。
Microsoft マイ アプリを使用することができます。 マイ アプリで [Akamai] タイルをクリックすると、SSO を設定した Akamai に自動的にサインインされます。 マイ アプリの詳細については、マイ アプリの概要に関するページを参照してください。
次のステップ
Akamai を構成したら、組織の機密データを流出と侵入からリアルタイムで保護するセッション制御を適用することができます。 セッション制御は、条件付きアクセスを拡張したものです。 Microsoft Defender for Cloud Apps でセッション制御を強制する方法をご覧ください。
フィードバック
以下は間もなく提供いたします。2024 年を通じて、コンテンツのフィードバック メカニズムとして GitHub の issue を段階的に廃止し、新しいフィードバック システムに置き換えます。 詳細については、「https://aka.ms/ContentUserFeedback」を参照してください。
フィードバックの送信と表示