Azure Maps Web SDK は、WebGL を使ったカスタム レイヤーの作成をサポートしています。 WebGL は OpenGL ES に基づいており、Web ブラウザーで 2D および 3D グラフィックスをレンダリングできます。
WebGL を使うと、ブラウザーにリアルタイムでレンダリングされるハイパフォーマンスなインタラクティブ グラフィックスを構築できます。これは、シミュレーション、データの視覚化、アニメーション、3D モデル化などのシナリオをサポートします。
開発者はレンダリング時にマップの WebGL コンテキストにアクセスし、カスタムの WebGL レイヤーを使って three.js や deck.gl などの他のライブラリと統合し、マップ上で充実した対話型コンテンツを提供することができます。
WebGL レイヤーを追加する
WebGL レイヤーをマップに追加する前に、WebGLRenderer インターフェイスを実装したオブジェクトを用意する必要があります。 まず、コンストラクターに id と renderer オブジェクトを指定して WebGL レイヤーを作成し、そのレイヤーをマップに追加してレンダリングします。
次のサンプル コードは、マップに WebGL レイヤーを追加する方法を示しています。
var myRenderer = {
    /**
     * Either "2d" or "3d". Defaults to "2d".
     * - "3d" to use the depth buffer and share it with other layers
     * - "2d" to add a layer with no depth. If you need to use the depth buffer for a "2d"
     *   layer you must use an offscreen framebuffer and the prerender method.
     */
    renderingMode: "2d",

    /**
     * Optional method called when the layer has been added to the Map.
     * This gives the layer a chance to initialize gl resources and register event listeners.
     * @param map The Map this custom layer was just added to.
     * @param gl The gl context for the map.
     */
    onAdd: function (map, gl) {},

    /**
     * Optional method called when the layer has been removed from the Map.
     * This gives the layer a chance to clean up gl resources and event listeners.
     * @param map The Map this custom layer was just added to.
     * @param gl The gl context for the map.
     */
    onRemove: function (map, gl) {},

    /**
     * Optional method called during a render frame to allow a layer to prepare resources
     * or render into a texture.
     *
     * The layer cannot make any assumptions about the current GL state and must bind a framebuffer before rendering.
     *
     * @param gl The map's gl context.
     * @param matrix The map's camera matrix.
     */
    prerender: function (gl, matrix) {},

    /**
     * Required. Called during a render frame allowing the layer to draw into the GL context.
     *
     * The layer can assume blending and depth state is set to allow the layer to
     * properly blend and clip other layers. The layer cannot make any other
     * assumptions about the current GL state.
     *
     * If the layer needs to render to a texture, it should implement the prerender
     * method to do this and only use the render method for drawing directly into the
     * main framebuffer.
     *
     * The blend function is set to gl.blendFunc(gl.ONE, gl.ONE_MINUS_SRC_ALPHA).
     * This expects colors to be provided in premultiplied alpha form where the r, g and b
     * values are already multiplied by the a value. If you are unable to provide colors in
     * premultiplied form you may want to change the blend function to
     * gl.blendFuncSeparate(gl.SRC_ALPHA, gl.ONE_MINUS_SRC_ALPHA, gl.ONE, gl.ONE_MINUS_SRC_ALPHA).
     *
     * @param gl The map's gl context.
     * @param matrix The map's camera matrix.
     */
    render: function (gl, matrix) {}
};

//Add the layer to the map.
map.layers.add(new atlas.layer.WebGLLayer("layerId", { renderer: myRenderer }));
注意
WebGLLayer クラスは minZoom、maxZoom、visible レイヤー オプションをサポートしています。
//Add the layer to the map with layer options.
map.layers.add(new atlas.layer.WebGLLayer("layerId",
    {
        renderer: myRenderer,
        minZoom: 10,
        maxZoom: 22,
        visible: true
    }
));
このサンプルでは、WebGL レイヤーを使ってマップ上に三角形をレンダリングします。

ソース コードを使用した完全に機能するサンプルについては、Azure Maps サンプルの「シンプルな 2D WebGL レイヤー」を参照してください。
マップのカメラ マトリックスは、球面のメルカトル点を gl 座標に投影するために使われています。 メルカトル点 [0, 0] はメルカトル世界の左上隅を、[1, 1] は右下隅を表しています。 renderingMode が "3d" の場合、z 座標は正角です。
メルカトル単位で x、y、z の長さが同一のボックスは立方体としてレンダリングされます。
MercatorPoint クラスには fromPosition、fromPositions、toFloat32Array の静的メソッドがあり、地理空間上の位置からメルカトル点に変換するために使用できます。 同様に、toPosition と toPositions のメソッドを使って、メルカトル点を位置に投影できます。
3D モデルをレンダリングする
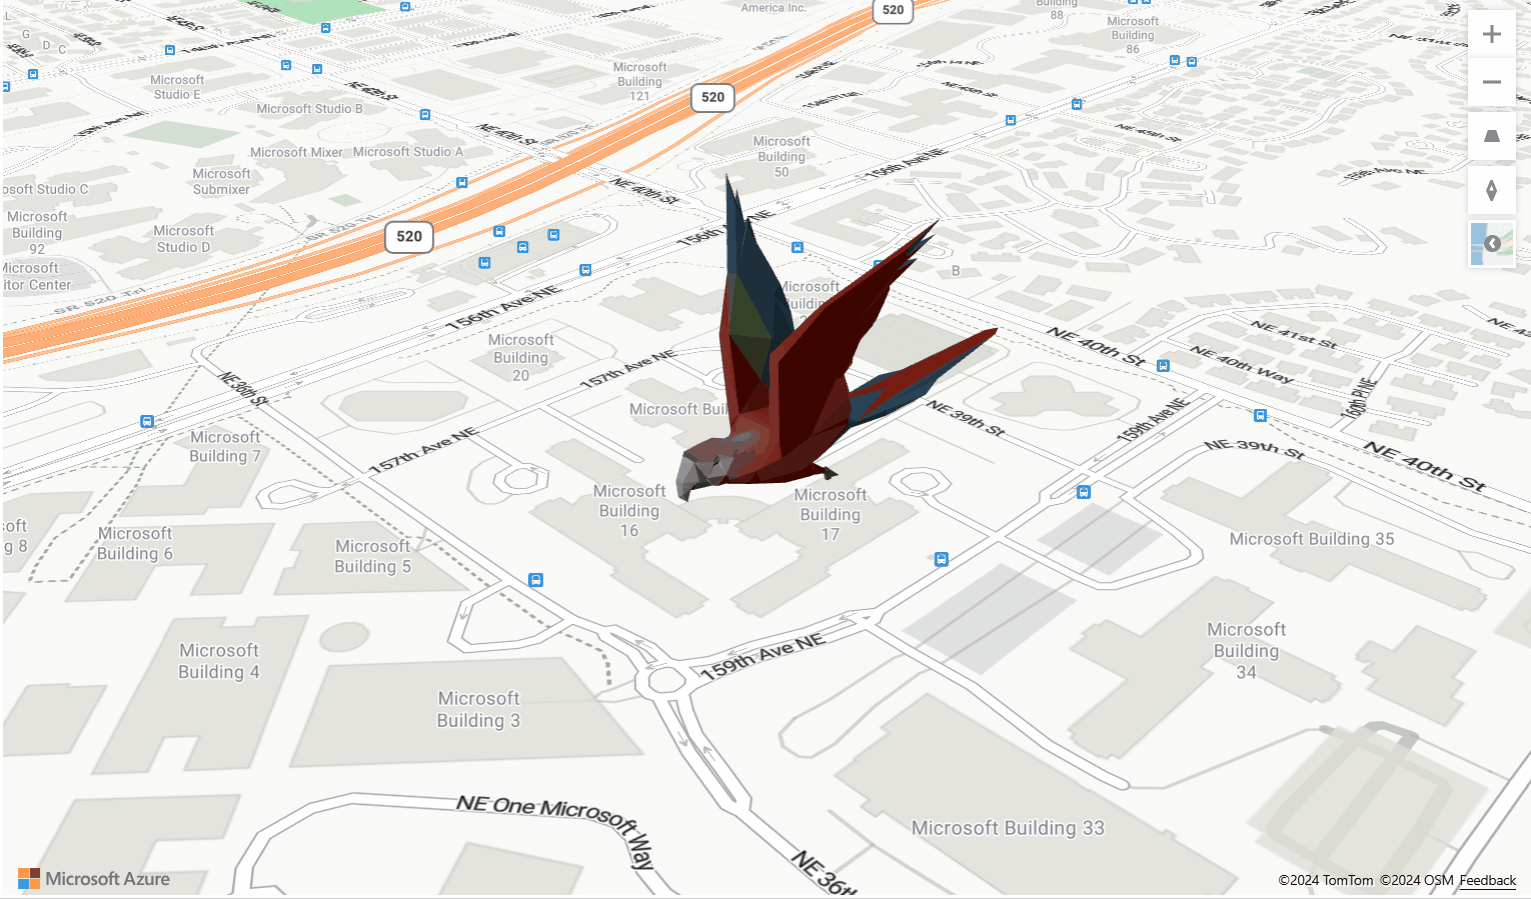
WebGL レイヤーを使って 3D モデルをレンダリングします。 次の例は、glTF ファイルを読み込み、three.js を使ってマップ上にそれをレンダリングする方法を示しています。
次のスクリプト ファイルを追加する必要があります。
<script src="https://unpkg.com/three@latest/build/three.min.js"></script>
<script src="https://unpkg.com/three@latest/examples/js/loaders/GLTFLoader.js"></script>
このサンプルにより、アニメーション化された 3D のオウムがマップ上にレンダリングされます。
ソース コードを使用した完全に機能するサンプルについては、Azure Maps サンプルの「Three カスタム WebGL レイヤー」を参照してください。
onAdd 関数を使って、.glb ファイルをメモリに読み込み、Camera、Scene、Light、THREE.WebGLRenderer などの three.js オブジェクトをインスタンス化します。
render 関数を使ってカメラのプロジェクション マトリックスを計算し、モデルをシーンにレンダリングします。
ヒント
- 連続的で滑らかなアニメーションを実現するために、
render関数内でmap.triggerRepaint()を呼び出して、1 つのフレームの再描画をトリガーすることができます。 - アンチエイリアシングを有効にするには、マップの作成時にスタイル オプションの 1 つである
antialiasをtrueに設定するだけです。
babylon.js を使用して 3D モデルをレンダリングする
Babylon.js は、世界をリードする WebGL ベースのグラフィックス エンジンの 1 つです。 次の例は、GLTF ファイルを読み込み、babylon.js を使ってマップ上にそれをレンダリングする方法を示しています。
次のスクリプト ファイルを追加する必要があります。
<script src="https://cdn.babylonjs.com/babylon.js"></script>
<script src="https://cdn.babylonjs.com/loaders/babylonjs.loaders.min.js"></script>
このサンプルでは、マップ上に衛星タワーをレンダリングします。
onAdd 関数は、BABYLON エンジンとシーンをインスタンス化します。 その後、BABYLON.SceneLoader を使用して .gltf ファイルを読み込みます。
render 関数を使ってカメラのプロジェクション マトリックスを計算し、モデルをシーンにレンダリングします。

ソース コードを使用した完全に機能するサンプルについては、Azure Maps サンプルの「Babylon カスタム WebGL レイヤー」を参照してください。
deck.gl レイヤーをレンダリングする
WebGL レイヤーは、deck.gl ライブラリのレイヤーをレンダリングするために使用できます。 次のサンプルは、特定の時間範囲内に米国内の郡間を移動する人の流れのデータ視覚化を示しています。
次のスクリプト ファイルを追加する必要があります。
<script src="https://unpkg.com/deck.gl@latest/dist.min.js"></script>
atlas.layer.WebGLLayer を拡張するレイヤー クラスを定義します。
class DeckGLLayer extends atlas.layer.WebGLLayer {

    constructor(options) {
        super(options.id);

        //Create an instance of deck.gl layer
        this._mbLayer = new deck.MapboxLayer(options);

        //Create a renderer
        const deckGLRenderer = {
            renderingMode: "3d",
            onAdd: (map, gl) => {
               this._mbLayer.onAdd?.(map["map"], gl);
            },
            onRemove: (map, gl) => {
                this._mbLayer.onRemove?.(map["map"], gl);
            },
            prerender: (gl, matrix) => {
                this._mbLayer.prerender?.(gl, matrix);
            },
            render: (gl, matrix) => {
                this._mbLayer.render(gl, matrix);
            }
        };
        this.setOptions({ renderer: deckGLRenderer });
    }
}
このサンプルにより、google deck.gl ライブラリの arc-layer がレンダリングされます。

ソース コードを使用した完全に機能するサンプルについては、Azure Maps サンプルの「Deck GL カスタム WebGL レイヤー」を参照してください。
次のステップ
この記事で使われているクラスとメソッドの詳細については、次を参照してください。