チュートリアル: Dapr Publish と Subscribe を使用したマイクロサービス通信
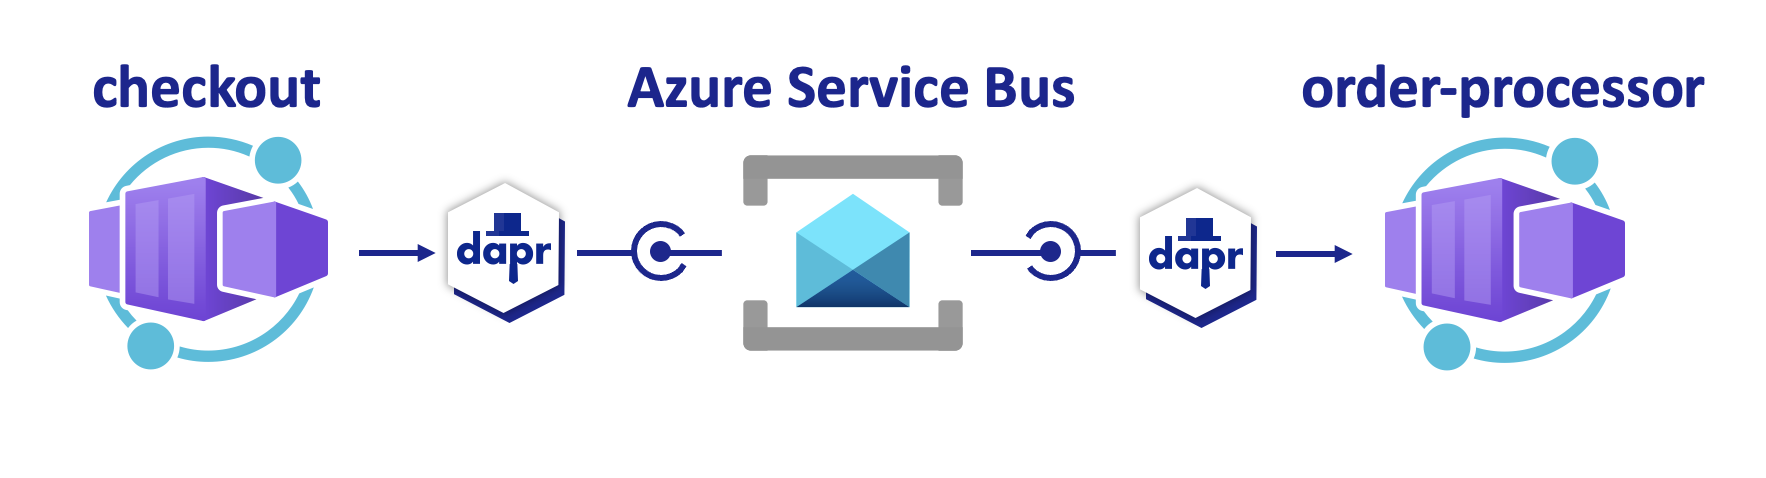
このチュートリアルでは、Dapr pub/sub API を利用して、イベント駆動型アーキテクチャのメッセージを使って通信する、パブリッシャーとサブスクライバーのマイクロサービスを作成します。 次のことを行います。
- Dapr pub/sub API を活用して、イベント ドリブン アーキテクチャのメッセージを使用して通信するパブリッシャー マイクロサービスとサブスクライバー マイクロサービスを作成します。
- 提供されている Bicep を使用して、Azure Developer CLI を介して Azure Container Apps にアプリケーションをデプロイします。
サンプルの pub/sub プロジェクトには、次のものが含まれます。
- 特定のトピックのメッセージを生成するメッセージ ジェネレーター
checkoutサービス (パブリッシャー)。 - 特定のトピックの
checkoutサービスからのメッセージをリッスンするorder-processorサービス (サブスクライバー)。
前提条件
- Azure Developer CLI をインストールする
- Dapr のインストールと初期化
- Docker Desktop
- Git
Node.js アプリケーションをローカルで実行する
Azure Container Apps にアプリケーションをデプロイする前に、Dapr と Azure Service Bus を使用して order-processor サービスと checkout サービスをローカルで実行します。
プロジェクトを準備する
サンプル アプリケーションをローカル コンピューターにクローンします。
git clone https://github.com/Azure-Samples/pubsub-dapr-nodejs-servicebus.gitサンプルのルート ディレクトリに移動します。
cd pubsub-dapr-nodejs-servicebus
Dapr CLI を使用してアプリケーションを実行する
最初に、order-processor サブスクライバー サービスを実行します。
サンプルのルート ディレクトリから、ディレクトリを
order-processorに変更します。cd order-processor依存関係をインストールします。
npm installorder-processorサービスを実行します。dapr run --app-port 5001 --app-id order-processing --app-protocol http --dapr-http-port 3501 --resources-path ../components -- npm run start新しいターミナル ウィンドウで、サンプルのルート ディレクトリから
checkoutパブリッシャー サービスに移動します。cd checkout依存関係をインストールします。
npm installcheckoutサービスを実行します。dapr run --app-id checkout --app-protocol http --resources-path ../components -- npm run start想定される出力
どちらのターミナルでも、
checkoutサービスは終了する前にorder-processorサービスが受信した 10 個のメッセージを発行します。checkout出力:== APP == Published data: {"orderId":1} == APP == Published data: {"orderId":2} == APP == Published data: {"orderId":3} == APP == Published data: {"orderId":4} == APP == Published data: {"orderId":5} == APP == Published data: {"orderId":6} == APP == Published data: {"orderId":7} == APP == Published data: {"orderId":8} == APP == Published data: {"orderId":9} == APP == Published data: {"orderId":10}order-processor出力:== APP == Subscriber received: {"orderId":1} == APP == Subscriber received: {"orderId":2} == APP == Subscriber received: {"orderId":3} == APP == Subscriber received: {"orderId":4} == APP == Subscriber received: {"orderId":5} == APP == Subscriber received: {"orderId":6} == APP == Subscriber received: {"orderId":7} == APP == Subscriber received: {"orderId":8} == APP == Subscriber received: {"orderId":9} == APP == Subscriber received: {"orderId":10}次のコマンドを実行して、両方のアプリケーションが停止していることを確認します。 チェックアウト ターミナルで、次の手順を実行します。
dapr stop --app-id checkoutオーダー プロセッサー ターミナルで、次の手順を実行します。
dapr stop --app-id order-processor
Azure Developer CLI を使用してアプリケーション テンプレートをデプロイする
azd を使用して、アプリケーションを Azure Container Apps にデプロイします。
プロジェクトを準備する
新しいターミナル ウィンドウで、サンプルのルート ディレクトリに移動します。
cd pubsub-dapr-nodejs-servicebus
Azure Developer CLI を使用したプロビジョニングとデプロイ
azd initを実行してプロジェクトを初期化します。azd initターミナルでメッセージが表示されたら、次のパラメーターを指定します。
パラメーター 説明 Environment Name すべての Azure リソースを保持するために作成されたリソース グループのプレフィックス。 Azure の場所 リソースの Azure の場所。 Azure サブスクリプション リソースの Azure サブスクリプション。 azd upを実行して、1 つのコマンドでインフラストラクチャをプロビジョニングしてアプリケーションを Azure Container Apps にデプロイします。azd upこの処理は、完了までに時間がかかる場合があります。
azd upコマンドが完了すると、CLI 出力に、デプロイの進行状況を監視するための 2 つの Azure portal リンクが表示されます。 また、出力では、次のazd upの方法も示されます。azd provisionを使用して、./infraディレクトリ内の指定されている Bicep ファイルを使用して、必要なすべての Azure リソースを作成して構成します。 Azure Developer CLI によってプロビジョニングされると、Azure portal からこれらのリソースにアクセスできます。 Azure リソースをプロビジョニングするファイルは次のとおりです。main.parameters.jsonmain.bicep- 機能別に整理された
appリソース ディレクトリ azdテンプレートで使用される Bicep モジュールを含むcoreリファレンス ライブラリ
azd deployを使用したコードのデプロイ
想定される出力
Initializing a new project (azd init)


Provisioning Azure resources (azd provision)
Provisioning Azure resources can take some time

  You can view detailed progress in the Azure Portal:
  https://portal.azure.com

  (✓) Done: Resource group: resource-group-name
  (✓) Done: Application Insights: app-insights-name
  (✓) Done: Portal dashboard: portal-dashboard-name
  (✓) Done: Log Analytics workspace: log-analytics-name
  (✓) Done: Key vault: key-vault-name
  (✓) Done: Container Apps Environment: ca-env-name
  (✓) Done: Container App: ca-checkout-name
  (✓) Done: Container App: ca-orders-name


Deploying services (azd deploy)

  (✓) Done: Deploying service checkout
  (✓) Done: Deploying service orders
  - Endpoint: https://ca-orders-name.endpoint.region.azurecontainerapps.io/

SUCCESS: Your Azure app has been deployed!
You can view the resources created under the resource group resource-group-name in Azure Portal:
https://portal.azure.com/#@/resource/subscriptions/subscription-id/resourceGroups/resource-group-name/overview
デプロイが成功したことを確認する
Azure portal で、checkout サービスが Azure Service Bus トピックにメッセージを公開していることを確認します。
ターミナル出力から
checkoutコンテナー アプリ名をコピーします。Azure portal にサインインし、名前でコンテナー アプリ リソースを検索します。
Container Apps ダッシュボードで、[監視]>[ログ ストリーム] を選択します。
![Azure portal の [ログ ストリーム] ページに移動するスクリーンショット。](media/microservices-dapr-azd/log-streams-menu.png)
checkoutコンテナーが先ほどのターミナルと同じ出力をログに記録しているかどうかを確認します。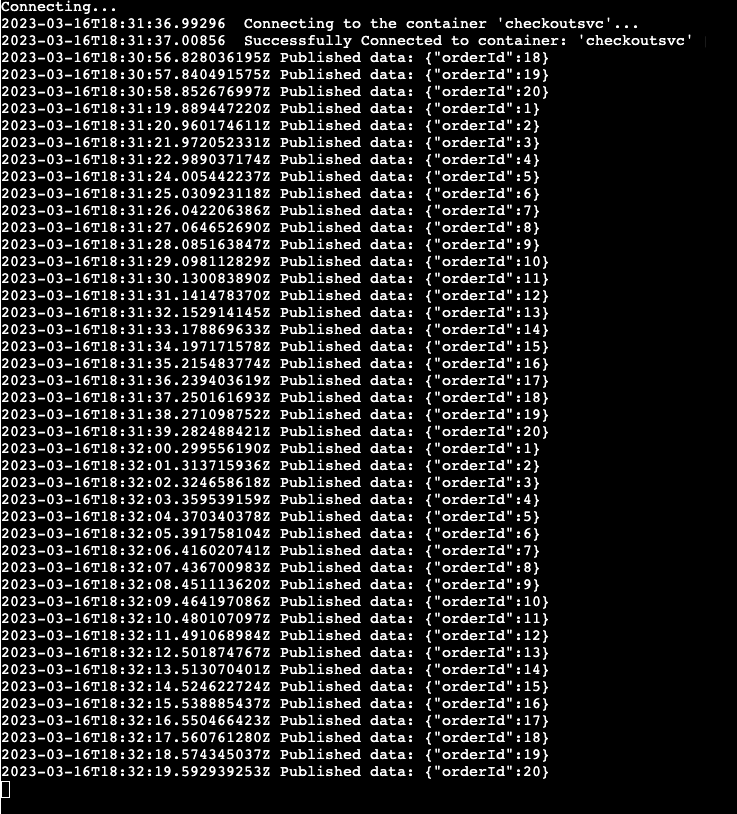
order-processorサービスに対して同じことを行います。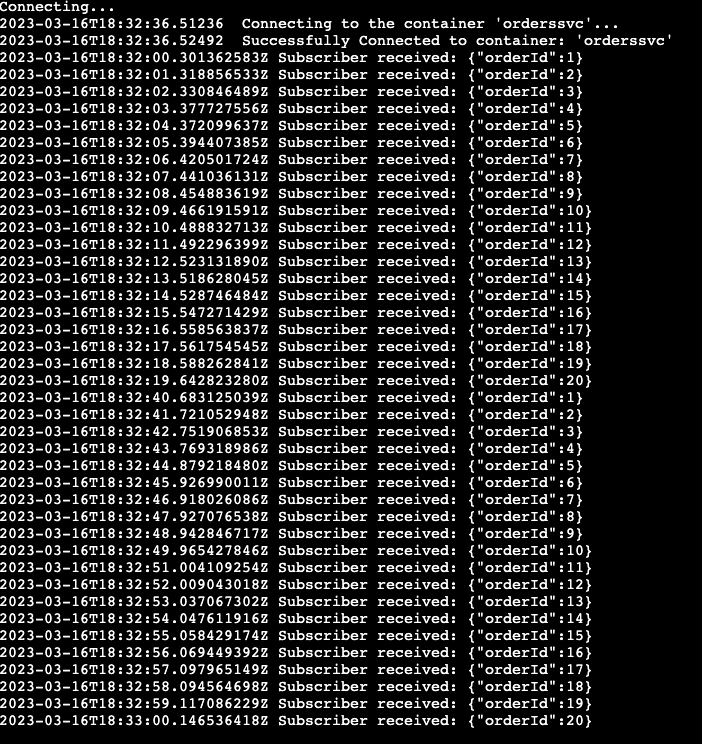
何が起きましたか?
azd up コマンドが正常に完了した場合、次のようになります。
- Azure Developer CLI は、サンプル プロジェクトの
./infraディレクトリで参照されている Azure リソースを、指定した Azure サブスクリプションにプロビジョニングしました。 これにより Azure portal から、これらの Azure リソースを表示できるようになりました。 - Azure Container Apps にデプロイされたアプリ。 ポータルから、完全に機能するアプリを参照できます。
Python アプリケーションをローカルで実行する
Azure Container Apps にアプリケーションをデプロイする前に、Dapr と Azure Service Bus を使用して order-processor サービスと checkout サービスをローカルで実行します。
プロジェクトを準備する
サンプル アプリケーションをローカル コンピューターにクローンします。
git clone https://github.com/Azure-Samples/pubsub-dapr-python-servicebus.gitサンプルのルート ディレクトリに移動します。
cd pubsub-dapr-python-servicebus
Dapr CLI を使用してアプリケーションを実行する
最初に、order-processor サブスクライバー サービスを実行します。
サンプルのルート ディレクトリから、ディレクトリを
order-processorに変更します。cd order-processor依存関係をインストールします。
pip3 install -r requirements.txtorder-processorサービスを実行します。dapr run --app-id order-processor --resources-path ../components/ --app-port 5001 -- python3 app.py新しいターミナル ウィンドウで、サンプルのルート ディレクトリから
checkoutパブリッシャー サービスに移動します。cd checkout依存関係をインストールします。
pip3 install -r requirements.txtcheckoutサービスを実行します。dapr run --app-id checkout --resources-path ../components/ -- python3 app.py想定される出力
どちらのターミナルでも、
checkoutサービスは終了する前にorder-processorサービスが受信した 10 個のメッセージを発行します。checkout出力:== APP == Published data: {"orderId":1} == APP == Published data: {"orderId":2} == APP == Published data: {"orderId":3} == APP == Published data: {"orderId":4} == APP == Published data: {"orderId":5} == APP == Published data: {"orderId":6} == APP == Published data: {"orderId":7} == APP == Published data: {"orderId":8} == APP == Published data: {"orderId":9} == APP == Published data: {"orderId":10}order-processor出力:== APP == Subscriber received: {"orderId":1} == APP == Subscriber received: {"orderId":2} == APP == Subscriber received: {"orderId":3} == APP == Subscriber received: {"orderId":4} == APP == Subscriber received: {"orderId":5} == APP == Subscriber received: {"orderId":6} == APP == Subscriber received: {"orderId":7} == APP == Subscriber received: {"orderId":8} == APP == Subscriber received: {"orderId":9} == APP == Subscriber received: {"orderId":10}次のコマンドを実行して、両方のアプリケーションが停止していることを確認します。 チェックアウト ターミナルで、次の手順を実行します。
dapr stop --app-id checkoutオーダー プロセッサー ターミナルで、次の手順を実行します。
dapr stop --app-id order-processor
Azure Developer CLI を使用してアプリケーション テンプレートをデプロイする
azd を使用して、アプリケーションを Azure Container Apps にデプロイします。
プロジェクトを準備する
新しいターミナル ウィンドウで、サンプルのルート ディレクトリに移動します。
cd pubsub-dapr-python-servicebus
Azure Developer CLI を使用したプロビジョニングとデプロイ
azd initを実行してプロジェクトを初期化します。azd initターミナルでメッセージが表示されたら、次のパラメーターを指定します。
パラメーター 説明 Environment Name すべての Azure リソースを保持するために作成されたリソース グループのプレフィックス。 Azure の場所 リソースの Azure の場所。 Azure サブスクリプション リソースの Azure サブスクリプション。 azd upを実行して、1 つのコマンドでインフラストラクチャをプロビジョニングしてアプリケーションを Azure Container Apps にデプロイします。azd upこの処理は、完了までに時間がかかる場合があります。
azd upコマンドが完了すると、CLI 出力に、デプロイの進行状況を監視するための 2 つの Azure portal リンクが表示されます。 また、出力では、次のazd upの方法も示されます。azd provisionを使用して、./infraディレクトリ内の指定されている Bicep ファイルを使用して、必要なすべての Azure リソースを作成して構成します。 Azure Developer CLI によってプロビジョニングされると、Azure portal からこれらのリソースにアクセスできます。 Azure リソースをプロビジョニングするファイルは次のとおりです。main.parameters.jsonmain.bicep- 機能別に整理された
appリソース ディレクトリ azdテンプレートで使用される Bicep モジュールを含むcoreリファレンス ライブラリ
azd deployを使用したコードのデプロイ
想定される出力
Initializing a new project (azd init)


Provisioning Azure resources (azd provision)
Provisioning Azure resources can take some time

  You can view detailed progress in the Azure Portal:
  https://portal.azure.com

  (✓) Done: Resource group: resource-group-name
  (✓) Done: Application Insights: app-insights-name
  (✓) Done: Portal dashboard: portal-dashboard-name
  (✓) Done: Log Analytics workspace: log-analytics-name
  (✓) Done: Key vault: key-vault-name
  (✓) Done: Container Apps Environment: ca-env-name
  (✓) Done: Container App: ca-checkout-name
  (✓) Done: Container App: ca-orders-name


Deploying services (azd deploy)

  (✓) Done: Deploying service checkout
  (✓) Done: Deploying service orders
  - Endpoint: https://ca-orders-name.endpoint.region.azurecontainerapps.io/

SUCCESS: Your Azure app has been deployed!
You can view the resources created under the resource group resource-group-name in Azure Portal:
https://portal.azure.com/#@/resource/subscriptions/subscription-id/resourceGroups/resource-group-name/overview
デプロイが成功したことを確認する
Azure portal で、checkout サービスが Azure Service Bus トピックにメッセージを公開していることを確認します。
ターミナル出力から
checkoutコンテナー アプリ名をコピーします。Azure portal にサインインし、名前でコンテナー アプリ リソースを検索します。
Container Apps ダッシュボードで、[監視]>[ログ ストリーム] を選択します。
checkoutコンテナーが先ほどのターミナルと同じ出力をログに記録しているかどうかを確認します。
order-processorサービスに対して同じことを行います。
何が起きましたか?
azd up コマンドが正常に完了した場合、次のようになります。
- Azure Developer CLI は、サンプル プロジェクトの
./infraディレクトリで参照されている Azure リソースを、指定した Azure サブスクリプションにプロビジョニングしました。 これにより Azure portal から、これらの Azure リソースを表示できるようになりました。 - Azure Container Apps にデプロイされたアプリ。 ポータルから、完全に機能するアプリを参照できます。
.NET アプリケーションをローカルで実行する
Azure Container Apps にアプリケーションをデプロイする前に、Dapr と Azure Service Bus を使用して order-processor サービスと checkout サービスをローカルで実行します。
プロジェクトを準備する
サンプル アプリケーションをローカル コンピューターにクローンします。
git clone https://github.com/Azure-Samples/pubsub-dapr-csharp-servicebus.gitサンプルのルート ディレクトリに移動します。
cd pubsub-dapr-csharp-servicebus
Dapr CLI を使用してアプリケーションを実行する
最初に、order-processor サブスクライバー サービスを実行します
サンプルのルート ディレクトリから、ディレクトリを
order-processorに変更します。cd order-processor依存関係をインストールします。
dotnet buildorder-processorサービスを実行します。dapr run --app-id order-processor --resources-path ../components/ --app-port 7001 -- dotnet run --project .新しいターミナル ウィンドウで、サンプルのルート ディレクトリから
checkoutパブリッシャー サービスに移動します。cd checkout依存関係をインストールします。
dotnet buildcheckoutサービスを実行します。dapr run --app-id checkout --resources-path ../components/ -- dotnet run --project .想定される出力
どちらのターミナルでも、
checkoutサービスは終了する前にorder-processorサービスが受信した 10 個のメッセージを発行します。checkout出力:== APP == Published data: {"orderId":1} == APP == Published data: {"orderId":2} == APP == Published data: {"orderId":3} == APP == Published data: {"orderId":4} == APP == Published data: {"orderId":5} == APP == Published data: {"orderId":6} == APP == Published data: {"orderId":7} == APP == Published data: {"orderId":8} == APP == Published data: {"orderId":9} == APP == Published data: {"orderId":10}order-processor出力:== APP == Subscriber received: {"orderId":1} == APP == Subscriber received: {"orderId":2} == APP == Subscriber received: {"orderId":3} == APP == Subscriber received: {"orderId":4} == APP == Subscriber received: {"orderId":5} == APP == Subscriber received: {"orderId":6} == APP == Subscriber received: {"orderId":7} == APP == Subscriber received: {"orderId":8} == APP == Subscriber received: {"orderId":9} == APP == Subscriber received: {"orderId":10}次のコマンドを実行して、両方のアプリケーションが停止していることを確認します。 チェックアウト ターミナルで。
dapr stop --app-id checkoutオーダー プロセッサー ターミナルで、次の手順を実行します。
dapr stop --app-id order-processor
Azure Developer CLI を使用してアプリケーション テンプレートをデプロイする
azd を使用して、アプリケーションを Azure Container Apps にデプロイします。
プロジェクトを準備する
新しいターミナル ウィンドウで、サンプルのルート ディレクトリに移動します。
cd pubsub-dapr-csharp-servicebus
Azure Developer CLI を使用したプロビジョニングとデプロイ
azd initを実行してプロジェクトを初期化します。azd initターミナルでメッセージが表示されたら、次のパラメーターを指定します。
パラメーター 説明 Environment Name すべての Azure リソースを保持するために作成されたリソース グループのプレフィックス。 Azure の場所 リソースの Azure の場所。 Azure サブスクリプション リソースの Azure サブスクリプション。 azd upを実行して、1 つのコマンドでインフラストラクチャをプロビジョニングしてアプリケーションを Azure Container Apps にデプロイします。azd upこの処理は、完了までに時間がかかる場合があります。
azd upコマンドが完了すると、CLI 出力に、デプロイの進行状況を監視するための 2 つの Azure portal リンクが表示されます。 また、出力では、次のazd upの方法も示されます。azd provisionを使用して、./infraディレクトリ内の指定されている Bicep ファイルを使用して、必要なすべての Azure リソースを作成して構成します。 Azure Developer CLI によってプロビジョニングされると、Azure portal からこれらのリソースにアクセスできます。 Azure リソースをプロビジョニングするファイルは次のとおりです。main.parameters.jsonmain.bicep- 機能別に整理された
appリソース ディレクトリ azdテンプレートで使用される Bicep モジュールを含むcoreリファレンス ライブラリ
azd deployを使用したコードのデプロイ
想定される出力
Initializing a new project (azd init)


Provisioning Azure resources (azd provision)
Provisioning Azure resources can take some time

  You can view detailed progress in the Azure Portal:
  https://portal.azure.com

  (✓) Done: Resource group: resource-group-name
  (✓) Done: Application Insights: app-insights-name
  (✓) Done: Portal dashboard: portal-dashboard-name
  (✓) Done: Log Analytics workspace: log-analytics-name
  (✓) Done: Key vault: key-vault-name
  (✓) Done: Container Apps Environment: ca-env-name
  (✓) Done: Container App: ca-checkout-name
  (✓) Done: Container App: ca-orders-name


Deploying services (azd deploy)

  (✓) Done: Deploying service checkout
  (✓) Done: Deploying service orders
  - Endpoint: https://ca-orders-name.endpoint.region.azurecontainerapps.io/

SUCCESS: Your Azure app has been deployed!
You can view the resources created under the resource group resource-group-name in Azure Portal:
https://portal.azure.com/#@/resource/subscriptions/subscription-id/resourceGroups/resource-group-name/overview
デプロイが成功したことを確認する
Azure portal で、checkout サービスが Azure Service Bus トピックにメッセージを公開していることを確認します。
ターミナル出力から
checkoutコンテナー アプリ名をコピーします。Azure portal にサインインし、名前でコンテナー アプリ リソースを検索します。
Container Apps ダッシュボードで、[監視]>[ログ ストリーム] を選択します。
checkoutコンテナーが先ほどのターミナルと同じ出力をログに記録しているかどうかを確認します。
order-processorサービスに対して同じことを行います。
何が起きましたか?
azd up コマンドが正常に完了した場合、次のようになります。
- Azure Developer CLI は、サンプル プロジェクトの
./infraディレクトリで参照されている Azure リソースを、指定した Azure サブスクリプションにプロビジョニングしました。 これにより Azure portal から、これらの Azure リソースを表示できるようになりました。 - Azure Container Apps にデプロイされたアプリ。 ポータルから、完全に機能するアプリを参照できます。
リソースをクリーンアップする
このアプリケーションを引き続き使用しない場合は、次のコマンドを使用して、プロビジョニングした Azure リソースを削除します。
azd down