重要
このページには、プレビュー段階にある Kubernetes デプロイ マニフェストを使用して Azure IoT Operations コンポーネントを管理する手順が含まれます。 この機能はいくつかの制限を設けて提供されており、運用環境のワークロードには使用しないでください。
ベータ版、プレビュー版、または一般提供としてまだリリースされていない Azure の機能に適用される法律条項については、「Microsoft Azure プレビューの追加使用条件」を参照してください。
認可ポリシーは、クライアントがブローカーに対して実行できるアクション (トピックへの接続、パブリッシュ、サブスクライブなど) を決定します。 BrokerAuthorization リソースで 1 つまたは複数の認可ポリシーを使うように MQTT ブローカーを構成します。 各 BrokerAuthorization リソースには、認可ポリシーのプリンシパルとリソースを指定する規則のリストが含まれています。
ルールの評価方法
- ポリシーは許可専用です。 プリンシパルのリソースに対するアクションを明示的に許可するルールがない場合、アクションは拒否されます。
- ルールは、プリンシパル (アクター)、アクション (接続/発行/サブスクライブまたは状態ストア操作)、リソース (トピックまたはキー) の 3 つの要素によって定義されます。
- ルール内のプリンシパルは論理 OR と一致します。 たとえば、一覧表示されているユーザー名、clientId、または属性の一致により、ルール内のリソースへのアクセスが許可されます。
トークンの置換とワイルドカード
- トピックとキーの場合、トークンの置換を使用して、
{principal.username}、 {principal.clientId}、 {principal.attributes.<attributeName>}など、クライアントごとに適応するルールを構築できます。
- MQTT トピックのワイルドカード
+ と # は、 brokerResources.topicsでサポートされています。
- トピックでトークン置換を使用する場合、トークンはパス セグメント内の唯一のテキストである必要があります。 たとえば、
clients/{principal.clientId}/# は有効ですが、 client-{principal.clientId}/# は有効ではありません。
- 接続アクションにトピックを含めることはできません。
BrokerAuthorization を BrokerListener にリンクする
BrokerListener リソースを BrokerAuthorization リソースにリンクするには、BrokerListener リソースの authorizationRef の設定で ports フィールドを指定します。 BrokerAuthentication と同様に、BrokerAuthorization リソースは複数の BrokerListener ポートにリンクできます。 認可ポリシーは、リンクされているすべてのリスナー ポートに適用されます。 BrokerAuthentication と比べて重要な違いが 1 つあります。
重要
BrokerAuthorization の構成をリスナー ポートに適用するには、少なくとも 1 つの BrokerAuthentication リソースもそのリスナー ポートにリンクされている必要があります。
BrokerListener について詳しくは、BrokerListener リソースに関する記事をご覧ください。
承認規則
認可を構成するには、Kubernetes クラスターに BrokerAuthorization リソースを作成します。 以下のセクションでは、ユーザー名、属性、X.509 証明書、Kubernetes サービス アカウント トークン (SAT) を使うクライアントに対して認可を構成する方法の例を示します。 使用できる設定の一覧については、Broker Authorization API リファレンスを参照してください。
次の例では、ユーザー名と属性の両方を使って BrokerAuthorization リソースを作成する方法を示します。
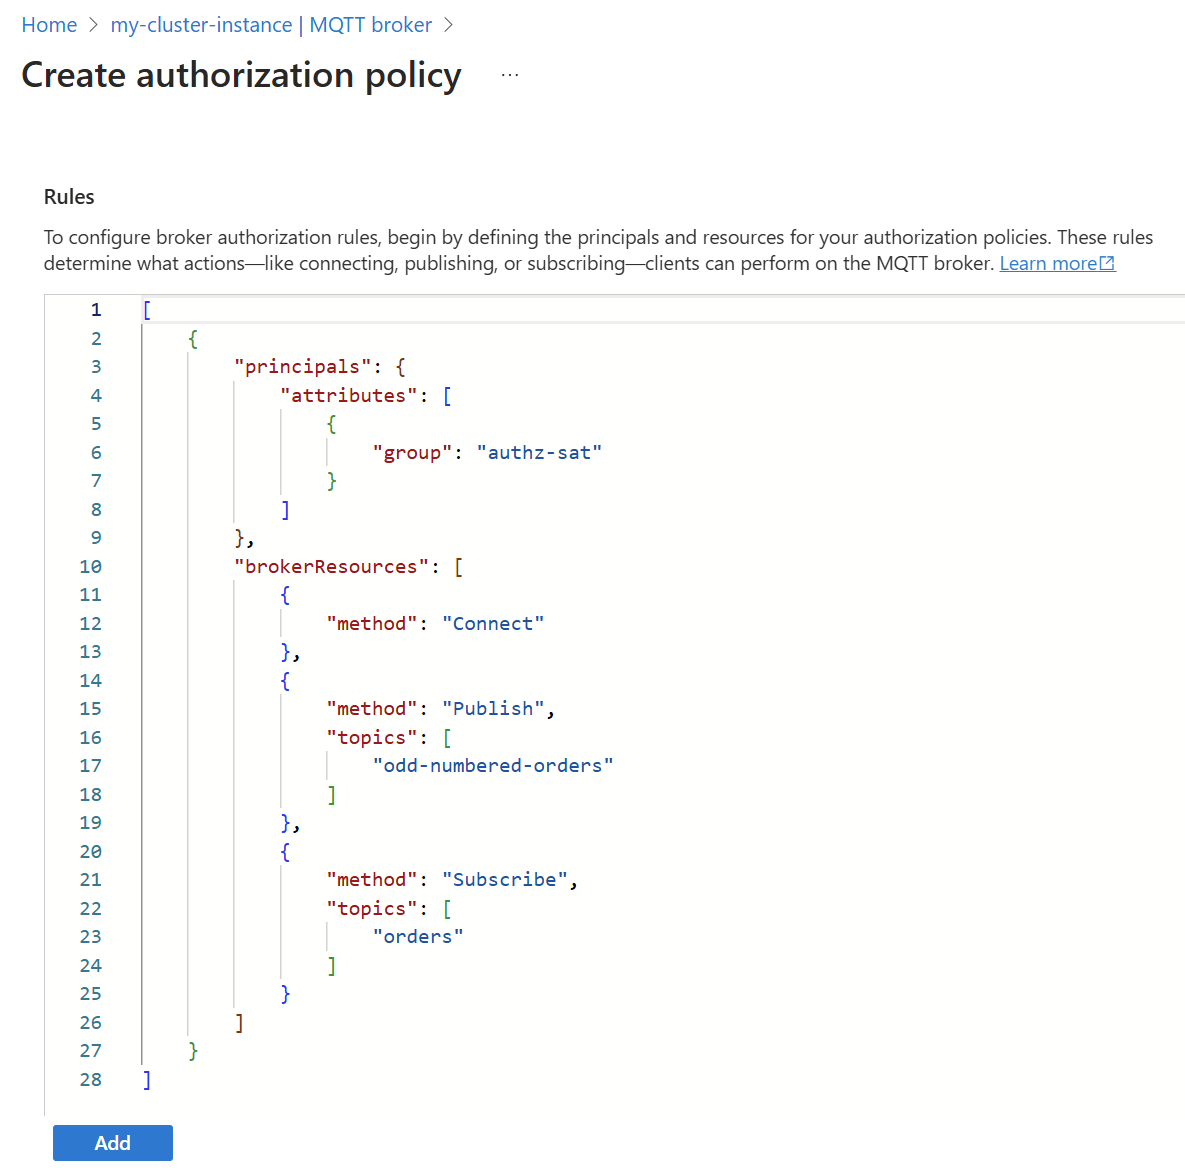
Azure portal で、IoT Operations インスタンスに移動します。
[コンポーネント] で、[MQTT ブローカー] を選択します。
承認タブを選択します。
既存の認証ポリシーを選択するか、[Create authorization policy]\(認証ポリシーの作成\) を選択して新しく作成します。
az iot ops broker authz apply コマンドを使用して、承認ポリシーを作成または変更します。
az iot ops broker authz apply --resource-group <ResourceGroupName> --instance <AioInstanceName> --broker <BrokerName> --name <AuthenticationResourceName> --config-file <ConfigFilePathAndName>
この例では、ユーザーのホーム ディレクトリに格納されている次のコンテンツを含む my-authz-policy.json という名前の構成ファイルを想定しています。
{
  "authorizationPolicies": {
    "cache": "Enabled",
    "rules": [
      {
        "brokerResources": [
          {
            "clientIds": [],
            "method": "Connect",
            "topics": []
          },
          {
            "clientIds": [],
            "method": "Publish",
            "topics": [
              "odd-numbered-orders"
            ]
          },
          {
            "clientIds": [],
            "method": "Subscribe",
            "topics": [
              "orders"
            ]
          }
        ],
        "principals": {
          "attributes": [
            {
              "group": "authz-sat"
            }
          ],
          "clientIds": [],
          "usernames": []
        }
      }
    ]
  }
}
my-authz-policyという名前の新しい承認ポリシーを作成するコマンドの例を次に示します。
az iot ops broker authz apply --resource-group myResourceGroupName --instance myAioInstanceName --broker default --name my-authz-policy --config-file ~/my-authz-policy.json
認可ポリシーを編集するには、次のような内容の .bicep ファイルを作成します。 必要に応じて設定を更新し、<AIO_INSTANCE_NAME> などのプレースホルダーの値を独自の値に置き換えます。
param aioInstanceName string = '<AIO_INSTANCE_NAME>'
param customLocationName string = '<CUSTOM_LOCATION_NAME>'
param policyName string = '<POLICY_NAME>'

resource aioInstance 'Microsoft.IoTOperations/instances@2024-11-01' existing = {
  name: aioInstanceName
}

resource customLocation 'Microsoft.ExtendedLocation/customLocations@2021-08-31-preview' existing = {
  name: customLocationName
}

resource defaultBroker 'Microsoft.IoTOperations/instances/brokers@2024-11-01' existing = {
  parent: aioInstance
  name: 'default'
}

resource brokerAuthorization 'Microsoft.IoTOperations/instances/brokers/authorizations@2024-11-01' = {
  parent: defaultBroker
  name: policyName
  extendedLocation: {
    name: customLocation.id
    type: 'CustomLocation'
  }
  properties: {
    authorizationPolicies: {
      cache: 'Enabled'
      rules: [
        {
          principals: {
            clientIds: [
              'temperature-sensor'
              'humidity-sensor'
            ]
            attributes: [
              {
                city: 'seattle'
                organization: 'contoso'
              }
            ]
          }
          brokerResources: [
            {
              method: 'Connect'
            }
            {
              method: 'Publish'
              topics: [
                '/sensor/{principal.clientId}'
                '/sensor/{principal.attributes.organization}'
              ]
            }
            {
              method: 'Subscribe'
              topics: [
                '/commands/{principal.attributes.organization}'
              ]
            }
          ]
        }
      ]
    }
  }
}
Azure CLI を使用して Bicep ファイルをデプロイします。
az deployment group create --resource-group <RESOURCE_GROUP> --template-file <FILE>.bicep
apiVersion: mqttbroker.iotoperations.azure.com/v1
kind: BrokerAuthorization
metadata:
  name: "my-authz-policies"
  namespace: azure-iot-operations
spec:
  authorizationPolicies:
    cache: Enabled
    rules:
      - principals:
          clientIds:
            - "temperature-sensor"
            - "humidity-sensor"
          attributes:
            - city: "seattle"
              organization: "contoso"
        brokerResources:
          - method: Connect
          - method: Publish
            topics:
              - "/sensor/{principal.clientId}"
              - "/sensor/{principal.attributes.organization}"
          - method: Subscribe
            topics:
              - "/commands/{principal.attributes.organization}"
この BrokerAuthorization リソースを作成するには、YAML マニフェストを Kubernetes クラスターに適用します。
このブローカー認可を使うと、クライアント ID が temperature-sensor または humidity-sensor のクライアント、または属性 organization の値が contoso で属性 city の値が seattle であるクライアントは、次の操作を実行できます。
- ブローカーに接続する。
- クライアント ID と組織を対象としたトピックにメッセージを発行します。 例:
-
temperature-sensor は、/sensor/temperature-sensor および /sensor/contoso に発行できます。
-
humidity-sensor は、/sensor/humidity-sensor および /sensor/contoso に発行できます。
-
some-other-username は、/sensor/contoso に発行できます。
- 組織をスコープとする
/commands/ トピックをサブスクライブします。 例:
-
temperature-sensor は、/commands/contoso をサブスクライブできます。
-
some-other-username は、/commands/contoso をサブスクライブできます。
認可にユーザー名を使用する
認可に MQTT ユーザー名を使用するには、それを principals.usernames の配列として指定します。 認証方法によっては、ユーザー名が検証されない場合があります。
-
Kubernetes SAT: ユーザー名は認証が強化された MQTTv5 では検証されないため、認可には使わないでください。
-
X.509: ユーザー名は証明書の共通名 (CN) と一致し、認可規則に使用できます。
-
カスタム: カスタム認証によってユーザー名が検証される場合にのみ、そのユーザー名を認可規則に使う必要があります。
セキュリティの問題を防ぐため、MQTT ユーザー名は、検証できる場合にのみブローカーの認可に使います。
ヒント
MQTT ユーザー名がクライアント ID と一致することを要求するには、トークンの置換を使用します。
principals:
  usernames:
    - "{principal.clientId}"
クライアント ID に基づいてアクセスをさらに制限する
principals フィールドは論理 OR であるため、clientIds フィールドを brokerResources フィールドに追加すると、クライアント ID に基づいてアクセスをさらに制限できます。 たとえば、建物番号で始まるクライアント ID を持つクライアントが、建物をスコープとするトピックに接続して発行できるようにするには、次の構成を使用します。
承認ポリシーのブローカー認可規則では、次の構成を使用します。
[
  {
    "brokerResources": [
      {
        "clientIds": [
          "{principal.attributes.building}*"
        ],
        "method": "Connect",
        "topics": []
      },
      {
        "clientIds": [],
        "method": "Publish",
        "topics": [
          "sensors/{principal.attributes.building}/{principal.clientId}/sensor"
        ]
      }
    ],
    "principals": {
      "attributes": [
        {
          "building": "building22"
        },
        {
          "building": "building23"
        }
      ]
    }
  }
]
az iot ops broker authz apply コマンドを使用して、承認ポリシーを作成または変更します。
az iot ops broker authz apply --resource-group <ResourceGroupName> --instance <AioInstanceName> --broker <BrokerName> --name <AuthenticationResourceName> --config-file <ConfigFilePathAndName>
承認ポリシーのブローカー承認規則で、 client-id-policy.json という名前の構成ファイルを作成し、次の構成をユーザーのホーム ディレクトリに格納します。
{
  "authorizationPolicies": {
    "cache": "Enabled",
    "rules": [
      {
        "brokerResources": [
          {
            "clientIds": [
              "{principal.attributes.building}*"
            ],
            "method": "Connect",
            "topics": []
          },
          {
            "clientIds": [],
            "method": "Publish",
            "topics": [
              "sensors/{principal.attributes.building}/{principal.clientId}/sensor"
            ]
          }
        ],
        "principals": {
          "attributes": [
            {
              "building": "building22"
            },
            {
              "building": "building23"
            }
          ]
        }
      }
    ]
  }
}
client-id-authz-policyという名前の新しい承認ポリシーを作成するコマンドの例を次に示します。
az iot ops broker authz apply --resource-group myResourceGroupName --instance myAioInstanceName --broker default --name my-authz-policy --config-file ~/client-id-authz-policy.json
認可ポリシーを編集するには、次のような内容の .bicep ファイルを作成します。 必要に応じて設定を更新し、<AIO_INSTANCE_NAME> などのプレースホルダーの値を独自の値に置き換えます。
param aioInstanceName string = '<AIO_INSTANCE_NAME>'
param customLocationName string = '<CUSTOM_LOCATION_NAME>'
param policyName string = '<POLICY_NAME>'

resource aioInstance 'Microsoft.IoTOperations/instances@2024-11-01' existing = {
  name: aioInstanceName
}

resource customLocation 'Microsoft.ExtendedLocation/customLocations@2021-08-31-preview' existing = {
  name: customLocationName
}

resource defaultBroker 'Microsoft.IoTOperations/instances/brokers@2024-11-01' existing = {
  parent: aioInstance
  name: 'default'
}

resource brokerAuthorization 'Microsoft.IoTOperations/instances/brokers/authorizations@2024-11-01' = {
  parent: defaultBroker
  name: policyName
  extendedLocation: {
    name: customLocation.id
    type: 'CustomLocation'
  }
  properties: {
    authorizationPolicies: {
      cache: 'Enabled'
      rules: [
        {
          principals: {
            attributes: [
              {
                building: 'building22'
              }
              {
                building: 'building23'
              }
            ]
          }
          brokerResources: [
            {
              method: 'Connect'
              clientIds: [
                '{principal.attributes.building}*' // client IDs must start with building22
              ]
            }
            {
              method: 'Publish'
              topics: [
                'sensors/{principal.attributes.building}/{principal.clientId}/sensor'
              ]
            }
          ]
        }
      ]
    }
  }
}
Azure CLI を使用して Bicep ファイルをデプロイします。
az deployment group create --resource-group <RESOURCE_GROUP> --template-file <FILE>.bicep
apiVersion: mqttbroker.iotoperations.azure.com/v1
kind: BrokerAuthorization
metadata:
  name: "my-authz-policies"
  namespace: azure-iot-operations
spec:
  authorizationPolicies:
    cache: Enabled
    rules:
    - principals:
        attributes:
          - building: "building22"
          - building: "building23"
      brokerResources:
      - method: Connect
        clientIds:
          - "{principal.attributes.building}*" # client IDs must start with building22
      - method: Publish
        topics:
          - "sensors/{principal.attributes.building}/{principal.clientId}/sensor"
ここで、clientIds が Connect メソッドで設定されなかった場合は、building 属性が building22 または building23 に設定されてさえいれば、どのようなクライアント ID を持つクライアントであっても接続できます。
clientIds フィールドを追加すると、クライアント ID が building22 または building23 で始まるクライアントのみが接続できます。 このように指定すると、クライアントが正しい属性を持つことと、クライアント ID が必要なパターンと一致することが保証されます。
X.509 認証を使用するクライアントを承認する
認証に X.509 証明書を使うクライアントが、証明書に存在する X.509 プロパティまたはチェーン上の発行元証明書に基づいてリソースにアクセスすることを認可できます。
属性を使用する
クライアントの証明書、そのルート CA、または中間 CA のプロパティに基づいてルールを作成するには、BrokerAuthorization リソースで X.509 属性を定義します。 詳細については、「証明書の属性」を参照してください。
クライアント証明書のサブジェクト共通名をユーザー名として使用
"クライアント" 証明書のサブジェクトの CN のみに基づいて認可ポリシーを作成するには、CN に基づく規則を作成します。
たとえば、サブジェクトが CN = smart-lock である証明書がクライアントにある場合、そのユーザー名は smart-lock です。 その後、通常どおりに認可ポリシーを作成します。
Kubernetes サービス アカウント トークンを使用するクライアントを認可する
SAT の認可属性は、サービス アカウント注釈の一部として設定されます。 たとえば、名前が group で値が authz-sat の認可属性を追加するには、次のコマンドを実行します。
kubectl annotate serviceaccount mqtt-client aio-broker-auth/group=authz-sat
属性の注釈は、他の注釈と区別するために、aio-broker-auth/ で始まる必要があります。
アプリケーションには authz-sat という名前の認可属性があるため、値 clientId または username を指定する必要はありません。 対応する BrokerAuthorization リソースでは、この属性がプリンシパルとして使用されます。次に例を示します。
承認ポリシーのブローカー認可規則では、次の構成を使用します。
[
  {
    "brokerResources": [
      {
        "clientIds": [],
        "method": "Connect",
        "topics": []
      },
      {
        "clientIds": [],
        "method": "Publish",
        "topics": [
          "odd-numbered-orders"
        ]
      },
      {
        "clientIds": [],
        "method": "Subscribe",
        "topics": [
          "orders"
        ]
      }
    ],
    "principals": {
      "attributes": [
        {
          "group": "authz-sat"
        }
      ]
    }
  }
]
az iot ops broker authz apply コマンドを使用して、承認ポリシーを作成または変更します。
az iot ops broker authz apply --resource-group <ResourceGroupName> --instance <AioInstanceName> --broker <BrokerName> --name <AuthenticationResourceName> --config-file <ConfigFilePathAndName>
この例では、ユーザーのホーム ディレクトリに格納されている次のコンテンツを含む my-authz-policy.json という名前の構成ファイルを想定しています。
{
  "authorizationPolicies": {
    "cache": "Enabled",
    "rules": [
      {
        "brokerResources": [
          {
            "clientIds": [],
            "method": "Connect",
            "topics": []
          },
          {
            "clientIds": [],
            "method": "Publish",
            "topics": [
              "odd-numbered-orders"
            ]
          },
          {
            "clientIds": [],
            "method": "Subscribe",
            "topics": [
              "orders"
            ]
          }
        ],
        "principals": {
          "attributes": [
            {
              "group": "authz-sat"
            }
          ],
          "clientIds": [],
          "usernames": []
        }
      }
    ]
  }
}
my-authz-policyという名前の新しい承認ポリシーを作成するコマンドの例を次に示します。
az iot ops broker authz apply --resource-group myResourceGroupName --instance myAioInstanceName --broker default --name my-authz-policy --config-file ~/my-authz-policy.json
認可ポリシーを編集するには、次のような内容の .bicep ファイルを作成します。 必要に応じて設定を更新し、<AIO_INSTANCE_NAME> などのプレースホルダーの値を独自の値に置き換えます。
param aioInstanceName string = '<AIO_INSTANCE_NAME>'
param customLocationName string = '<CUSTOM_LOCATION_NAME>'
param policyName string = '<POLICY_NAME>'

resource aioInstance 'Microsoft.IoTOperations/instances@2024-11-01' existing = {
  name: aioInstanceName
}

resource customLocation 'Microsoft.ExtendedLocation/customLocations@2021-08-31-preview' existing = {
  name: customLocationName
}

resource defaultBroker 'Microsoft.IoTOperations/instances/brokers@2024-11-01' existing = {
  parent: aioInstance
  name: 'default'
}

resource brokerAuthorization 'Microsoft.IoTOperations/instances/brokers/authorizations@2024-11-01' = {
  parent: defaultBroker
  name: policyName
  extendedLocation: {
    name: customLocation.id
    type: 'CustomLocation'
  }
  properties: {
    authorizationPolicies: {
      rules: [
        {
          principals: {
            attributes: [
              {
                group: 'authz-sat'
              }
            ]
          }
          brokerResources: [
            {
              method: 'Connect'
            }
            {
              method: 'Publish'
              topics: [
                'odd-numbered-orders'
              ]
            }
            {
              method: 'Subscribe'
              topics: [
                'orders'
              ]
            }
          ]
        }
      ]
    }
  }
}
Azure CLI を使用して Bicep ファイルをデプロイします。
az deployment group create --resource-group <RESOURCE_GROUP> --template-file <FILE>.bicep
apiVersion: mqttbroker.iotoperations.azure.com/v1
kind: BrokerAuthorization
metadata:
  name: "my-authz-policies"
  namespace: azure-iot-operations
spec:
  authorizationPolicies:
    cache: Enabled
    rules:
      - principals:
          attributes:
            - group: "authz-sat"
        brokerResources:
          - method: Connect
          - method: Publish
            topics:
              - "odd-numbered-orders"
          - method: Subscribe
            topics:
              - "orders"
例の詳細については、「Dapr クライアントを使用して認可ポリシーを設定する」を参照してください。
状態ストア
MQTT ブローカーは、クライアントが状態を格納するために使用できる状態ストアを提供します。 状態ストアを高可用性に構成することもできます。
状態ストアを使用するクライアントの承認を設定するには、プロトコル トピックとキーのアクセス許可を指定します。
- 要求を発行する:
statestore/v1/FA9AE35F-2F64-47CD-9BFF-08E2B32A0FE8/command/invoke。
- 発行時に設定した応答トピック (通常は
clients/{principal.clientId}/services/statestore/v1/FA9AE35F-2F64-47CD-9BFF-08E2B32A0FE8/command/invoke/response/#) をサブスクライブします。
- 以下のガイダンスに従って、
stateStoreResources のキー アクセス権を付与します。
状態ストア キー
状態ストアには、トピック statestore/v1/FA9AE35F-2F64-47CD-9BFF-08E2B32A0FE8/command/invoke の MQTT ブローカー経由でアクセスします。
クライアントはトピックにアクセスできるので、MQTT ブローカーの stateStoreResources 構成の brokerResources セクションで、キーとアクセス レベルを指定できます。
stateStoreResources セクション形式は、アクセス レベル、パターン インジケーター、およびパターンで構成されます。
承認ポリシーの規則に stateStoreResources セクションを含めます。
"stateStoreResources": [
  {
    "method": "", // Values: read, write, readwrite
    "keyType": "", //Values: string, pattern, binary. Default is pattern
    "keys": [
      // List of patterns to match
    ]
  },
]
承認ポリシーの規則に stateStoreResources セクションを含めます。
"stateStoreResources": [
  {
    "method": "", // Values: read, write, readwrite
    "keyType": "", //Values: string, pattern, binary. Default is pattern
    "keys": [
      // List of patterns to match
    ]
  },
]
Bicep で、承認ポリシーに stateStoreResources セクションを含めます。
stateStoreResources: [
  {
    method: '' // Values: read, write, readwrite
    keyType: '' //Values: string, pattern, binary. Default is pattern
    keys: [
      // List of patterns to match
    ]
  }
  {
    method: 'ReadWrite'
    keyType: 'Binary'
    keys: [
      'xxxxxxxxxxxxxxxxxxxx'
    ]
  }
]
カスタム リソース定義で、承認ポリシーに stateStoreResources セクションを含めます。
stateStoreResources:
  - method:  # Values: read, write, readwrite
    keyType: # Values: string, pattern, binary. Default is pattern
    keys:
      - # List of patterns to match
method フィールドでは、アクセス レベルを指定します。
- 読み取りアクセスは、
read で指定します。 書き込みアクセスは、write で指定します。 読み書きアクセスは、readwrite で指定します。
- アクセス レベルは必須です。
- 読み取りアクセス レベルは
get と keynotify のアクションを意味します。
- 書き込みアクセス レベルは、
set、del、および vdel のアクションを意味します。
keyType フィールドでは、キーのマッチングの種類を指定します。
-
pattern: glob スタイルのパターン マッチングに使われます。
-
string: 完全一致に使われます。パターンとして一致する可能性がある文字 (*、?、[0-9]) がキーに含まれている場合など。
-
binary: バイナリ キーとの一致に使われます。
keys フィールドでは、一致させるキーを指定します。 キーは、glob スタイルのパターン、トークンの置換、または正確な文字列として指定できます。
次に示すのは、状態ストア リソースの作成方法の例です。
認可ポリシーのブローカー認可規則で、同様の構成を追加します。
[
  {
    "brokerResources": [
      {
        "clientIds": [
          "{principal.attributes.building}*"
        ],
        "method": "Connect"
      },
      {
        "method": "Publish",
        "topics": [
          "sensors/{principal.attributes.building}/{principal.clientId}/sensor/*"
        ]
      },
      {
        "method": "Subscribe",
        "topics": [
          "commands/{principal.attributes.organization}"
        ]
      }
    ],
    "principals": {
      "attributes": [
        {
          "building": "17",
          "organization": "contoso"
        }
      ],
      "usernames": [
        "temperature-sensor",
        "humidity-sensor"
      ]
    },
    "stateStoreResources": [
      {
        "method": "Read",
        "keyType": "Pattern",
        "keys": [
          "myreadkey",
          "myotherkey?",
          "mynumerickeysuffix[0-9]",
          "clients/{principal.clientId}/*"
        ]
      },
      {
        "method": "ReadWrite",
        "keyType": "Binary",
        "keys": [
          "xxxxxxxxxxxxxxxxxxxx"
        ]
      }
    ]
  }
]
この例では、ユーザーのホーム ディレクトリに state-store-authz-policy.json という名前の構成ファイルがあるとします。 認可ポリシーのブローカー認可規則で、同様の構成を追加します。
{
  "authorizationPolicies": {
    "cache": "Enabled",
    "rules": [
      {
        "brokerResources": [
          {
            "clientIds": [
              "{principal.attributes.building}*"
            ],
            "method": "Connect"
          },
          {
            "method": "Publish",
            "topics": [
              "sensors/{principal.attributes.building}/{principal.clientId}/sensor/*"
            ]
          },
          {
            "method": "Subscribe",
            "topics": [
              "commands/{principal.attributes.organization}"
            ]
          }
        ],
        "principals": {
          "attributes": [
            {
              "building": "17",
              "organization": "contoso"
            }
          ],
          "usernames": [
            "temperature-sensor",
            "humidity-sensor"
          ]
        },
        "stateStoreResources": [
          {
            "method": "Read",
            "keyType": "Pattern",
            "keys": [
              "myreadkey",
              "myotherkey?",
              "mynumerickeysuffix[0-9]",
              "clients/{principal.clientId}/*"
            ]
          },
          {
            "method": "ReadWrite",
            "keyType": "Binary",
            "keys": [
              "xxxxxxxxxxxxxxxxxxxx"
            ]
          }
        ]
      }
    ]
  }
}
state-store-authz-policyという名前の新しい承認ポリシーを作成するコマンドの例を次に示します。
az iot ops broker authz apply --resource-group myResourceGroupName --instance myAioInstanceName --broker default --name my-authz-policy --config-file ~/state-store-authz-policy.json
認可ポリシーを編集するには、次のような内容の .bicep ファイルを作成します。 必要に応じて設定を更新し、<AIO_INSTANCE_NAME> などのプレースホルダーの値を独自の値に置き換えます。
param aioInstanceName string = '<AIO_INSTANCE_NAME>'
param customLocationName string = '<CUSTOM_LOCATION_NAME>'
param policyName string = '<POLICY_NAME>'

resource aioInstance 'Microsoft.IoTOperations/instances@2024-11-01' existing = {
  name: aioInstanceName
}

resource customLocation 'Microsoft.ExtendedLocation/customLocations@2021-08-31-preview' existing = {
  name: customLocationName
}

resource defaultBroker 'Microsoft.IoTOperations/instances/brokers@2024-11-01' existing = {
  parent: aioInstance
  name: 'default'
}

resource brokerAuthorization 'Microsoft.IoTOperations/instances/brokers/authorizations@2024-11-01' = {
  parent: defaultBroker
  name: policyName
  extendedLocation: {
    name: customLocation.id
    type: 'CustomLocation'
  }
  properties: {
    authorizationPolicies: {
      cache: 'Enabled'
      rules: [
        {
          principals: {
            usernames: [
              'temperature-sensor'
              'humidity-sensor'
            ]
            attributes: [
              {
                city: 'seattle'
                organization: 'contoso'
              }
            ]
          }
          brokerResources: [
            {
              method: 'Connect'
            }
            {
              method: 'Publish'
              topics: [
                '/sensor/{principal.username}'
                '/sensor/{principal.attributes.organization}'
              ]
            }
            {
              method: 'Subscribe'
              topics: [
                '/commands/{principal.attributes.organization}'
              ]
            }
          ]
          stateStoreResources: [
            {
              method: 'Read'
              keyType: 'Pattern'
              keys: [
                'myreadkey'
                'myotherkey?'
                'mynumerickeysuffix[0-9]'
                'clients/{principal.clientId}/*'
              ]
            }
            {
              method: 'ReadWrite'
              keyType: 'Binary'
              keys: [
                'xxxxxxxxxxxxxxxxxxxx'
              ]
            }
          ]
        }
      ]
    }
  }
}
Azure CLI を使用して Bicep ファイルをデプロイします。
az deployment group create --resource-group <RESOURCE_GROUP> --template-file <FILE>.bicep
stateStoreResources:
  - method: Read # Read includes Get, Notify
    keyType: "pattern" # string, pattern, binary
    keys:
      - "myreadkey" # explicit read access on key: myreadkey
      - "myotherkey?" # single digit wildcard
      - "mynumerickeysuffix[0-9]" # single digit number range
      - "clients/{principal.clientId}/*" # use token substitution and a wildcard for per-client sandboxing
  - method: ReadWrite  # ReadWrite access includes Get, Notify, Set, Del
    keyType: "binary" # binary keys have exact match, no patterns
    keys:
      - "xxxxxxxxxxxxxxxxxxxx"  # base-64 encoded binary key.
認可を更新する
ブローカー認可リソースは、再起動せずに実行時に更新できます。 ポリシーの更新時に接続されているすべてのクライアントは切断されます。 ポリシーの種類の変更もサポートされています。
kubectl edit brokerauthorization my-authz-policies
キャッシュ動作
高スループットトピックの承認オーバーヘッドを減らすには、 authorizationPolicies.cache: Enabledを使用してメモリ内キャッシュを有効にします。
- 決定は、クライアント、アクション、およびリソースのタプルごとにキャッシュされます。 繰り返しの操作がキャッシュにヒットします。
- リソースが大きく変動する (メッセージごとの一意のトピック セグメントなど) と、キャッシュ ヒット 率が低い。
- キャッシュは、一意のタプルの数に合わせて増加します。 非常に高いチャーン パターンのメモリを監視します。
認可を無効にする
- Azure portal で、IoT Operations インスタンスに移動します。
-
[コンポーネント] で、[MQTT ブローカー] を選択します。
- 編集するブローカー リスナーを一覧から選択します。
- 認可を無効にするポートの認可ドロップダウンで [なし] を選びます。
az iot ops broker listener port add コマンドを使用して、ポートの承認を無効にします。 認証を無効にするには、 --authz-ref パラメーターを含めないでください。
az iot ops broker listener port add --resource-group <ResourceGroupName> --instance <AioInstanceName> --broker default --listener <ListenerName> --port <ListenerServicePort>
次の例では、 aio-broker-loadbalancerという名前のリスナーに対するポート 8884 の承認を無効にします。
az iot ops broker listener port add --resource-group myResourceGroupName --instance myAioInstanceName --broker default --listener aio-broker-loadbalancer --authn-ref default --port 8884
認可を無効にするには、BrokerListener リソースの authorizationRef の設定で ports を省略します。
認可を無効にするには、BrokerListener リソースの authorizationRef の設定で ports を省略します。
MQTT 3.1.1 での未承認の発行
MQTT 3.1.1 では、発行が拒否されると、このプロトコル バージョンではエラー コードを返すことがサポートされていないため、クライアントはエラーなしで PUBACK を受け取ります。 MQTTv5 では、発行が拒否されると理由コード 135 (非認可) で PUBACK が返されます。
トラブルシューティング
ルールを検証する
- スキーマの問題については、BrokerAuthorization YAML/JSON を確認してください。
- 構成を適用するときに出力を確認します。スキーマ エラーは API サーバーによって報告されます。
- フロントエンド ポッドログを
debug または traceに設定し、ポッドを再起動し、解析された有効なルールを示す authz でタグ付けされたエントリを検査します。
正常なログの例 (簡略化):
<7>2025-02-10T16:28:31.986Z aio-broker-frontend-0 [mq@311 tid="1" module="authz"] - adding broker config ... and store config ...
<6>2025-02-10T16:28:31.986Z aio-broker-frontend-0 [mq@311 tid="1"] - starting broker authorization engine with basic rules. Cache enabled: true
<7>2025-02-10T16:28:31.987Z aio-broker-frontend-0 [mq@311 tid="1" module="authz"] - set broker authorization engine data: {"rules":[{...}]}
MQTT ブローカー操作
発行拒否の例:
<7>2025-02-10T16:32:19.398Z aio-broker-frontend-0 [mq@311 tid="15" module="authz"] - checking authorization for {"action":"publish","clientId":"test-publisher","topic":"test"}
<7>2025-02-10T16:32:19.411Z aio-broker-frontend-0 [mq@311 tid="15" module="authz"] - publish from client 'test-publisher' was denied ... reason_code: NotAuthorized
状態ストアの操作
拒否された取得の例:
<7>2025-02-10T16:41:31.314Z aio-broker-frontend-0 [mq@311 tid="8" module="authz"] - checking authorization for {"action":"get","clientId":"statestore-cli","key":"dGVzdA=="}
<7>2025-02-10T16:41:31.322Z aio-broker-frontend-0 [mq@311 tid="8" module="authz"] - cached new authorization result ...: Denied("no rule matched")
次のステップ