チュートリアル:リモート ファイルを URL に基づいてエンコードし、ビデオをストリーム配信する - Azure CLI
![]()
警告
Azure Media Services は、2024 年 6 月 30 日に廃止されます。 詳細については、 AMS 廃止ガイドを参照してください。
このチュートリアルでは、Azure Media Services と Azure CLI を使用して、さまざまなブラウザーおよびデバイスを対象とした動画のエンコードとストリーム配信を簡単に行う方法を示します。 HTTPS URL、SAS URL、または Azure Blob Storage 内のファイルのパスを使用して、入力コンテンツを指定できます。
この記事の例では、HTTPS URL を使用してアクセスできるようにするコンテンツをエンコードします。 現在、Media Services v3 は HTTPS URL を介したチャンク転送エンコードをサポートしていません。
このチュートリアルを最後まで行うと、動画をストリーム配信できるようになります。
Media Services アカウントを作成する
Azure でメディア コンテンツの暗号化、エンコード、分析、管理、ストリーム配信を行う前に、Media Services アカウントを作成する必要があります。 このアカウントは、1 つまたは複数のストレージ アカウントに関連付ける必要があります。
Media Services アカウントおよび関連するすべてのストレージ アカウントは、同じ Azure サブスクリプションに存在する必要があります。 待ち時間やデータ エグレス コストを抑えるために、ストレージ アカウントを Media Services アカウントと同じ場所で使用することをお勧めします。
リソース グループを作成する
az group create -n amsResourceGroup -l westus2
Azure のストレージ アカウントの作成
この例では、General Purpose v2 Standard LRS アカウントを作成します。
ストレージ アカウントで実験する場合は、--sku Standard_LRS を使用します。 運用環境用の SKU を選択する場合は、ビジネス継続性のために地理的レプリケーションを提供する --sku Standard_RAGRS を検討してください。 詳細については、ストレージ アカウントに関するページを参照してください。
az storage account create -n amsstorageaccount --kind StorageV2 --sku Standard_LRS -l westus2 -g amsResourceGroup
Azure Media Services アカウントの作成
az ams account create --n amsaccount -g amsResourceGroup --storage-account amsstorageaccount -l westus2
次のような応答が返されます。
{
  "id": "/subscriptions/<id>/resourceGroups/amsResourceGroup/providers/Microsoft.Media/mediaservices/amsaccount",
  "location": "West US 2",
  "mediaServiceId": "8b569c2e-d648-4fcb-9035-c7fcc3aa7ddf",
  "name": "amsaccount",
  "resourceGroup": "amsResourceGroupTest",
  "storageAccounts": [
    {
      "id": "/subscriptions/<id>/resourceGroups/amsResourceGroup/providers/Microsoft.Storage/storageAccounts/amsstorageaccount",
      "resourceGroup": "amsResourceGroupTest",
      "type": "Primary"
    }
  ],
  "tags": null,
  "type": "Microsoft.Media/mediaservices"
}
ストリーミング エンドポイントを開始する
次の Azure CLI コマンドは、既定のストリーミング エンドポイントを開始します。
az ams streaming-endpoint start -n default -a amsaccount -g amsResourceGroup
次のような応答が返されます。
{
  "accessControl": null,
  "availabilitySetName": null,
  "cdnEnabled": true,
  "cdnProfile": "AzureMediaStreamingPlatformCdnProfile-StandardVerizon",
  "cdnProvider": "StandardVerizon",
  "created": "2019-02-06T21:58:03.604954+00:00",
  "crossSiteAccessPolicies": null,
  "customHostNames": [],
  "description": "",
  "freeTrialEndTime": "2019-02-21T22:05:31.277936+00:00",
  "hostName": "amsaccount-usw22.streaming.media.azure.net",
  "id": "/subscriptions/<id>/resourceGroups/amsResourceGroup/providers/Microsoft.Media/mediaservices/amsaccount/streamingendpoints/default",
  "lastModified": "2019-02-06T21:58:03.604954+00:00",
  "location": "West US 2",
  "maxCacheAge": null,
  "name": "default",
  "provisioningState": "Succeeded",
  "resourceGroup": "amsResourceGroup",
  "resourceState": "Running",
  "scaleUnits": 0,
  "tags": {},
  "type": "Microsoft.Media/mediaservices/streamingEndpoints"
}
ストリーミング エンドポイントが既に実行されている場合は、次のようなメッセージが返されます。
(InvalidOperation) The server cannot execute the operation in its current state.
アダプティブ ビットレート エンコードのための変換を作成する
変換を作成して、ビデオのエンコードや分析を行うための一般的なタスクを構成します。 この例では、アダプティブ ビットレート エンコードを実行します。 その後、作成した変換でジョブを送信します。 ジョブは、特定のビデオまたはオーディオ コンテンツの入力に変換を適用する、Media Services への要求です。
az ams transform create --name testEncodingTransform --preset AdaptiveStreaming --description 'a simple Transform for Adaptive Bitrate Encoding' -g amsResourceGroup -a amsaccount
次のような応答が返されます。
{
  "created": "2019-02-15T00:11:18.506019+00:00",
  "description": "a simple Transform for Adaptive Bitrate Encoding",
  "id": "/subscriptions/<id>/resourceGroups/amsResourceGroup/providers/Microsoft.Media/mediaservices/amsaccount/transforms/testEncodingTransform",
  "lastModified": "2019-02-15T00:11:18.506019+00:00",
  "name": "testEncodingTransform",
  "outputs": [
    {
      "onError": "StopProcessingJob",
      "preset": {
        "odatatype": "#Microsoft.Media.BuiltInStandardEncoderPreset",
        "presetName": "AdaptiveStreaming"
      },
      "relativePriority": "Normal"
    }
  ],
  "resourceGroup": "amsResourceGroup",
  "type": "Microsoft.Media/mediaservices/transforms"
}
出力アセットを作成する
エンコード ジョブの出力として使用する出力アセットを作成します。
az ams asset create -n testOutputAssetName -a amsaccount -g amsResourceGroup
次のような応答が返されます。
{
  "alternateId": null,
  "assetId": "96427438-bbce-4a74-ba91-e38179b72f36",
  "container": null,
  "created": "2019-02-14T23:58:19.127000+00:00",
  "description": null,
  "id": "/subscriptions/<id>/resourceGroups/amsResourceGroup/providers/Microsoft.Media/mediaservices/amsaccount/assets/testOutputAssetName",
  "lastModified": "2019-02-14T23:58:19.127000+00:00",
  "name": "testOutputAssetName",
  "resourceGroup": "amsResourceGroup",
  "storageAccountName": "amsstorageaccount",
  "storageEncryptionFormat": "None",
  "type": "Microsoft.Media/mediaservices/assets"
}
HTTPS 入力を使用してジョブを開始する
ビデオを処理するジョブを送信するときに、入力ビデオを検索する場所を Media Services に指示する必要があります。 選択肢の 1 つは、(この例で示すように) HTTPS URL をジョブの入力として指定することです。
az ams job start を実行すると、ジョブの出力にラベルを設定できます。 次に、ラベルを使用して出力アセットの目的を特定できます。
ラベルに値を割り当てる場合は、"--output-assets" を "assetname=label" に設定します。
ラベルに値を割り当てない場合は、"--output-assets" を "assetname=" に設定します。
output-assetsに "=" を追加することに注意してください。
az ams job start --name testJob001 --transform-name testEncodingTransform --base-uri 'https://nimbuscdn-nimbuspm.streaming.mediaservices.windows.net/2b533311-b215-4409-80af-529c3e853622/' --files 'Ignite-short.mp4' --output-assets testOutputAssetName= -a amsaccount -g amsResourceGroup
次のような応答が返されます。
{
  "correlationData": {},
  "created": "2019-02-15T05:08:26.266104+00:00",
  "description": null,
  "id": "/subscriptions/<id>/resourceGroups/amsResourceGroup/providers/Microsoft.Media/mediaservices/amsaccount/transforms/testEncodingTransform/jobs/testJob001",
  "input": {
    "baseUri": "https://nimbuscdn-nimbuspm.streaming.mediaservices.windows.net/2b533311-b215-4409-80af-529c3e853622/",
    "files": [
      "Ignite-short.mp4"
    ],
    "label": null,
    "odatatype": "#Microsoft.Media.JobInputHttp"
  },
  "lastModified": "2019-02-15T05:08:26.266104+00:00",
  "name": "testJob001",
  "outputs": [
    {
      "assetName": "testOutputAssetName",
      "error": null,
      "label": "",
      "odatatype": "#Microsoft.Media.JobOutputAsset",
      "progress": 0,
      "state": "Queued"
    }
  ],
  "priority": "Normal",
  "resourceGroup": "amsResourceGroup",
  "state": "Queued",
  "type": "Microsoft.Media/mediaservices/transforms/jobs"
}
状態の確認
5 分後、ジョブの状態を確認してください。 "Finished"(完了) になっているはずです。完了していない場合は、数分後にもう一度確認します。 完了したら、次の手順に進み、ストリーミング ロケーターを作成します。
az ams job show -a amsaccount -g amsResourceGroup -t testEncodingTransform -n testJob001
ストリーミング ロケーターを作成し、パスを取得する
エンコードが完了したら、次の手順は、出力アセット内のビデオをクライアントが再生に使用できるようにすることです。 そのために、まずストリーミング ロケーターを作成します。 次に、クライアントが使用できるストリーミング URL を作成します。
ストリーミング ロケーターを作成する
az ams streaming-locator create -n testStreamingLocator --asset-name testOutputAssetName --streaming-policy-name Predefined_ClearStreamingOnly -g amsResourceGroup -a amsaccount
次のような応答が返されます。
{
  "alternativeMediaId": null,
  "assetName": "output-3b6d7b1dffe9419fa104b952f7f6ab76",
  "contentKeys": [],
  "created": "2019-02-15T04:35:46.270750+00:00",
  "defaultContentKeyPolicyName": null,
  "endTime": "9999-12-31T23:59:59.999999+00:00",
  "id": "/subscriptions/<id>/resourceGroups/amsResourceGroup/providers/Microsoft.Media/mediaservices/amsaccount/streamingLocators/testStreamingLocator",
  "name": "testStreamingLocator",
  "resourceGroup": "amsResourceGroup",
  "startTime": null,
  "streamingLocatorId": "e01b2be1-5ea4-42ca-ae5d-7fe704a5962f",
  "streamingPolicyName": "Predefined_ClearStreamingOnly",
  "type": "Microsoft.Media/mediaservices/streamingLocators"
}
ストリーミング ロケーターのパスを取得する
az ams streaming-locator get-paths -a amsaccount -g amsResourceGroup -n testStreamingLocator
次のような応答が返されます。
{
  "downloadPaths": [],
  "streamingPaths": [
    {
      "encryptionScheme": "NoEncryption",
      "paths": [
        "/e01b2be1-5ea4-42ca-ae5d-7fe704a5962f/ignite.ism/manifest(format=m3u8-aapl)"
      ],
      "streamingProtocol": "Hls"
    },
    {
      "encryptionScheme": "NoEncryption",
      "paths": [
        "/e01b2be1-5ea4-42ca-ae5d-7fe704a5962f/ignite.ism/manifest(format=mpd-time-csf)"
      ],
      "streamingProtocol": "Dash"
    },
    {
      "encryptionScheme": "NoEncryption",
      "paths": [
        "/e01b2be1-5ea4-42ca-ae5d-7fe704a5962f/ignite.ism/manifest"
      ],
      "streamingProtocol": "SmoothStreaming"
    }
  ]
}
HTTP ライブ ストリーミング (HLS) パスをコピーします。 このケースでは /e01b2be1-5ea4-42ca-ae5d-7fe704a5962f/ignite.ism/manifest(format=m3u8-aapl) です。
URL を構築する
ストリーミング エンドポイントのホスト名を取得する
az ams streaming-endpoint list -a amsaccount -g amsResourceGroup -n default
hostName 値をコピーします。 このケースでは amsaccount-usw22.streaming.media.azure.net です。
URL を組み立てる
"https:// " + <hostName の値> + <Hls パスの値>
次に例を示します。
https://amsaccount-usw22.streaming.media.azure.net/7f19e783-927b-4e0a-a1c0-8a140c49856c/ignite.ism/manifest(format=m3u8-aapl)
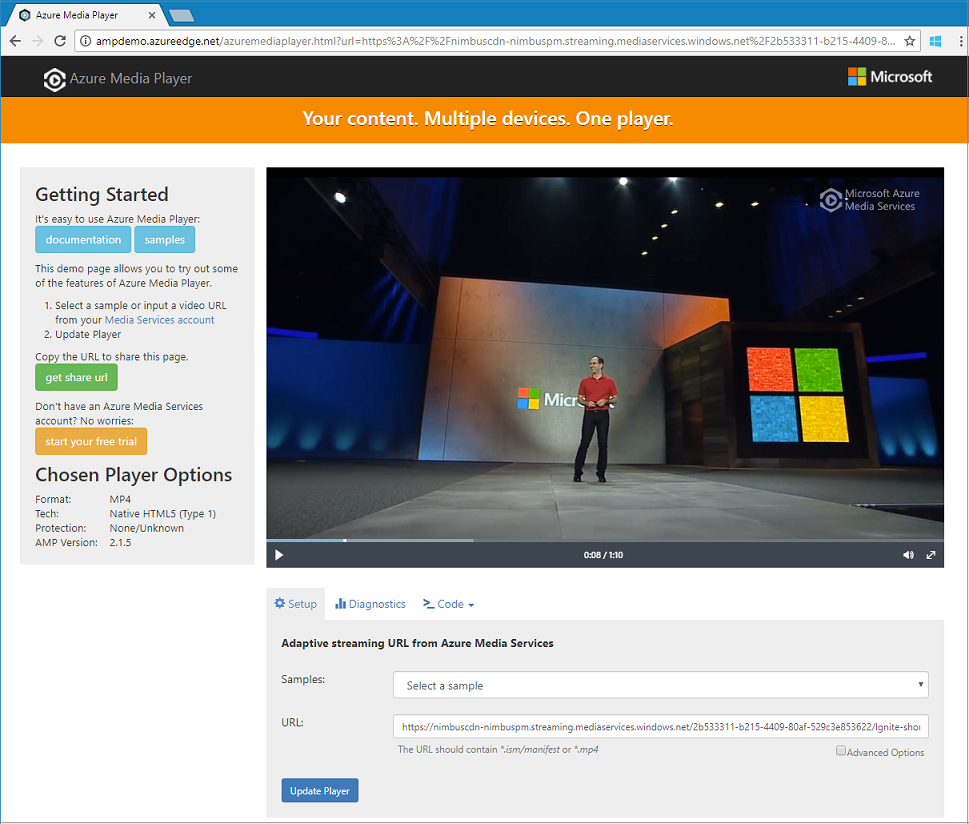
Azure Media Player を使用して再生をテストする
注意
プレーヤーが HTTPS サイトでホストされている場合は、忘れずに "https" を使用して URL を起動します。
- Web ブラウザーを開き、https://aka.ms/azuremediaplayer/ に移動します。
- [URL] ボックスに、前のセクションで構築した URL を貼り付けます。 HLS (色合い-輝度-鮮やかさ) の形式で URL を貼り付けることができます。 Azure Media Player には、デバイスでの再生に適切なストリーミング プロトコルが自動的に使用されます。
- [Update Player](プレーヤーの更新) を選択します。
Note
Azure Media Player はテストには使用できますが、運用環境では使わないでください。
リソースをクリーンアップする
このチュートリアルで作成した Media Services アカウントとストレージ アカウントも含め、リソース グループ内のどのリソースも必要なくなった場合は、リソース グループを削除します。
次の Azure CLI コマンドを実行します。
az group delete --name amsResourceGroup
ヘルプとサポート
質問がある場合は Media Services に問い合わせるか、次のいずれかの方法で更新内容に従ってください。
- Q & A
- Stack Overflow。 質問に タグを付けます
azure-media-services。 - @MSFTAzureMedia するか 、@AzureSupport を使用してサポートを要求します。
- Azure portalからサポート チケットを開きます。