方法: 色を回転させる
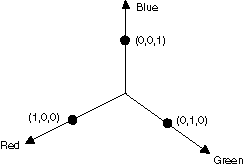
4 次元の色空間での回転は、視覚化するのが困難です。 色要素の 1 つを固定することに同意すれば、回転の視覚化を容易にすることができます。 たとえば、アルファ要素を 1 (完全に不透明) に固定することに同意したとします。 そうすると、次の図に示すように、赤、緑、青を軸とする 3 次元の色空間を視覚化できます。

色は、3D 空間内の点と考えることができます。 たとえば、空間内の点 (1, 0, 0) は赤を表し、空間内の点 (0, 1, 0) は緑を表します。
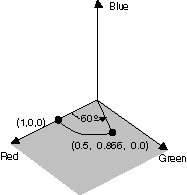
次の図は、赤と緑の平面で 60 度の角度を使用して、色 (1, 0, 0) を回転させるということがどのようなことなのかを示したものです。 赤と緑の平面と平行である平面内での回転は、青の軸を中心とした回転であると考えることができます。

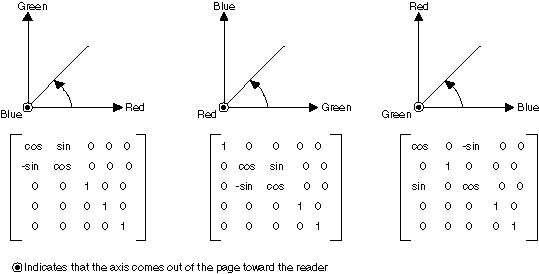
次の図は、カラー行列を初期化して、3 つの座標軸 (赤、緑、青) のそれぞれに対して回転を実行する方法を示したものです。

例
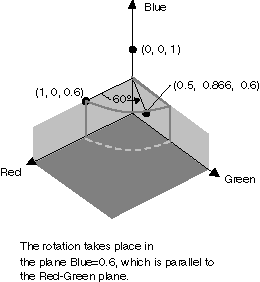
次の例では、1 つの色 (1, 0, 0.6) だけで塗られた画像を使用し、青の軸を中心として 60 度の回転を適用しています。 回転の角度は、赤と緑の平面に平行した平面内で適用されます。
次の図は、左側に元の画像、右側に色回転後の画像を示したものです。

次の図は、下記のコードで実行される色回転の視覚化を示したものです。

private void RotateColors(PaintEventArgs e)
{
    Bitmap image = new Bitmap("RotationInput.bmp");
    ImageAttributes imageAttributes = new ImageAttributes();
    int width = image.Width;
    int height = image.Height;
    float degrees = 60f;
    double r = degrees * System.Math.PI / 180; // degrees to radians

    float[][] colorMatrixElements = {
        new float[] {(float)System.Math.Cos(r),  (float)System.Math.Sin(r),  0,  0, 0},
        new float[] {(float)-System.Math.Sin(r),  (float)-System.Math.Cos(r),  0,  0, 0},
        new float[] {0,  0,  2,  0, 0},
        new float[] {0,  0,  0,  1, 0},
        new float[] {0, 0, 0, 0, 1}};

    ColorMatrix colorMatrix = new ColorMatrix(colorMatrixElements);

    imageAttributes.SetColorMatrix(
       colorMatrix,
       ColorMatrixFlag.Default,
       ColorAdjustType.Bitmap);

    e.Graphics.DrawImage(image, 10, 10, width, height);

    e.Graphics.DrawImage(
       image,
       new Rectangle(150, 10, width, height),  // destination rectangle
        0, 0,        // upper-left corner of source rectangle
        width,       // width of source rectangle
        height,      // height of source rectangle
        GraphicsUnit.Pixel,
       imageAttributes);
}
Private Sub RotateColors(ByVal e As PaintEventArgs)
    Dim image As Bitmap = New Bitmap("RotationInput.bmp")
    Dim imageAttributes As New ImageAttributes()
    Dim width As Integer = image.Width
    Dim height As Integer = image.Height
    Dim degrees As Single = 60.0F
    Dim r As Double = degrees * System.Math.PI / 180 ' degrees to radians
    Dim colorMatrixElements As Single()() = { _
       New Single() {CSng(System.Math.Cos(r)), _
                     CSng(System.Math.Sin(r)), 0, 0, 0}, _
       New Single() {CSng(-System.Math.Sin(r)), _
                     CSng(-System.Math.Cos(r)), 0, 0, 0}, _
       New Single() {0, 0, 2, 0, 0}, _
       New Single() {0, 0, 0, 1, 0}, _
       New Single() {0, 0, 0, 0, 1}}

    Dim colorMatrix As New ColorMatrix(colorMatrixElements)

    imageAttributes.SetColorMatrix( _
       colorMatrix, _
       ColorMatrixFlag.Default, _
       ColorAdjustType.Bitmap)

    e.Graphics.DrawImage(image, 10, 10, width, height)

    ' Pass in the destination rectangle (2nd argument), the upper-left corner
    ' (3rd and 4th arguments), width (5th argument),  and height (6th
    ' argument) of the source rectangle.
    e.Graphics.DrawImage( _
       image, _
       New Rectangle(150, 10, width, height), _
       0, 0, _
       width, _
       height, _
       GraphicsUnit.Pixel, _
       imageAttributes)
End Sub
コードのコンパイル
前の例は、Windows フォームで使用するために設計されていて、PaintEventArgs イベント ハンドラーのパラメーターである ePaint を必要とします。 RotationInput.bmp を、ご使用のシステムで有効な画像ファイル名とパスに置き換えてください。
関連項目
.NET Desktop feedback
フィードバック
以下は間もなく提供いたします。2024 年を通じて、コンテンツのフィードバック メカニズムとして GitHub の issue を段階的に廃止し、新しいフィードバック システムに置き換えます。 詳細については、「https://aka.ms/ContentUserFeedback」を参照してください。
フィードバックの送信と表示
