Microsoft Fabric で SynapseML と共に Azure AI サービスを使う
Azure AI サービスは、開発者と組織が、すぐに使用できる事前構築済みのカスタマイズ可能な API とモデルを使用して、インテリジェントで最先端の市場対応の責任あるアプリケーションを迅速に作成するのに役立ちます。 この記事では、Azure AI サービスで利用できるさまざまなサービスを使用して、テキスト分析、翻訳、ドキュメント インテリジェンス、ビジョン、画像検索、音声テキスト変換とテキスト読み上げ変換、異常検出、Web API からのデータ抽出などのタスクを実行します。
Azure AI サービスの目標は、開発者が、聞いたり、話したり、理解したり、推論し始めたりできるアプリケーションの作成を支援することです。 Azure AI サービス内のサービス カタログは、5 つの主要な柱として視覚、音声、言語、Web 検索、意思決定に分類できます。
前提条件
Microsoft Fabric サブスクリプションを取得します。 または、無料の Microsoft Fabric 試用版にサインアップします。
Microsoft Fabric にサインインします。
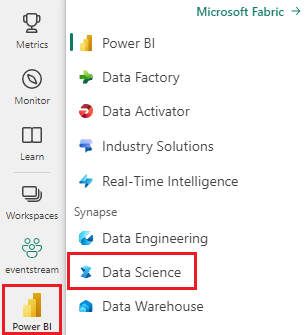
ホーム ページの左側にある環境スイッチャーを使って、Synapse Data Science 環境に切り替えます。
- 新しいノートブックを作成します。
- ノートブックをレイクハウスにアタッチします。 ノートブックの左側で [追加] を選択して、既存のレイクハウスを追加するか、新しいレイクハウスを作成します。
- 「クイックスタート: Azure AI サービスのマルチサービス リソースを作成する」に従って、Azure AI サービスのキーを取得します。 次のコード サンプルで使用するキーの値をコピーします。
システムを準備する
まず、必要なライブラリをインポートし、Spark セッションを初期化します。
from pyspark.sql.functions import udf, col
from synapse.ml.io.http import HTTPTransformer, http_udf
from requests import Request
from pyspark.sql.functions import lit
from pyspark.ml import PipelineModel
from pyspark.sql.functions import col
import os
from pyspark.sql import SparkSession
from synapse.ml.core.platform import *

# Bootstrap Spark Session
spark = SparkSession.builder.getOrCreate()
Azure AI サービスのライブラリをインポートし、次のコード スニペットのキーと場所を Azure AI サービスのキーと場所に置き換えます。
from synapse.ml.cognitive import *

# A general Azure AI services key for Text Analytics, Vision and Document Intelligence (or use separate keys that belong to each service)
service_key = "<YOUR-KEY-VALUE>" # Replace <YOUR-KEY-VALUE> with your Azure AI service key, check prerequisites for more details
service_loc = "eastus"

# A Bing Search v7 subscription key
bing_search_key =  "<YOUR-KEY-VALUE>" # Replace <YOUR-KEY-VALUE> with your Bing v7 subscription key, check prerequisites for more details

# An Anomaly Detector subscription key
anomaly_key = <"YOUR-KEY-VALUE"> # Replace <YOUR-KEY-VALUE> with your anomaly service key, check prerequisites for more details
anomaly_loc = "westus2"

# A Translator subscription key
translator_key = "<YOUR-KEY-VALUE>" # Replace <YOUR-KEY-VALUE> with your translator service key, check prerequisites for more details
translator_loc = "eastus"

# An Azure search key
search_key = "<YOUR-KEY-VALUE>" # Replace <YOUR-KEY-VALUE> with your search key, check prerequisites for more details
テキストに対するセンチメント分析を実行する
Text Analytics サービスには、テキストからインテリジェントな分析情報を抽出するためのアルゴリズムがいくつか用意されています。 たとえば、サービスを使用して、入力テキストのセンチメントを見つけることができます。 このサービスでは、0.0 と 1.0 の間のスコアが返されます。低いスコアは否定的なセンチメントを示し、高いスコアは肯定的なセンチメントを示します。
次のコード サンプルは、3 つの単純な文のセンチメントを返します。
# Create a dataframe that's tied to it's column names
df = spark.createDataFrame(
    [
        ("I am so happy today, its sunny!", "en-US"),
        ("I am frustrated by this rush hour traffic", "en-US"),
        ("The cognitive services on spark aint bad", "en-US"),
    ],
    ["text", "language"],
)

# Run the Text Analytics service with options
sentiment = (
    TextSentiment()
    .setTextCol("text")
    .setLocation(service_loc)
    .setSubscriptionKey(service_key)
    .setOutputCol("sentiment")
    .setErrorCol("error")
    .setLanguageCol("language")
)

# Show the results of your text query in a table format
display(
    sentiment.transform(df).select(
        "text", col("sentiment.document.sentiment").alias("sentiment")
    )
)
正常性データのテキスト分析を実行する
Text Analytics for Health サービス により、医師のメモ、退院要約、臨床ドキュメント、電子健康記録などの非構造化テキストから関連する医療情報が抽出されて、ラベルが付けられます。
次のコード サンプルでは、医師のメモのテキストを分析して構造化データに変換します。
df = spark.createDataFrame(
    [
        ("20mg of ibuprofen twice a day",),
        ("1tsp of Tylenol every 4 hours",),
        ("6-drops of Vitamin B-12 every evening",),
    ],
    ["text"],
)

healthcare = (
    AnalyzeHealthText()
    .setSubscriptionKey(service_key)
    .setLocation(service_loc)
    .setLanguage("en")
    .setOutputCol("response")
)

display(healthcare.transform(df))
別の言語にテキストを翻訳する
Translator はクラウドベースの機械翻訳サービスであり、インテリジェント アプリを構築するたに使用されるコグニティブ API の Azure AI サービス ファミリに含まれています。 Translator は、皆さんのアプリケーションや Web サイト、ツール、ソリューションに簡単に統合することができます。 これを使用すると、90 の言語と方言での多言語ユーザー エクスペリエンスを追加できます。また、どのオペレーティング システムでのテキスト翻訳にも使用できます。
次のサンプルでは、翻訳する文と翻訳先の言語を指定して、簡単なテキスト翻訳を行います。
from pyspark.sql.functions import col, flatten

# Create a dataframe including sentences you want to translate
df = spark.createDataFrame(
    [(["Hello, what is your name?", "Bye"],)],
    [
        "text",
    ],
)

# Run the Translator service with options
translate = (
    Translate()
    .setSubscriptionKey(translator_key)
    .setLocation(translator_loc)
    .setTextCol("text")
    .setToLanguage(["zh-Hans"])
    .setOutputCol("translation")
)

# Show the results of the translation.
display(
    translate.transform(df)
    .withColumn("translation", flatten(col("translation.translations")))
    .withColumn("translation", col("translation.text"))
    .select("translation")
)
ドキュメントから構造化データに情報を抽出する
Azure AI ドキュメント インテリジェンスは、機械学習テクノロジを利用して自動データ処理ソフトウェアを構築できる Azure AI サービスの一部です。 Azure AI Document Intelligence を使用すると、ドキュメントに存在するテキスト、キーと値の組み合わせ、選択マーク、表、構造を特定、抽出します。 このサービスは、ファイル、バウンディング ボックス、機密情報などの元データの要素同士の関係を含む、構造化されたデータを出力します。
次のコード サンプルでは、ビジネス カードイメージを分析し、その情報を構造化データに抽出します。
from pyspark.sql.functions import col, explode

# Create a dataframe containing the source files
imageDf = spark.createDataFrame(
    [
        (
            "https://mmlspark.blob.core.windows.net/datasets/FormRecognizer/business_card.jpg",
        )
    ],
    [
        "source",
    ],
)

# Run the Form Recognizer service
analyzeBusinessCards = (
    AnalyzeBusinessCards()
    .setSubscriptionKey(service_key)
    .setLocation(service_loc)
    .setImageUrlCol("source")
    .setOutputCol("businessCards")
)

# Show the results of recognition.
display(
    analyzeBusinessCards.transform(imageDf)
    .withColumn(
        "documents", explode(col("businessCards.analyzeResult.documentResults.fields"))
    )
    .select("source", "documents")
)
画像の分析とタグ付け
Computer Vision は、画像を分析して、顔、物体、自然言語による記述などの構造を識別します。
次のコード例では、イメージを分析し、タグでラベルを付けます。 タグは、認識可能な物体、人物、風景、アクションなど、画像内のものを 1 単語で表したものです。
# Create a dataframe with the image URLs
base_url = "https://raw.githubusercontent.com/Azure-Samples/cognitive-services-sample-data-files/master/ComputerVision/Images/"
df = spark.createDataFrame(
    [
        (base_url + "objects.jpg",),
        (base_url + "dog.jpg",),
        (base_url + "house.jpg",),
    ],
    [
        "image",
    ],
)

# Run the Computer Vision service. Analyze Image extracts information from/about the images.
analysis = (
    AnalyzeImage()
    .setLocation(service_loc)
    .setSubscriptionKey(service_key)
    .setVisualFeatures(
        ["Categories", "Color", "Description", "Faces", "Objects", "Tags"]
    )
    .setOutputCol("analysis_results")
    .setImageUrlCol("image")
    .setErrorCol("error")
)

# Show the results of what you wanted to pull out of the images.
display(analysis.transform(df).select("image", "analysis_results.description.tags"))
自然言語クエリに関連する画像を検索する
Bing Image Search では、Web を検索して、ユーザーの自然言語クエリに関連する画像を取得します。
次のコード サンプルでは、引用符で囲まれた画像を検索するテキスト クエリを使用します。 コードの出力は、クエリに関連する写真を含む画像 URL の一覧です。
# Number of images Bing will return per query
imgsPerBatch = 10
# A list of offsets, used to page into the search results
offsets = [(i * imgsPerBatch,) for i in range(100)]
# Since web content is our data, we create a dataframe with options on that data: offsets
bingParameters = spark.createDataFrame(offsets, ["offset"])

# Run the Bing Image Search service with our text query
bingSearch = (
    BingImageSearch()
    .setSubscriptionKey(bing_search_key)
    .setOffsetCol("offset")
    .setQuery("Martin Luther King Jr. quotes")
    .setCount(imgsPerBatch)
    .setOutputCol("images")
)

# Transformer that extracts and flattens the richly structured output of Bing Image Search into a simple URL column
getUrls = BingImageSearch.getUrlTransformer("images", "url")

# This displays the full results returned, uncomment to use
# display(bingSearch.transform(bingParameters))

# Since we have two services, they are put into a pipeline
pipeline = PipelineModel(stages=[bingSearch, getUrls])

# Show the results of your search: image URLs
display(pipeline.transform(bingParameters))
音声をテキストに変換する
音声テキスト変換サービスでは、音声のストリームまたはファイルをテキストに変換します。 次のコード サンプルでは、1 つのオーディオ ファイルをテキストに文字起こしします。
# Create a dataframe with our audio URLs, tied to the column called "url"
df = spark.createDataFrame(
    [("https://mmlspark.blob.core.windows.net/datasets/Speech/audio2.wav",)], ["url"]
)

# Run the Speech-to-text service to translate the audio into text
speech_to_text = (
    SpeechToTextSDK()
    .setSubscriptionKey(service_key)
    .setLocation(service_loc)
    .setOutputCol("text")
    .setAudioDataCol("url")
    .setLanguage("en-US")
    .setProfanity("Masked")
)

# Show the results of the translation
display(speech_to_text.transform(df).select("url", "text.DisplayText"))
テキストを音声に変換する
テキスト読み上げ は、119 の言語と言語変種の 270 以上のニューラル音声から選択して、自然に話すアプリとサービスを構築できるサービスです。
次のコード サンプルでは、テキストをテキストの内容を含むオーディオ ファイルに変換します。
from synapse.ml.cognitive import TextToSpeech

fs = ""
if running_on_databricks():
    fs = "dbfs:"
elif running_on_synapse_internal():
    fs = "Files"

# Create a dataframe with text and an output file location
df = spark.createDataFrame(
    [
        (
            "Reading out loud is fun! Check out aka.ms/spark for more information",
            fs + "/output.mp3",
        )
    ],
    ["text", "output_file"],
)

tts = (
    TextToSpeech()
    .setSubscriptionKey(service_key)
    .setTextCol("text")
    .setLocation(service_loc)
    .setVoiceName("en-US-JennyNeural")
    .setOutputFileCol("output_file")
)

# Check to make sure there were no errors during audio creation
display(tts.transform(df))
時系列データの異常を検出する
Anomaly Detector は、時系列データ内の不規則性を検出するのに適しています。 次のコード サンプルでは、Anomaly Detector サービスを使用して、時系列データ全体の異常を検出します。
# Create a dataframe with the point data that Anomaly Detector requires
df = spark.createDataFrame(
    [
        ("1972-01-01T00:00:00Z", 826.0),
        ("1972-02-01T00:00:00Z", 799.0),
        ("1972-03-01T00:00:00Z", 890.0),
        ("1972-04-01T00:00:00Z", 900.0),
        ("1972-05-01T00:00:00Z", 766.0),
        ("1972-06-01T00:00:00Z", 805.0),
        ("1972-07-01T00:00:00Z", 821.0),
        ("1972-08-01T00:00:00Z", 20000.0),
        ("1972-09-01T00:00:00Z", 883.0),
        ("1972-10-01T00:00:00Z", 898.0),
        ("1972-11-01T00:00:00Z", 957.0),
        ("1972-12-01T00:00:00Z", 924.0),
        ("1973-01-01T00:00:00Z", 881.0),
        ("1973-02-01T00:00:00Z", 837.0),
        ("1973-03-01T00:00:00Z", 9000.0),
    ],
    ["timestamp", "value"],
).withColumn("group", lit("series1"))

# Run the Anomaly Detector service to look for irregular data
anamoly_detector = (
    SimpleDetectAnomalies()
    .setSubscriptionKey(anomaly_key)
    .setLocation(anomaly_loc)
    .setTimestampCol("timestamp")
    .setValueCol("value")
    .setOutputCol("anomalies")
    .setGroupbyCol("group")
    .setGranularity("monthly")
)

# Show the full results of the analysis with the anomalies marked as "True"
display(
    anamoly_detector.transform(df).select("timestamp", "value", "anomalies.isAnomaly")
)
任意の Web API から情報を取得する
HTTP on Spark を使用すると、任意の Web サービスを自分のビッグ データ パイプラインで使用することができます。 次のコード サンプルでは、World Bank API を使用して、世界のさまざまな国に関する情報を取得します。
# Use any requests from the python requests library


def world_bank_request(country):
    return Request(
        "GET", "http://api.worldbank.org/v2/country/{}?format=json".format(country)
    )


# Create a dataframe with specifies which countries we want data on
df = spark.createDataFrame([("br",), ("usa",)], ["country"]).withColumn(
    "request", http_udf(world_bank_request)(col("country"))
)

# Much faster for big data because of the concurrency :)
client = (
    HTTPTransformer().setConcurrency(3).setInputCol("request").setOutputCol("response")
)

# Get the body of the response


def get_response_body(resp):
    return resp.entity.content.decode()


# Show the details of the country data returned
display(
    client.transform(df).select(
        "country", udf(get_response_body)(col("response")).alias("response")
    )
)
関連するコンテンツ
フィードバック
以下は間もなく提供いたします。2024 年を通じて、コンテンツのフィードバック メカニズムとして GitHub の issue を段階的に廃止し、新しいフィードバック システムに置き換えます。 詳細については、「https://aka.ms/ContentUserFeedback」を参照してください。
フィードバックの送信と表示