Microsoft Graph を使って Angular の単一ページ アプリを構築する
このチュートリアルでは、Microsoft Angularを使用してユーザーの予定表情報Graphを取得する方法について説明します。
ヒント
完了したチュートリアルをダウンロードする場合は、リポジトリをダウンロードまたは複製GitHubできます。
前提条件
このチュートリアルを開始する前に、開発 Node.js インストールする必要があります。 インストールされていない場合はNode.js前のリンクにアクセスしてダウンロード オプションを確認してください。
また、Outlook.com 上のメールボックスを持つ個人用 Microsoft アカウント、または Microsoft の仕事用または学校用のアカウントを持っている必要があります。 Microsoft アカウントをお持ちでない場合は、無料アカウントを取得するためのオプションが 2 つご利用できます。
- 新しい 個人用 Microsoft アカウントにサインアップできます。
- 開発者プログラムにサインアップしてMicrosoft 365無料のサブスクリプションをOffice 365できます。
注意
このチュートリアルは、ノード バージョン 14.15.0 で記述されています。 このガイドの手順は、他のバージョンでも動作しますが、テストされていない場合があります。
フィードバック
このチュートリアルに関するフィードバックは、リポジトリのGitHubしてください。
Angular の単一ページ アプリを作成する
このセクションでは、新しいプロジェクトを作成Angularします。
コマンド ライン インターフェイス (CLI) を開き、ファイルを作成する権限を持つディレクトリに移動し、次のコマンドを実行して Angular CLI ツールをインストールし、新しい Angular アプリを作成します。
npm install -g @angular/cli
ng new graph-tutorial
CLI Angular詳細を求めるメッセージが表示されます。 次のようにプロンプトに答えます。
? Would you like to add Angular routing? Yes
? Which stylesheet format would you like to use? CSS
コマンドが完了したら、
graph-tutorialCLI のディレクトリに移動し、次のコマンドを実行してローカル Web サーバーを起動します。ng serve --open既定のブラウザーが開き、https://localhost:4200/既定のページAngularされます。 ブラウザーが開かない場合は、ブラウザーを開いて参照して https://localhost:4200/ 、新しいアプリが動作するを確認します。
ノード パッケージの追加
次に進む前に、後で使用する追加のパッケージをインストールします。
- ng-bootstrap for using Bootstrap components from Angular.
- 日付と 時刻を書式設定する時間。
- windows-iana
- msal-angular を使用して、アクセス トークンAzure Active Directory取得します。
- Microsoft-graph-client を使用して Microsoft Graph。
CLI で次のコマンドを実行します。
ng add @ng-bootstrap/ng-bootstrap
npm install @azure/msal-browser@2.16.1 @azure/msal-angular@2.0.2
npm install date-fns@2.23.0 date-fns-tz@1.1.6 windows-iana@5.0.2
npm install @microsoft/microsoft-graph-client@3.0.0
npm install @microsoft/microsoft-graph-types --save-dev
アプリを設計する
このセクションでは、アプリのユーザー インターフェイスを作成します。
./src/styles.css を開 き、次の行を追加します。
@import "~bootstrap/dist/css/bootstrap.css";

/* Add padding for the nav bar */
body {
  padding-top: 4.5rem;
}

/* Style debug info in alerts */
.alert-pre {
  word-wrap: break-word;
  word-break: break-all;
  white-space: pre-wrap;
}

/* Add padding to user avatar link */
.avatar-link {
  padding-top: .25em;
  padding-bottom: .25em;
}
user.ts という 名前の ./src/app フォルダーに新しいファイルを作成し、次のコードを追加します。
export class User {
  displayName!: string;
  email!: string;
  avatar!: string;
  timeZone!: string;
}
ページ上Angularナビゲーション用の新しいコンポーネントを生成します。 CLI で、次のコマンドを実行します。
ng generate component nav-barコマンドが完了したら、 ./src/app/nav-bar/nav-bar.component.ts を開き、その内容を次のように置き換えてください。
import { Component, OnInit } from '@angular/core';

import { User } from '../user';

@Component({
  selector: 'app-nav-bar',
  templateUrl: './nav-bar.component.html',
  styleUrls: ['./nav-bar.component.css']
})
export class NavBarComponent implements OnInit {

  // Should the collapsed nav show?
  showNav: boolean = false;
  // Is a user logged in?
  authenticated: boolean = false;
  // The user
  user?: User = undefined;

  constructor() { }

  ngOnInit() { }

  // Used by the Bootstrap navbar-toggler button to hide/show
  // the nav in a collapsed state
  toggleNavBar(): void {
    this.showNav = !this.showNav;
  }

  signIn(): void {
    // Temporary
    this.authenticated = true;
    this.user = {
      displayName: 'Adele Vance',
      email: 'AdeleV@contoso.com',
      avatar: '/assets/no-profile-photo.png',
      timeZone: ''
    };
  }

  signOut(): void {
    // Temporary
    this.authenticated = false;
    this.user = undefined;
  }
}
./src/app/nav-bar/nav-bar.component.htmlを開き、その内容 を次のように置き換えてください。
<nav class="navbar navbar-expand-md navbar-dark fixed-top bg-dark">
  <div class="container">
    <a routerLink="/" class="navbar-brand">Angular Graph Tutorial</a>
    <button class="navbar-toggler" type="button" (click)="toggleNavBar()" [attr.aria-expanded]="showNav"
    aria-controls="navbarCollapse" aria-expanded="false" aria-label="Toggle navigation">
      <span class="navbar-toggler-icon"></span>
    </button>
    <div class="collapse navbar-collapse" [class.show]="showNav" id="navbarCollapse">
      <ul class="navbar-nav mr-auto">
        <li class="nav-item">
          <a routerLink="/" class="nav-link" routerLinkActive="active">Home</a>
        </li>
        <li *ngIf="authenticated" class="nav-item">
          <a routerLink="/calendar" class="nav-link" routerLinkActive="active">Calendar</a>
        </li>
      </ul>
      <ul class="navbar-nav justify-content-end">
        <li class="nav-item">
          <a class="nav-link" href="https://docs.microsoft.com/graph/overview" target="_blank">Docs</a>
        </li>
        <li *ngIf="authenticated" ngbDropdown placement="bottom-right" class="nav-item">
          <a ngbDropdownToggle id="userMenu" class="nav-link avatar-link" role="button" aria-haspopup="true"
            aria-expanded="false">
            <img src="{{user != null ? user.avatar : ''}}" class="rounded-circle align-self-center mr-2" style="width: 32px;">
          </a>
          <div ngbDropdownMenu aria-labelledby="userMenu" class="dropdown-menu-right">
            <h5 class="dropdown-item-text mb-0">{{user != null ? user.displayName : ''}}</h5>
            <p class="dropdown-item-text text-muted mb-0">{{user != null ? user.email : ''}}</p>
            <div class="dropdown-divider"></div>
            <button class="dropdown-item" role="button" (click)="signOut()">Sign Out</button>
          </div>
        </li>
        <li *ngIf="!authenticated" class="nav-item">
          <button class="btn btn-link nav-link border-0" role="button" (click)="signIn()">Sign In</button>
        </li>
      </ul>
    </div>
  </div>
</nav>
アプリのホーム ページを作成します。 CLI で次のコマンドを実行します。
ng generate component homeコマンドが完了したら、 ./src/app/home/home.component.ts を開き、その内容を次のように置き換えてください。
import { Component, OnInit } from '@angular/core';

import { User } from '../user';

@Component({
  selector: 'app-home',
  templateUrl: './home.component.html',
  styleUrls: ['./home.component.css']
})
export class HomeComponent implements OnInit {

  // Is a user logged in?
  authenticated: boolean = false;
  // The user
  user?: User = undefined;

  constructor() { }

  ngOnInit() { }

  signIn(): void {
    // Temporary
    this.authenticated = true;
    this.user = {
      displayName: 'Adele Vance',
      email: 'AdeleV@contoso.com',
      avatar: '',
      timeZone: ''
    };
  }
}
./src/app/home/home.component.htmlを開き、その 内容を次のように置き換えてください。
<div class="jumbotron">
  <h1>Angular Graph Tutorial</h1>
  <p class="lead">This sample app shows how to use the Microsoft Graph API from Angular</p>
  <div *ngIf="authenticated; then welcomeUser else signInPrompt"></div>
  <ng-template #welcomeUser>
    <h4>Welcome {{ user != null ? user.displayName : '' }}!</h4>
    <p>Use the navigation bar at the top of the page to get started.</p>
  </ng-template>
  <ng-template #signInPrompt>
    <button class="btn btn-primary btn-large" role="button" (click)="signIn()">Click here to sign in</button>
  </ng-template>
</div>
単純なクラスを作成
Alertします。 alert.ts という 名前の ./src/app ディレクトリに新しいファイルを作成し、次のコードを追加します。export class Alert { type!: string; message!: string; debug!: string; }アプリがユーザーにメッセージを表示するために使用できるアラート サービスを作成します。 CLI で、次のコマンドを実行します。
ng generate service alerts./src/app/alerts.service.ts を開き、その内容を次のように置き換えてください。
import { Injectable } from '@angular/core';
import { Alert } from './alert';

@Injectable({
  providedIn: 'root'
})

export class AlertsService {

  alerts: Alert[] = [];

  addError(message: string, debug?: string) {
    this.alerts.push({message: message, debug: debug ?? '', type: 'danger'});
  }

  addSuccess(message: string, debug?: string) {
    this.alerts.push({message: message, debug: debug ?? '', type: 'success'});
  }

  remove(alert: Alert) {
    this.alerts.splice(this.alerts.indexOf(alert), 1);
  }
}
アラートを表示するアラート コンポーネントを生成します。 CLI で、次のコマンドを実行します。
ng generate component alertsコマンドが完了したら、 ./src/app/alerts/alerts.component.ts を開き、その内容を次のように置き換えてください。
import { Component, OnInit } from '@angular/core';
import { AlertsService } from '../alerts.service';
import { Alert } from '../alert';

@Component({
  selector: 'app-alerts',
  templateUrl: './alerts.component.html',
  styleUrls: ['./alerts.component.css']
})
export class AlertsComponent implements OnInit {

  constructor(public alertsService: AlertsService) { }

  ngOnInit() {
  }

  close(alert: Alert) {
    this.alertsService.remove(alert);
  }
}
./src/app/alerts/alerts.component.html を開き、その内容を次のように置き換えてください。
<div *ngFor="let alert of alertsService.alerts">
  <ngb-alert type="{{alert.type}}" (close)="close(alert)">
    {{alert.message}}
    <pre *ngIf="alert.debug" class="alert-pre border bg-light p-2 mt-2"><code>{{alert.debug}}</code></pre>
  </ngb-alert>
</div>
./src/app/app-routing.module.ts
const routes: Routes = [];を開き、行を次のコードに置き換えます。import { HomeComponent } from './home/home.component'; const routes: Routes = [ { path: '', component: HomeComponent }, ];./src/app/app.component.html を開き、その内容全体を次のように置き換えてください。
<app-nav-bar></app-nav-bar>
<main role="main" class="container">
  <app-alerts></app-alerts>
  <router-outlet></router-outlet>
</main>
./src/assets ディレクトリに、選択 no-profile-photo.png 名前の イメージ ファイルを追加 します。 この画像は、ユーザーが Microsoft サーバーで写真を持ってない場合に、ユーザーの写真Graph。
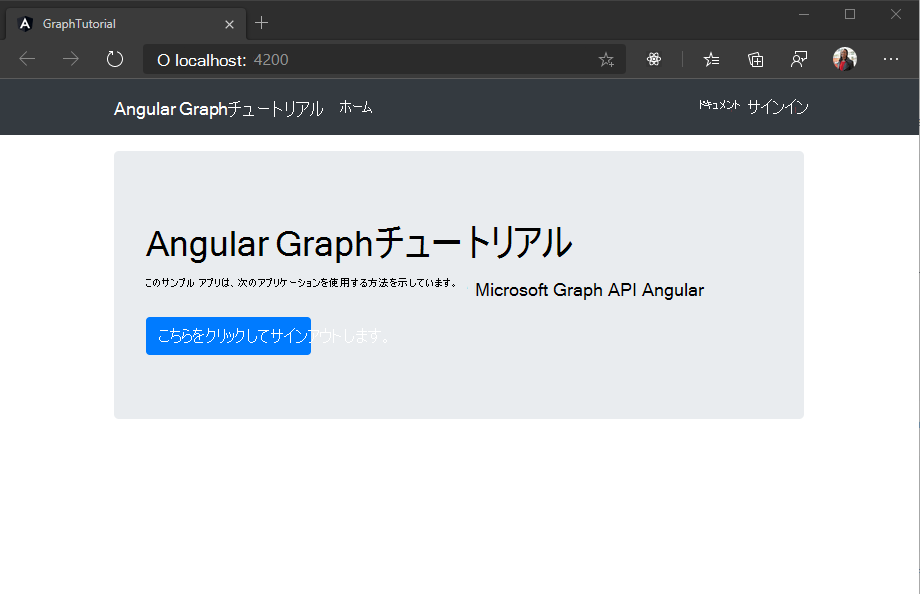
すべての変更を保存し、ページを更新します。 これで、アプリは非常に異なって見える必要があります。
ポータルでアプリを登録する
この演習では、管理者センターを使用して新Azure AD Web アプリケーション登録Azure Active Directoryします。
ブラウザーを開き、Azure Active Directory 管理センターへ移動します。 個人用アカウント (別名: Microsoft アカウント)、または 職場/学校アカウント を使用してログインします。
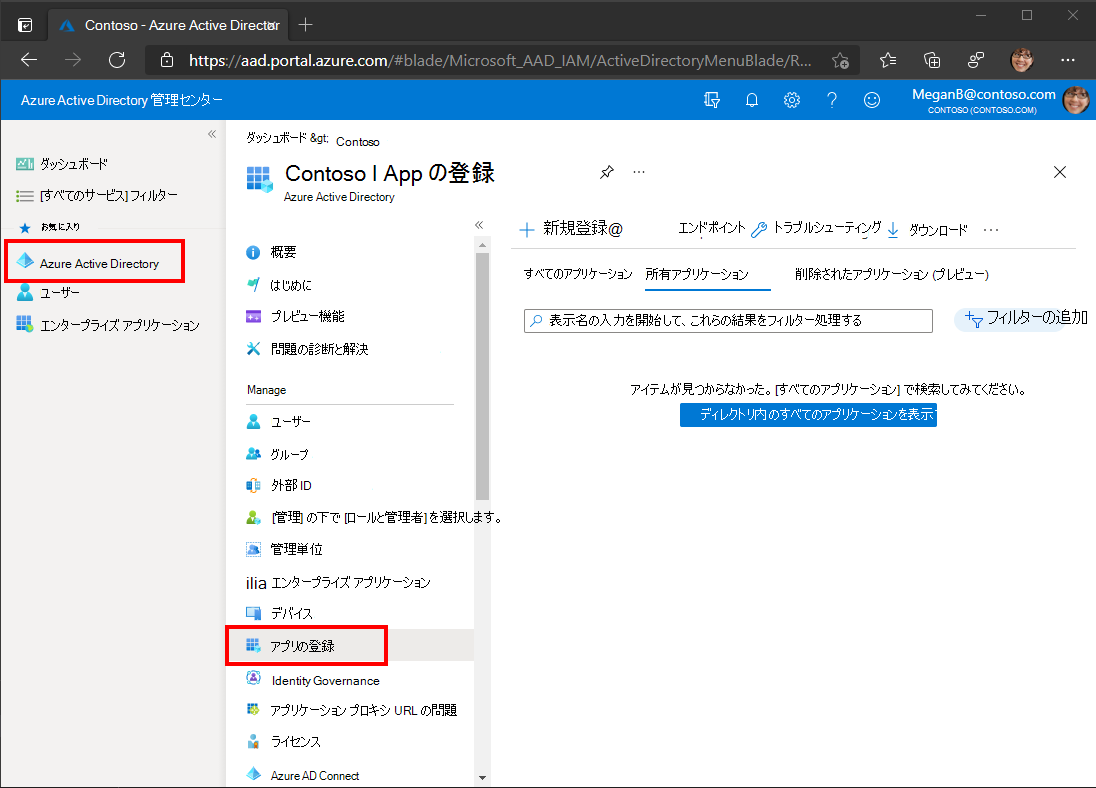
左側のナビゲーションで [Azure Active Directory] を選択し、それから [管理] で [アプリの登録] を選択します。
[新規登録] を選択します。 [アプリケーションを登録] ページで、次のように値を設定します。
Angular Graph Tutorialに [名前] を設定します。- [サポートされているアカウントの種類] を [任意の組織のディレクトリ内のアカウントと個人用の Microsoft アカウント] に設定します。
- [リダイレクト URI] で、最初のドロップダウン リストを
Single-page application (SPA)に設定し、それからhttp://localhost:4200に値を設定します。
![[アプリケーションを登録する] ページのスクリーンショット](angular/tutorial/images/aad-register-an-app.png)
[登録] を選択します。 [チュートリアル Angular Graph] ページで、アプリケーション (クライアント) ID の値をコピーして保存します。次の手順で必要になります。

Azure AD 認証を追加する
この演習では、前の演習からアプリケーションを拡張して、アプリケーションの認証をサポートAzure AD。 これは、Microsoft サーバーを呼び出す必要がある OAuth アクセス トークンを取得するために必要Graph。 この手順では、Microsoft 認証ライブラリをアプリケーションAngular統合します。
oauth.ts という名前の ./src ディレクトリに新しいファイルを作成し、次のコードを追加します。
export const OAuthSettings = {
  appId: 'YOUR_APP_ID_HERE',
  redirectUri: 'http://localhost:4200',
  scopes: [
    "user.read",
    "mailboxsettings.read",
    "calendars.readwrite"
  ]
};
アプリケーション
YOUR_APP_ID_HERE登録ポータルのアプリケーション ID に置き換える。重要
git などのソース管理を使用している場合は、 oauth.ts ファイルをソース管理から除外して、アプリ ID が誤って漏洩しないようにする良い時期です。
./src/app/app.module.ts
importを開き、ファイルの上部に次のステートメントを追加します。import { FormsModule } from '@angular/forms'; import { IPublicClientApplication, PublicClientApplication, BrowserCacheLocation } from '@azure/msal-browser'; import { MsalModule, MsalService, MSAL_INSTANCE } from '@azure/msal-angular'; import { OAuthSettings } from '../oauth';ステートメントの下に次の関数を
import追加します。let msalInstance: IPublicClientApplication | undefined = undefined; export function MSALInstanceFactory(): IPublicClientApplication { msalInstance = msalInstance ?? new PublicClientApplication({ auth: { clientId: OAuthSettings.appId, redirectUri: OAuthSettings.redirectUri, postLogoutRedirectUri: OAuthSettings.redirectUri }, cache: { cacheLocation: BrowserCacheLocation.LocalStorage, } }); return msalInstance; }宣言
MsalModule内FormsModuleの配列をimports追加して配列に追加@NgModuleします。imports: [ BrowserModule, FormsModule, AppRoutingModule, NgbModule, MsalModule ],宣言内
MSALInstanceFactoryの配列MsalServiceにprovidersand を追加@NgModuleします。providers: [ { provide: MSAL_INSTANCE, useFactory: MSALInstanceFactory }, MsalService ],
サインインの実装
このセクションでは、認証サービスを作成し、サインインとサインアウトを実装します。
CLI で次のコマンドを実行します。
ng generate service authこのためのサービスを作成することで、認証方法にアクセスする必要がある任意のコンポーネントに簡単に挿入できます。
コマンドが終了したら、 ./src/app/auth.service.ts を開き、その内容を次のコードに置き換えます。
import { Injectable } from '@angular/core';
import { MsalService } from '@azure/msal-angular';
import { InteractionType, PublicClientApplication } from '@azure/msal-browser';

import { AlertsService } from './alerts.service';
import { OAuthSettings } from '../oauth';
import { User } from './user';

@Injectable({
  providedIn: 'root'
})

export class AuthService {
  public authenticated: boolean;
  public user?: User;

  constructor(
    private msalService: MsalService,
    private alertsService: AlertsService) {

    this.authenticated = false;
    this.user = undefined;
  }

  // Prompt the user to sign in and
  // grant consent to the requested permission scopes
  async signIn(): Promise<void> {
    const result = await this.msalService
      .loginPopup(OAuthSettings)
      .toPromise()
      .catch((reason) => {
        this.alertsService.addError('Login failed',
          JSON.stringify(reason, null, 2));
      });

    if (result) {
      this.msalService.instance.setActiveAccount(result.account);
      this.authenticated = true;
      // Temporary placeholder
      this.user = new User();
      this.user.displayName = 'Adele Vance';
      this.user.email = 'AdeleV@contoso.com';
      this.user.avatar = '/assets/no-profile-photo.png';

      // Temporary to display token in an error box
      this.alertsService.addSuccess('Token acquired', result.accessToken);
    }
  }

  // Sign out
  async signOut(): Promise<void> {
    await this.msalService.logout().toPromise();
    this.user = undefined;
    this.authenticated = false;
  }
}
./src/app/nav-bar/nav-bar.component.ts を開き、その内容を次のように置き換えてください。
import { Component, OnInit } from '@angular/core';

import { AuthService } from '../auth.service';
import { User } from '../user';

@Component({
  selector: 'app-nav-bar',
  templateUrl: './nav-bar.component.html',
  styleUrls: ['./nav-bar.component.css']
})
export class NavBarComponent implements OnInit {

  // Should the collapsed nav show?
  showNav: boolean = false;
  // Is a user logged in?
  get authenticated(): boolean {
    return this.authService.authenticated;
  }
  // The user
  get user(): User | undefined {
    return this.authService.user;
  }

  constructor(private authService: AuthService) { }

  ngOnInit() { }

  // Used by the Bootstrap navbar-toggler button to hide/show
  // the nav in a collapsed state
  toggleNavBar(): void {
    this.showNav = !this.showNav;
  }

  async signIn(): Promise<void> {
    await this.authService.signIn();
  }

  signOut(): void {
    this.authService.signOut();
  }
}
./src/app/home/home.component.ts を開き、その内容を次のように置き換えてください。
変更を保存し、ブラウザーを更新します。 [ここを クリックしてサインイン] ボタンを クリックすると、にリダイレクトされます https://login.microsoftonline.com。 Microsoft アカウントでログインし、要求されたアクセス許可に同意します。 アプリ ページが更新され、トークンが表示されます。
ユーザーの詳細情報を取得する
現在、認証サービスは、ユーザーの表示名と電子メール アドレスの定数値を設定します。 これで、アクセス トークンが作成されたので、これらの値が現在のユーザーに対応Graphからユーザーの詳細を取得できます。
./src/app/auth.service.ts
importを開き、次のステートメントをファイルの上部に追加します。import { Client } from '@microsoft/microsoft-graph-client'; import { AuthCodeMSALBrowserAuthenticationProvider } from '@microsoft/microsoft-graph-client/authProviders/authCodeMsalBrowser'; import * as MicrosoftGraph from '@microsoft/microsoft-graph-types';というクラスにプロパティ
AuthServiceを追加しますgraphClient。public graphClient?: Client;というクラスに新しい関数
AuthServiceを追加しますgetUser。private async getUser(): Promise<User | undefined> { if (!this.authenticated) return undefined; const graphClient = Client.init({ // Initialize the Graph client with an auth // provider that requests the token from the // auth service authProvider: async(done) => { const token = await this.getAccessToken() .catch((reason) => { done(reason, null); }); if (token) { done(null, token); } else { done("Could not get an access token", null); } } }); // Get the user from Graph (GET /me) const graphUser: MicrosoftGraph.User = await graphClient .api('/me') .select('displayName,mail,mailboxSettings,userPrincipalName') .get(); const user = new User(); user.displayName = graphUser.displayName ?? ''; // Prefer the mail property, but fall back to userPrincipalName user.email = graphUser.mail ?? graphUser.userPrincipalName ?? ''; user.timeZone = graphUser.mailboxSettings?.timeZone ?? 'UTC'; // Use default avatar user.avatar = '/assets/no-profile-photo.png'; return user; }メソッドから次のコードを見つけて削除
signInします。// Temporary placeholder this.user = new User(); this.user.displayName = "Adele Vance"; this.user.email = "AdeleV@contoso.com"; this.user.avatar = '/assets/no-profile-photo.png'; // Temporary to display token in an error box this.alertsService.addSuccess('Token acquired', result);その場所に、次のコードを追加します。
this.user = await this.getUser();この新しいコードでは、Microsoft Graph SDK
Userを使用してユーザーの詳細を取得し、API 呼び出しで返される値を使用してオブジェクトを作成します。ユーザーが
constructor既にログインAuthServiceしている場合は、クラスの内容を変更して、その詳細を読み込む必要があります。 既存のファイルを次にconstructor置き換える。constructor( private msalService: MsalService, private alertsService: AlertsService) { this.authenticated = this.msalService.instance .getAllAccounts().length > 0; this.getUser().then((user) => {this.user = user}); }
これで、変更を保存してアプリを起動した場合は、サインイン後にホーム ページに戻る必要がありますが、サインイン済みかどうかを示す UI が変更される必要があります。
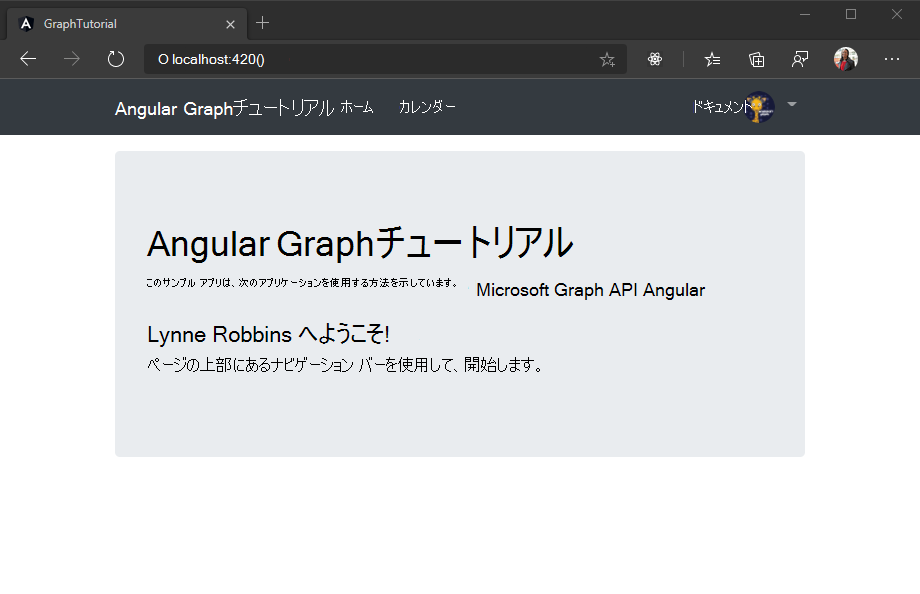
右上隅にあるユーザー アバターをクリックして、[サインアウト] リンクにアクセス します。 [サインアウト] をクリックすると、セッションがリセットされ、ホーム ページに戻ります。
![[サインアウト] リンクのドロップダウン メニューのスクリーンショット](angular/tutorial/images/add-aad-auth-02.png)
トークンの保存と更新
この時点で、アプリケーションはアクセス トークンを持ち Authorization 、API 呼び出しのヘッダーに送信されます。 これは、アプリがユーザーの代わりに Microsoft Graphアクセスできるトークンです。
ただし、このトークンは一時的なものです。 トークンは発行後 1 時間で期限切れになります。 アプリは MSAL ライブラリを使用していますので、トークンストレージや更新ロジックを実装する必要は一切ない。 ブラウザー MsalService ストレージにトークンをキャッシュします。 メソッド acquireTokenSilent は、最初にキャッシュされたトークンをチェックし、有効期限が切れていない場合は、それを返します。 有効期限が切れている場合は、新しい要求を取得するサイレント 要求を行います。
予定表ビューの取得
この演習では、アプリケーションに Microsoft Graphを組み込む必要があります。 このアプリケーションの場合は、microsoft-graph-client ライブラリを使用して Microsoft Graph。
Outlook からカレンダー イベントを取得する
すべての通話を保持する新しいサービスGraphします。 CLI で次のコマンドを実行します。
ng generate service graph前に作成した認証サービスと同様に、このためのサービスを作成すると、Microsoft サービスへのアクセスが必要な任意のコンポーネントに挿入Graph。
コマンドが完了したら、 ./src/app/graph.service.ts を開き、その内容を次のように置き換えてください。
import { Injectable } from '@angular/core';
import * as MicrosoftGraph from '@microsoft/microsoft-graph-types';

import { AuthService } from './auth.service';
import { AlertsService } from './alerts.service';

@Injectable({
  providedIn: 'root'
})

export class GraphService {

  constructor(
    private authService: AuthService,
    private alertsService: AlertsService) {}

  async getCalendarView(start: string, end: string, timeZone: string): Promise<MicrosoftGraph.Event[] | undefined> {
    if (!this.authService.graphClient) {
      this.alertsService.addError('Graph client is not initialized.');
      return undefined;
    }

    try {
      // GET /me/calendarview?startDateTime=''&endDateTime=''
      // &$select=subject,organizer,start,end
      // &$orderby=start/dateTime
      // &$top=50
      const result =  await this.authService.graphClient
        .api('/me/calendarview')
        .header('Prefer', `outlook.timezone="${timeZone}"`)
        .query({
          startDateTime: start,
          endDateTime: end
        })
        .select('subject,organizer,start,end')
        .orderby('start/dateTime')
        .top(50)
        .get();

      return result.value;
    } catch (error) {
      this.alertsService.addError('Could not get events', JSON.stringify(error, null, 2));
    }
    return undefined;
  }
}
このコードの実行内容を考えましょう。
- サービスのコンストラクター Graphクライアントを初期化します。
- このメソッドは、次
getCalendarViewの方法でクライアントGraphを使用する関数を実装します。- 呼び出される URL は
/me/calendarviewです。 - この
headerメソッドにはヘッダーがPrefer: outlook.timezone含まれます。この場合、返されるイベントの開始時刻と終了時刻がユーザーの優先タイム ゾーンに含まれます。 - メソッド
queryは、カレンダー ビューstartDateTimeのendDateTime時間ウィンドウを定義するパラメーターとパラメーターを追加します。 - メソッド
selectは、各イベントに返されるフィールドを、ビューが実際に使用するフィールドに制限します。 - メソッド
orderbyは、開始時刻で結果を並べ替える。
- 呼び出される URL は
この新しいAngular呼び出し、呼び出しの結果を表示するコンポーネントを作成します。 CLI で次のコマンドを実行します。
ng generate component calendarコマンドが完了したら、.
routes/src/app/app-routing.module.ts の配列にコンポーネントを追加します。import { CalendarComponent } from './calendar/calendar.component'; const routes: Routes = [ { path: '', component: HomeComponent }, { path: 'calendar', component: CalendarComponent }, ];./src/app/calendar/calendar.component.ts を開き、その内容を次のように置き換えてください。
import { Component, OnInit } from '@angular/core';
import { parseISO } from 'date-fns';
import { endOfWeek, startOfWeek } from 'date-fns/esm';
import { zonedTimeToUtc } from 'date-fns-tz';
import { findIana } from 'windows-iana';
import * as MicrosoftGraph from '@microsoft/microsoft-graph-types';

import { AuthService } from '../auth.service';
import { GraphService } from '../graph.service';
import { AlertsService } from '../alerts.service';

@Component({
  selector: 'app-calendar',
  templateUrl: './calendar.component.html',
  styleUrls: ['./calendar.component.css']
})
export class CalendarComponent implements OnInit {

  public events?: MicrosoftGraph.Event[];

  constructor(
    private authService: AuthService,
    private graphService: GraphService,
    private alertsService: AlertsService) { }

  async ngOnInit() {
    // Convert the user's timezone to IANA format
    const ianaName = findIana(this.authService.user?.timeZone ?? 'UTC');
    const timeZone = ianaName![0].valueOf() || this.authService.user?.timeZone || 'UTC';

    // Get midnight on the start of the current week in the user's timezone,
    // but in UTC. For example, for Pacific Standard Time, the time value would be
    // 07:00:00Z
    const now = new Date();
    const weekStart = zonedTimeToUtc(startOfWeek(now), timeZone);
    const weekEnd = zonedTimeToUtc(endOfWeek(now), timeZone);

    this.events = await this.graphService.getCalendarView(
      weekStart.toISOString(),
      weekEnd.toISOString(),
      this.authService.user?.timeZone ?? 'UTC');

      // Temporary to display raw results
      this.alertsService.addSuccess('Events from Graph', JSON.stringify(events, null, 2));
  }
}
今のところ、これはページ上の JSON でイベントの配列をレンダリングします。 変更内容を保存し、アプリを再起動します。 サインインして、ナビゲーション バー の [予定表 ] リンクをクリックします。 すべてが正常に機能していれば、ユーザーのカレンダーにイベントの JSON ダンプが表示されます。
結果の表示
これで、コンポーネントを更新して CalendarComponent 、よりユーザーフレンドリーな方法でイベントを表示できます。
関数からアラートを追加する一時的なコードを削除
ngOnInitします。 更新された関数は次のように表示されます。ngOnInit() { // Convert the user's timezone to IANA format const ianaName = findIana(this.authService.user?.timeZone ?? 'UTC'); const timeZone = ianaName![0].valueOf() || this.authService.user?.timeZone || 'UTC'; // Get midnight on the start of the current week in the user's timezone, // but in UTC. For example, for Pacific Standard Time, the time value would be // 07:00:00Z var startOfWeek = moment.tz(timeZone).startOf('week').utc(); var endOfWeek = moment(startOfWeek).add(7, 'day'); this.graphService.getCalendarView( startOfWeek.format(), endOfWeek.format(), this.authService.user?.timeZone ?? 'UTC') .then((events) => { this.events = events; }); }ISO 文字列にオブジェクトを書式設定
CalendarComponentする関数DateTimeTimeZoneをクラスに追加します。formatDateTimeTimeZone(dateTime: MicrosoftGraph.DateTimeTimeZone | undefined | null): string { if (dateTime == undefined || dateTime == null) { return ''; } try { // Pass UTC for the time zone because the value // is already adjusted to the user's time zone return moment.tz(dateTime.dateTime, 'UTC').format(); } catch(error) { this.alertsService.addError('DateTimeTimeZone conversion error', JSON.stringify(error)); return ''; } }./src/app/calendar/calendar.component.htmlを開き、その内容 を次のように置き換えてください。
<h1>Calendar</h1>
<a class="btn btn-light btn-sm mb-3" routerLink="/newevent">New event</a>
<table class="table">
  <thead>
    <th scope="col">Organizer</th>
    <th scope="col">Subject</th>
    <th scope="col">Start</th>
    <th scope="col">End</th>
  </thead>
  <tbody>
    <tr *ngFor="let event of events">
      <td>{{event.organizer?.emailAddress?.name}}</td>
      <td>{{event.subject}}</td>
      <!-- Use 'UTC' in the pipe to date so Angular will not convert the
            already converted time to local time. See
            https://angular.io/api/common/DatePipe -->
      <td>{{formatDateTimeTimeZone(event.start) | date:'short' : 'UTC' }}</td>
      <td>{{formatDateTimeTimeZone(event.end) | date: 'short' : 'UTC' }}</td>
    </tr>
  </tbody>
</table>
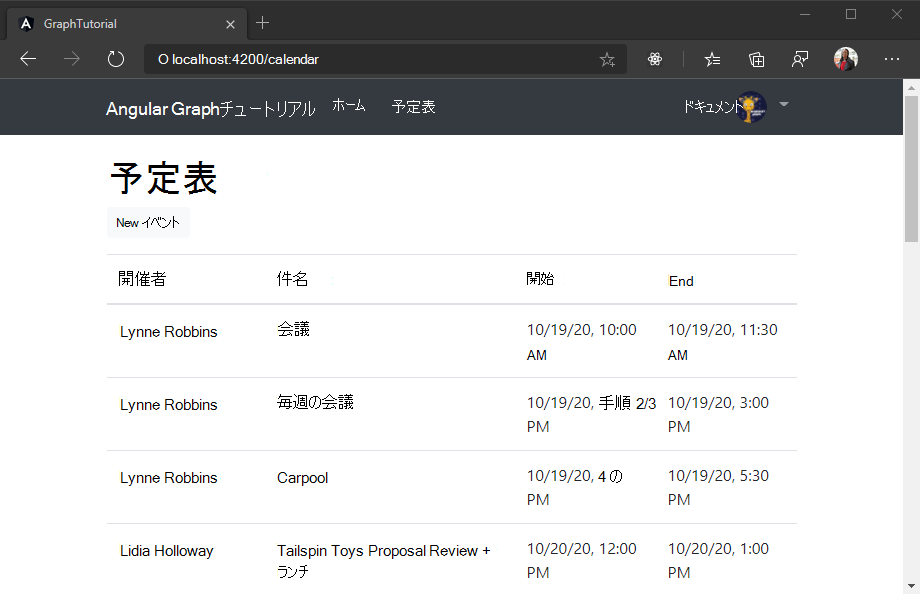
これにより、イベントのコレクションがループし、各行にテーブル行が追加されます。 変更を保存し、アプリを再起動します。 [予定表] リンクをクリック すると、アプリはイベントのテーブルを表示する必要があります。
新しいイベントを作成する
このセクションでは、ユーザーの予定表にイベントを作成する機能を追加します。
./src/app/graph.service.ts を開き、次の関数をクラスに追加
GraphServiceします。async addEventToCalendar(newEvent: MicrosoftGraph.Event): Promise<void> { try { // POST /me/events await this.graphClient .api('/me/events') .post(newEvent); } catch (error) { throw Error(JSON.stringify(error, null, 2)); } }
新しいイベント フォームを作成する
フォームを表示Angular、この新しい関数を呼び出すコンポーネントを作成します。 CLI で次のコマンドを実行します。
ng generate component new-eventコマンドが完了したら、.
routes/src/app/app-routing.module.ts の配列にコンポーネントを追加します。import { NewEventComponent } from './new-event/new-event.component'; const routes: Routes = [ { path: '', component: HomeComponent }, { path: 'calendar', component: CalendarComponent }, { path: 'newevent', component: NewEventComponent }, ];new-event.ts という名前の ./src/app/new-event ディレクトリに新しいファイルを作成し、次のコードを追加します。
import * as MicrosoftGraph from '@microsoft/microsoft-graph-types';

// Model for the new event form
export class NewEvent {
  subject?: string;
  attendees?: string;
  start?: string;
  end?: string;
  body?: string;

  // Generate a MicrosoftGraph.Event from the model
  getGraphEvent(timeZone: string): MicrosoftGraph.Event {
    const graphEvent: MicrosoftGraph.Event = {
      subject: this.subject,
      start: {
        dateTime: this.start,
        timeZone: timeZone
      },
      end: {
        dateTime: this.end,
        timeZone: timeZone
      }
    };

    // If there are attendees, convert to array
    // and add them
    if (this.attendees && this.attendees.length > 0) {
      graphEvent.attendees = [];

      const emails = this.attendees.split(';');
      emails.forEach(email => {
        graphEvent.attendees?.push({
          type: 'required',
          emailAddress: {
            address: email
          }
        });
      });
    }

    // If there is a body, add it as plain text
    if (this.body && this.body.length > 0) {
      graphEvent.body = {
        contentType: 'text',
        content: this.body
      };
    }

    return graphEvent;
  }
}
このクラスは、新しいイベント フォームのモデルとして機能します。
./src/app/new-event/new-event.component.ts を開き、その内容を次のコードに置き換えます。
import { Component, OnInit } from '@angular/core';

import { AuthService } from '../auth.service';
import { GraphService } from '../graph.service';
import { AlertsService } from '../alerts.service';
import { NewEvent } from './new-event';

@Component({
  selector: 'app-new-event',
  templateUrl: './new-event.component.html',
  styleUrls: ['./new-event.component.css']
})
export class NewEventComponent implements OnInit {

  model = new NewEvent();

  constructor(
    private authService: AuthService,
    private graphService: GraphService,
    private alertsService: AlertsService) { }

  ngOnInit(): void {
  }

  onSubmit(): void {
    const timeZone = this.authService.user?.timeZone ?? 'UTC';
    const graphEvent = this.model.getGraphEvent(timeZone);

    this.graphService.addEventToCalendar(graphEvent)
      .then(() => {
        this.alertsService.addSuccess('Event created.');
      }).catch(error => {
        this.alertsService.addError('Error creating event.', error.message);
      });
  }
}
./src/app/new-event/new-event.component.htmlを開き、その内容を次 のコードに置き換えます。
<h1>New event</h1>
<form (ngSubmit)="onSubmit()" #newEventForm="ngForm">
  <div class="form-group">
    <label for="subject">Subject</label>
    <input type="text" class="form-control" id="subject"
           required
           [(ngModel)]="model.subject" name="subject"
           #name="ngModel">
    <div [hidden]="name.valid || name.pristine"
          class="alert alert-danger">Subject is required</div>
  </div>
  <div class="form-group">
    <label for="attendees">Attendees</label>
    <input type="text" class="form-control" id="attendees"
           placeholder="Enter one or more email addresses (separated with a ;) to add attendees"
           [(ngModel)]="model.attendees" name="attendees"
           #name="ngModel">
  </div>
  <div class="form-row">
    <div class="col">
      <div class="form-group">
        <label for="start">Start</label>
        <input type="datetime-local" class="form-control" id="start"
               required
               [(ngModel)]="model.start" name="start"
               #name="ngModel">
        <div [hidden]="name.valid || name.pristine"
             class="alert alert-danger">Start is required</div>
      </div>
    </div>
    <div class="col">
      <div class="form-group">
        <label for="end">End</label>
        <input type="datetime-local" class="form-control" id="end"
               required
               [(ngModel)]="model.end" name="end"
               #name="ngModel">
        <div [hidden]="name.valid || name.pristine"
             class="alert alert-danger">End is required</div>
      </div>
    </div>
  </div>
  <div class="form-group">
    <label for="body">Body</label>
    <textarea class="form-control" id="body" rows="4"
              [(ngModel)]="model.body" name="body"
              #name="ngModel"></textarea>
  </div>
  <button type="submit" class="btn btn-primary mr-2"
          [disabled]="!newEventForm.form.valid">Create</button>
  <a class="btn btn-secondary" routerLink="/calendar">Cancel</a>
</form>
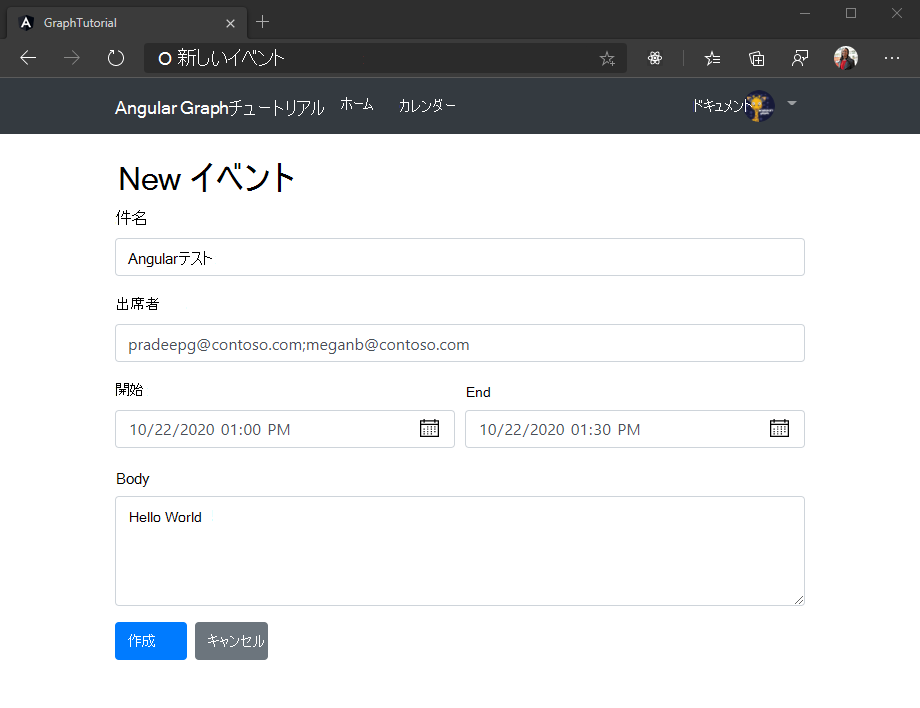
変更を保存し、アプリを更新します。 予定表ページ の [新しい イベント] ボタンを選択し、フォームを使用してユーザーの予定表にイベントを作成します。
おめでとうございます。
Microsoft のチュートリアルのAngular完了Graphしました。 Microsoft Graphを呼び出す作業アプリが作成されたので、新しい機能を試して追加できます。 Microsoft Graphの概要を参照して、Microsoft Graph でアクセスできるすべてのデータを確認Graph。
フィードバック
このチュートリアルに関するフィードバックは、リポジトリのGitHubしてください。
このセクションに問題がある場合 このセクションを改善できるよう、フィードバックをお送りください。