Microsoft Graph を使用した ASP.NET コア MVC アプリのビルド
このチュートリアルでは、Microsoft ASP.NET Core API を使用してユーザーの予定表情報Graphを取得する web アプリを作成する方法について説明します。
ヒント
完了したチュートリアルをダウンロードする場合は、リポジトリをダウンロードまたは複製GitHubできます。 アプリ ID とシークレットを使用してアプリを構成する手順については、デモ フォルダーの README ファイルを参照してください。
前提条件
このチュートリアルを開始する前に、開発マシンに .NET Core SDK がインストールされている必要があります。 SDK がない場合は、前のリンクにアクセスしてダウンロード オプションを確認してください。
また、Outlook.com 上のメールボックスを持つ個人用 Microsoft アカウント、または Microsoft の仕事用または学校用のアカウントを持っている必要があります。 Microsoft アカウントをお持ちでない場合は、無料アカウントを取得するためのオプションが 2 つご利用できます。
- 新しい 個人用 Microsoft アカウントにサインアップできます。
- 開発者プログラムにサインアップしてMicrosoft 365無料のサブスクリプションをOffice 365できます。
注意
このチュートリアルは、.NET Core SDK バージョン 5.0.102 で記述されています。 このガイドの手順は、他のバージョンでも動作しますが、テストされていない場合があります。
フィードバック
このチュートリアルに関するフィードバックは、リポジトリのGitHubしてください。
ASP.NET コア MVC web アプリを作成する
まず、Web アプリ ASP.NET Core作成します。
プロジェクトを作成するディレクトリでコマンド ライン インターフェイス (CLI) を開きます。 次のコマンドを実行します。
dotnet new mvc -o GraphTutorialプロジェクトが作成されると、現在のディレクトリを GraphTutorial ディレクトリに変更し、CLI で次のコマンドを実行して動作します。
dotnet runブラウザーを開き、を参照します
https://localhost:5001。 すべてが機能している場合は、既定のページが表示 ASP.NET Coreがあります。
重要
localhost の証明書が信頼されていないという警告を受け取った場合は、.NET Core CLI を使用して開発証明書をインストールして信頼できます。 特定のオペレーティング システムの手順については、「ASP.NET Coreで HTTPS を適用する」を参照してください。
NuGet パッケージを追加する
次に進む前に、後で使用NuGet追加のパッケージをインストールします。
- アクセス トークンの要求と管理を行う Microsoft.Identity.Web。
- Microsoft.Identity.Web.MicrosoftGraph を使用して、依存関係の挿入をGraph SDK を追加します。
- サインインおよびサインアウト UI 用の Microsoft.Identity.Web.UI 。
- タイム ゾーン識別子をクロスプラットフォームで処理する TimeZoneConverter。
依存関係をインストールするには、CLI で次のコマンドを実行します。
dotnet add package Microsoft.Identity.Web --version 1.5.1
dotnet add package Microsoft.Identity.Web.MicrosoftGraph --version 1.5.1
dotnet add package Microsoft.Identity.Web.UI --version 1.5.1
dotnet add package TimeZoneConverter
アプリを設計する
このセクションでは、アプリケーションの基本的な UI 構造を作成します。
アラート拡張メソッドの実装
このセクションでは、コントローラー ビューによって返される型の IActionResult 拡張メソッドを作成します。 この拡張機能を使用すると、一時的なエラーメッセージまたは成功メッセージをビューに渡す機能が有効になります。
ヒント
任意のテキスト エディターを使用して、このチュートリアルのソース ファイルを編集できます。 ただし、Visual Studio Codeデバッグや Intellisense などの追加機能が提供されます。
Alerts という名前の GraphTutorial ディレクトリに新しい ディレクトリを 作成します。
./Alerts ディレクトリに WithAlertResult.cs という名前の新しいファイルを作成し、次のコードを追加します。
using Microsoft.AspNetCore.Mvc;
using Microsoft.AspNetCore.Mvc.ViewFeatures;
using Microsoft.Extensions.DependencyInjection;
using System.Threading.Tasks;

namespace GraphTutorial
{
    // WithAlertResult adds temporary error/info/success
    // messages to the result of a controller action.
    // This data is read and displayed by the _AlertPartial view
    public class WithAlertResult : IActionResult
    {
        public IActionResult Result { get; }
        public string Type { get; }
        public string Message { get; }
        public string DebugInfo { get; }

        public WithAlertResult(IActionResult result,
                                    string type,
                                    string message,
                                    string debugInfo)
        {
            Result = result;
            Type = type;
            Message = message;
            DebugInfo = debugInfo;
        }

        public async Task ExecuteResultAsync(ActionContext context)
        {
            var factory = context.HttpContext.RequestServices
            .GetService<ITempDataDictionaryFactory>();

            var tempData = factory.GetTempData(context.HttpContext);

            tempData["_alertType"] = Type;
            tempData["_alertMessage"] = Message;
            tempData["_alertDebugInfo"] = DebugInfo;

            await Result.ExecuteResultAsync(context);
        }
    }
}
./Alerts ディレクトリに AlertExtensions.cs という名前の新しいファイルを作成し、次のコードを追加します。
using Microsoft.AspNetCore.Mvc;

namespace GraphTutorial
{
    public static class AlertExtensions
    {
        public static IActionResult WithError(this IActionResult result,
                                            string message,
                                            string debugInfo = null)
        {
            return Alert(result, "danger", message, debugInfo);
        }

        public static IActionResult WithSuccess(this IActionResult result,
                                            string message,
                                            string debugInfo = null)
        {
            return Alert(result, "success", message, debugInfo);
        }

        public static IActionResult WithInfo(this IActionResult result,
                                            string message,
                                            string debugInfo = null)
        {
            return Alert(result, "info", message, debugInfo);
        }

        private static IActionResult Alert(IActionResult result,
                                        string type,
                                        string message,
                                        string debugInfo)
        {
            return new WithAlertResult(result, type, message, debugInfo);
        }
    }
}
ユーザー データ拡張メソッドの実装
このセクションでは、Microsoft Identity プラットフォーム ClaimsPrincipal によって生成されたオブジェクトの拡張メソッドを作成します。 これにより、Microsoft のデータを使用して既存のユーザー ID を拡張Graph。
注意
このコードは、今のところプレースホルダーにすら変え、後のセクションで完了します。
GraphTutorial ディレクトリに新しいディレクトリを作成します 。Graph。
GraphClaimsPrincipalExtensions.cs という 名前の新しいファイルを作成し、次のコードを追加します。
using System.Security.Claims;

namespace GraphTutorial
{
    public static class GraphClaimTypes {
        public const string DisplayName ="graph_name";
        public const string Email = "graph_email";
        public const string Photo = "graph_photo";
        public const string TimeZone = "graph_timezone";
        public const string DateTimeFormat = "graph_datetimeformat";
    }

    // Helper methods to access Graph user data stored in
    // the claims principal
    public static class GraphClaimsPrincipalExtensions
    {
        public static string GetUserGraphDisplayName(this ClaimsPrincipal claimsPrincipal)
        {
            return "Adele Vance";
        }

        public static string GetUserGraphEmail(this ClaimsPrincipal claimsPrincipal)
        {
            return "adelev@contoso.com";
        }

        public static string GetUserGraphPhoto(this ClaimsPrincipal claimsPrincipal)
        {
            return "/img/no-profile-photo.png";
        }
    }
}
ビューの作成
このセクションでは、アプリケーションの Razor ビューを実装します。
./Views/Shared ディレクトリに _LoginPartial.cshtml という名前の新しいファイルを追加し、次のコードを追加します。
@using GraphTutorial

<ul class="nav navbar-nav">
@if (User.Identity.IsAuthenticated)
{
    <li class="nav-item dropdown">
        <a class="nav-link dropdown-toggle" data-toggle="dropdown" href="#" role="button">
            <img src="@User.GetUserGraphPhoto()" class="nav-profile-photo rounded-circle align-self-center mr-2">
        </a>
        <div class="dropdown-menu dropdown-menu-right">
            <h5 class="dropdown-item-text mb-0">@User.GetUserGraphDisplayName()</h5>
            <p class="dropdown-item-text text-muted mb-0">@User.GetUserGraphEmail()</p>
            <div class="dropdown-divider"></div>
            <a class="dropdown-item" asp-area="MicrosoftIdentity" asp-controller="Account" asp-action="SignOut">Sign out</a>
        </div>
    </li>
}
else
{
    <li class="nav-item">
        <a class="nav-link" asp-area="MicrosoftIdentity" asp-controller="Account" asp-action="SignIn">Sign in</a>
    </li>
}
</ul>
./Views/Shared ディレクトリに _AlertPartial.cshtml という名前の新しいファイルを追加し、次のコードを追加します。
@{
    var type = $"{TempData["_alertType"]}";
    var message = $"{TempData["_alertMessage"]}";
    var debugInfo = $"{TempData["_alertDebugInfo"]}";
}

@if (!string.IsNullOrEmpty(type))
{
    <div class="alert alert-@type" role="alert">
        @if (string.IsNullOrEmpty(debugInfo))
        {
            <p class="mb-0">@message</p>
        }
        else
        {
            <p class="mb-3">@message</p>
            <pre class="alert-pre border bg-light p-2"><code>@debugInfo</code></pre>
        }
    </div>
}
アプリのグローバル レイアウトを更新するため、./Views/Shared/_Layout.cshtml ファイルを開き、内容全体を次のコードで置き換えます。
@{
    string controller = $"{ViewContext.RouteData.Values["controller"]}";
}

<!DOCTYPE html>
<html lang="en">
<head>
    <meta charset="utf-8" />
    <meta name="viewport" content="width=device-width, initial-scale=1.0" />
    <title>@ViewData["Title"] - GraphTutorial</title>
    <link rel="stylesheet" href="~/lib/bootstrap/dist/css/bootstrap.min.css" />
    <link rel="stylesheet" href="~/css/site.css" />
</head>
<body>
    <header>
        <nav class="navbar navbar-expand-sm navbar-toggleable-sm navbar-dark bg-dark border-bottom box-shadow mb-3">
            <div class="container">
                <a class="navbar-brand" asp-area="" asp-controller="Home" asp-action="Index">GraphTutorial</a>
                <button class="navbar-toggler" type="button" data-toggle="collapse" data-target=".navbar-collapse"
                    aria-controls="navbarSupportedContent" aria-expanded="false" aria-label="Toggle navigation">
                    <span class="navbar-toggler-icon"></span>
                </button>
                <div class="navbar-collapse collapse mr-auto">
                    <ul class="navbar-nav flex-grow-1">
                        <li class="@(controller == "Home" ? "nav-item active" : "nav-item")">
                            <a class="nav-link" asp-area="" asp-controller="Home" asp-action="Index">Home</a>
                        </li>
                        @if (User.Identity.IsAuthenticated)
                        {
                        <li class="@(controller == "Calendar" ? "nav-item active" : "nav-item")">
                            <a class="nav-link" asp-area="" asp-controller="Calendar" asp-action="Index">Calendar</a>
                        </li>
                        }
                    </ul>
                    <partial name="_LoginPartial"/>
                </div>
            </div>
        </nav>
    </header>
    <div class="container">
        <main role="main" class="pb-3">
            <partial name="_AlertPartial"/>
            @RenderBody()
        </main>
    </div>

    <footer class="border-top footer text-muted">
        <div class="container">
            © 2020 - GraphTutorial - <a asp-area="" asp-controller="Home" asp-action="Privacy">Privacy</a>
        </div>
    </footer>
    <script src="~/lib/jquery/dist/jquery.min.js"></script>
    <script src="~/lib/bootstrap/dist/js/bootstrap.bundle.min.js"></script>
    <script src="~/js/site.js" asp-append-version="true"></script>
    @RenderSection("Scripts", required: false)
</body>
</html>
./wwwroot/css/site.css を 開き、ファイルの下部に次のコードを追加します。
.nav-profile-photo {
  width: 32px;
}

.alert-pre {
  word-wrap: break-word;
  word-break: break-all;
  white-space: pre-wrap;
}

.calendar-view-date-cell {
  width: 150px;
}

.calendar-view-date {
  width: 40px;
  font-size: 36px;
  line-height: 36px;
  margin-right: 10px;
}

.calendar-view-month {
  font-size: 0.75em;
}

.calendar-view-timespan {
  width: 200px;
}

.calendar-view-subject {
  font-size: 1.25em;
}

.calendar-view-organizer {
  font-size: .75em;
}

.calendar-view-date-diff {
  font-size: .75em
}
./Views/Home/index.cshtml ファイルを開き、その内容を次に置き換えます。
@{
    ViewData["Title"] = "Home Page";
}

@using GraphTutorial

<div class="jumbotron">
    <h1>ASP.NET Core Graph Tutorial</h1>
    <p class="lead">This sample app shows how to use the Microsoft Graph API to access a user's data from ASP.NET Core</p>
    @if (User.Identity.IsAuthenticated)
    {
        <h4>Welcome @User.GetUserGraphDisplayName()!</h4>
        <p>Use the navigation bar at the top of the page to get started.</p>
    }
    else
    {
        <a class="btn btn-primary btn-large" asp-area="MicrosoftIdentity" asp-controller="Account" asp-action="SignIn">Click here to sign in</a>
    }
</div>
img という名前の ./wwwroot ディレクトリに新しい ディレクトリを作成 します。 このディレクトリに、選択した名前 のno-profile-photo.pngを 追加します。 この画像は、ユーザーが Microsoft サーバーで写真を持ってない場合に、ユーザーの写真Graph。
ヒント
これらのスクリーンショットで使用されている画像は、次のページからGitHub。
すべての変更を保存し、サーバーを再起動します (
dotnet run)。 これで、アプリは非常に異なって見える必要があります。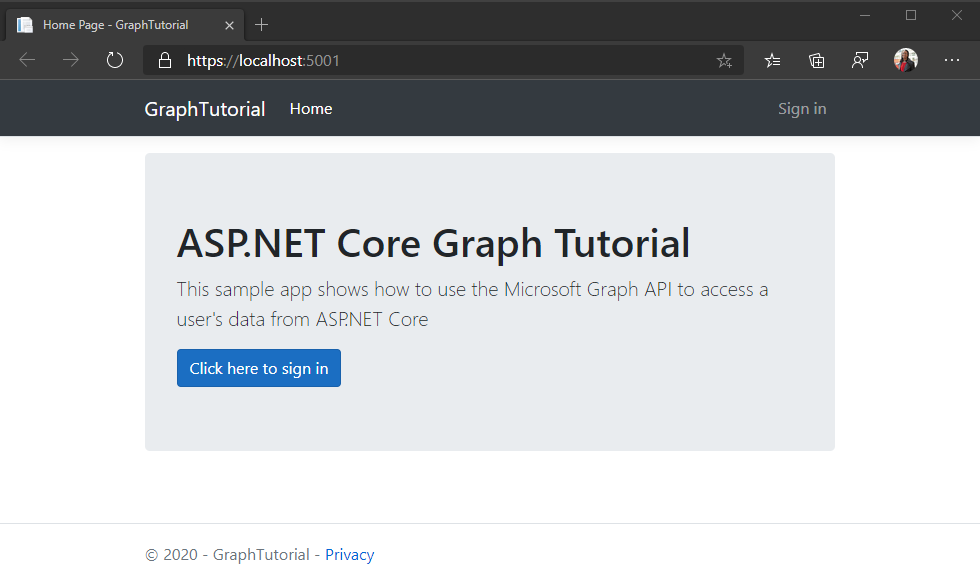
ポータルでアプリを登録する
この演習では、管理者センターを使用して新Azure AD Web アプリケーション登録Azure Active Directoryします。
ブラウザーを開き、Azure Active Directory 管理センターへ移動します。 個人用アカウント (別名: Microsoft アカウント)、または 職場/学校アカウント を使用してログインします。
左側のナビゲーションで [Azure Active Directory] を選択し、それから [管理] で [アプリの登録] を選択します。
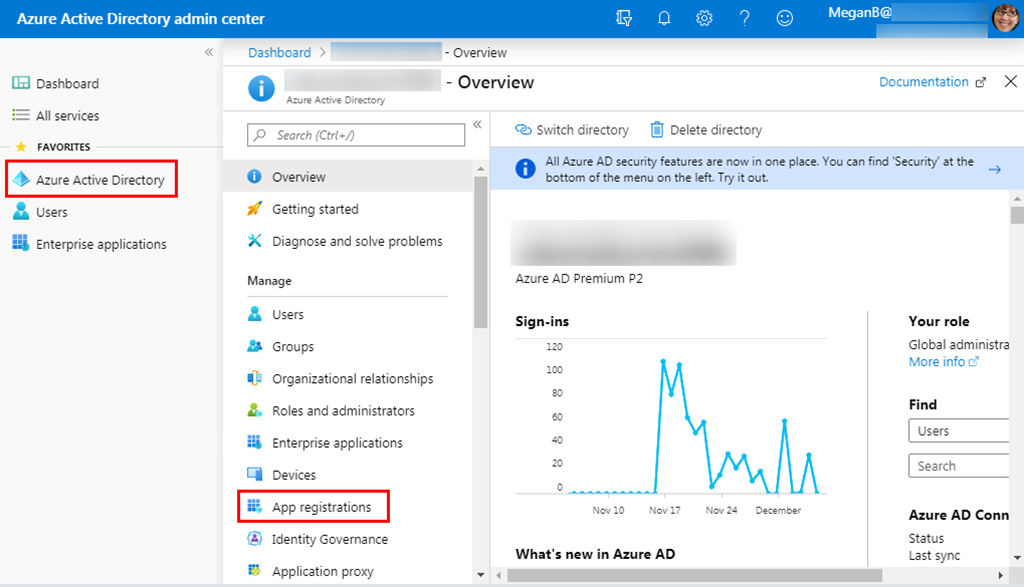
[新規登録] を選択します。 [アプリケーションを登録] ページで、次のように値を設定します。
ASP.NET Core Graph Tutorialに [名前] を設定します。- [サポートされているアカウントの種類] を [任意の組織のディレクトリ内のアカウントと個人用の Microsoft アカウント] に設定します。
- [リダイレクト URI] で、最初のドロップダウン リストを
Webに設定し、それからhttps://localhost:5001/に値を設定します。
![[アプリケーションを登録する] ページのスクリーンショット](aspnet-core/tutorial/images/aad-register-an-app.png)
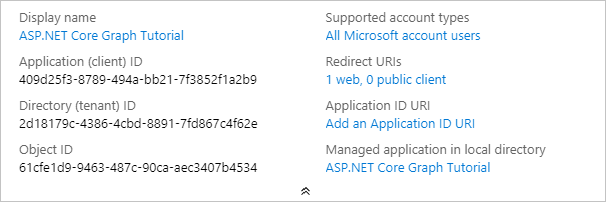
[登録] を選択します。 [チュートリアル ASP.NET Core Graph] ページで、アプリケーション (クライアント) ID の値をコピーして保存します。次の手順で必要になります。
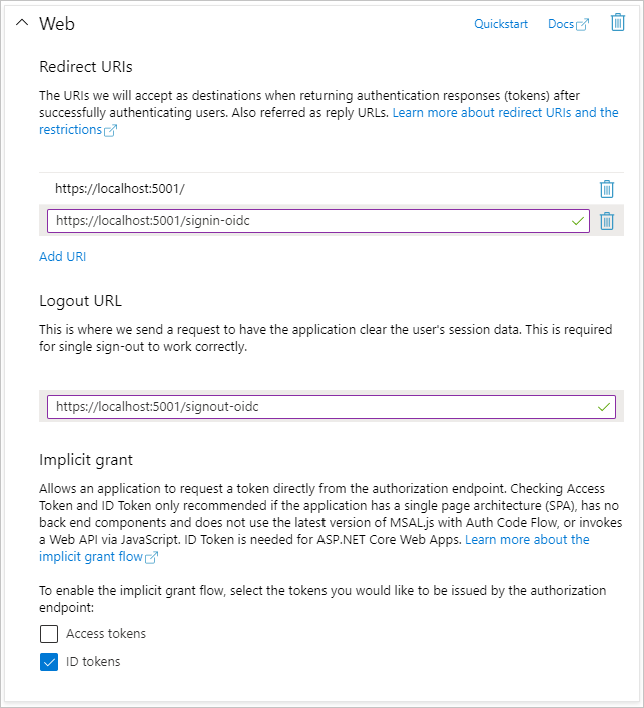
[管理] の下の [認証] を選択します。 [ リダイレクト URI] で、 値を持つ URI を追加します
https://localhost:5001/signin-oidc。[ログアウト URL] をに設定 します
https://localhost:5001/signout-oidc。[暗黙的な許可] セクションを検索し、[ID トークン] を有効にします。 [保存] を選択します。
[管理] で [証明書とシークレット] を選択します。 [新しいクライアント シークレット] ボタンを選択します。 [説明] に値を入力して、[有効期限] のオプションのいずれかを選び、[追加] を選択します。
![[クライアントシークレットの追加] ダイアログのスクリーンショット](aspnet-core/tutorial/images/aad-new-client-secret.png)
このページを離れる前に、クライアント シークレットの値をコピーします。 次の手順で行います。
重要
このクライアント シークレットは今後表示されないため、この段階で必ずコピーするようにしてください。

Azure AD 認証を追加する
この演習では、前の演習からアプリケーションを拡張して、アプリケーションの認証をサポートAzure AD。 これは、Microsoft Graph API を呼び出すのに必要な OAuth アクセス トークンを取得するために必要です。 この手順では、 Microsoft.Identity.Web ライブラリを構成 します。
重要
アプリケーション ID とシークレットをソースに格納しないようにするには、 .NET Secret Manager を使用してこれらの値を格納します。 シークレット マネージャーは開発のみを目的としますが、実稼働アプリでは、シークレットを格納するために信頼できるシークレット マネージャーを使用する必要があります。
./appsettings.json を開き、その内容を次に置き換えてください。
{
  "AzureAd": {
    "Instance": "https://login.microsoftonline.com/",
    "TenantId": "common",
    "CallbackPath": "/signin-oidc"
  },
  "Logging": {
    "LogLevel": {
      "Default": "Information",
      "Microsoft": "Warning",
      "Microsoft.Hosting.Lifetime": "Information"
    }
  },
  "AllowedHosts": "*"
}
GraphTutorial.csproj
YOUR_APP_IDがあるディレクトリで CLI を開き、次のコマンドを実行し、Azure portalYOUR_APP_SECRETのアプリケーション ID に置き換え、アプリケーション シークレットを使用します。dotnet user-secrets init dotnet user-secrets set "AzureAd:ClientId" "YOUR_APP_ID" dotnet user-secrets set "AzureAd:ClientSecret" "YOUR_APP_SECRET"
サインインの実装
まず、Microsoft Identity プラットフォーム サービスをアプリケーションに追加します。
./Graph ディレクトリに GraphConstants.cs という 名前の新しいファイルを作成 し、次のコードを追加します。
namespace GraphTutorial
{
    public static class GraphConstants
    {
        // Defines the permission scopes used by the app
        public readonly static string[] Scopes =
        {
            "User.Read",
            "MailboxSettings.Read",
            "Calendars.ReadWrite"
        };
    }
}
./Startup.cs ファイルを 開き、ファイル
usingの上部に次のステートメントを追加します。using Microsoft.AspNetCore.Authentication.OpenIdConnect; using Microsoft.AspNetCore.Authorization; using Microsoft.AspNetCore.Mvc.Authorization; using Microsoft.Identity.Web; using Microsoft.Identity.Web.UI; using Microsoft.IdentityModel.Protocols.OpenIdConnect; using Microsoft.Graph; using System.Net; using System.Net.Http.Headers;既存の
ConfigureServices関数を、以下の関数で置き換えます。public void ConfigureServices(IServiceCollection services) { services // Use OpenId authentication .AddAuthentication(OpenIdConnectDefaults.AuthenticationScheme) // Specify this is a web app and needs auth code flow .AddMicrosoftIdentityWebApp(Configuration) // Add ability to call web API (Graph) // and get access tokens .EnableTokenAcquisitionToCallDownstreamApi(options => { Configuration.Bind("AzureAd", options); }, GraphConstants.Scopes) // Use in-memory token cache // See https://github.com/AzureAD/microsoft-identity-web/wiki/token-cache-serialization .AddInMemoryTokenCaches(); // Require authentication services.AddControllersWithViews(options => { var policy = new AuthorizationPolicyBuilder() .RequireAuthenticatedUser() .Build(); options.Filters.Add(new AuthorizeFilter(policy)); }) // Add the Microsoft Identity UI pages for signin/out .AddMicrosoftIdentityUI(); }関数で
Configure、行の上に次の行を追加app.UseAuthorization();します。app.UseAuthentication();./Controllers/HomeController.cs を開き、その内容を次に置き換えてください。
using GraphTutorial.Models;
using Microsoft.AspNetCore.Authorization;
using Microsoft.AspNetCore.Mvc;
using Microsoft.Extensions.Logging;
using Microsoft.Identity.Web;
using System.Diagnostics;
using System.Threading.Tasks;

namespace GraphTutorial.Controllers
{
    public class HomeController : Controller
    {
        ITokenAcquisition _tokenAcquisition;
        private readonly ILogger<HomeController> _logger;

        // Get the ITokenAcquisition interface via
        // dependency injection
        public HomeController(
            ITokenAcquisition tokenAcquisition,
            ILogger<HomeController> logger)
        {
            _tokenAcquisition = tokenAcquisition;
            _logger = logger;
        }

        public async Task<IActionResult> Index()
        {
            // TEMPORARY
            // Get the token and display it
            try
            {
                string token = await _tokenAcquisition
                    .GetAccessTokenForUserAsync(GraphConstants.Scopes);
                return View().WithInfo("Token acquired", token);
            }
            catch (MicrosoftIdentityWebChallengeUserException)
            {
                return Challenge();
            }
        }

        public IActionResult Privacy()
        {
            return View();
        }

        [ResponseCache(Duration = 0, Location = ResponseCacheLocation.None, NoStore = true)]
        public IActionResult Error()
        {
            return View(new ErrorViewModel { RequestId = Activity.Current?.Id ?? HttpContext.TraceIdentifier });
        }

        [ResponseCache(Duration = 0, Location = ResponseCacheLocation.None, NoStore = true)]
        [AllowAnonymous]
        public IActionResult ErrorWithMessage(string message, string debug)
        {
            return View("Index").WithError(message, debug);
        }
    }
}
変更を保存してプロジェクトを開始します。 Microsoft アカウントでログインします。
同意のプロンプトを確認します。 アクセス許可の一覧は、./Graph/GraphConstants.cs で構成されたアクセス許可スコープの一覧に対応します。
- アクセス権を付与 したデータへのアクセスを維持する: (
offline_access) このアクセス許可は、更新トークンを取得するために MSAL によって要求されます。 - サインインしてプロファイルを読み取る: (
User.Read) このアクセス許可を使用すると、アプリはログインしているユーザーのプロファイルとプロファイル写真を取得できます。 - メールボックスの設定を読み取る: (
MailboxSettings.Read) このアクセス許可を使用すると、アプリはタイム ゾーンとタイム 形式を含むユーザーのメールボックス設定を読み取るできます。 - 予定表へのフル アクセス権を 持つ: (
Calendars.ReadWrite) このアクセス許可を使用すると、アプリはユーザーの予定表のイベントを読み取り、新しいイベントを追加し、既存のイベントを変更できます。
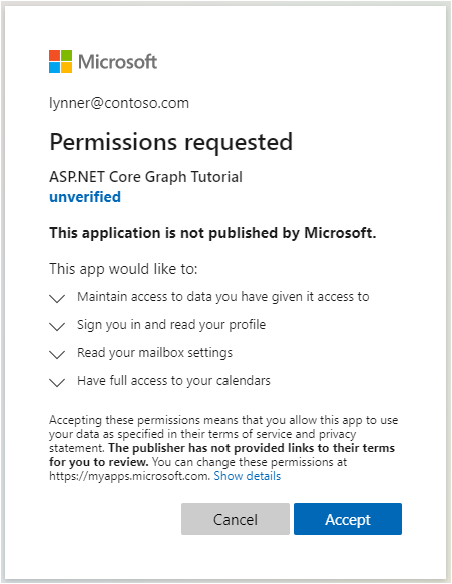
同意に関する詳細については、「アプリケーションの同意エクスペリエンスAzure AD理解する」を参照してください。
- アクセス権を付与 したデータへのアクセスを維持する: (
要求されたアクセス許可に同意します。 ブラウザーがアプリにリダイレクトし、トークンが表示されます。
ユーザーの詳細情報を取得する
ユーザーがログインすると、Microsoft Graph からそのユーザーの情報を入手できます。
./Graph/GraphClaimsPrincipalExtensions.cs を開き、その内容全体を次に置き換えてください。
using Microsoft.Graph;
using System;
using System.IO;
using System.Security.Claims;

namespace GraphTutorial
{
    public static class GraphClaimTypes {
        public const string DisplayName ="graph_name";
        public const string Email = "graph_email";
        public const string Photo = "graph_photo";
        public const string TimeZone = "graph_timezone";
        public const string TimeFormat = "graph_timeformat";
    }

    // Helper methods to access Graph user data stored in
    // the claims principal
    public static class GraphClaimsPrincipalExtensions
    {
        public static string GetUserGraphDisplayName(this ClaimsPrincipal claimsPrincipal)
        {
            return claimsPrincipal.FindFirstValue(GraphClaimTypes.DisplayName);
        }

        public static string GetUserGraphEmail(this ClaimsPrincipal claimsPrincipal)
        {
            return claimsPrincipal.FindFirstValue(GraphClaimTypes.Email);
        }

        public static string GetUserGraphPhoto(this ClaimsPrincipal claimsPrincipal)
        {
            return claimsPrincipal.FindFirstValue(GraphClaimTypes.Photo);
        }

        public static string GetUserGraphTimeZone(this ClaimsPrincipal claimsPrincipal)
        {
            return claimsPrincipal.FindFirstValue(GraphClaimTypes.TimeZone);
        }

        public static string GetUserGraphTimeFormat(this ClaimsPrincipal claimsPrincipal)
        {
            return claimsPrincipal.FindFirstValue(GraphClaimTypes.TimeFormat);
        }

        public static void AddUserGraphInfo(this ClaimsPrincipal claimsPrincipal, User user)
        {
            var identity = claimsPrincipal.Identity as ClaimsIdentity;

            identity.AddClaim(
                new Claim(GraphClaimTypes.DisplayName, user.DisplayName));
            identity.AddClaim(
                new Claim(GraphClaimTypes.Email,
                    user.Mail ?? user.UserPrincipalName));
            identity.AddClaim(
                new Claim(GraphClaimTypes.TimeZone,
                    user.MailboxSettings.TimeZone));
            identity.AddClaim(
                new Claim(GraphClaimTypes.TimeFormat, user.MailboxSettings.TimeFormat));
        }

        public static void AddUserGraphPhoto(this ClaimsPrincipal claimsPrincipal, Stream photoStream)
        {
            var identity = claimsPrincipal.Identity as ClaimsIdentity;

            if (photoStream == null)
            {
                // Add the default profile photo
                identity.AddClaim(
                    new Claim(GraphClaimTypes.Photo, "/img/no-profile-photo.png"));
                return;
            }

            // Copy the photo stream to a memory stream
            // to get the bytes out of it
            var memoryStream = new MemoryStream();
            photoStream.CopyTo(memoryStream);
            var photoBytes = memoryStream.ToArray();

            // Generate a date URI for the photo
            var photoUrl = $"data:image/png;base64,{Convert.ToBase64String(photoBytes)}";

            identity.AddClaim(
                new Claim(GraphClaimTypes.Photo, photoUrl));
        }
    }
}
./Startup.cs を開 き、既存の行を次
.AddMicrosoftIdentityWebApp(Configuration)のコードに置き換えます。// Specify this is a web app and needs auth code flow .AddMicrosoftIdentityWebApp(options => { Configuration.Bind("AzureAd", options); options.Prompt = "select_account"; options.Events.OnTokenValidated = async context => { var tokenAcquisition = context.HttpContext.RequestServices .GetRequiredService<ITokenAcquisition>(); var graphClient = new GraphServiceClient( new DelegateAuthenticationProvider(async (request) => { var token = await tokenAcquisition .GetAccessTokenForUserAsync(GraphConstants.Scopes, user:context.Principal); request.Headers.Authorization = new AuthenticationHeaderValue("Bearer", token); }) ); // Get user information from Graph var user = await graphClient.Me.Request() .Select(u => new { u.DisplayName, u.Mail, u.UserPrincipalName, u.MailboxSettings }) .GetAsync(); context.Principal.AddUserGraphInfo(user); // Get the user's photo // If the user doesn't have a photo, this throws try { var photo = await graphClient.Me .Photos["48x48"] .Content .Request() .GetAsync(); context.Principal.AddUserGraphPhoto(photo); } catch (ServiceException ex) { if (ex.IsMatch("ErrorItemNotFound") || ex.IsMatch("ConsumerPhotoIsNotSupported")) { context.Principal.AddUserGraphPhoto(null); } else { throw; } } }; options.Events.OnAuthenticationFailed = context => { var error = WebUtility.UrlEncode(context.Exception.Message); context.Response .Redirect($"/Home/ErrorWithMessage?message=Authentication+error&debug={error}"); context.HandleResponse(); return Task.FromResult(0); }; options.Events.OnRemoteFailure = context => { if (context.Failure is OpenIdConnectProtocolException) { var error = WebUtility.UrlEncode(context.Failure.Message); context.Response .Redirect($"/Home/ErrorWithMessage?message=Sign+in+error&debug={error}"); context.HandleResponse(); } return Task.FromResult(0); }; })このコードの動作を検討します。
- イベントのイベント ハンドラーを追加
OnTokenValidatedします。- インターフェイスを使用して
ITokenAcquisitionアクセス トークンを取得します。 - Microsoft Graphを呼び出して、ユーザーのプロファイルと写真を取得します。
- ユーザーの id にGraph情報を追加します。
- インターフェイスを使用して
- イベントのイベント ハンドラーを追加
呼び出しの後と呼び出しの前に、
EnableTokenAcquisitionToCallDownstreamApi次の関数呼び出しを追加AddInMemoryTokenCachesします。// Add a GraphServiceClient via dependency injection .AddMicrosoftGraph(options => { options.Scopes = string.Join(' ', GraphConstants.Scopes); })これにより、依存関係の挿入を 介して、認証された GraphServiceClient をコントローラーで使用できます。
./Controllers/HomeController.cs を開き、関数を次に
Index置き換える。public IActionResult Index() { return View(); }HomeController クラス内のすべての
ITokenAcquisition参照を削除します。変更を保存し、アプリを起動し、サインイン プロセスを実行します。 ホーム ページに戻る必要がありますが、サインイン済みかどうかを示す UI が変更される必要があります。
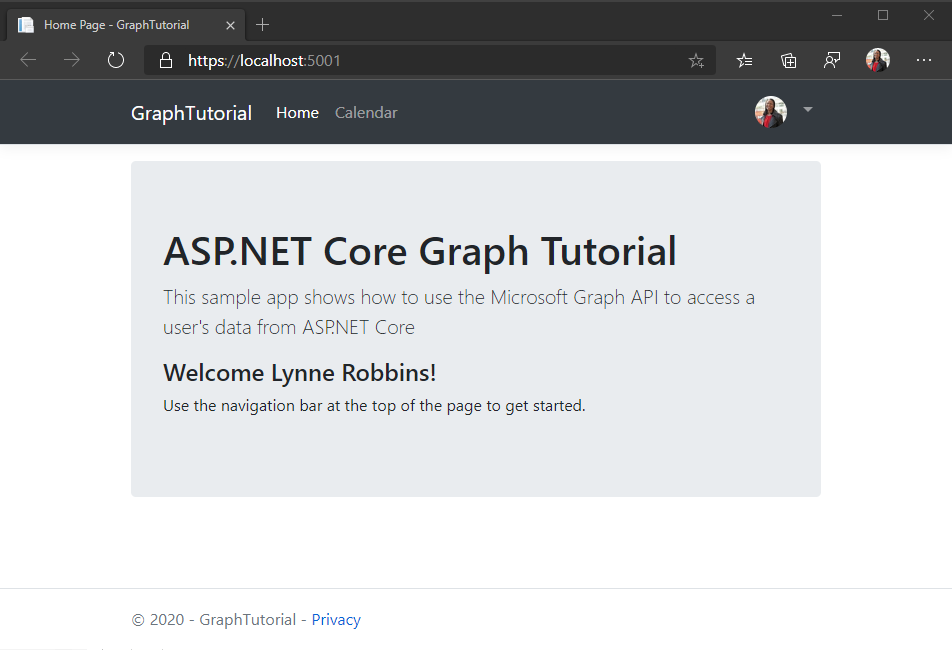
右上隅にあるユーザー アバターをクリックして、[サインアウト] リンクにアクセス します。 [サインアウト] をクリックすると、セッションがリセットされ、ホーム ページに戻ります。
![[サインアウト] リンクのドロップダウン メニューのスクリーンショット](aspnet-core/tutorial/images/add-aad-auth-02.png)
ヒント
ホーム ページにユーザー名が表示されない場合、これらの変更を行った後に[アバターの使用] ドロップダウンに名前とメールが表示されない場合は、サインアウトしてサインインし戻します。
トークンの保存と更新
この時点で、アプリケーションはアクセス トークンを持ち Authorization 、API 呼び出しのヘッダーに送信されます。 これは、アプリが Microsoft Graph にユーザーの代わりにアクセスできるようにするトークンです。
ただし、このトークンは一時的なものです。 トークンは発行後 1 時間で期限切れになります。 ここで、更新トークンが役に立ちます。 更新トークンを使用すると、ユーザーが再度サインインしなくても、アプリは新しいアクセス トークンを要求できます。
アプリは Microsoft.Identity.Web ライブラリを使用していますので、トークンストレージまたは更新ロジックを実装する必要は一切ない。
アプリはメモリ内トークン キャッシュを使用します。これは、アプリの再起動時にトークンを保持する必要がないアプリで十分です。 実稼働アプリでは、代わりに Microsoft.Identity.Web ライブラリの分散キャッシュ オプションを使用できます。
このメソッド GetAccessTokenForUserAsync は、トークンの有効期限と更新を処理します。 最初にキャッシュされたトークンをチェックし、有効期限が切れていない場合は、トークンを返します。 有効期限が切れている場合は、キャッシュされた更新トークンを使用して新しい更新トークンを取得します。
コントローラー が依存関係の挿入 を介して取得する GraphServiceClient は、ユーザーに使用する認証プロバイダーで事前構成 GetAccessTokenForUserAsync されます。
予定表ビューを取得する
このセクションでは、アプリケーションに Microsoft Graphを組み込む必要があります。 このアプリケーションでは、Microsoft Graph クライアント ライブラリ for .NET を使用して Microsoft クライアント ライブラリを呼び出Graph。
Outlook からカレンダー イベントを取得する
まず、予定表ビュー用の新しいコントローラーを作成します。
CalendarController.cs という 名前の新しいファイルを ./Controllers ディレクトリに追加し、次のコードを追加します。
using GraphTutorial.Models;
using Microsoft.AspNetCore.Mvc;
using Microsoft.Extensions.Logging;
using Microsoft.Identity.Web;
using Microsoft.Graph;
using System;
using System.Collections.Generic;
using System.Threading.Tasks;
using TimeZoneConverter;

namespace GraphTutorial.Controllers
{
    public class CalendarController : Controller
    {
        private readonly GraphServiceClient _graphClient;
        private readonly ILogger<HomeController> _logger;

        public CalendarController(
            GraphServiceClient graphClient,
            ILogger<HomeController> logger)
        {
            _graphClient = graphClient;
            _logger = logger;
        }
    }
}
次の関数をクラスに追加
CalendarControllerして、ユーザーの予定表ビューを取得します。private async Task<IList<Event>> GetUserWeekCalendar(DateTime startOfWeekUtc) { // Configure a calendar view for the current week var endOfWeekUtc = startOfWeekUtc.AddDays(7); var viewOptions = new List<QueryOption> { new QueryOption("startDateTime", startOfWeekUtc.ToString("o")), new QueryOption("endDateTime", endOfWeekUtc.ToString("o")) }; var events = await _graphClient.Me .CalendarView .Request(viewOptions) // Send user time zone in request so date/time in // response will be in preferred time zone .Header("Prefer", $"outlook.timezone=\"{User.GetUserGraphTimeZone()}\"") // Get max 50 per request .Top(50) // Only return fields app will use .Select(e => new { e.Subject, e.Organizer, e.Start, e.End }) // Order results chronologically .OrderBy("start/dateTime") .GetAsync(); IList<Event> allEvents; // Handle case where there are more than 50 if (events.NextPageRequest != null) { allEvents = new List<Event>(); // Create a page iterator to iterate over subsequent pages // of results. Build a list from the results var pageIterator = PageIterator<Event>.CreatePageIterator( _graphClient, events, (e) => { allEvents.Add(e); return true; } ); await pageIterator.IterateAsync(); } else { // If only one page, just use the result allEvents = events.CurrentPage; } return allEvents; } private static DateTime GetUtcStartOfWeekInTimeZone(DateTime today, TimeZoneInfo timeZone) { // Assumes Sunday as first day of week int diff = System.DayOfWeek.Sunday - today.DayOfWeek; // create date as unspecified kind var unspecifiedStart = DateTime.SpecifyKind(today.AddDays(diff), DateTimeKind.Unspecified); // convert to UTC return TimeZoneInfo.ConvertTimeToUtc(unspecifiedStart, timeZone); }コードの動作を検討
GetUserWeekCalendarします。- ユーザーのタイム ゾーンを使用して、週の UTC 開始日と終了日時の値を取得します。
- ユーザーの予定表ビューを 照会して、 開始日と終了日時の間のすべてのイベントを取得します。 イベントを一覧に表示する代わりに予定表ビューを使用すると、定期的なイベントが展開され、指定したタイム ウィンドウで発生したイベントが返されます。
- ヘッダーを使用して
Prefer: outlook.timezone、ユーザーのタイム ゾーンで結果を取得します。 - これは、
Selectアプリで使用されるフィールドに戻るフィールドを制限するために使用します。 - 結果を
OrderBy時系列的に並べ替える場合に使用します。 - イベント コレクションのページに a
PageIteratorを使用します。 これは、ユーザーが要求されたページ サイズよりも多くのイベントを予定表に持つ場合を処理します。
返されるデータの一時的な
CalendarControllerビューを実装するには、次の関数をクラスに追加します。// Minimum permission scope needed for this view [AuthorizeForScopes(Scopes = new[] { "Calendars.Read" })] public async Task<IActionResult> Index() { try { var userTimeZone = TZConvert.GetTimeZoneInfo( User.GetUserGraphTimeZone()); var startOfWeek = CalendarController.GetUtcStartOfWeekInTimeZone( DateTime.Today, userTimeZone); var events = await GetUserWeekCalendar(startOfWeek); // Return a JSON dump of events return new ContentResult { Content = _graphClient.HttpProvider.Serializer.SerializeObject(events), ContentType = "application/json" }; } catch (ServiceException ex) { if (ex.InnerException is MicrosoftIdentityWebChallengeUserException) { throw; } return new ContentResult { Content = $"Error getting calendar view: {ex.Message}", ContentType = "text/plain" }; } }アプリを起動し、サインインして、ナビゲーション バーの [カレンダー] リンクをクリックします。 すべてが正常に機能していれば、ユーザーのカレンダーにイベントの JSON ダンプが表示されます。
結果の表示
結果を表示するとき、よりユーザー フレンドリなビューを追加できます。
ビュー モデルの作成
./Models ディレクトリに CalendarViewEvent.cs という名前の新しいファイルを作成し、次のコードを追加します。
using Microsoft.Graph;
using System;

namespace GraphTutorial.Models
{
    public class CalendarViewEvent
    {
        public string Subject { get; private set; }
        public string Organizer { get; private set; }
        public DateTime Start { get; private set; }
        public DateTime End { get; private set; }

        public CalendarViewEvent(Event graphEvent)
        {
            Subject = graphEvent.Subject;
            Organizer = graphEvent.Organizer.EmailAddress.Name;
            Start = DateTime.Parse(graphEvent.Start.DateTime);
            End = DateTime.Parse(graphEvent.End.DateTime);
        }
    }
}
./Models ディレクトリに DailyViewModel.cs という名前の新しいファイルを作成し、次のコードを追加します。
using System;
using System.Collections.Generic;

namespace GraphTutorial.Models
{
    public class DailyViewModel
    {
        // Day the view is for
        public DateTime Day { get; private set; }
        // Events on this day
        public IEnumerable<CalendarViewEvent> Events { get; private set; }

        public DailyViewModel(DateTime day, IEnumerable<CalendarViewEvent> events)
        {
            Day = day;
            Events = events;
        }
    }
}
./Models ディレクトリに CalendarViewModel.cs という名前の新しいファイルを作成し、次のコードを追加します。
using Microsoft.Graph;
using System;
using System.Collections.Generic;
using System.Linq;

namespace GraphTutorial.Models
{
    public class CalendarViewModel
    {
        private DateTime _startOfWeek;
        private DateTime _endOfWeek;
        private List<CalendarViewEvent> _events;

        public CalendarViewModel()
        {
            _startOfWeek = DateTime.MinValue;
            _events = new List<CalendarViewEvent>();
        }

        public CalendarViewModel(DateTime startOfWeek, IEnumerable<Event> events)
        {
            _startOfWeek = startOfWeek;
            _endOfWeek = startOfWeek.AddDays(7);
            _events = new List<CalendarViewEvent>();

            if (events != null)
            {
              foreach (var item in events)
              {
                  _events.Add(new CalendarViewEvent(item));
              }
            }
        }

        // Get the start - end dates of the week
        public string TimeSpan()
        {
            return $"{_startOfWeek.ToString("MMMM d, yyyy")} - {_startOfWeek.AddDays(6).ToString("MMMM d, yyyy")}";
        }

        // Property accessors to pass to the daily view partial
        // These properties get all events on the specific day
        public DailyViewModel Sunday
        {
            get
            {
                return new DailyViewModel(
                  _startOfWeek,
                  GetEventsForDay(System.DayOfWeek.Sunday));
            }
        }

        public DailyViewModel Monday
        {
            get
            {
                return new DailyViewModel(
                  _startOfWeek.AddDays(1),
                  GetEventsForDay(System.DayOfWeek.Monday));
            }
        }

        public DailyViewModel Tuesday
        {
            get
            {
                return new DailyViewModel(
                  _startOfWeek.AddDays(2),
                  GetEventsForDay(System.DayOfWeek.Tuesday));
            }
        }

        public DailyViewModel Wednesday
        {
            get
            {
                return new DailyViewModel(
                  _startOfWeek.AddDays(3),
                  GetEventsForDay(System.DayOfWeek.Wednesday));
            }
        }

        public DailyViewModel Thursday
        {
            get
            {
                return new DailyViewModel(
                  _startOfWeek.AddDays(4),
                  GetEventsForDay(System.DayOfWeek.Thursday));
            }
        }

        public DailyViewModel Friday
        {
            get
            {
                return new DailyViewModel(
                  _startOfWeek.AddDays(5),
                  GetEventsForDay(System.DayOfWeek.Friday));
            }
        }

        public DailyViewModel Saturday
        {
            get
            {
                return new DailyViewModel(
                  _startOfWeek.AddDays(6),
                  GetEventsForDay(System.DayOfWeek.Saturday));
            }
        }

        private IEnumerable<CalendarViewEvent> GetEventsForDay(System.DayOfWeek day)
        {
            return _events.Where(e => (e.End > _startOfWeek &&
                ((e.Start.DayOfWeek.Equals(day) && e.Start >= _startOfWeek) ||
                 (e.End.DayOfWeek.Equals(day) && e.End < _endOfWeek))));

        }
    }
}
ビューの作成
./Views ディレクトリに Calendar という名前の 新しいディレクトリを作成 します。
./Views/Calendar ディレクトリに _DailyEventsPartial.cshtml という名前の新しいファイルを作成し、次のコードを追加します。
@model DailyViewModel

@{
    bool dateCellAdded = false;
    var timeFormat = User.GetUserGraphTimeFormat();
    var rowClass = Model.Day.Date.Equals(DateTime.Today.Date) ? "table-warning" : "";
}

@if (Model.Events.Count() <= 0)
{
  // Render an empty row for the day
  <tr>
    <td class="calendar-view-date-cell">
      <div class="calendar-view-date float-left text-right">@Model.Day.Day</div>
      <div class="calendar-view-day">@Model.Day.ToString("dddd")</div>
      <div class="calendar-view-month text-muted">@Model.Day.ToString("MMMM, yyyy")</div>
    </td>
    <td></td>
    <td></td>
  </tr>
}

@foreach(var item in Model.Events)
{
  <tr class="@rowClass">
    @if (!dateCellAdded)
    {
      // Only add the day cell once
      dateCellAdded = true;
      <td class="calendar-view-date-cell" rowspan="@Model.Events.Count()">
        <div class="calendar-view-date float-left text-right">@Model.Day.Day</div>
        <div class="calendar-view-day">@Model.Day.ToString("dddd")</div>
        <div class="calendar-view-month text-muted">@Model.Day.ToString("MMMM, yyyy")</div>
      </td>
    }
    <td class="calendar-view-timespan">
      <div>@item.Start.ToString(timeFormat) - @item.End.ToString(timeFormat)</div>
      @if (item.Start.Date != Model.Day.Date)
      {
        <div class="calendar-view-date-diff">Start date: @item.Start.Date.ToShortDateString()</div>
      }
      @if (item.End.Date != Model.Day.Date)
      {
        <div class="calendar-view-date-diff">End date: @item.End.Date.ToShortDateString()</div>
      }
    </td>
    <td>
      <div class="calendar-view-subject">@item.Subject</div>
      <div class="calendar-view-organizer">@item.Organizer</div>
    </td>
  </tr>
}
./Views/Calendar ディレクトリに Index.cshtml という名前の新しいファイルを作成し、次のコードを追加します。
@model CalendarViewModel

@{
    ViewData["Title"] = "Calendar";
}

<div class="mb-3">
  <h1 class="mb-3">@Model.TimeSpan()</h1>
  <a class="btn btn-light btn-sm" asp-controller="Calendar" asp-action="New">New event</a>
</div>
<div class="calendar-week">
  <div class="table-responsive">
    <table class="table table-sm">
      <thead>
        <tr>
          <th>Date</th>
          <th>Time</th>
          <th>Event</th>
        </tr>
      </thead>
      <tbody>
        <partial name="_DailyEventsPartial" for="Sunday" />
        <partial name="_DailyEventsPartial" for="Monday" />
        <partial name="_DailyEventsPartial" for="Tuesday" />
        <partial name="_DailyEventsPartial" for="Wednesday" />
        <partial name="_DailyEventsPartial" for="Thursday" />
        <partial name="_DailyEventsPartial" for="Friday" />
        <partial name="_DailyEventsPartial" for="Saturday" />
      </tbody>
    </table>
  </div>
</div>
予定表コントローラーの更新
./Controllers/CalendarController.cs
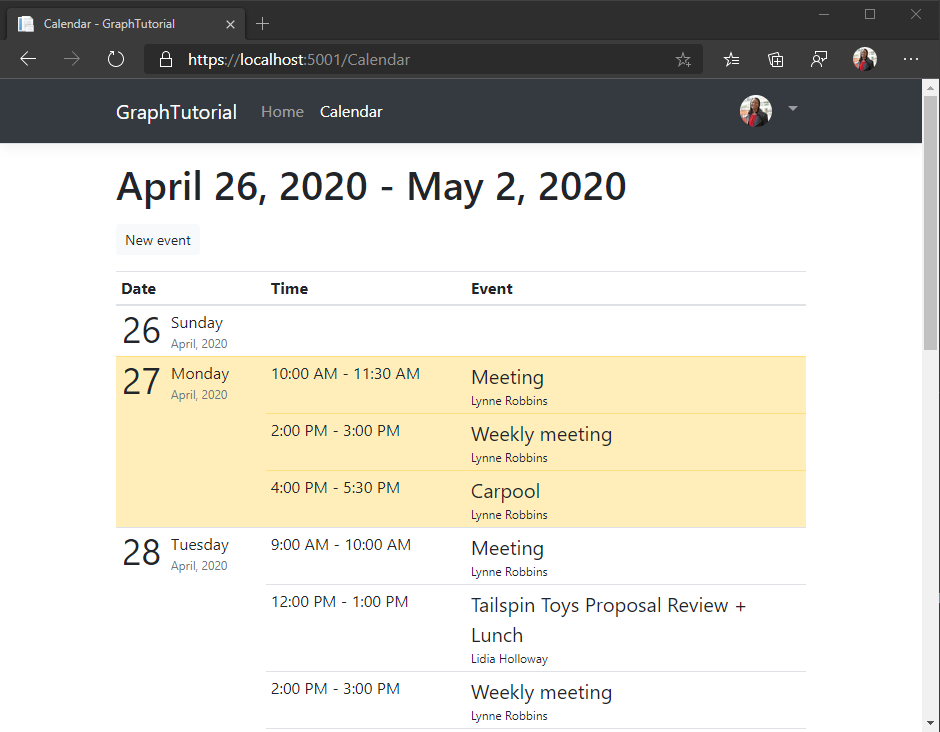
Indexを開き、既存の関数を次に置き換える。// Minimum permission scope needed for this view [AuthorizeForScopes(Scopes = new[] { "Calendars.Read" })] public async Task<IActionResult> Index() { try { var userTimeZone = TZConvert.GetTimeZoneInfo( User.GetUserGraphTimeZone()); var startOfWeekUtc = CalendarController.GetUtcStartOfWeekInTimeZone( DateTime.Today, userTimeZone); var events = await GetUserWeekCalendar(startOfWeekUtc); // Convert UTC start of week to user's time zone for // proper display var startOfWeekInTz = TimeZoneInfo.ConvertTimeFromUtc(startOfWeekUtc, userTimeZone); var model = new CalendarViewModel(startOfWeekInTz, events); return View(model); } catch (ServiceException ex) { if (ex.InnerException is MicrosoftIdentityWebChallengeUserException) { throw; } return View(new CalendarViewModel()) .WithError("Error getting calendar view", ex.Message); } }アプリを起動し、サインインして、[カレンダー] リンクをクリックします。 アプリにイベントの表が表示されます。
新しいイベントを作成する
このセクションでは、ユーザーの予定表にイベントを作成する機能を追加します。
モデルを作成する
./Models ディレクトリに NewEvent.cs という名前の新しいファイルを作成し、次のコードを追加します。
using System;
using System.ComponentModel.DataAnnotations;

namespace GraphTutorial.Models
{
    public class NewEvent
    {
        [Required]
        public string Subject { get; set; }
        public DateTime Start { get; set; }
        public DateTime End { get; set; }
        [DataType(DataType.MultilineText)]
        public string Body { get; set; }
        [RegularExpression(@"((\w+([-+.']\w+)*@\w+([-.]\w+)*\.\w+([-.]\w+)*)*([;])*)*",
          ErrorMessage="Please enter one or more email addresses separated by a semi-colon (;)")]
        public string Attendees { get; set; }
    }
}
ビューの作成
New.cshtml という名前の新 しいファイルを ./Views/Calendar ディレクトリに作成し、次のコードを追加します。
@model NewEvent

@{
    ViewData["Title"] = "New event";
}

<form asp-action="New">
  <div asp-validation-summary="ModelOnly" class="text-danger"></div>
  <div class="form-group">
    <label asp-for="Subject" class="control-label"></label>
    <input asp-for="Subject" class="form-control" />
    <span asp-validation-for="Subject" class="text-danger"></span>
  </div>
  <div class="form-group">
    <label asp-for="Attendees" class="control-label"></label>
    <input asp-for="Attendees" class="form-control" />
    <span asp-validation-for="Attendees" class="text-danger"></span>
  </div>
  <div class="form-row">
    <div class="col">
      <div class="form-group">
        <label asp-for="Start" class="control-label"></label>
        <input asp-for="Start" class="form-control" />
        <span asp-validation-for="Start" class="text-danger"></span>
      </div>
    </div>
    <div class="col">
      <div class="form-group">
        <label asp-for="End" class="control-label"></label>
        <input asp-for="End" class="form-control" />
        <span asp-validation-for="End" class="text-danger"></span>
      </div>
    </div>
  </div>
  <div class="form-group">
    <label asp-for="Body" class="control-label"></label>
    <textarea asp-for="Body" class="form-control"></textarea>
    <span asp-validation-for="Body" class="text-danger"></span>
  </div>
  <div class="form-group">
    <input type="submit" value="Save" class="btn btn-primary" />
  </div>
</form>

@section Scripts {
    @{await Html.RenderPartialAsync("_ValidationScriptsPartial");}
}
コントローラーアクションの追加
./Controllers/CalendarController.cs
CalendarControllerを開き、次のアクションをクラスに追加して、新しいイベント フォームをレンダリングします。// Minimum permission scope needed for this view [AuthorizeForScopes(Scopes = new[] { "Calendars.ReadWrite" })] public IActionResult New() { return View(); }ユーザーが [保存]
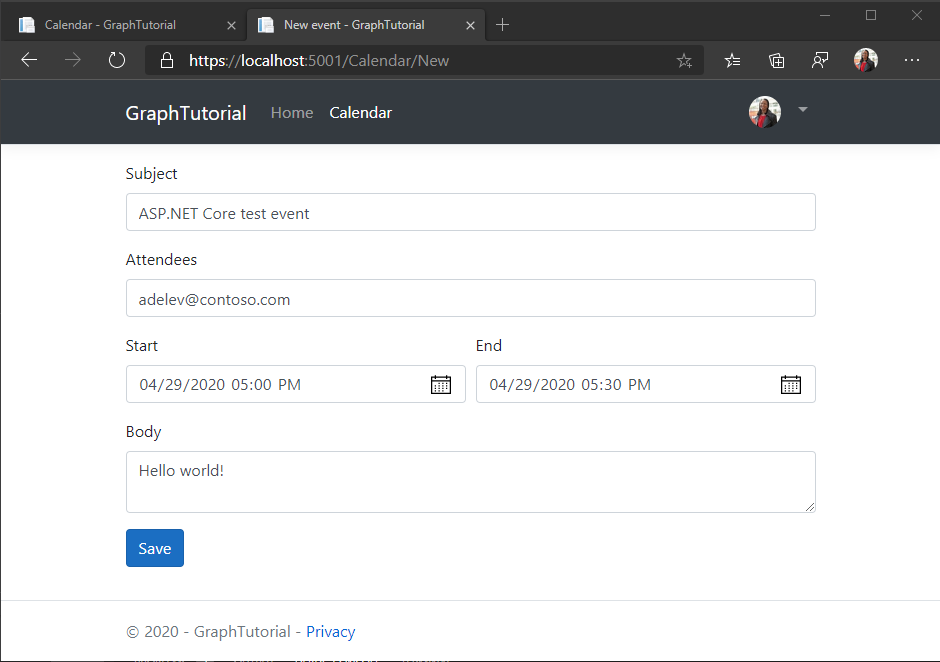
CalendarControllerをクリックして Microsoft Graph を使用してユーザーの予定表にイベントを追加するときに、フォームから新しいイベントを受信する次のアクションをクラスに追加します。[HttpPost] [ValidateAntiForgeryToken] [AuthorizeForScopes(Scopes = new[] { "Calendars.ReadWrite" })] public async Task<IActionResult> New([Bind("Subject,Attendees,Start,End,Body")] NewEvent newEvent) { var timeZone = User.GetUserGraphTimeZone(); // Create a Graph event with the required fields var graphEvent = new Event { Subject = newEvent.Subject, Start = new DateTimeTimeZone { DateTime = newEvent.Start.ToString("o"), // Use the user's time zone TimeZone = timeZone }, End = new DateTimeTimeZone { DateTime = newEvent.End.ToString("o"), // Use the user's time zone TimeZone = timeZone } }; // Add body if present if (!string.IsNullOrEmpty(newEvent.Body)) { graphEvent.Body = new ItemBody { ContentType = BodyType.Text, Content = newEvent.Body }; } // Add attendees if present if (!string.IsNullOrEmpty(newEvent.Attendees)) { var attendees = newEvent.Attendees.Split(';', StringSplitOptions.RemoveEmptyEntries); if (attendees.Length > 0) { var attendeeList = new List<Attendee>(); foreach (var attendee in attendees) { attendeeList.Add(new Attendee{ EmailAddress = new EmailAddress { Address = attendee }, Type = AttendeeType.Required }); } graphEvent.Attendees = attendeeList; } } try { // Add the event await _graphClient.Me.Events .Request() .AddAsync(graphEvent); // Redirect to the calendar view with a success message return RedirectToAction("Index").WithSuccess("Event created"); } catch (ServiceException ex) { // Redirect to the calendar view with an error message return RedirectToAction("Index") .WithError("Error creating event", ex.Error.Message); } }アプリを起動し、サインインして、[カレンダー] リンクをクリックします。 [新しい イベント] ボタンを クリックし、フォームに入力し、[保存] を クリックします。
おめでとうございます。
Microsoft のチュートリアルの ASP.NET Core完了Graphしました。 Microsoft Graphを呼び出す作業アプリが作成されたので、新しい機能を試して追加できます。 Microsoft Graphの概要を参照して、Microsoft Graph でアクセスできるすべてのデータを確認Graph。
フィードバック
このチュートリアルに関するフィードバックは、リポジトリのGitHubしてください。
このセクションに問題がある場合 このセクションを改善できるよう、フィードバックをお送りください。