Microsoft Graph で iOS Objective-C アプリを構築する
このチュートリアルでは、Microsoft React Native API を使用してユーザー Graphカレンダー情報を取得するアプリを作成する方法について説明します。
ヒント
完了したチュートリアルをダウンロードする場合は、リポジトリをダウンロードまたは複製GitHubできます。
前提条件
このチュートリアルを開始する前に、開発マシンに次の手順をインストールする必要があります。
また、Outlook.com 上のメールボックスを持つ個人用 Microsoft アカウント、または Microsoft の仕事用または学校用のアカウントを持っている必要があります。 Microsoft アカウントをお持ちでない場合は、無料アカウントを取得するためのオプションが 2 つご利用できます。
- 新しい 個人用 Microsoft アカウントにサインアップできます。
- 開発者プログラムにサインアップして、Microsoft 365サブスクリプションをMicrosoft 365できます。
注意
このチュートリアルは、Xcode バージョン 12.3 と CocoaPods バージョン 1.10.1 を使用して記述されています。 このガイドの手順は、他のバージョンでも動作しますが、テストされていない場合があります。
フィードバック
このチュートリアルに関するフィードバックは、リポジトリのGitHubしてください。
iOS Objective-C アプリを作成する
まず、新しい Objective-C プロジェクトを作成します。
Xcode を開きます。 [ファイル]メニューの[新規]を選択 し、[Project]をクリックします。
[アプリ テンプレート] を選択し 、[次へ] を 選択します。
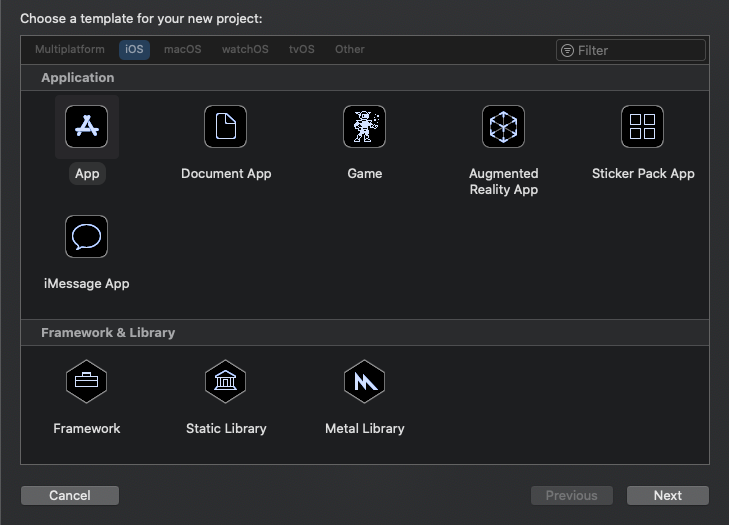
[製品 名] と [
GraphTutorial言語] を Objective-C に設定します。残りのフィールドに入力し、[次へ] を 選択します。
プロジェクトの場所を選択し、[作成] を 選択します。
依存関係のインストール
次に進む前に、後で使用する追加の依存関係をインストールします。
- Microsoft Authentication Library (MSAL) for iOS for authenticationing to Azure AD。
- Microsoft Graphを呼び出す目的 C用の SDK Graph。
- Microsoft Graphユーザーやイベントなどのリソースを表す、強く型指定されたオブジェクトGraphモデル SDK for Objective C。
Xcode を終了します。
ターミナルを開き、ディレクトリを GraphTutorial プロジェクトの場所に変更 します。
ポッドファイルを作成するには、次のコマンドを実行します。
pod initPodfile を開き、行の直後に次の行を追加
use_frameworks!します。pod 'MSAL', '~> 1.1.13' pod 'MSGraphClientSDK', ' ~> 1.0.0' pod 'MSGraphClientModels', '~> 1.3.0'Podfile を保存し、次のコマンドを実行して依存関係をインストールします。
pod installコマンドが完了したら、Xcode で新しく作成した GraphTutorial.xcworkspace を 開きます。
アプリを設計する
このセクションでは、サインイン ページ、タブ バー ナビゲーター、ウェルカム ページ、予定表ページなど、アプリのビューを作成します。 また、アクティビティ インジケーター オーバーレイも作成します。
[サインイン ページの作成]
Xcode で GraphTutorial フォルダーを展開し 、ViewController.m ファイルを選択 します。
[ファイル インスペクター] で、ファイル の名前を に 変更します
SignInViewController.m。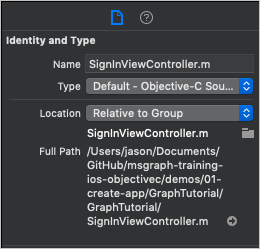
SignInViewController.m を 開き、その内容を次のコードに置き換えます。
#import "SignInViewController.h"

@interface SignInViewController ()

@end

@implementation SignInViewController

- (void)viewDidLoad {
    [super viewDidLoad];
    // Do any additional setup after loading the view.
}

- (IBAction)signIn {
    [self performSegueWithIdentifier: @"userSignedIn" sender: nil];
}
@end
ViewController.h ファイルを選択 します。
[ファイル インスペクター] で、ファイル の名前を に 変更します
SignInViewController.h。SignInViewController.h を 開き、すべてのインスタンスをに変更
ViewControllerしますSignInViewController。Main.storyboard ファイルを開 きます。
[コントローラー シーンの表示] を展開 し、[コントローラーの表示 ] を選択します。
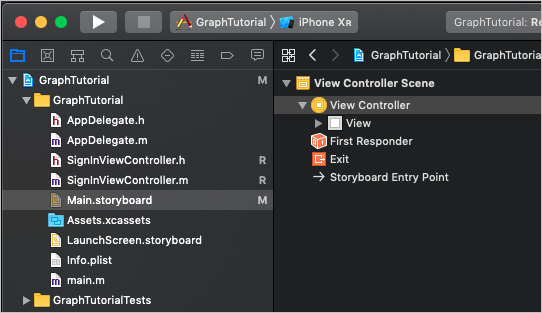
[Identity Inspector] を選択 し、[クラス] ドロップダウンを SignInViewController に変更します。
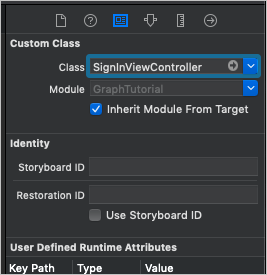
ライブラリを 選択し、ボタン をサインイン ビュー コントローラー にドラッグします。
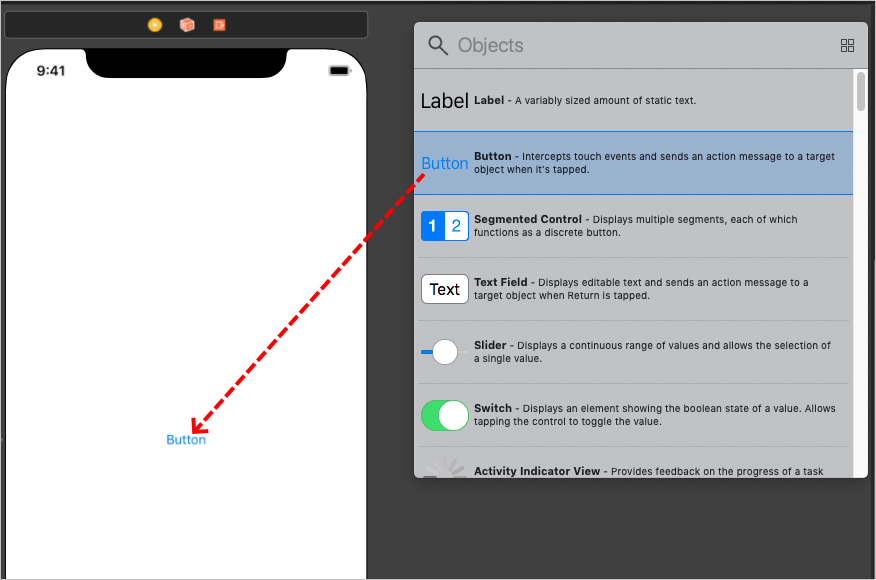
ボタンを選択した後、属性インスペクタ ーを選択し 、ボタン のタイトルを に変更します
Sign In。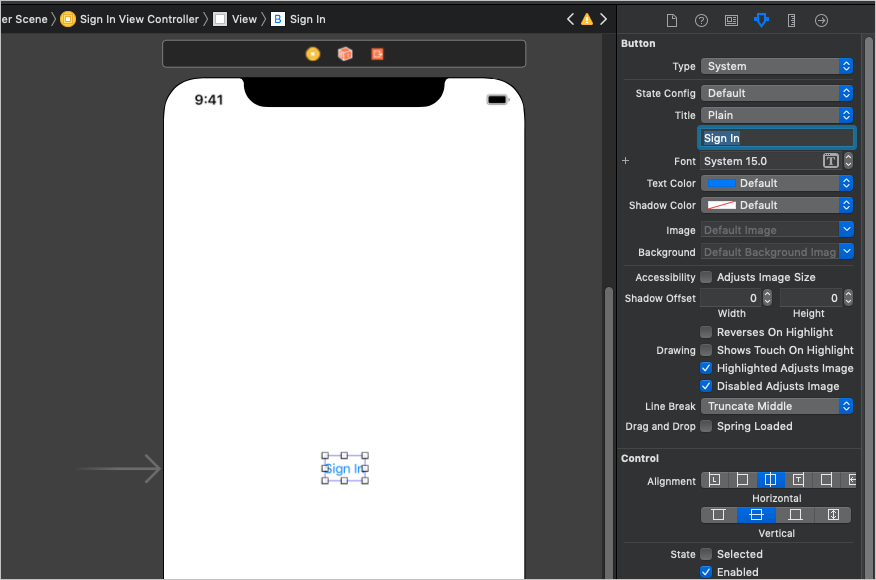
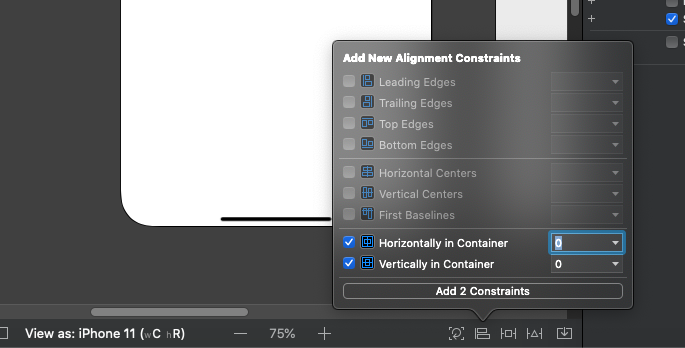
ボタンを選択して、ストーリーボード の 下部にある [配置] ボタンを選択します。 [コンテナー内の 水平方向] と[コンテナーの垂直方向] の両方の制約を選択し、その値を 0 のままにしてから、[2 制約の追加]を選択します。
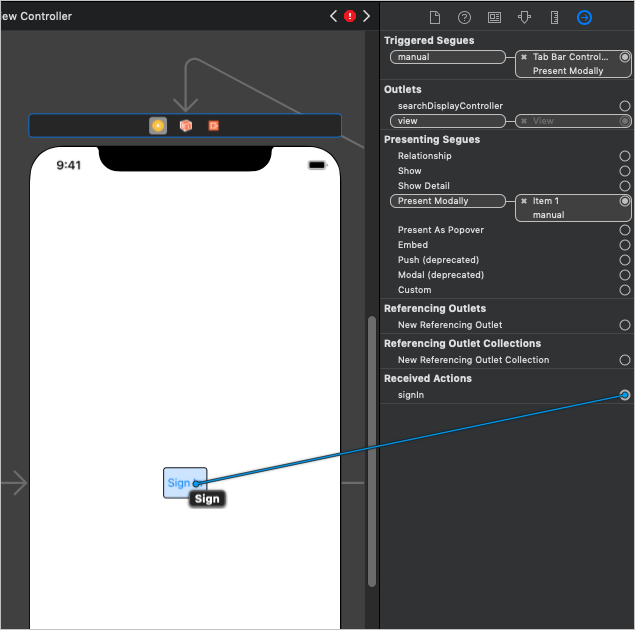
[サインイン ビュー コントローラー] を選択し、[接続] インスペクタ を選択します。
[ 受信したアクション] で、次に入力されていない円をドラッグして 、signIn をボタン に移動します。 ポップアップ メニューの [内側に タッチアップ] を選択します。
タブ バーの作成
ライブラリを 選択し、タブ バー コントローラーをストーリーボード にドラッグします。
[サインイン ビュー コントローラー] を選択し、[接続] インスペクタ を選択します。
[トリガーされたセグエ] で、手動の横にある塗り付けされていない円をストーリーボードの タブ バー コントローラー にドラッグします。 ポップアップ メニューで [モーダルの 表示] を選択します。
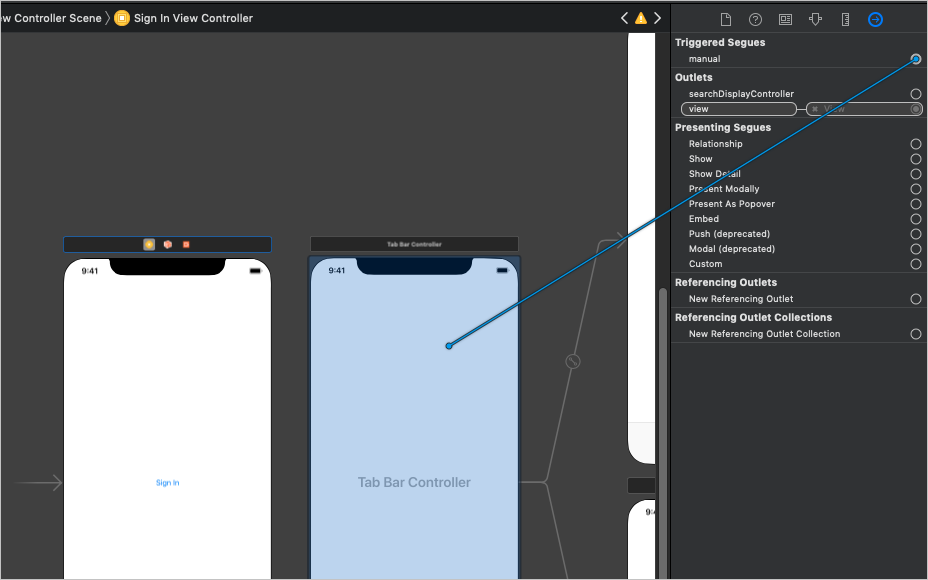
追加したセグエを選択し、[属性] インスペクタ を選択します。 [識別子] フィールドを
userSignedInに設定し、[プレゼンテーション] を [フルスクリーン] に設定します。![Xcode の属性インスペクターの [識別子] フィールドのスクリーンショット](ios-objectivec/tutorial/images/set-segue-identifier.png)
アイテム 1 シーンを選択し、[接続] インスペクタ を選択します。
[トリガーされたセグ エ] で、手動の横にある塗り付けされていない円をストーリーボードの サインイン ビュー コントローラー にドラッグします。 ポップアップ メニューで [モーダルの 表示] を選択します。
追加したセグエを選択し、[属性] インスペクタ を選択します。 [識別子] フィールドを
userSignedOutに設定し、[プレゼンテーション] を [フルスクリーン] に設定します。
ようこそページを作成する
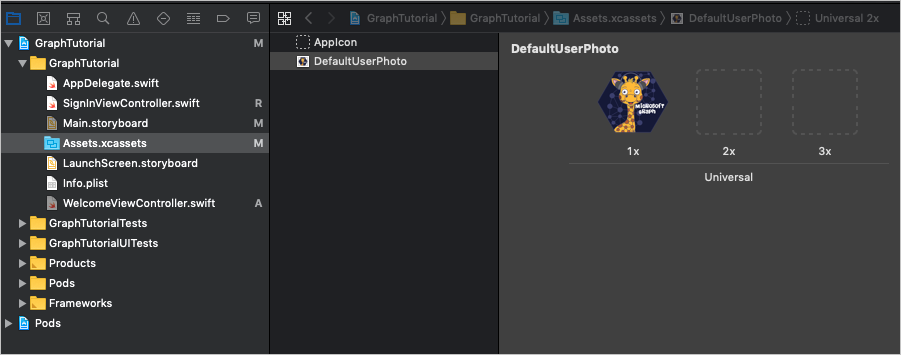
Assets.xcassets ファイルを選択 します。
[エディター] メニューの [新しい アセットの追加] 、 次に [イメージ セット] の順に選択します。
新しい Image アセットを選択 し、属性インスペクタ ーを使用して Name を に設定 します
DefaultUserPhoto。既定のユーザー プロファイル写真として使用する画像を追加します。
という名前の GraphTutorial フォルダーに新しいココア タッチ クラス ファイルを作成します
WelcomeViewController。 [ サブクラス] フィールドで [UIViewController] を選択 します。WelcomeViewController.h を開 き、宣言内に次のコードを追加
@interfaceします。@property (nonatomic) IBOutlet UIImageView *userProfilePhoto; @property (nonatomic) IBOutlet UILabel *userDisplayName; @property (nonatomic) IBOutlet UILabel *userEmail;WelcomeViewController.m を 開き、その内容を次のコードに置き換えます。
#import "WelcomeViewController.h"

@interface WelcomeViewController ()

@end

@implementation WelcomeViewController

- (void)viewDidLoad {
    [super viewDidLoad];
    // Do any additional setup after loading the view.

    // TEMPORARY
    self.userProfilePhoto.image = [UIImage imageNamed:@"DefaultUserPhoto"];
    self.userDisplayName.text = @"Default User";
    [self.userDisplayName sizeToFit];
    self.userEmail.text = @"default@contoso.com";
    [self.userEmail sizeToFit];
}

- (IBAction)signOut {
    [self performSegueWithIdentifier: @"userSignedOut" sender: nil];
}

@end
Main.storyboard を開きます。 アイテム 1 シーンを選択し、[Identity Inspector] を選択します。 クラスの 値を WelcomeViewController に変更します。
ライブラリを 使用して、アイテム 1 シーンに 次のアイテムを追加します。
- 1 つのイメージ ビュー
- 2 つのラベル
- 1 つのボタン
接続インスペクタ ーを使用して、次の接続を行います。
- userDisplayName アウトレットを 最初のラベルにリンクします。
- userEmail アウトレットを 2 番目のラベルにリンクします。
- userProfilePhoto アウトレットを イメージ ビューにリンクします。
- signOut 受信アクションを ボタンの Touch Up Inside にリンクします。
イメージ ビューを選択し、[サイズインスペクター] を選択します。
[幅]**と [**高さ] を 196 に設定します。
[配置 ] ボタン を使用して、 コンテナーの水平方向 の制約に値 0 を追加します。
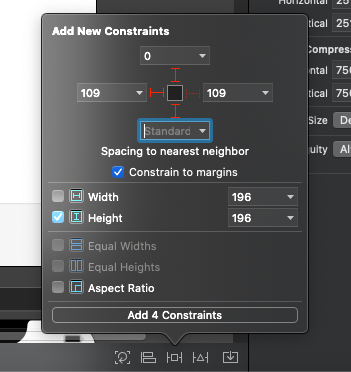
[新しい 制約の追加] ボタン ([配置] ボタンの横) を 使用 して、次の制約を追加します。
- [上の位置を揃える]: セーフ領域、値: 0
- 下のスペース: ユーザー表示名、値: Standard
- 高さ、値: 196
- 幅、値: 196
1 つ目のラベルを選択し、[配置]ボタンを使用して、コンテナーの水平方向の制約を 0 の値で追加します。
[新しい 制約の追加] ボタン を使用して、次の制約を追加します。
- Top Space to: User Profile Photo, value: Standard
- 下のスペース: ユーザーの電子メール、値: Standard
2 番目のラベルを選択し、[属性] インスペクタ を選択します。
[色 ] を [濃い灰色] に変更し、[フォント] を [システム 12.0] に変更します。
[配置 ] ボタン を使用して、 コンテナーの水平方向 の制約に値 0 を追加します。
[新しい 制約の追加] ボタン を使用して、次の制約を追加します。
- 上のスペース: ユーザー表示名、値: Standard
- 下のスペース: サインアウト、値: 14
ボタンを選択し、[属性] インスペクタ を選択します。
[タイトル] をに変更 します
Sign Out。[配置 ] ボタン を使用して、 コンテナーの水平方向 の制約に値 0 を追加します。
[新しい 制約の追加] ボタン を使用して、次の制約を追加します。
- Top Space to: User Email, value: 14
シーンの下部にあるタブ バー項目を選択し、[属性] インスペクタを 選択します。 [タイトル] をに変更 します
Me。[エディター]メニューの[自動レイアウトの問題の解決] を選択し、[ようこそビュー コントローラーのすべてのビュー] の下にある [不足している制約の追加 ] を選択します。
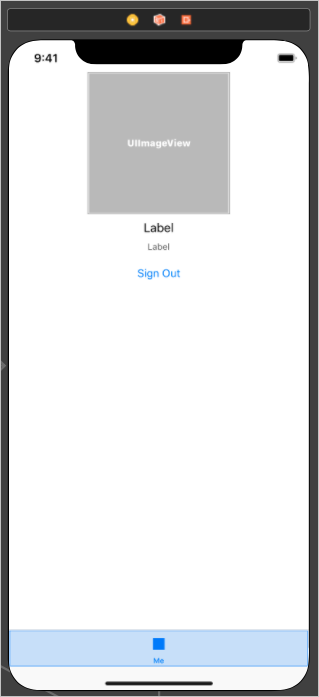
完了したら、ウェルカム シーンは次のように表示されます。
[予定表の作成] ページ
という名前の GraphTutorial フォルダーに新しいココア タッチ クラス ファイルを作成します
CalendarViewController。 [ サブクラス] フィールドで [UIViewController] を選択 します。CalendarViewController.h を開 き、宣言内に次のコードを追加
@interfaceします。@property (nonatomic) IBOutlet UITextView *calendarJSON;CalendarViewController.m を 開き、その内容を次のコードに置き換えます。
#import "CalendarViewController.h"

@interface CalendarViewController ()

@end

@implementation CalendarViewController

- (void)viewDidLoad {
    [super viewDidLoad];
    // Do any additional setup after loading the view.

    // TEMPORARY
    self.calendarJSON.text = @"Calendar";
    [self.calendarJSON sizeToFit];
}

@end
Main.storyboard を開きます。 アイテム 2 シーンを選択し、[Identity Inspector] を選択します。 クラスの 値を CalendarViewController に変更します。
ライブラリを 使用して、アイテム 2 シーンに****テキスト ビューを追加します。
追加したテキスト ビューを選択します。 エディターで 、[埋め 込み ] を選択し、[スクロール ビュー ] を選択します。
接続インスペクタ ーを使用して**、calendarJSON アウトレットを** テキスト ビューに接続します。
シーンの下部にあるタブ バー項目を選択し、[属性] インスペクタを 選択します。 [タイトル] をに変更 します
Calendar。[エディター]メニューの[自動レイアウトの問題の解決] を選択し、[ようこそビュー コントローラーのすべてのビュー] の下にある [不足している制約の追加 ] を選択します。
完了したら、カレンダー シーンは次のように表示されます。

アクティビティ インジケーターの作成
という名前の GraphTutorial フォルダーに新しいココア タッチ クラス ファイルを作成します
SpinnerViewController。 [ サブクラス] フィールドで [UIViewController] を選択 します。SpinnerViewController.h を 開き、宣言内に次のコードを追加
@interfaceします。- (void) startWithContainer:(UIViewController*) container; - (void) stop;SpinnerViewController.m を 開き、その内容を次のコードに置き換えます。
#import "SpinnerViewController.h"

@interface SpinnerViewController ()
@property (nonatomic) UIActivityIndicatorView* spinner;
@end

@implementation SpinnerViewController

- (void)viewDidLoad {
    [super viewDidLoad];

    _spinner = [[UIActivityIndicatorView alloc] initWithActivityIndicatorStyle:
                UIActivityIndicatorViewStyleLarge];

    self.view.backgroundColor = [UIColor colorWithWhite:0 alpha:0.7];
    [self.view addSubview:_spinner];

    _spinner.translatesAutoresizingMaskIntoConstraints = false;
    [_spinner startAnimating];

    [_spinner.centerXAnchor constraintEqualToAnchor:self.view.centerXAnchor].active = true;
    [_spinner.centerYAnchor constraintEqualToAnchor:self.view.centerYAnchor].active = true;
}

- (void) startWithContainer:(UIViewController *)container {
    [container addChildViewController:self];
    self.view.frame = container.view.frame;
    [container.view addSubview:self.view];
    [self didMoveToParentViewController:container];
}

- (void) stop {
    [self willMoveToParentViewController:nil];
    [self.view removeFromSuperview];
    [self removeFromParentViewController];
}

@end
アプリのテスト
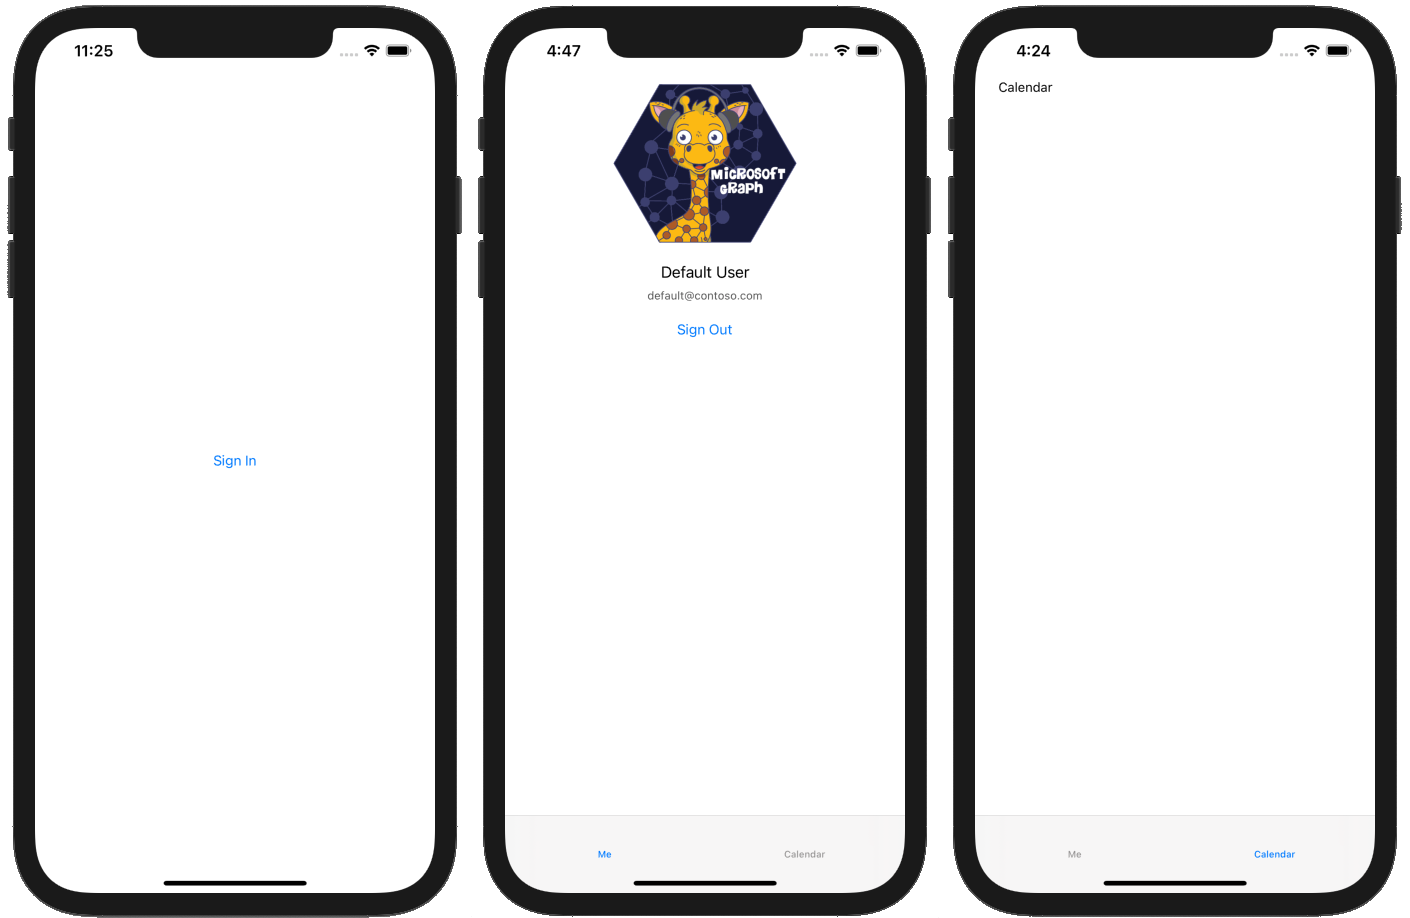
変更を保存し、アプリを起動します。 [サインイン] ボタンと [サイン アウト] ボタンとタブ バーを使用して、画面間を移動できる必要があります。
ポータルでアプリを登録する
この演習では、新しい Azure AD管理センターを使用Azure Active Directoryします。
ブラウザーを開き、Azure Active Directory 管理センターへ移動して、個人用アカウント (別名: Microsoft アカウント)、または 職場/学校アカウント を使用してログインします。
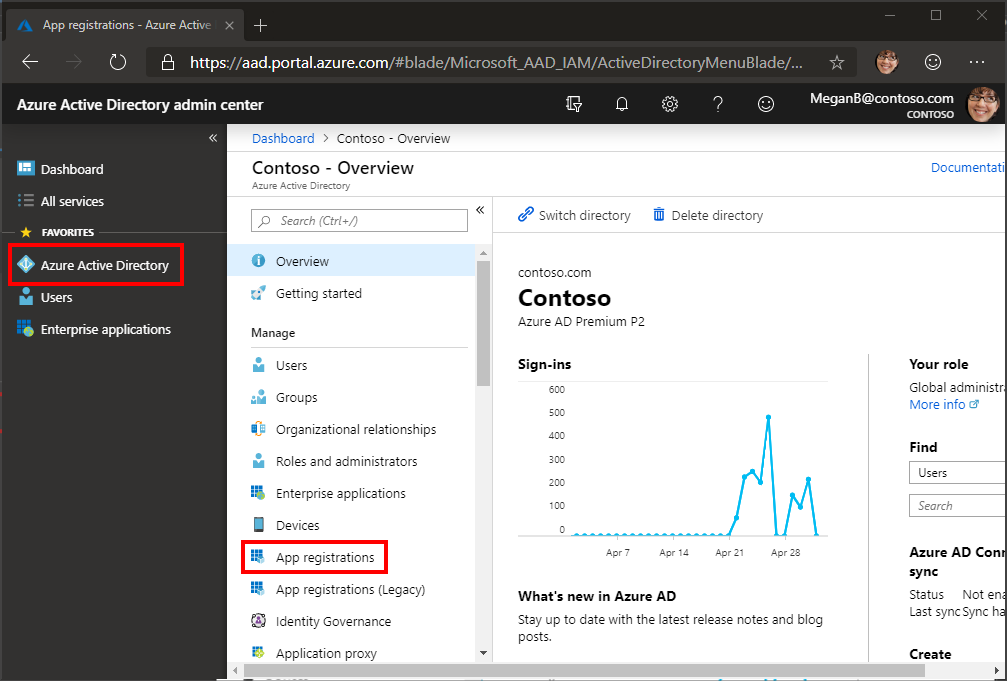
左側のナビゲーションで [Azure Active Directory] を選択し、それから [管理] で [アプリの登録] を選択します。
[新規登録] を選択します。 [アプリケーションを登録] ページで、次のように値を設定します。
iOS Objective-C Graph Tutorialに [名前] を設定します。- [サポートされているアカウントの種類] を [任意の組織のディレクトリ内のアカウントと個人用の Microsoft アカウント] に設定します。
- [リダイレクト URI] を空のままにします。
![[アプリケーションを登録する] ページのスクリーンショット](ios-objectivec/tutorial/images/aad-register-an-app.png)
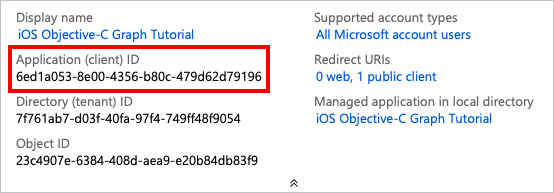
[登録] を選択します。 [iOS Objective-C Graph チュートリアル] ページで、アプリケーション (クライアント) ID の値をコピーして保存します。次の手順で必要になります。
[管理] の下の [認証] を選択します。 [ プラットフォームの追加] を 選択し 、[iOS/ macOS] を選択します。
アプリのバンドル ID を入力し、[構成] を 選択し、[完了] を 選択します。
Azure AD 認証を追加する
この演習では、前の演習からアプリケーションを拡張して、Azure サーバーでの認証をサポートAD。 これは、Microsoft サーバーを呼び出す必要がある OAuth アクセス トークンを取得するために必要Graph。 これを行うには 、iOS 用 Microsoft 認証ライブラリ (MSAL) をアプリケーションに統合します。
AuthSettings.plist という名前の GraphTutorial プロジェクトに新しいプロパティ リスト ファイルを作成します。
ルート ディクショナリのファイルに次の項目 を 追加します。
キー 型 値 AppIdString Azure portal からのアプリケーション ID GraphScopes配列 3 つの文字列値: User.ReadMailboxSettings.Read、、およびCalendars.ReadWrite
重要
git などのソース管理を使用している場合は 、AuthSettings.plist ファイルをソース管理から除外して、アプリ ID が誤って漏洩しないようにする良い時期です。
サインインの実装
このセクションでは、MSAL のプロジェクトを構成し、認証マネージャー クラスを作成し、サインインしてサインアウトするアプリを更新します。
MSAL のプロジェクトを構成する
プロジェクトの機能に新しいキーチェーン グループを追加します。
- GraphTutorial プロジェクトを選択 し、次に [署名&機能] を選択します。
- [+ 機能] を 選択し、[キーチェーン共有] をダブルクリックします。
- 値を持つキーチェーン グループを追加します
com.microsoft.adalcache。
[コントロール] をクリックして [Info.plist] をクリック し、[ ファイル名を指定して開く] を選択し、[ソース コード] を選択します。
要素内に次の項目を
<dict>追加します。<key>CFBundleURLTypes</key> <array> <dict> <key>CFBundleURLSchemes</key> <array> <string>msauth.$(PRODUCT_BUNDLE_IDENTIFIER)</string> </array> </dict> </array> <key>LSApplicationQueriesSchemes</key> <array> <string>msauthv2</string> <string>msauthv3</string> </array>AppDelegate.m を 開き、ファイルの上部に次のインポート ステートメントを追加します。
#import <MSAL/MSAL.h>次の関数を
AppDelegateクラスに追加します。- (BOOL)application:(UIApplication *)app openURL:(NSURL *)url options:(NSDictionary<UIApplicationOpenURLOptionsKey,id> *)options { return [MSALPublicClientApplication handleMSALResponse:url sourceApplication:options[UIApplicationOpenURLOptionsSourceApplicationKey]]; }
認証マネージャーの作成
AuthenticationManager という名前の GraphTutorial プロジェクトで新しいココア タッチ クラス を作成します。 [ サブクラス] フィールドで [NSObject] を選択 します。
AuthenticationManager.h を開 き、その内容を次のコードに置き換えます。
#import <Foundation/Foundation.h>
#import <MSAL/MSAL.h>
#import <MSGraphClientSDK/MSGraphClientSDK.h>

NS_ASSUME_NONNULL_BEGIN

typedef void (^GetTokenCompletionBlock)(NSString* _Nullable accessToken, NSError* _Nullable error);

@interface AuthenticationManager : NSObject<MSAuthenticationProvider>

+ (id) instance;
- (void) getTokenInteractivelyWithParentView: (UIViewController*) parentView
                          andCompletionBlock: (GetTokenCompletionBlock)completionBlock;
- (void) getTokenSilentlyWithCompletionBlock: (GetTokenCompletionBlock)completionBlock;
- (void) signOut;
- (void) getAccessTokenForProviderOptions:(id<MSAuthenticationProviderOptions>)authProviderOptions
                            andCompletion:(void (^)(NSString *, NSError *))completion;

@end

NS_ASSUME_NONNULL_END
AuthenticationManager.m を開 き、その内容を次のコードに置き換えます。
#import "AuthenticationManager.h"

@interface AuthenticationManager()

@property NSString* appId;
@property NSArray<NSString*>* graphScopes;
@property MSALPublicClientApplication* publicClient;

@end

@implementation AuthenticationManager

+ (id) instance {
    static AuthenticationManager *singleInstance = nil;
    static dispatch_once_t onceToken;
    dispatch_once(&onceToken, ^ {
        singleInstance = [[self alloc] init];
    });

    return singleInstance;
}

- (id) init {
    if (self = [super init]) {
        // Get app ID and scopes from AuthSettings.plist
        NSString* authConfigPath =
        [NSBundle.mainBundle pathForResource:@"AuthSettings" ofType:@"plist"];
        NSDictionary* authConfig = [NSDictionary dictionaryWithContentsOfFile:authConfigPath];

        self.appId = authConfig[@"AppId"];
        self.graphScopes = authConfig[@"GraphScopes"];

        // Create the MSAL client
        self.publicClient = [[MSALPublicClientApplication alloc] initWithClientId:self.appId error:nil];
    }

    return self;
}

- (void) getAccessTokenForProviderOptions:(id<MSAuthenticationProviderOptions>) authProviderOptions
                            andCompletion:(void (^)(NSString * _Nonnull, NSError * _Nonnull)) completion {
    [self getTokenSilentlyWithCompletionBlock:completion];
}

- (void) getTokenInteractivelyWithParentView:(UIViewController *) parentView
                          andCompletionBlock:(GetTokenCompletionBlock) completionBlock {
    MSALWebviewParameters* webParameters = [[MSALWebviewParameters alloc]
                                            initWithAuthPresentationViewController:parentView];
    MSALInteractiveTokenParameters* interactiveParameters =
    [[MSALInteractiveTokenParameters alloc]
     initWithScopes:self.graphScopes
     webviewParameters:webParameters];

    // Call acquireToken to open a browser so the user can sign in
    [self.publicClient
     acquireTokenWithParameters:interactiveParameters
     completionBlock:^(MSALResult * _Nullable result, NSError * _Nullable error) {

        // Check error
        if (error) {
            completionBlock(nil, error);
            return;
        }

        // Check result
        if (!result) {
            NSMutableDictionary* details = [NSMutableDictionary dictionary];
            [details setValue:@"No result was returned" forKey:NSDebugDescriptionErrorKey];
            completionBlock(nil, [NSError errorWithDomain:@"AuthenticationManager" code:0 userInfo:details]);
            return;
        }

        NSLog(@"Got token interactively: %@", result.accessToken);
        completionBlock(result.accessToken, nil);
    }];
}

- (void) getTokenSilentlyWithCompletionBlock:(GetTokenCompletionBlock)completionBlock {
    // Check if there is an account in the cache
    NSError* msalError;
    MSALAccount* account = [self.publicClient allAccounts:&msalError].firstObject;

    if (msalError || !account) {
        NSMutableDictionary* details = [NSMutableDictionary dictionary];
        [details setValue:@"Could not retrieve account from cache" forKey:NSDebugDescriptionErrorKey];
        completionBlock(nil, [NSError errorWithDomain:@"AuthenticationManager" code:0 userInfo:details]);
        return;
    }

    MSALSilentTokenParameters* silentParameters = [[MSALSilentTokenParameters alloc] initWithScopes:self.graphScopes
                                                                                            account:account];

    // Attempt to get token silently
    [self.publicClient
     acquireTokenSilentWithParameters:silentParameters
     completionBlock:^(MSALResult * _Nullable result, NSError * _Nullable error) {
         // Check error
         if (error) {
             completionBlock(nil, error);
             return;
         }

         // Check result
         if (!result) {
             NSMutableDictionary* details = [NSMutableDictionary dictionary];
             [details setValue:@"No result was returned" forKey:NSDebugDescriptionErrorKey];
             completionBlock(nil, [NSError errorWithDomain:@"AuthenticationManager" code:0 userInfo:details]);
             return;
         }

         NSLog(@"Got token silently: %@", result.accessToken);
         completionBlock(result.accessToken, nil);
     }];
}

- (void) signOut {
    NSError* msalError;
    NSArray* accounts = [self.publicClient allAccounts:&msalError];

    if (msalError) {
        NSLog(@"Error getting accounts from cache: %@", msalError.debugDescription);
        return;
    }

    for (id account in accounts) {
        [self.publicClient removeAccount:account error:nil];
    }
}

@end
サインインとサインアウトの追加
SignInViewController.m ファイルを開 き、その内容を次のコードに置き換えます。
#import "SignInViewController.h"
#import "SpinnerViewController.h"
#import "AuthenticationManager.h"

@interface SignInViewController ()
@property SpinnerViewController* spinner;
@end

@implementation SignInViewController

- (void)viewDidLoad {
    [super viewDidLoad];
    // Do any additional setup after loading the view.

    self.spinner = [SpinnerViewController alloc];
    [self.spinner startWithContainer:self];

    [AuthenticationManager.instance
     getTokenSilentlyWithCompletionBlock:^(NSString * _Nullable accessToken, NSError * _Nullable error) {
         dispatch_async(dispatch_get_main_queue(), ^{
             [self.spinner stop];

             if (error || !accessToken) {
                 // If there is no token or if there's an error,
                 // no user is signed in, so stay here
                 return;
             }

             // Since we got a token, user is signed in
             // Go to welcome page
             [self performSegueWithIdentifier: @"userSignedIn" sender: nil];
         });
    }];
}

- (IBAction)signIn {
    [self.spinner startWithContainer:self];

    [AuthenticationManager.instance
     getTokenInteractivelyWithParentView:self
     andCompletionBlock:^(NSString * _Nullable accessToken, NSError * _Nullable error) {
         dispatch_async(dispatch_get_main_queue(), ^{
             [self.spinner stop];

             if (error || !accessToken) {
                 // Show the error and stay on the sign-in page
                 UIAlertController* alert = [UIAlertController
                                             alertControllerWithTitle:@"Error signing in"
                                             message:error.debugDescription
                                             preferredStyle:UIAlertControllerStyleAlert];

                 UIAlertAction* okButton = [UIAlertAction
                                            actionWithTitle:@"OK"
                                            style:UIAlertActionStyleDefault
                                            handler:nil];

                 [alert addAction:okButton];
                 [self presentViewController:alert animated:true completion:nil];
                 return;
             }

             // Since we got a token, user is signed in
             // Go to welcome page
             [self performSegueWithIdentifier: @"userSignedIn" sender: nil];
         });
     }];
}
@end
WelcomeViewController.m を 開き、ファイルの上部に
import次のステートメントを追加します。#import "AuthenticationManager.h"既存の
signOut関数を、以下の関数で置き換えます。- (IBAction)signOut { [AuthenticationManager.instance signOut]; [self performSegueWithIdentifier: @"userSignedOut" sender: nil]; }変更を保存し、シミュレーターでアプリケーションを再起動します。
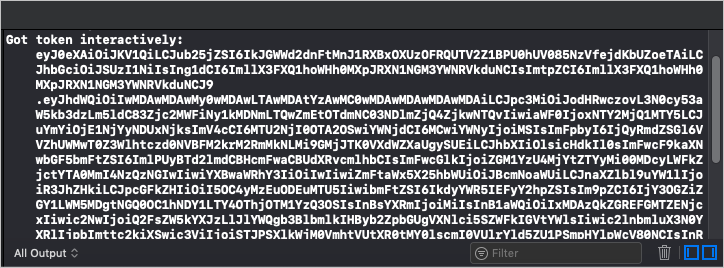
アプリにサインインすると、Xcode の出力ウィンドウにアクセス トークンが表示されます。
ユーザーの詳細情報を取得する
このセクションでは、Microsoft Graph へのすべての呼び出しを保持するヘルパー クラスを作成し、この新しいクラスを使用してログイン ユーザーを取得するために更新します WelcomeViewController 。
GraphManager という 名前の GraphTutorial プロジェクトで新しいココア タッチ クラス を作成します。 [ サブクラス] フィールドで [NSObject] を選択 します。
GraphManager.h を開き、その内容を次のコードに置き換えます。
#import <Foundation/Foundation.h>
#import <MSGraphClientSDK/MSGraphClientSDK.h>
#import <MSGraphClientModels/MSGraphClientModels.h>
#import <MSGraphClientModels/MSCollection.h>
#import "AuthenticationManager.h"

NS_ASSUME_NONNULL_BEGIN

typedef void (^GetMeCompletionBlock)(MSGraphUser* _Nullable user,
                                     NSError* _Nullable error);

@interface GraphManager : NSObject

+ (id) instance;
- (void) getMeWithCompletionBlock: (GetMeCompletionBlock) completion;

@end

NS_ASSUME_NONNULL_END
GraphManager.m を開 き、その内容を次のコードに置き換えます。
#import "GraphManager.h"

@interface GraphManager()

@property MSHTTPClient* graphClient;

@end

@implementation GraphManager

+ (id) instance {
    static GraphManager *singleInstance = nil;
    static dispatch_once_t onceToken;
    dispatch_once(&onceToken, ^ {
        singleInstance = [[self alloc] init];
    });

    return singleInstance;
}

- (id) init {
    if (self = [super init]) {
        // Create the Graph client
        self.graphClient = [MSClientFactory
                            createHTTPClientWithAuthenticationProvider:AuthenticationManager.instance];
    }

    return self;
}

- (void) getMeWithCompletionBlock: (GetMeCompletionBlock) completion {
    // GET /me
    NSString* meUrlString = [NSString stringWithFormat:@"%@/me?%@",
                             MSGraphBaseURL,
                             @"$select=displayName,mail,mailboxSettings,userPrincipalName"];
    NSURL* meUrl = [[NSURL alloc] initWithString:meUrlString];
    NSMutableURLRequest* meRequest = [[NSMutableURLRequest alloc] initWithURL:meUrl];

    MSURLSessionDataTask* meDataTask =
    [[MSURLSessionDataTask alloc]
        initWithRequest:meRequest
        client:self.graphClient
        completion:^(NSData *data, NSURLResponse *response, NSError *error) {
            if (error) {
                completion(nil, error);
                return;
            }

            // Deserialize the response as a user
            NSError* graphError;
            MSGraphUser* user = [[MSGraphUser alloc] initWithData:data error:&graphError];

            if (graphError) {
                completion(nil, graphError);
            } else {
                completion(user, nil);
            }
        }];

    // Execute the request
    [meDataTask execute];
}

@end
WelcomeViewController.m を 開き、ファイルの上部に
#import次のステートメントを追加します。#import "SpinnerViewController.h" #import "GraphManager.h" #import <MSGraphClientModels/MSGraphClientModels.h>インターフェイス宣言に次のプロパティ
WelcomeViewControllerを追加します。@property SpinnerViewController* spinner;既存のコードを次
viewDidLoadのコードに置き換えます。- (void)viewDidLoad { [super viewDidLoad]; // Do any additional setup after loading the view. self.spinner = [SpinnerViewController alloc]; [self.spinner startWithContainer:self]; self.userProfilePhoto.image = [UIImage imageNamed:@"DefaultUserPhoto"]; [GraphManager.instance getMeWithCompletionBlock:^(MSGraphUser * _Nullable user, NSError * _Nullable error) { dispatch_async(dispatch_get_main_queue(), ^{ [self.spinner stop]; if (error) { // Show the error UIAlertController* alert = [UIAlertController alertControllerWithTitle:@"Error getting user profile" message:error.debugDescription preferredStyle:UIAlertControllerStyleAlert]; UIAlertAction* okButton = [UIAlertAction actionWithTitle:@"OK" style:UIAlertActionStyleDefault handler:nil]; [alert addAction:okButton]; [self presentViewController:alert animated:true completion:nil]; return; } // Set display name self.userDisplayName.text = user.displayName ? : @"Mysterious Stranger"; [self.userDisplayName sizeToFit]; // AAD users have email in the mail attribute // Personal accounts have email in the userPrincipalName attribute self.userEmail.text = user.mail ? : user.userPrincipalName; [self.userEmail sizeToFit]; // Save user time zone [GraphManager.instance setGraphTimeZone:(user.mailboxSettings.timeZone ? : @"UTC")]; }); }]; }
変更を保存してアプリを再起動すると、サインイン後に UI がユーザーの表示名と電子メール アドレスで更新されます。
予定表ビューを取得する
この演習では、アプリケーションに Microsoft Graphを組み込む必要があります。 このアプリケーションでは、目的 C 用の Microsoft Graph SDKを使用して、Microsoft サーバーに呼び出Graph。
Outlook からカレンダー イベントを取得する
このセクションでは、クラスを拡張して、現在の週のユーザーのイベントを取得する関数を追加し、この新しい関数を使用 GraphManager CalendarViewController する更新を行います。
GraphManager.h を開 き、宣言の上に次のコードを追加
@interfaceします。typedef void (^GetCalendarViewCompletionBlock)(NSData* _Nullable data, NSError* _Nullable error);宣言に次のコードを
@interface追加します。- (void) getCalendarViewStartingAt: (NSString*) viewStart endingAt: (NSString*) viewEnd withCompletionBlock: (GetCalendarViewCompletionBlock) completion;GraphManager.m を開 き、次の関数をクラスに追加
GraphManagerします。- (void) getCalendarViewStartingAt: (NSString *) viewStart endingAt: (NSString *) viewEnd withCompletionBlock: (GetCalendarViewCompletionBlock) completion { // Set calendar view start and end parameters NSString* viewStartEndString = [NSString stringWithFormat:@"startDateTime=%@&endDateTime=%@", viewStart, viewEnd]; // GET /me/calendarview NSString* eventsUrlString = [NSString stringWithFormat:@"%@/me/calendarview?%@&%@&%@&%@", MSGraphBaseURL, viewStartEndString, // Only return these fields in results @"$select=subject,organizer,start,end", // Sort results by start time @"$orderby=start/dateTime", // Request at most 25 results @"$top=25"]; NSURL* eventsUrl = [[NSURL alloc] initWithString:eventsUrlString]; NSMutableURLRequest* eventsRequest = [[NSMutableURLRequest alloc] initWithURL:eventsUrl]; // Add the Prefer: outlook.timezone header to get start and end times // in user's time zone NSString* preferHeader = [NSString stringWithFormat:@"outlook.timezone=\"%@\"", self.graphTimeZone]; [eventsRequest addValue:preferHeader forHTTPHeaderField:@"Prefer"]; MSURLSessionDataTask* eventsDataTask = [[MSURLSessionDataTask alloc] initWithRequest:eventsRequest client:self.graphClient completion:^(NSData *data, NSURLResponse *response, NSError *error) { if (error) { completion(nil, error); return; } // TEMPORARY completion(data, nil); }]; // Execute the request [eventsDataTask execute]; }注意
コードの実行を
getCalendarViewStartingAt検討します。- 呼び出される URL は
/v1.0/me/calendarviewです。- クエリ
startDateTimeパラメーターendDateTimeとクエリ パラメーターは、予定表ビューの開始と終了を定義します。 - クエリ
selectパラメーターは、各イベントで返されるフィールドを、ビューが実際に使用するフィールドに限定します。 - クエリ
orderbyパラメーターは、開始時刻で結果を並べ替える。 - クエリ
topパラメーターは、ページごとに 25 の結果を要求します。 - ヘッダーを使用すると、Microsoft Graphユーザーのタイム ゾーン内の各イベントの開始時刻と終了時刻
Prefer: outlook.timezoneを返します。
- クエリ
- 呼び出される URL は
GraphToiana という名前の GraphTutorial プロジェクトで新しいココア タッチ クラスを作成します。 [ サブクラス] フィールドで [NSObject] を選択 します。
GraphToIana.h を開き、その内容を次のコードに置き換えます。
#import <Foundation/Foundation.h>

NS_ASSUME_NONNULL_BEGIN

@interface GraphToIana : NSObject

+ (NSString*) getIanaIdentifierFromGraphIdentifier: (NSString *) graphIdentifier;

@end

NS_ASSUME_NONNULL_END
GraphToIana.m を開 き、その内容を次のコードに置き換えます。
#import "GraphToIana.h"

@implementation GraphToIana

// Basic lookup for mapping Windows time zone identifiers to
// IANA identifiers
// Mappings taken from
// https://github.com/unicode-org/cldr/blob/master/common/supplemental/windowsZones.xml
+ (NSString*) getIanaIdentifierFromGraphIdentifier: (NSString *) graphIdentifier {
    static NSDictionary* timeZoneMap = nil;
    static dispatch_once_t onceToken;

    dispatch_once(&onceToken, ^{
        timeZoneMap = @{
            @"Dateline Standard Time" : @"Etc/GMT+12",
            @"UTC-11" : @"Etc/GMT+11",
            @"Aleutian Standard Time" : @"America/Adak",
            @"Hawaiian Standard Time" : @"Pacific/Honolulu",
            @"Marquesas Standard Time" : @"Pacific/Marquesas",
            @"Alaskan Standard Time" : @"America/Anchorage",
            @"UTC-09" : @"Etc/GMT+9",
            @"Pacific Standard Time (Mexico)" : @"America/Tijuana",
            @"UTC-08" : @"Etc/GMT+8",
            @"Pacific Standard Time" : @"America/Los_Angeles",
            @"US Mountain Standard Time" : @"America/Phoenix",
            @"Mountain Standard Time (Mexico)" : @"America/Chihuahua",
            @"Mountain Standard Time" : @"America/Denver",
            @"Central America Standard Time" : @"America/Guatemala",
            @"Central Standard Time" : @"America/Chicago",
            @"Easter Island Standard Time" : @"Pacific/Easter",
            @"Central Standard Time (Mexico)" : @"America/Mexico_City",
            @"Canada Central Standard Time" : @"America/Regina",
            @"SA Pacific Standard Time" : @"America/Bogota",
            @"Eastern Standard Time (Mexico)" : @"America/Cancun",
            @"Eastern Standard Time" : @"America/New_York",
            @"Haiti Standard Time" : @"America/Port-au-Prince",
            @"Cuba Standard Time" : @"America/Havana",
            @"US Eastern Standard Time" : @"America/Indianapolis",
            @"Turks And Caicos Standard Time" : @"America/Grand_Turk",
            @"Paraguay Standard Time" : @"America/Asuncion",
            @"Atlantic Standard Time" : @"America/Halifax",
            @"Venezuela Standard Time" : @"America/Caracas",
            @"Central Brazilian Standard Time" : @"America/Cuiaba",
            @"SA Western Standard Time" : @"America/La_Paz",
            @"Pacific SA Standard Time" : @"America/Santiago",
            @"Newfoundland Standard Time" : @"America/St_Johns",
            @"Tocantins Standard Time" : @"America/Araguaina",
            @"E. South America Standard Time" : @"America/Sao_Paulo",
            @"SA Eastern Standard Time" : @"America/Cayenne",
            @"Argentina Standard Time" : @"America/Buenos_Aires",
            @"Greenland Standard Time" : @"America/Godthab",
            @"Montevideo Standard Time" : @"America/Montevideo",
            @"Magallanes Standard Time" : @"America/Punta_Arenas",
            @"Saint Pierre Standard Time" : @"America/Miquelon",
            @"Bahia Standard Time" : @"America/Bahia",
            @"UTC-02" : @"Etc/GMT+2",
            @"Azores Standard Time" : @"Atlantic/Azores",
            @"Cape Verde Standard Time" : @"Atlantic/Cape_Verde",
            @"UTC" : @"Etc/GMT",
            @"GMT Standard Time" : @"Europe/London",
            @"Greenwich Standard Time" : @"Atlantic/Reykjavik",
            @"Sao Tome Standard Time" : @"Africa/Sao_Tome",
            @"Morocco Standard Time" : @"Africa/Casablanca",
            @"W. Europe Standard Time" : @"Europe/Berlin",
            @"Central Europe Standard Time" : @"Europe/Budapest",
            @"Romance Standard Time" : @"Europe/Paris",
            @"Central European Standard Time" : @"Europe/Warsaw",
            @"W. Central Africa Standard Time" : @"Africa/Lagos",
            @"Jordan Standard Time" : @"Asia/Amman",
            @"GTB Standard Time" : @"Europe/Bucharest",
            @"Middle East Standard Time" : @"Asia/Beirut",
            @"Egypt Standard Time" : @"Africa/Cairo",
            @"E. Europe Standard Time" : @"Europe/Chisinau",
            @"Syria Standard Time" : @"Asia/Damascus",
            @"West Bank Standard Time" : @"Asia/Hebron",
            @"South Africa Standard Time" : @"Africa/Johannesburg",
            @"FLE Standard Time" : @"Europe/Kiev",
            @"Israel Standard Time" : @"Asia/Jerusalem",
            @"Kaliningrad Standard Time" : @"Europe/Kaliningrad",
            @"Sudan Standard Time" : @"Africa/Khartoum",
            @"Libya Standard Time" : @"Africa/Tripoli",
            @"Namibia Standard Time" : @"Africa/Windhoek",
            @"Arabic Standard Time" : @"Asia/Baghdad",
            @"Turkey Standard Time" : @"Europe/Istanbul",
            @"Arab Standard Time" : @"Asia/Riyadh",
            @"Belarus Standard Time" : @"Europe/Minsk",
            @"Russian Standard Time" : @"Europe/Moscow",
            @"E. Africa Standard Time" : @"Africa/Nairobi",
            @"Iran Standard Time" : @"Asia/Tehran",
            @"Arabian Standard Time" : @"Asia/Dubai",
            @"Astrakhan Standard Time" : @"Europe/Astrakhan",
            @"Azerbaijan Standard Time" : @"Asia/Baku",
            @"Russia Time Zone 3" : @"Europe/Samara",
            @"Mauritius Standard Time" : @"Indian/Mauritius",
            @"Saratov Standard Time" : @"Europe/Saratov",
            @"Georgian Standard Time" : @"Asia/Tbilisi",
            @"Volgograd Standard Time" : @"Europe/Volgograd",
            @"Caucasus Standard Time" : @"Asia/Yerevan",
            @"Afghanistan Standard Time" : @"Asia/Kabul",
            @"West Asia Standard Time" : @"Asia/Tashkent",
            @"Ekaterinburg Standard Time" : @"Asia/Yekaterinburg",
            @"Pakistan Standard Time" : @"Asia/Karachi",
            @"Qyzylorda Standard Time" : @"Asia/Qyzylorda",
            @"India Standard Time" : @"Asia/Calcutta",
            @"Sri Lanka Standard Time" : @"Asia/Colombo",
            @"Nepal Standard Time" : @"Asia/Katmandu",
            @"Central Asia Standard Time" : @"Asia/Almaty",
            @"Bangladesh Standard Time" : @"Asia/Dhaka",
            @"Omsk Standard Time" : @"Asia/Omsk",
            @"Myanmar Standard Time" : @"Asia/Rangoon",
            @"SE Asia Standard Time" : @"Asia/Bangkok",
            @"Altai Standard Time" : @"Asia/Barnaul",
            @"W. Mongolia Standard Time" : @"Asia/Hovd",
            @"North Asia Standard Time" : @"Asia/Krasnoyarsk",
            @"N. Central Asia Standard Time" : @"Asia/Novosibirsk",
            @"Tomsk Standard Time" : @"Asia/Tomsk",
            @"China Standard Time" : @"Asia/Shanghai",
            @"North Asia East Standard Time" : @"Asia/Irkutsk",
            @"Singapore Standard Time" : @"Asia/Singapore",
            @"W. Australia Standard Time" : @"Australia/Perth",
            @"Taipei Standard Time" : @"Asia/Taipei",
            @"Ulaanbaatar Standard Time" : @"Asia/Ulaanbaatar",
            @"Aus Central W. Standard Time" : @"Australia/Eucla",
            @"Transbaikal Standard Time" : @"Asia/Chita",
            @"Tokyo Standard Time" : @"Asia/Tokyo",
            @"North Korea Standard Time" : @"Asia/Pyongyang",
            @"Korea Standard Time" : @"Asia/Seoul",
            @"Yakutsk Standard Time" : @"Asia/Yakutsk",
            @"Cen. Australia Standard Time" : @"Australia/Adelaide",
            @"AUS Central Standard Time" : @"Australia/Darwin",
            @"E. Australia Standard Time" : @"Australia/Brisbane",
            @"AUS Eastern Standard Time" : @"Australia/Sydney",
            @"West Pacific Standard Time" : @"Pacific/Port_Moresby",
            @"Tasmania Standard Time" : @"Australia/Hobart",
            @"Vladivostok Standard Time" : @"Asia/Vladivostok",
            @"Lord Howe Standard Time" : @"Australia/Lord_Howe",
            @"Bougainville Standard Time" : @"Pacific/Bougainville",
            @"Russia Time Zone 10" : @"Asia/Srednekolymsk",
            @"Magadan Standard Time" : @"Asia/Magadan",
            @"Norfolk Standard Time" : @"Pacific/Norfolk",
            @"Sakhalin Standard Time" : @"Asia/Sakhalin",
            @"Central Pacific Standard Time" : @"Pacific/Guadalcanal",
            @"Russia Time Zone 11" : @"Asia/Kamchatka",
            @"New Zealand Standard Time" : @"Pacific/Auckland",
            @"UTC+12" : @"Etc/GMT-12",
            @"Fiji Standard Time" : @"Pacific/Fiji",
            @"Chatham Islands Standard Time" : @"Pacific/Chatham",
            @"UTC+13" : @"Etc/GMT-13",
            @"Tonga Standard Time" : @"Pacific/Tongatapu",
            @"Samoa Standard Time" : @"Pacific/Apia",
            @"Line Islands Standard Time" : @"Pacific/Kiritimati"
        };
    });

    // If a mapping was not found, assume the value passed
    // was already an IANA identifier
    return timeZoneMap[graphIdentifier] ? : graphIdentifier;
}

@end
これは、Microsoft が返すタイム ゾーン名に基づいて IANA タイム ゾーン識別子を検索する簡単なGraph。
CalendarViewController.m を 開き、その内容全体を次のコードに置き換えます。
#import "CalendarViewController.h"
#import "SpinnerViewController.h"
#import "GraphManager.h"
#import "GraphToIana.h"
#import <MSGraphClientModels/MSGraphClientModels.h>

@interface CalendarViewController ()

@property SpinnerViewController* spinner;

@end

@implementation CalendarViewController

- (void)viewDidLoad {
    [super viewDidLoad];
    // Do any additional setup after loading the view.

    self.spinner = [SpinnerViewController alloc];
    [self.spinner startWithContainer:self];

    // Calculate the start and end of the current week
    NSString* timeZoneId = [GraphToIana
                            getIanaIdentifierFromGraphIdentifier:
                            [GraphManager.instance graphTimeZone]];

    NSDate* now = [NSDate date];
    NSCalendar* calendar = [NSCalendar calendarWithIdentifier:NSCalendarIdentifierGregorian];
    NSTimeZone* timeZone = [NSTimeZone timeZoneWithName:timeZoneId];
    [calendar setTimeZone:timeZone];

    NSDateComponents* startOfWeekComponents = [calendar
                                               components:NSCalendarUnitCalendar |
                                               NSCalendarUnitYearForWeekOfYear |
                                               NSCalendarUnitWeekOfYear
                                               fromDate:now];
    NSDate* startOfWeek = [startOfWeekComponents date];
    NSDate* endOfWeek = [calendar dateByAddingUnit:NSCalendarUnitDay
                                             value:7
                                            toDate:startOfWeek
                                           options:0];

    // Convert start and end to ISO 8601 strings
    NSISO8601DateFormatter* isoFormatter = [[NSISO8601DateFormatter alloc] init];
    NSString* viewStart = [isoFormatter stringFromDate:startOfWeek];
    NSString* viewEnd = [isoFormatter stringFromDate:endOfWeek];

    [GraphManager.instance
     getCalendarViewStartingAt:viewStart
     endingAt:viewEnd
     withCompletionBlock:^(NSData * _Nullable data, NSError * _Nullable error) {
         dispatch_async(dispatch_get_main_queue(), ^{
             [self.spinner stop];

             if (error) {
                 // Show the error
                 UIAlertController* alert = [UIAlertController
                                             alertControllerWithTitle:@"Error getting events"
                                             message:error.debugDescription
                                             preferredStyle:UIAlertControllerStyleAlert];

                 UIAlertAction* okButton = [UIAlertAction
                                            actionWithTitle:@"OK"
                                            style:UIAlertActionStyleDefault
                                            handler:nil];

                 [alert addAction:okButton];
                 [self presentViewController:alert animated:true completion:nil];
                 return;
             }

             // TEMPORARY
             self.calendarJSON.text = [[NSString alloc] initWithData:data encoding:NSUTF8StringEncoding];
             [self.calendarJSON sizeToFit];
         });
     }];
}

@end
アプリを実行し、サインインし、メニューの [予定表 ] ナビゲーション 項目をタップします。 アプリにイベントの JSON ダンプが表示されます。
結果の表示
これで、JSON ダンプを何かに置き換え、結果をユーザーフレンドリーに表示できます。 このセクションでは、関数を変更して、強く型指定されたオブジェクトを返し、テーブル ビューを使用してイベント getCalendarViewStartingAt CalendarViewController をレンダリングするために変更します。
getCalendarViewStartingAt の更新
GraphManager.h を開きます。 型定義
GetCalendarViewCompletionBlockを次に変更します。typedef void (^GetCalendarViewCompletionBlock)(NSArray<MSGraphEvent*>* _Nullable events, NSError* _Nullable error);GraphManager.m を開きます。 既存の
getCalendarViewStartingAt関数を、以下のコードで置換します。- (void) getCalendarViewStartingAt: (NSString *) viewStart endingAt: (NSString *) viewEnd withCompletionBlock: (GetCalendarViewCompletionBlock) completion { // Set calendar view start and end parameters NSString* viewStartEndString = [NSString stringWithFormat:@"startDateTime=%@&endDateTime=%@", viewStart, viewEnd]; // GET /me/calendarview NSString* eventsUrlString = [NSString stringWithFormat:@"%@/me/calendarview?%@&%@&%@&%@", MSGraphBaseURL, viewStartEndString, // Only return these fields in results @"$select=subject,organizer,start,end", // Sort results by start time @"$orderby=start/dateTime", // Request at most 25 results @"$top=25"]; NSURL* eventsUrl = [[NSURL alloc] initWithString:eventsUrlString]; NSMutableURLRequest* eventsRequest = [[NSMutableURLRequest alloc] initWithURL:eventsUrl]; // Add the Prefer: outlook.timezone header to get start and end times // in user's time zone NSString* preferHeader = [NSString stringWithFormat:@"outlook.timezone=\"%@\"", self.graphTimeZone]; [eventsRequest addValue:preferHeader forHTTPHeaderField:@"Prefer"]; MSURLSessionDataTask* eventsDataTask = [[MSURLSessionDataTask alloc] initWithRequest:eventsRequest client:self.graphClient completion:^(NSData *data, NSURLResponse *response, NSError *error) { if (error) { completion(nil, error); return; } NSError* graphError; // Deserialize to an events collection MSCollection* eventsCollection = [[MSCollection alloc] initWithData:data error:&graphError]; if (graphError) { completion(nil, graphError); return; } // Create an array to return NSMutableArray* eventsArray = [[NSMutableArray alloc] initWithCapacity:eventsCollection.value.count]; for (id event in eventsCollection.value) { // Deserialize the event and add to the array MSGraphEvent* graphEvent = [[MSGraphEvent alloc] initWithDictionary:event]; [eventsArray addObject:graphEvent]; } completion(eventsArray, nil); }]; // Execute the request [eventsDataTask execute]; }
CalendarViewController の更新
という名前の GraphTutorial プロジェクトで新しいココア タッチ クラス ファイルを作成します
CalendarTableViewCell。 [ サブクラス] フィールドで [UITableViewCell] を選択 します。CalendarTableViewCell.h を開 き、その内容を次のコードに置き換えます。
#import <UIKit/UIKit.h>

NS_ASSUME_NONNULL_BEGIN

@interface CalendarTableViewCell : UITableViewCell

@property (nonatomic) NSString* subject;
@property (nonatomic) NSString* organizer;
@property (nonatomic) NSString* duration;

@end

NS_ASSUME_NONNULL_END
CalendarTableViewCell.m を開 き、その内容を次のコードに置き換えます。
#import "CalendarTableViewCell.h"

@interface CalendarTableViewCell()

@property (nonatomic) IBOutlet UILabel *subjectLabel;
@property (nonatomic) IBOutlet UILabel *organizerLabel;
@property (nonatomic) IBOutlet UILabel *durationLabel;

@end

@implementation CalendarTableViewCell

- (void)awakeFromNib {
    [super awakeFromNib];
    // Initialization code
}

- (void)setSelected:(BOOL)selected animated:(BOOL)animated {
    [super setSelected:selected animated:animated];

    // Configure the view for the selected state
}

- (void) setSubject:(NSString *)subject {
    _subject = subject;
    self.subjectLabel.text = subject;
    [self.subjectLabel sizeToFit];
}

- (void) setOrganizer:(NSString *)organizer {
    _organizer = organizer;
    self.organizerLabel.text = organizer;
    [self.organizerLabel sizeToFit];
}

- (void) setDuration:(NSString *)duration {
    _duration = duration;
    self.durationLabel.text = duration;
    [self.durationLabel sizeToFit];
}

@end
という名前の GraphTutorial プロジェクトで新しいココア タッチ クラス ファイルを作成します
CalendarTableViewController。 [ サブクラス] フィールドで [UITableViewController] を選択 します。CalendarTableViewController.h を 開き、その内容を次のコードに置き換えます。
#import <UIKit/UIKit.h>
#import <MSGraphClientModels/MSGraphClientModels.h>

NS_ASSUME_NONNULL_BEGIN

@interface CalendarTableViewController : UITableViewController

@property (nonatomic) NSArray<MSGraphEvent*>* events;

@end

NS_ASSUME_NONNULL_END
CalendarTableViewController.m を 開き、その内容を次のコードに置き換えます。
#import "CalendarTableViewController.h"
#import "CalendarTableViewCell.h"
#import <MSGraphClientModels/MSGraphClientModels.h>

@interface CalendarTableViewController ()

@end

@implementation CalendarTableViewController

- (void)viewDidLoad {
    [super viewDidLoad];

    self.tableView.rowHeight = UITableViewAutomaticDimension;
    self.tableView.estimatedRowHeight = 100;
}

- (NSInteger) numberOfSections:(UITableView*) tableView {
    return 1;
}

- (NSInteger) tableView:(UITableView*) tableView numberOfRowsInSection:(NSInteger) section {
    return self.events ? self.events.count : 0;
}

- (UITableViewCell*) tableView:(UITableView *)tableView cellForRowAtIndexPath:(NSIndexPath *)indexPath {
    CalendarTableViewCell* cell = [tableView dequeueReusableCellWithIdentifier:@"EventCell"];

    // Get the event that corresponds to the row
    MSGraphEvent* event = self.events[indexPath.row];

    // Configure the cell
    cell.subject = event.subject;
    cell.organizer = event.organizer.emailAddress.name;
    cell.duration = [NSString stringWithFormat:@"%@ to %@",
                     [self formatGraphDateTime:event.start],
                     [self formatGraphDateTime:event.end]];

    return cell;
}

- (NSString*) formatGraphDateTime:(MSGraphDateTimeTimeZone*) dateTime {
    // Create a formatter to parse Graph's date format
    NSDateFormatter* isoFormatter = [[NSDateFormatter alloc] init];
    isoFormatter.dateFormat = @"yyyy-MM-dd'T'HH:mm:ss.SSSSSSS";

    // Specify the time zone
    isoFormatter.timeZone = [[NSTimeZone alloc] initWithName:dateTime.timeZone];

    NSDate* date = [isoFormatter dateFromString:dateTime.dateTime];

    // Output like 5/5/2019, 2:00 PM
    NSDateFormatter* dateFormatter = [[NSDateFormatter alloc] init];
    dateFormatter.dateStyle = NSDateFormatterShortStyle;
    dateFormatter.timeStyle = NSDateFormatterShortStyle;

    NSString* dateString = [dateFormatter stringFromDate:date];
    return dateString;
}

- (void) setEvents:(NSArray<MSGraphEvent *> *)events {
    _events = events;
    [self.tableView reloadData];
}

@end
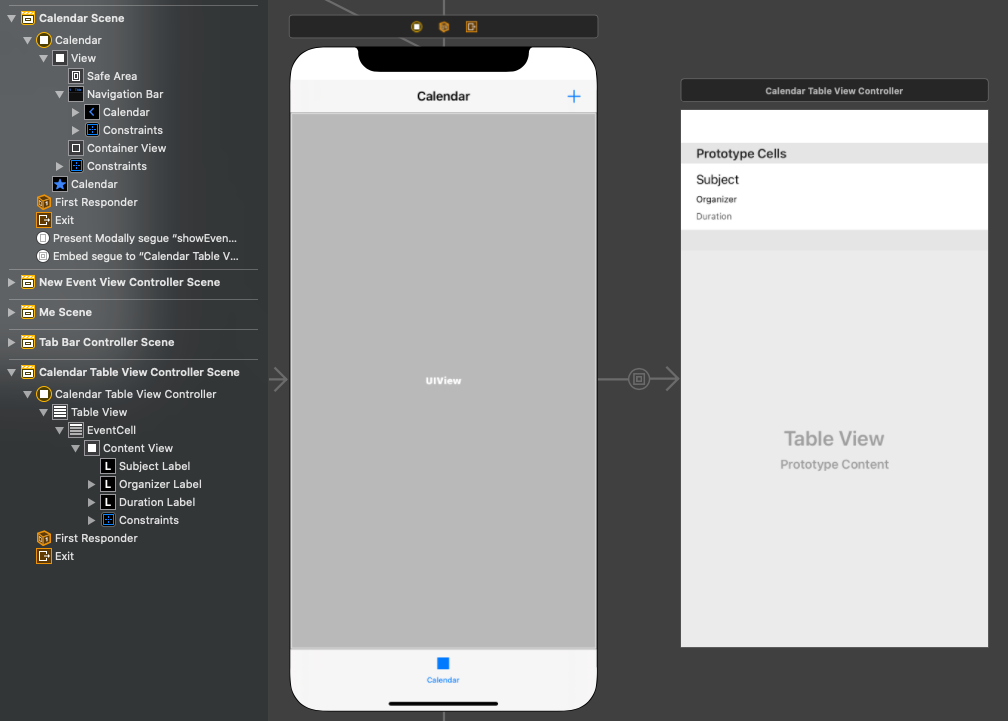
Main.storyboard を開き、カレンダー シーン を探します。 ルート ビューからスクロール ビューを削除します。
ライブラリを 使用して、ビュー の上部に ナビゲーション バーを追加します。
ナビゲーション バーの [タイトル] をダブルクリックし、に更新します
Calendar。ライブラリを 使用して、ナビゲーション バー の 右側にバー ボタン 項目を追加します。
新しいバー ボタンを選択し、[属性] インスペクタ を選択します。 イメージ をプラスに****変更します。
ライブラリから ナビゲーション バー の 下の ビューにコンテナー ビューを追加します。 コンテナー ビューのサイズを変更して、ビュー内の残りのすべての領域を取得します。
ナビゲーション バーとコンテナー ビューの制約を次のように設定します。
- ナビゲーション バー
- 制約の追加: 高さ、値: 44
- 制約の追加: 領域の先頭にスペースセーフ、値: 0
- 制約の追加: 領域に末尾セーフ、値: 0
- 制約の追加: 領域にトップ スペースセーフ値: 0
- コンテナー ビュー
- 制約の追加: 領域の先頭にスペースセーフ、値: 0
- 制約の追加: 領域に末尾セーフ、値: 0
- 制約の追加: ナビゲーション バーの下部に上のスペース、値: 0
- 制約の追加: 領域に下セーフ、値: 0
- ナビゲーション バー
コンテナー ビューを追加するときに、ストーリーボードに追加された 2 番目のビュー コントローラーを探します。 埋め込みセ グによってカレンダー シーンに接続されます。 このコントローラーを選択し 、Identity Inspector を使用してクラス****を CalendarTableViewController に変更します。
予定表テーブル ビュー コントローラー****からビューを削除します。
ライブラリから 予定表テーブル ビュー コントローラーに テーブル ビュー を追加します。
テーブル ビューを選択し、[属性] インスペクタ を選択します。 [ プロトタイプ セル] を 1 に設定します。
プロトタイプ セルの下端をドラッグして、操作する領域を大きくします。
ライブラリを 使用して、 プロトタイプ セルに 3 つのラベル を追加します。
[プロトタイプ] セルを選択し、[Identity Inspector] を選択します。 クラス を CalendarTableViewCell に変更します。
[属性] インスペクタを選択し 、[ 識別子] をに 設定します
EventCell。EventCell が選択 されている場合は、[ 接続 ] インスペクタを選択して接続し、ストーリーボードのセルに追加したラベル
durationLabelorganizerLabelsubjectLabelに接続します。3 つのラベルのプロパティと制約を次のように設定します。
- 件名ラベル
- 制約の追加: コンテンツ ビューの先頭余白に先頭のスペース、値: 0
- 制約の追加: コンテンツ ビューの末尾余白に末尾のスペース、値: 0
- 制約の追加: コンテンツ ビューの上余白にトップスペース、値: 0
- オーガナイザー ラベル
- フォント: システム 12.0
- 制約の追加: 高さ、値: 15
- 制約の追加: コンテンツ ビューの先頭余白に先頭のスペース、値: 0
- 制約の追加: コンテンツ ビューの末尾余白に末尾のスペース、値: 0
- 制約の追加: 件名ラベルの下に上のスペース、値: Standard
- 期間ラベル
- フォント: システム 12.0
- 色: 濃い灰色
- 制約の追加: 高さ、値: 15
- 制約の追加: コンテンツ ビューの先頭余白に先頭のスペース、値: 0
- 制約の追加: コンテンツ ビューの末尾余白に末尾のスペース、値: 0
- 制約を追加する: [オーガナイザー ラベルの下部] に上部スペース、値: Standard
- 制約の追加: コンテンツ ビューの下余白に下のスペース、値: 0
- 件名ラベル
EventCell を選択し、[サイズインスペクター] を選択します。 行の 高さに 対して 自動を有効にする。
CalendarViewController.h を開き、 プロパティを削除
calendarJSONします。CalendarViewController.m を 開き、その内容を次のコードに置き換えます。
#import "CalendarViewController.h"
#import "CalendarTableViewController.h"
#import "SpinnerViewController.h"
#import "GraphManager.h"
#import "GraphToIana.h"
#import <MSGraphClientModels/MSGraphClientModels.h>

@interface CalendarViewController ()

@property SpinnerViewController* spinner;
@property CalendarTableViewController* tableView;

@end

@implementation CalendarViewController

- (void)viewDidLoad {
    [super viewDidLoad];
    // Do any additional setup after loading the view.

    self.spinner = [SpinnerViewController alloc];
    [self.spinner startWithContainer:self];

    // Calculate the start and end of the current week
    NSString* timeZoneId = [GraphToIana
                            getIanaIdentifierFromGraphIdentifier:
                            [GraphManager.instance graphTimeZone]];

    NSDate* now = [NSDate date];
    NSCalendar* calendar = [NSCalendar calendarWithIdentifier:NSCalendarIdentifierGregorian];
    NSTimeZone* timeZone = [NSTimeZone timeZoneWithName:timeZoneId];
    [calendar setTimeZone:timeZone];

    NSDateComponents* startOfWeekComponents = [calendar
                                               components:NSCalendarUnitCalendar |
                                               NSCalendarUnitYearForWeekOfYear |
                                               NSCalendarUnitWeekOfYear
                                               fromDate:now];
    NSDate* startOfWeek = [startOfWeekComponents date];
    NSDate* endOfWeek = [calendar dateByAddingUnit:NSCalendarUnitDay
                                             value:7
                                            toDate:startOfWeek
                                           options:0];

    // Convert start and end to ISO 8601 strings
    NSISO8601DateFormatter* isoFormatter = [[NSISO8601DateFormatter alloc] init];
    NSString* viewStart = [isoFormatter stringFromDate:startOfWeek];
    NSString* viewEnd = [isoFormatter stringFromDate:endOfWeek];

    [GraphManager.instance
     getCalendarViewStartingAt:viewStart
     endingAt:viewEnd
     withCompletionBlock:^(NSArray<MSGraphEvent*>* _Nullable events, NSError * _Nullable error) {
         dispatch_async(dispatch_get_main_queue(), ^{
             [self.spinner stop];

             if (error) {
                 // Show the error
                 UIAlertController* alert = [UIAlertController
                                             alertControllerWithTitle:@"Error getting events"
                                             message:error.debugDescription
                                             preferredStyle:UIAlertControllerStyleAlert];

                 UIAlertAction* okButton = [UIAlertAction
                                            actionWithTitle:@"OK"
                                            style:UIAlertActionStyleDefault
                                            handler:nil];

                 [alert addAction:okButton];
                 [self presentViewController:alert animated:true completion:nil];
                 return;
             }

             [self.tableView setEvents:events];
         });
     }];
}

- (void) prepareForSegue:(UIStoryboardSegue *)segue sender:(id)sender {
    // Save a reference to the contained table view so
    // we can pass the results of the Graph call to it
    if ([segue.destinationViewController isKindOfClass:[CalendarTableViewController class]]) {
        self.tableView = segue.destinationViewController;
    }
}

- (IBAction) showNewEventForm {
    [self performSegueWithIdentifier:@"showEventForm" sender:nil];
}

@end
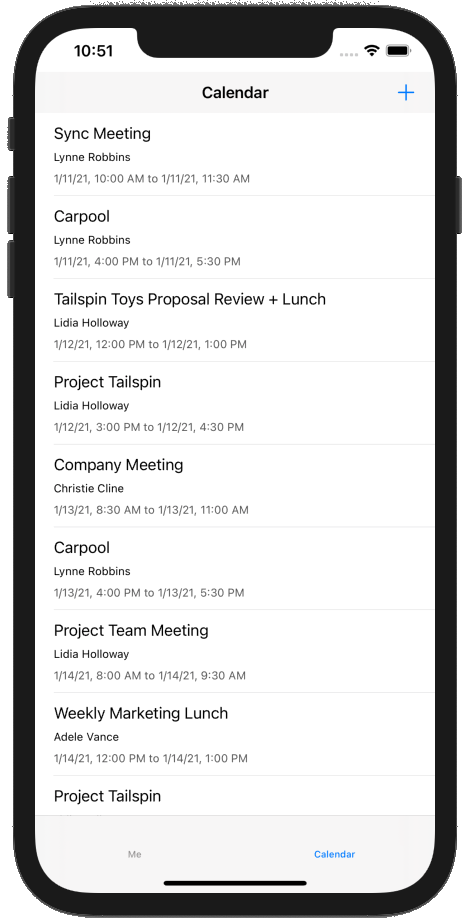
アプリを実行し、サインインし、[予定表] タブ をタップ します。イベントの一覧が表示されます。
新しいイベントを作成する
このセクションでは、ユーザーの予定表にイベントを作成する機能を追加します。
GraphManager.h を開 き、宣言の上に次のコードを追加
@interfaceします。typedef void (^CreateEventCompletionBlock)(MSGraphEvent* _Nullable event, NSError* _Nullable error);宣言に次のコードを
@interface追加します。- (void) createEventWithSubject: (NSString*) subject andStart: (NSDate*) start andEnd: (NSDate*) end andAttendees: (NSArray<NSString*>* _Nullable) attendees andBody: (NSString* _Nullable) body andCompletionBlock: (CreateEventCompletionBlock) completion;GraphManager.m を開 き、次の関数を追加して、ユーザーの予定表に新しいイベントを作成します。
- (void) createEventWithSubject: (NSString*) subject
                       andStart: (NSDate*) start
                         andEnd: (NSDate*) end
                   andAttendees: (NSArray<NSString*>* _Nullable) attendees
                        andBody: (NSString* _Nullable) body
             andCompletionBlock: (CreateEventCompletionBlock) completion {
    NSDateFormatter* isoFormatter = [[NSDateFormatter alloc] init];
    isoFormatter.dateFormat = @"yyyy-MM-dd'T'HH:mm";

    // Create a dictionary to represent the event
    // Current version of the Graph SDK models don't serialize properly
    // see https://github.com/microsoftgraph/msgraph-sdk-objc-models/issues/27
    NSMutableDictionary* eventDict = [NSMutableDictionary dictionary];

    [eventDict setObject:subject forKey:@"subject"];

    NSDictionary* startDict = @{
        @"dateTime": [isoFormatter stringFromDate:start],
        @"timeZone": self.graphTimeZone
    };
    [eventDict setObject:startDict forKey:@"start"];

    NSDictionary* endDict = @{
        @"dateTime": [isoFormatter stringFromDate:end],
        @"timeZone": self.graphTimeZone
    };
    [eventDict setObject:endDict forKey:@"end"];

    if (attendees != nil && attendees.count > 0) {
        NSMutableArray* attendeeArray = [NSMutableArray array];

        for (id email in attendees) {
            NSDictionary* attendeeDict = @{
                @"type": @"required",
                @"emailAddress": @{
                    @"address": email
                }
            };

            [attendeeArray addObject:attendeeDict];
        }

        [eventDict setObject:attendeeArray forKey:@"attendees"];
    }

    if (body != nil) {
        NSDictionary* bodyDict = @{
            @"content": body,
            @"contentType": @"text"
        };

        [eventDict setObject:bodyDict forKey:@"body"];
    }

    NSError* error = nil;
    NSData* eventData = [NSJSONSerialization dataWithJSONObject:eventDict
                                                        options:kNilOptions
                                                          error:&error];

    // Prepare Graph request
    NSString* eventsUrlString =
    [NSString stringWithFormat:@"%@/me/events", MSGraphBaseURL];
    NSURL* eventsUrl = [[NSURL alloc] initWithString:eventsUrlString];
    NSMutableURLRequest* eventsRequest = [[NSMutableURLRequest alloc] initWithURL:eventsUrl];

    eventsRequest.HTTPMethod = @"POST";
    eventsRequest.HTTPBody = eventData;
    [eventsRequest addValue:@"application/json" forHTTPHeaderField:@"Content-Type"];

    MSURLSessionDataTask* createEventDataTask =
    [[MSURLSessionDataTask alloc]
     initWithRequest:eventsRequest
     client:self.graphClient
     completion:^(NSData *data, NSURLResponse *response, NSError *error) {
        if (error) {
            completion(nil, error);
            return;
        }

        NSError* graphError;

        // Deserialize to an event
        MSGraphEvent* event = [[MSGraphEvent alloc] initWithData:data
                                                           error:&graphError];
        if (graphError) {
            completion(nil, graphError);
            return;
        }

        completion(event, nil);
    }];

    // Execute the request
    [createEventDataTask execute];
}
という名前の GraphTutorial フォルダーに新しいココア タッチ クラス ファイルを作成します
NewEventViewController。 [ サブクラス] フィールドで [UIViewController] を選択 します。NewEventViewController.h を 開き、宣言内に次のコードを追加
@interfaceします。@property (nonatomic) IBOutlet UITextField* subject; @property (nonatomic) IBOutlet UITextField* attendees; @property (nonatomic) IBOutlet UIDatePicker* start; @property (nonatomic) IBOutlet UIDatePicker* end; @property (nonatomic) IBOutlet UITextView* body;NewEventController.m を 開き、その内容を次のコードに置き換えます。
#import "NewEventViewController.h"
#import "SpinnerViewController.h"
#import "GraphManager.h"

@interface NewEventViewController ()

@property SpinnerViewController* spinner;

@end

@implementation NewEventViewController

- (void)viewDidLoad {
    [super viewDidLoad];

    self.spinner = [SpinnerViewController alloc];

    // Add border around text view
    UIColor* borderColor = [UIColor colorWithRed:0.85 green:0.85 blue:0.85 alpha:1.0];
    self.body.layer.borderWidth = 0.5;
    self.body.layer.borderColor = [borderColor CGColor];
    self.body.layer.cornerRadius = 5.0;

    // Set start picker to the next closest half-hour
    NSDate* now = [NSDate date];
    NSCalendar* calendar = [NSCalendar currentCalendar];
    NSInteger minutes = [calendar component:NSCalendarUnitMinute fromDate:now];
    NSInteger offset = 30 - (minutes % 30);

    NSDate* start = [calendar dateByAddingUnit:NSCalendarUnitMinute
                                         value:offset
                                        toDate:now
                                       options:kNilOptions];
    self.start.date = start;

    // Set end picker to start + 30 min
    NSDate* end = [calendar dateByAddingUnit:NSCalendarUnitMinute
                                       value:30
                                      toDate:start
                                     options:kNilOptions];
    self.end.date = end;
}

- (IBAction) createEvent {
    [self.spinner startWithContainer:self];

    NSString* subject = self.subject.text;

    NSString* attendeeString = self.attendees.text;
    NSArray* attendees = nil;
    if (attendeeString != nil && attendeeString.length > 0) {
        attendees = [attendeeString componentsSeparatedByString:@";"];
    }

    NSDate* start = self.start.date;
    NSDate* end = self.end.date;

    NSString* body = self.body.text;

    [GraphManager.instance createEventWithSubject:subject
                                         andStart:start
                                           andEnd:end
                                     andAttendees:attendees
                                          andBody:body
                               andCompletionBlock:^(MSGraphEvent * _Nullable event,
                                                    NSError * _Nullable error) {
        dispatch_async(dispatch_get_main_queue(), ^{
            [self.spinner stop];

            NSString* alertTitle = nil;
            NSString* alertMessage = nil;

            UIAlertAction* okButton = nil;

            if (error) {
                // Show the error
                alertTitle = @"Error creating event";
                alertMessage = error.debugDescription;
                okButton = [UIAlertAction
                            actionWithTitle:@"OK"
                            style:UIAlertActionStyleDefault
                            handler:nil];
            } else {
                alertTitle = @"Success";
                alertMessage = @"Event created";
                okButton = [UIAlertAction
                            actionWithTitle:@"OK"
                            style:UIAlertActionStyleDefault
                            handler:^(UIAlertAction * action) {
                    [self dismissViewControllerAnimated:true completion:nil];
                }];
            }

            UIAlertController* alert = [UIAlertController
                                        alertControllerWithTitle:alertTitle
                                        message:alertMessage
                                        preferredStyle:UIAlertControllerStyleAlert];

            [alert addAction:okButton];
            [self presentViewController:alert animated:true completion:nil];
        });
    }];
}

- (IBAction) cancel {
    [self dismissViewControllerAnimated:true completion:nil];
}

@end
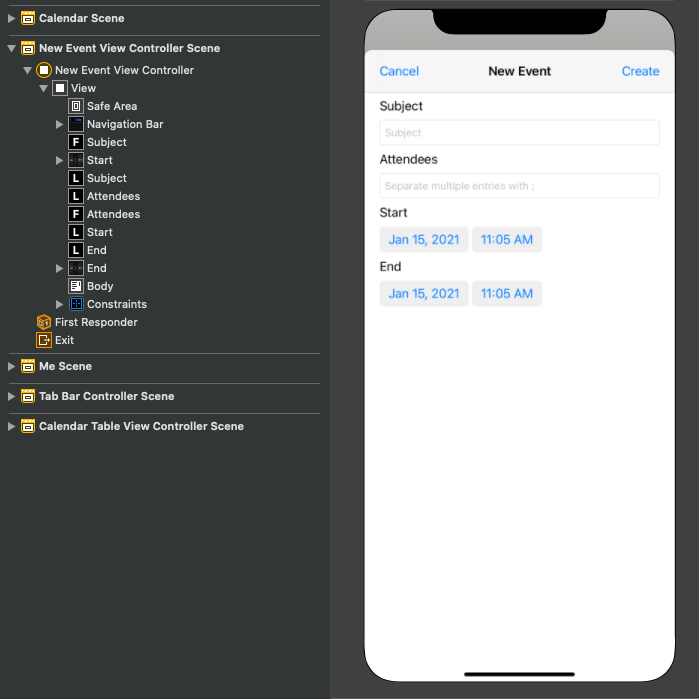
Main.storyboard を開きます。 ライブラリを 使用して 、ビュー コントローラーをストーリーボード にドラッグします。
ライブラリを 使用して、ビュー コントローラーにナビゲーション バー を追加します。
ナビゲーション バーの [タイトル] をダブルクリックし、に更新します
New Event。ライブラリを 使用して、ナビゲーション バー の 左側にバー ボタン 項目を追加します。
新しいバー ボタンを選択し、[属性] インスペクタ を選択します。 [タイトル ] をに変更 します
Cancel。ライブラリを 使用して、ナビゲーション バー の 右側にバー ボタン 項目を追加します。
新しいバー ボタンを選択し、[属性] インスペクタ を選択します。 [タイトル ] をに変更 します
Create。ビュー コントローラーを選択し、[Identity Inspector] を選択します。 クラス を NewEventViewController に変更します。
ライブラリからビューに次の コントロール を追加します。
- ナビゲーション バー の下にラベル を追加します。 テキストをに設定します
Subject。 - ラベルの 下にテキスト フィールド を追加します。 プレースホルダー属性 をに設定 します
Subject。 - テキスト フィールド の下にラベル を追加します。 テキストをに設定します
Attendees。 - ラベルの 下にテキスト フィールド を追加します。 プレースホルダー属性 をに設定 します
Separate multiple entries with ;。 - テキスト フィールド の下にラベル を追加します。 テキストをに設定します
Start。 - ラベルの 下に日付ピッカー を追加します。 [優先 スタイル] を [コンパクト] に 設定し、 間隔 を 15 分に設定し、高さを 35 に設定します。
- 日付ピ ッカーの下 にラベルを追加します。 テキストをに設定します
End。 - ラベルの 下に日付ピッカー を追加します。 [優先 スタイル] を [コンパクト] に 設定し、 間隔 を 15 分に設定し、高さを 35 に設定します。
- 日付ピ ッカーの下に テキスト ビューを追加します。
- ナビゲーション バー の下にラベル を追加します。 テキストをに設定します
[新しい イベント ビュー コントローラー] を 選択し、[ 接続インスペクター] を使用して 次の接続を行います。
- Connect取り 消しアクション を [キャンセル]バー ボタンに 移動します。
- Connectアクション を [バーの 作成] ボタン に 移動します。
- Connectを 最初の テキスト フィールドに設定します。
- Connect 参加者の出口を 2 番目のテキスト フィールドに設定します。
- Connect を最初の 日付ピッカーに設定します。
- Connectを 2 番目の日付ピッカーに設定します。
- Connectに 本文の 出口を表示します。
次の制約を追加します。
- ナビゲーション バー
- 領域を先頭にセーフ領域、値: 0
- 領域の末尾にセーフ領域、値: 0
- [領域] のセーフ、 値: 0
- 高さ、値: 44
- 件名ラベル
- 余白を表示する先頭のスペース、値: 0
- 余白を表示する末尾のスペース、値: 0
- ナビゲーション バーの上のスペース、値: 20
- 件名テキスト フィールド
- 余白を表示する先頭のスペース、値: 0
- 余白を表示する末尾のスペース、値: 0
- 件名ラベルの上のスペース、値: Standard
- 出席者ラベル
- 余白を表示する先頭のスペース、値: 0
- 余白を表示する末尾のスペース、値: 0
- 件名テキスト フィールドの上のスペース、値: Standard
- 出席者テキスト フィールド
- 余白を表示する先頭のスペース、値: 0
- 余白を表示する末尾のスペース、値: 0
- 出席者ラベルの上部スペース、値: Standard
- ラベルの開始
- 余白を表示する先頭のスペース、値: 0
- 余白を表示する末尾のスペース、値: 0
- 件名テキスト フィールドの上のスペース、値: Standard
- 開始日ピッカー
- 余白を表示する先頭のスペース、値: 0
- 余白を表示する末尾のスペース、値: 0
- 出席者ラベルの上部スペース、値: Standard
- 高さ、値: 35
- End Label
- 余白を表示する先頭のスペース、値: 0
- 余白を表示する末尾のスペース、値: 0
- 開始日ピッカーの上のスペース、値: Standard
- 終了日ピッカー
- 余白を表示する先頭のスペース、値: 0
- 余白を表示する末尾のスペース、値: 0
- 上のスペースから終了ラベル、値: Standard
- 高さ: 35
- 本文の表示
- 余白を表示する先頭のスペース、値: 0
- 余白を表示する末尾のスペース、値: 0
- トップ スペースから終了日ピッカー、値: Standard
- 余白を表示する下のスペース、値: 0
- ナビゲーション バー
[カレンダー シーン ] を選択 し、[接続] インスペクタ を選択します。
[トリガーされたセグエ] で、手動の横にある塗り付けされていない円をストーリーボードの新しいイベント ビュー コントローラー にドラッグします。 ポップアップ メニューで [モーダルの 表示] を選択します。
追加したセグエを選択し、[属性] インスペクタ を選択します。 [識別子] フィールドを に設定します
showEventForm。Connectボタン に showNewEventForm 受信アクション + を追加します。
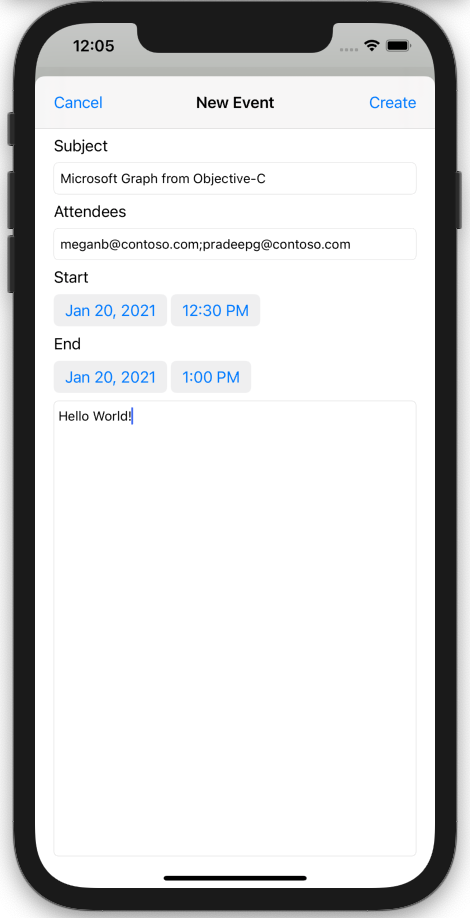
変更内容を保存し、アプリを再起動します。 予定表ページに移動し、ボタンをタップ + します。 フォームに入力し、[作成] を タップして 新しいイベントを作成します。
おめでとうございます。
iOS Objective-C Microsoft のチュートリアルをGraphしました。 Microsoft Graphを呼び出す作業アプリが作成されたので、新しい機能を試して追加できます。 Microsoft Graphの概要を参照して、Microsoft Graphでアクセスできるすべてのデータを確認Graph。
フィードバック
このチュートリアルに関するフィードバックは、GitHubしてください。
このセクションに問題がある場合 このセクションを改善できるよう、フィードバックをお送りください。