Microsoft Graph を使って Ruby on Rails アプリを構築する
このチュートリアルでは、Microsoft Graph API を使用してユーザーの予定表情報を取得する Ruby on Rails Web アプリを作成する方法について説明します。
ヒント
完成したチュートリアルをダウンロードするだけの場合は、2 つの方法でダウンロードできます。
- Ruby クイック スタートをダウンロードして 、作業コードを数分で取得します。
- リポジトリをダウンロードまたは複製GitHubします。
前提条件
このチュートリアルを開始する前に、開発マシンに次のツールがインストールされている必要があります。
また、Outlook.com 上のメールボックスを持つ個人用 Microsoft アカウント、または Microsoft の仕事用または学校用のアカウントを持っている必要があります。 Microsoft アカウントをお持ちでない場合は、無料アカウントを取得するためのオプションが 2 つご利用できます。
- 新しい 個人用 Microsoft アカウントにサインアップできます。
- 開発者プログラムにサインアップして、Microsoft 365サブスクリプションをMicrosoft 365できます。
注意
このチュートリアルは、必要なツールの次のバージョンで記述されています。 このガイドの手順は、他のバージョンでも動作しますが、テストされていない場合があります。
- Ruby バージョン 3.0.1
- SQLite3 バージョン 3.35.5
- Node.jsバージョン 14.15.0
- Yarn バージョン 1.22.0
フィードバック
このチュートリアルに関するフィードバックは、リポジトリのGitHubしてください。
Ruby on Rails Web アプリを作成する
この演習では 、Ruby on Rails を使用して Web アプリをビルドします。
Rails がインストールされていない場合は、次のコマンドを使用してコマンド ライン インターフェイス (CLI) からインストールできます。
gem install rails -v 6.1.3.1CLI を開き、ファイルを作成する権限を持つディレクトリに移動し、次のコマンドを実行して新しい Rails アプリを作成します。
rails new graph-tutorialこの新しいディレクトリに移動し、次のコマンドを入力してローカル Web サーバーを起動します。
rails serverブラウザーを開き、
http://localhost:3000に移動します。 すべてが機能している場合は、"Yay! You'on Rails! メッセージ。 そのメッセージが表示できない場合は、「Rails の開始ガイド 」を参照してください。
gems のインストール
次に進む前に、後で使用する追加の gem をインストールします。
- サインインおよび OAuth トークン フローを処理するomniauth-oauth2。
- omniauth-rails_csrf_protection に CSRF 保護を追加する場合に使用します。
- microsoft Graphを呼び出Graph。
- activerecord-session_store セッションをデータベースに格納する場合に使用します。
./Gemfile を開 き、次の行を追加します。
# OAuth
gem 'omniauth-oauth2', '~> 1.7.1'
# OmniAuth CSRF protection
gem 'omniauth-rails_csrf_protection', '~> 1.0.0'
# REST calls to Microsoft Graph
gem 'httparty', '~> 0.18.1'
# Session storage in database
gem 'activerecord-session_store', '~> 2.0.0'
CLI で、次のコマンドを実行します。
bundle installCLI で、次のコマンドを実行して、セッションを格納するためのデータベースを構成します。
rails generate active_record:session_migration rake db:migratesession_store.rb./config/initializers ディレクトリで呼び出される新しいファイルを作成し、次のコードを追加します。Rails.application.config.session_store :active_record_store, :key => '_graph_app_session'
アプリを設計する
このセクションでは、アプリの基本的な UI を作成します。
./app/views/layouts/application.html.erb を開き、その内容を次に置き換えます。
<!DOCTYPE html>
<html>
  <head>
    <title>Ruby Graph Tutorial</title>
    <%= csrf_meta_tags %>
    <%= csp_meta_tag %>

    <link rel="shortcut icon" href="favicon.png"/>

    <link rel="stylesheet" href="https://cdn.jsdelivr.net/npm/bootstrap@4.6.0/dist/css/bootstrap.min.css"
      integrity="sha384-B0vP5xmATw1+K9KRQjQERJvTumQW0nPEzvF6L/Z6nronJ3oUOFUFpCjEUQouq2+l"
      crossorigin="anonymous">
    <link rel="stylesheet"
      href="https://static2.sharepointonline.com/files/fabric/office-ui-fabric-core/11.0.0/css/fabric.min.css"/>

    <%= stylesheet_link_tag 'application', media: 'all', 'data-turbolinks-track': 'reload' %>
  </head>

  <body>
    <nav class="navbar navbar-expand-md navbar-dark fixed-top bg-dark">
      <div class="container">
        <%= link_to "Ruby Graph Tutorial", root_path, class: "navbar-brand" %>
        <button class="navbar-toggler" type="button" data-toggle="collapse" data-target="#navbarCollapse"
          aria-controls="navbarCollapse" aria-expanded="false" aria-label="Toggle navigation">
          <span class="navbar-toggler-icon"></span>
        </button>
        <div class="collapse navbar-collapse" id="navbarCollapse">
          <ul class="navbar-nav mr-auto">
            <li class="nav-item">
              <%= link_to "Home", root_path, class: "nav-link#{' active' if controller.controller_name == 'home'}" %>
            </li>
            <% if @user_name %>
              <li class="nav-item" data-turbolinks="false">
                <%= link_to "Calendar", "/calendar", class: "nav-link#{' active' if controller.controller_name == 'calendar'}" %>
              </li>
            <% end %>
          </ul>
          <ul class="navbar-nav justify-content-end">
            <li class="nav-item">
              <a class="nav-link external-link" href="https://developer.microsoft.com/graph/docs/concepts/overview" target="_blank">
                <i class="ms-Icon ms-Icon--NavigateExternalInline mr-1"></i>Docs
              </a>
            </li>
            <% if @user_name %>
              <li class="nav-item dropdown">
                <a class="nav-link avatar-link dropdown-toggle" data-toggle="dropdown" href="#" role="button" aria-haspopup="true" aria-expanded="false">
                  <% if @user_avatar %>
                    <img src=<%= @user_avatar %> class="rounded-circle align-self-center mr-2 profile-photo">
                  <% else %>
                    <%= image_tag "no-profile-photo.png", class: "rounded-circle align-self-center mr-2 profile-photo" %>
                  <% end %>
                </a>
                <div class="dropdown-menu dropdown-menu-right">
                  <h5 class="dropdown-item-text mb-0"><%= @user_name %></h5>
                  <p class="dropdown-item-text text-muted mb-0"><%= @user_email %></p>
                  <div class="dropdown-divider"></div>
                  <%= link_to "Sign Out", {:controller => :auth, :action => :signout}, :class => "dropdown-item" %>
                </div>
              </li>
            <% else %>
              <li class="nav-item">
                <%= link_to "Sign In", "/auth/microsoft_graph_auth", method: :post, class: "nav-link" %>
              </li>
            <% end %>
          </ul>
        </div>
      </div>
    </nav>
    <main role="main" class="container">
      <% if @errors %>
        <% @errors.each do |error| %>
          <div class="alert alert-danger" role="alert">
            <p class="mb-3"><%= error[:message] %></p>
            <%if error[:debug] %>
              <pre class="alert-pre border bg-light p-2"><code><%= error[:debug] %></code></pre>
            <% end %>
          </div>
        <% end %>
      <% end %>
      <%= yield %>
    </main>

    <script src="https://code.jquery.com/jquery-3.5.1.slim.min.js"
      integrity="sha384-DfXdz2htPH0lsSSs5nCTpuj/zy4C+OGpamoFVy38MVBnE+IbbVYUew+OrCXaRkfj" crossorigin="anonymous"></script>
    <script src="https://cdn.jsdelivr.net/npm/bootstrap@4.5.3/dist/js/bootstrap.bundle.min.js"
      integrity="sha384-ho+j7jyWK8fNQe+A12Hb8AhRq26LrZ/JpcUGGOn+Y7RsweNrtN/tE3MoK7ZeZDyx"
      crossorigin="anonymous"></script>

    <%= javascript_pack_tag 'application', 'data-turbolinks-track': 'reload' %>
  </body>
</html>
このコードでは、 単純なスタイル 設定用のブートストラップと、いくつかの簡単なアイコン の Fabric Core を追加します。 また、ナビゲーション バーを持つグローバル レイアウトも定義します。
./app/assets/stylesheets/application.css を開き、ファイルの末尾に次の項目を追加します。
body {
  padding-top: 4.5rem;
}

.alert-pre {
  word-wrap: break-word;
  word-break: break-all;
  white-space: pre-wrap;
}

.external-link {
  padding-top: 6px;
}

.avatar-link {
  padding-top: 4px;
  padding-bottom: 4px;
}

.profile-photo {
  width: 32px;
}
次のコマンドを使用してホーム ページ コントローラーを生成します。
rails generate controller Home indexコントローラーの
indexアクションをHomeアプリの既定のページとして構成します。 ./config/routes.rb を 開き、その内容を次の内容に置き換えるRails.application.routes.draw do get 'home/index' root 'home#index' # Add future routes here end./app/view/home/index.html.erb を開き、その内容を次に置き換えます。
<div class="jumbotron">
  <h1>Ruby Graph Tutorial</h1>
  <p class="lead">This sample app shows how to use the Microsoft Graph API to access a user's data from Ruby</p>
  <% if @user_name %>
    <h4>Welcome <%= @user_name %>!</h4>
    <p>Use the navigation bar at the top of the page to get started.</p>
  <% else %>
    <%= link_to "Click here to sign in", "/auth/microsoft_graph_auth", method: :post, class: "btn btn-primary btn-large" %>
  <% end %>
</div>
./app/assets/images ディレクトリにno-profile-photo.png という名前の PNG ファイルを追加します。
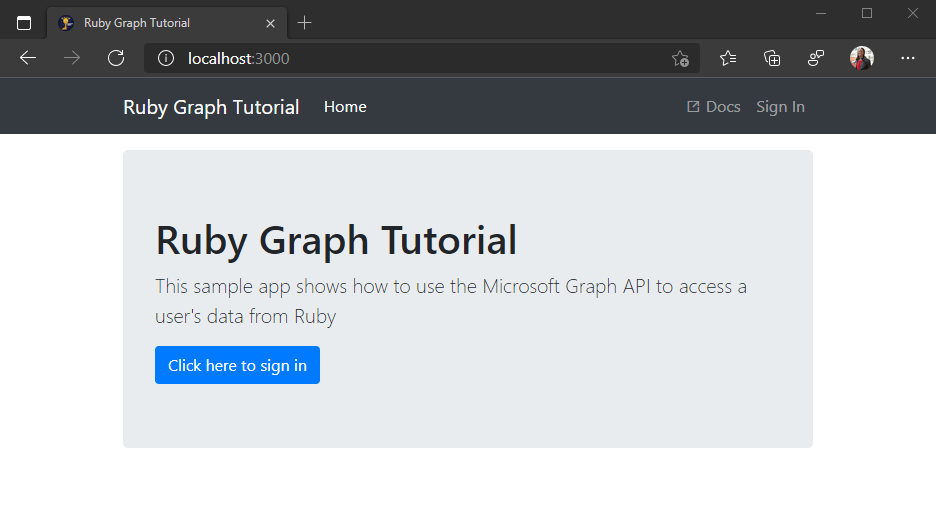
変更内容をすべて保存し、サーバーを再起動します。 これで、アプリは非常に異なって見える必要があります。

ポータルでアプリを登録する
この演習では、管理者センターを使用して新AD Azure Azure Active Directory作成します。
ブラウザーを開き、Azure Active Directory 管理センターへ移動します。 個人用アカウント (別名: Microsoft アカウント)、または 職場/学校アカウント を使用してログインします。
左側のナビゲーションで [Azure Active Directory] を選択し、それから [管理] で [アプリの登録] を選択します。

[新規登録] を選択します。 [アプリケーションを登録] ページで、次のように値を設定します。
Ruby Graph Tutorialに [名前] を設定します。- [サポートされているアカウントの種類] を [任意の組織のディレクトリ内のアカウントと個人用の Microsoft アカウント] に設定します。
- [リダイレクト URI] で、最初のドロップダウン リストを
Webに設定し、それからhttp://localhost:3000/auth/microsoft_graph_auth/callbackに値を設定します。
![[アプリケーションを登録する] ページのスクリーンショット](ruby/tutorial/images/aad-register-an-app.png)
[登録] を選択します。 [Ruby Graphチュートリアル] ページで、アプリケーション (クライアント) ID の値をコピーして保存します。次の手順で必要になります。

[管理] で [証明書とシークレット] を選択します。 [新しいクライアント シークレット] ボタンを選択します。 [説明] に値を入力して、[有効期限] のオプションのいずれかを選び、[追加] を選択します。
![[クライアントシークレットの追加] ダイアログのスクリーンショット](ruby/tutorial/images/aad-new-client-secret.png)
このページを離れる前に、クライアント シークレットの値をコピーします。 次の手順で行います。
重要
このクライアント シークレットは今後表示されないため、この段階で必ずコピーするようにしてください。

Azure AD 認証を追加する
この演習では、前の演習からアプリケーションを拡張して、Azure サーバーでの認証をサポートAD。 これは、Microsoft サーバーを呼び出す必要がある OAuth アクセス トークンを取得するために必要Graph。 この手順では 、omniauth-oauth2 gem をアプリケーションに統合し、カスタムの OmniAuth 戦略を作成します。
アプリ ID とシークレットを保持する個別のファイルを作成します。 ./config フォルダーで呼
oauth_environment_variables.rbび出された新しい ファイルを作成 し、次のコードを追加します。ENV['AZURE_APP_ID'] = 'YOUR_APP_ID_HERE' ENV['AZURE_APP_SECRET'] = 'YOUR_APP_SECRET_HERE' ENV['AZURE_SCOPES'] = 'openid profile email offline_access user.read mailboxsettings.read calendars.readwrite'アプリケーション
YOUR_APP_ID_HERE登録ポータルのアプリケーション ID に置き換え、生成YOUR_APP_SECRET_HEREしたパスワードに置き換える。重要
git などのソース管理を使用している場合は、アプリ ID とパスワードが誤って漏洩しないように、ソース管理からファイルを除外する良い時期
oauth_environment_variables.rbです。./config/environment.rb を 開き、行の前に次のコードを追加
Rails.application.initialize!します。# Load the Rails application. require_relative "application" # Load OAuth settings oauth_environment_variables = File.join(Rails.root, 'config', 'oauth_environment_variables.rb') load(oauth_environment_variables) if File.exist?(oauth_environment_variables) # Initialize the Rails application. Rails.application.initialize!
セットアップの OmniAuth
Gem は既にインストール済みですが、Azure OAuth エンドポイントで動作するには omniauth-oauth2 、OAuth2戦略を作成する必要があります。 これは、Azure プロバイダーに OAuth 要求を行うパラメーターを定義する Ruby クラスです。
microsoft_graph_auth.rb./lib '** フォルダーで呼び出された新しいファイルを作成し、次のコードを追加します。require 'omniauth-oauth2' module OmniAuth module Strategies # Implements an OmniAuth strategy to get a Microsoft Graph # compatible token from Azure AD class MicrosoftGraphAuth < OmniAuth::Strategies::OAuth2 option :name, :microsoft_graph_auth DEFAULT_SCOPE = 'openid email profile User.Read'.freeze # Configure the Microsoft identity platform endpoints option :client_options, :site => 'https://login.microsoftonline.com', :authorize_url => '/common/oauth2/v2.0/authorize', :token_url => '/common/oauth2/v2.0/token' # Send the scope parameter during authorize option :authorize_options, [:scope] # Unique ID for the user is the id field uid { raw_info['id'] } # Get additional information after token is retrieved extra do { 'raw_info' => raw_info } end def raw_info # Get user profile information from the /me endpoint @raw_info ||= access_token.get('https://graph.microsoft.com/v1.0/me?$select=displayName,mail,mailboxSettings,userPrincipalName').parsed end def authorize_params super.tap do |params| params[:scope] = request.params['scope'] if request.params['scope'] params[:scope] ||= DEFAULT_SCOPE end end # Override callback URL # OmniAuth by default passes the entire URL of the callback, including # query parameters. Azure fails validation because that doesn't match the # registered callback. def callback_url options[:redirect_uri] || (full_host + script_name + callback_path) end end end endこのコードの動作を確認してください。
- この設定では
client_options、エンドポイントのMicrosoft ID プラットフォーム設定します。 - 承認フェーズ中に
scopeパラメーターを送信するように指定します。 - ユーザーの
idプロパティをユーザーの一意の ID としてマップします。 - アクセス トークンを使用して、Microsoft からユーザーのプロファイルを取得し、Graph入力
raw_infoします。 - アプリ登録ポータルで登録されたコールバックと一致するコールバック URL を上書きします。
- この設定では
omniauth_graph.rb./config/initializers フォルダーで呼び出される新しいファイルを作成し、次のコードを追加します。require 'microsoft_graph_auth' Rails.application.config.middleware.use OmniAuth::Builder do provider :microsoft_graph_auth, ENV['AZURE_APP_ID'], ENV['AZURE_APP_SECRET'], :scope => ENV['AZURE_SCOPES'] endこのコードは、アプリの起動時に実行されます。 このミドルウェアは、プロバイダーを使用して OmniAuth ミドルウェアを読み込み、oauth_environment_variables.rb に設定
microsoft_graph_authされた環境変数で構成します。
サインインの実装
これで、OmniAuth ミドルウェアが構成されたので、アプリへのサインインの追加に進む必要があります。
CLI で次のコマンドを実行して、サインインとサインアウトのコントローラーを生成します。
rails generate controller Auth./app/controllers/auth_controller.rb を開きます。 クラスにコールバック メソッドを追加
AuthControllerします。 このメソッドは、OAuth フローが完了すると、OmniAuth ミドルウェアによって呼び出されます。def callback # Access the authentication hash for omniauth data = request.env['omniauth.auth'] # Temporary for testing! render json: data.to_json end今のところ、これは OmniAuth によって提供されるハッシュをレンダリングする作業です。 これを使用して、サインインが動作しているか確認してから、次に進む必要があります。
ルートを ./config/routes.rb に追加します。
# Add route for OmniAuth callback
match '/auth/:provider/callback', :to => 'auth#callback', :via => [:get, :post]
サーバーを起動し、を参照します
https://localhost:3000。 [サインイン] ボタンをクリックすると、https://login.microsoftonline.comにリダイレクトされます。 Microsoft アカウントでログインし、要求されたアクセス許可に同意します。 ブラウザーはアプリにリダイレクトされ、OmniAuth によって生成されたハッシュが表示されます。{ "provider": "microsoft_graph_auth", "uid": "eb52b3b2-c4ac-4b4f-bacd-d5f7ece55df0", "info": { "name": null }, "credentials": { "token": "eyJ0eXAi...", "refresh_token": "OAQABAAA...", "expires_at": 1529517383, "expires": true }, "extra": { "raw_info": { "@odata.context": "https://graph.microsoft.com/v1.0/$metadata#users(displayName,mail,mailboxSettings,userPrincipalName)/$entity", "displayName": "Lynne Robbins", "mail": "LynneR@contoso.OnMicrosoft.com", "userPrincipalName": "LynneR@contoso.OnMicrosoft.com", "id": "d294e784-840e-4f9f-bb1e-95c0a75f2f18@2d18179c-4386-4cbd-8891-7fd867c4f62e", "mailboxSettings": { "archiveFolder": "AAMkAGI2...", "timeZone": "Pacific Standard Time", "delegateMeetingMessageDeliveryOptions": "sendToDelegateOnly", "dateFormat": "M/d/yyyy", "timeFormat": "h:mm tt", "automaticRepliesSetting": { "status": "disabled", "externalAudience": "all", "internalReplyMessage": "", "externalReplyMessage": "", "scheduledStartDateTime": { "dateTime": "2020-12-09T17:00:00.0000000", "timeZone": "UTC" }, "scheduledEndDateTime": { "dateTime": "2020-12-10T17:00:00.0000000", "timeZone": "UTC" } }, "language": { "locale": "en-US", "displayName": "English (United States)" }, "workingHours": { "daysOfWeek": [ "monday", "tuesday", "wednesday", "thursday", "friday" ], "startTime": "08:00:00.0000000", "endTime": "17:00:00.0000000", "timeZone": { "name": "Pacific Standard Time" } } } } } }
トークンの格納
トークンを取得できるようになったので、トークンをアプリに格納する手順を実装します。 これはサンプル アプリのため、わかりやすくするため、セッションに保存します。 実際のアプリでは、データベースのような、より信頼性の高い安全なストレージ ソリューションを使用します。
./app/controllers/application_controller.rb を開きます。 次のメソッドを
ApplicationControllerクラスに追加します。def save_in_session(auth_hash) # Save the token info session[:graph_token_hash] = auth_hash[:credentials] # Save the user's display name session[:user_name] = auth_hash.dig(:extra, :raw_info, :displayName) # Save the user's email address # Use the mail field first. If that's empty, fall back on # userPrincipalName session[:user_email] = auth_hash.dig(:extra, :raw_info, :mail) || auth_hash.dig(:extra, :raw_info, :userPrincipalName) # Save the user's time zone session[:user_timezone] = auth_hash.dig(:extra, :raw_info, :mailboxSettings, :timeZone) endこのメソッドは、OmniAuth ハッシュをパラメーターとして受け取り、関連する情報を抽出し、その情報をセッションに格納します。
アクセサー関数をクラスに追加して、ユーザー名、電子メール アドレス、およびアクセス トークンをセッションから戻
ApplicationControllerします。def user_name session[:user_name] end def user_email session[:user_email] end def user_timezone session[:user_timezone] end def access_token session[:graph_token_hash][:token] endアクションが処理される前に実行
ApplicationControllerされるクラスに、次のコードを追加します。before_action :set_user def set_user @user_name = user_name @user_email = user_email endこのメソッドは、レイアウト (l.erb application.htm) がナビゲーション バーにユーザーの情報を表示するために使用する変数を設定します。 ここに追加することで、このコードをすべてのコントローラー アクションに追加する必要はありません。 ただし、これは、最適ではない、 のアクション
AuthControllerにも対して実行されます。次のコードを
AuthController./app/controllers/auth_controller.rb のクラスに追加して、before アクションをスキップします。skip_before_action :set_userクラスの
callback関数を更新AuthControllerして、トークンをセッションに格納し、メイン ページにリダイレクトします。 既存のcallback関数を、以下の関数で置き換えます。def callback # Access the authentication hash for omniauth data = request.env['omniauth.auth'] # Save the data in the session save_in_session data redirect_to root_url end
サインアウトの実装
この新機能をテストする前に、サインアウトする方法を追加します。
次のアクションをクラスに追加
AuthControllerします。def signout reset_session redirect_to root_url endこのアクションを ./config/routes.rb に追加します。
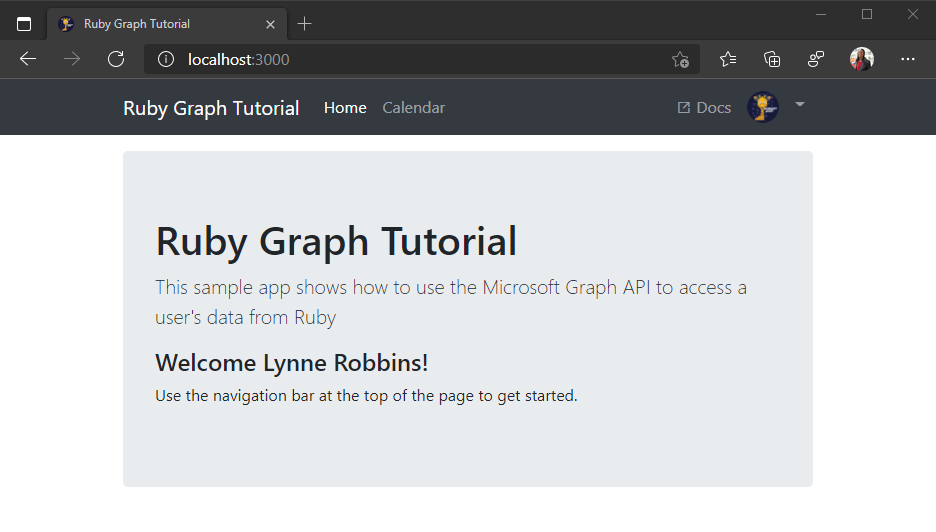
get 'auth/signout'サーバーを再起動し、サインイン プロセスを実行します。 ホーム ページに戻る必要がありますが、サインイン済みかどうかを示す UI が変更される必要があります。

右上隅にあるユーザー アバターをクリックして、[サインアウト] リンクにアクセス します。 [サインアウト] をクリックすると、セッションがリセットされ、ホーム ページに戻ります。
![[サインアウト] リンクのドロップダウン メニューのスクリーンショット](ruby/tutorial/images/add-aad-auth-02.png)
トークンの更新
OmniAuth によって生成されたハッシュを注意して確認すると、ハッシュに 2 つのトークンが含まれます。 token refresh_token 値は token アクセス トークンで、API 呼び出しの Authorization ヘッダーで送信されます。 これは、アプリがユーザーの代わりに Microsoft Graphアクセスできるトークンです。
ただし、このトークンは一時的なものです。 トークンは発行後 1 時間で期限切れになります。 この値が役 refresh_token に立つ場所です。 更新トークンを使用すると、ユーザーが再度サインインしなくても、アプリは新しいアクセス トークンを要求できます。 トークンの更新を実装するためにトークン管理コードを更新します。
./app/controllers/application_controller.rb を開き、上部に次の
requireステートメントを追加します。require 'microsoft_graph_auth' require 'oauth2'次のメソッドを
ApplicationControllerクラスに追加します。def refresh_tokens(token_hash) oauth_strategy = OmniAuth::Strategies::MicrosoftGraphAuth.new( nil, ENV['AZURE_APP_ID'], ENV['AZURE_APP_SECRET'] ) token = OAuth2::AccessToken.new( oauth_strategy.client, token_hash[:token], :refresh_token => token_hash[:refresh_token] ) # Refresh the tokens new_tokens = token.refresh!.to_hash.slice(:access_token, :refresh_token, :expires_at) # Rename token key new_tokens[:token] = new_tokens.delete :access_token # Store the new hash session[:graph_token_hash] = new_tokens endこのメソッドは 、oauth2 gem (gem の依存関係) を使用してトークンを更新し、
omniauth-oauth2セッションを更新します。現在のメソッドを
access_token次に置き換える。def access_token token_hash = session[:graph_token_hash] # Get the expiry time - 5 minutes expiry = Time.at(token_hash[:expires_at] - 300) if Time.now > expiry # Token expired, refresh new_hash = refresh_tokens token_hash new_hash[:token] else token_hash[:token] end endセッションからトークンを返すのではなく、トークンが有効期限に近い場合に最初に確認します。 その場合は、トークンを返す前に更新されます。
予定表ビューを取得する
この演習では、アプリケーションに Microsoft Graphを組み込む必要があります。 このアプリケーションでは、httparty gem を使用して Microsoft Graph。
カスタム ヘルパー Graphする
すべての API 呼び出しを管理するヘルパーを作成します。 CLI で次のコマンドを実行してヘルパーを生成します。
rails generate helper Graph./app/helpers/graph_helper.rb を開き、内容を次に置き換えてください。
require 'httparty'

# Graph API helper methods
module GraphHelper
  GRAPH_HOST = 'https://graph.microsoft.com'.freeze

  def make_api_call(method, endpoint, token, headers = nil, params = nil, payload = nil)
    headers ||= {}
    headers[:Authorization] = "Bearer #{token}"
    headers[:Accept] = 'application/json'

    params ||= {}

    case method.upcase
    when 'GET'
      HTTParty.get "#{GRAPH_HOST}#{endpoint}",
                   :headers => headers,
                   :query => params
    when 'POST'
      headers['Content-Type'] = 'application/json'
      HTTParty.post "#{GRAPH_HOST}#{endpoint}",
                    :headers => headers,
                    :query => params,
                    :body => payload ? payload.to_json : nil
    else
      raise "HTTP method #{method.upcase} not implemented"
    end
  end
end
このコードの動作を確認してください。 Gem を介して要求されたエンドポイントに対して単純な GET 要求または POST httparty 要求を行います。 ヘッダーにアクセス トークンを送信 Authorization し、渡されるクエリ パラメーターが含まれます。
たとえば、メソッドを使用して GET を実行 make_api_call するには、 https://graph.microsoft.com/v1.0/me?$select=displayName 次のように呼び出します。
make_api_call 'GET', '/v1.0/me', access_token, {}, { '$select': 'displayName' }
後で、アプリに Microsoft の機能を実装するGraphを構築します。
Outlook からカレンダー イベントを取得する
CLI で、次のコマンドを実行して新しいコントローラーを追加します。
rails generate controller Calendar index new新しいルートを ./config/routes.rb に追加します。
get 'calendar', :to => 'calendar#index'カレンダー ビューを取得するには、Graphヘルパーに新しいメソッドを追加します。 ./app/helpers/graph_helper.rb を開き、次のメソッドをモジュールに追加
GraphHelperします。def get_calendar_view(token, start_datetime, end_datetime, timezone) get_events_url = '/v1.0/me/calendarview' headers = { 'Prefer' => "outlook.timezone=\"#{timezone}\"" } query = { 'startDateTime' => start_datetime.iso8601, 'endDateTime' => end_datetime.iso8601, '$select' => 'subject,organizer,start,end', '$orderby' => 'start/dateTime', '$top' => 50 } response = make_api_call 'GET', get_events_url, token, headers, query raise response.parsed_response.to_s || "Request returned #{response.code}" unless response.code == 200 response.parsed_response['value'] endこのコードの実行内容を考えましょう。
- 呼び出される URL は
/v1.0/me/calendarviewです。- ヘッダーによって、結果の開始時刻と終了時刻がユーザーのタイム ゾーン
Prefer: outlook.timezoneに合わせて調整されます。 - and
startDateTimeパラメーターendDateTimeは、ビューの開始と終了を設定します。 - パラメーター
$selectは、各イベントに返されるフィールドを、ビューが実際に使用するフィールドに制限します。 - パラメーター
$orderbyは、開始時刻によって結果を並べ替える。 - パラメーター
$topは、結果を 50 イベントに制限します。
- ヘッダーによって、結果の開始時刻と終了時刻がユーザーのタイム ゾーン
- 応答が成功した場合、キーに含まれるアイテムの配列を返
valueします。
- 呼び出される URL は
新しいメソッドを Graphヘルパーに追加して、タイム ゾーン名に基づいてIANAタイム Windows参照します。 これは、Microsoft Graphがタイム ゾーン名としてWindows返し、Ruby DateTime クラスには IANA タイム ゾーン識別子が必要なので、これが必要です。
TIME_ZONE_MAP = {
  'Dateline Standard Time' => 'Etc/GMT+12',
  'UTC-11' => 'Etc/GMT+11',
  'Aleutian Standard Time' => 'America/Adak',
  'Hawaiian Standard Time' => 'Pacific/Honolulu',
  'Marquesas Standard Time' => 'Pacific/Marquesas',
  'Alaskan Standard Time' => 'America/Anchorage',
  'UTC-09' => 'Etc/GMT+9',
  'Pacific Standard Time (Mexico)' => 'America/Tijuana',
  'UTC-08' => 'Etc/GMT+8',
  'Pacific Standard Time' => 'America/Los_Angeles',
  'US Mountain Standard Time' => 'America/Phoenix',
  'Mountain Standard Time (Mexico)' => 'America/Chihuahua',
  'Mountain Standard Time' => 'America/Denver',
  'Central America Standard Time' => 'America/Guatemala',
  'Central Standard Time' => 'America/Chicago',
  'Easter Island Standard Time' => 'Pacific/Easter',
  'Central Standard Time (Mexico)' => 'America/Mexico_City',
  'Canada Central Standard Time' => 'America/Regina',
  'SA Pacific Standard Time' => 'America/Bogota',
  'Eastern Standard Time (Mexico)' => 'America/Cancun',
  'Eastern Standard Time' => 'America/New_York',
  'Haiti Standard Time' => 'America/Port-au-Prince',
  'Cuba Standard Time' => 'America/Havana',
  'US Eastern Standard Time' => 'America/Indianapolis',
  'Turks And Caicos Standard Time' => 'America/Grand_Turk',
  'Paraguay Standard Time' => 'America/Asuncion',
  'Atlantic Standard Time' => 'America/Halifax',
  'Venezuela Standard Time' => 'America/Caracas',
  'Central Brazilian Standard Time' => 'America/Cuiaba',
  'SA Western Standard Time' => 'America/La_Paz',
  'Pacific SA Standard Time' => 'America/Santiago',
  'Newfoundland Standard Time' => 'America/St_Johns',
  'Tocantins Standard Time' => 'America/Araguaina',
  'E. South America Standard Time' => 'America/Sao_Paulo',
  'SA Eastern Standard Time' => 'America/Cayenne',
  'Argentina Standard Time' => 'America/Buenos_Aires',
  'Greenland Standard Time' => 'America/Godthab',
  'Montevideo Standard Time' => 'America/Montevideo',
  'Magallanes Standard Time' => 'America/Punta_Arenas',
  'Saint Pierre Standard Time' => 'America/Miquelon',
  'Bahia Standard Time' => 'America/Bahia',
  'UTC-02' => 'Etc/GMT+2',
  'Azores Standard Time' => 'Atlantic/Azores',
  'Cape Verde Standard Time' => 'Atlantic/Cape_Verde',
  'UTC' => 'Etc/GMT',
  'GMT Standard Time' => 'Europe/London',
  'Greenwich Standard Time' => 'Atlantic/Reykjavik',
  'Sao Tome Standard Time' => 'Africa/Sao_Tome',
  'Morocco Standard Time' => 'Africa/Casablanca',
  'W. Europe Standard Time' => 'Europe/Berlin',
  'Central Europe Standard Time' => 'Europe/Budapest',
  'Romance Standard Time' => 'Europe/Paris',
  'Central European Standard Time' => 'Europe/Warsaw',
  'W. Central Africa Standard Time' => 'Africa/Lagos',
  'Jordan Standard Time' => 'Asia/Amman',
  'GTB Standard Time' => 'Europe/Bucharest',
  'Middle East Standard Time' => 'Asia/Beirut',
  'Egypt Standard Time' => 'Africa/Cairo',
  'E. Europe Standard Time' => 'Europe/Chisinau',
  'Syria Standard Time' => 'Asia/Damascus',
  'West Bank Standard Time' => 'Asia/Hebron',
  'South Africa Standard Time' => 'Africa/Johannesburg',
  'FLE Standard Time' => 'Europe/Kiev',
  'Israel Standard Time' => 'Asia/Jerusalem',
  'Kaliningrad Standard Time' => 'Europe/Kaliningrad',
  'Sudan Standard Time' => 'Africa/Khartoum',
  'Libya Standard Time' => 'Africa/Tripoli',
  'Namibia Standard Time' => 'Africa/Windhoek',
  'Arabic Standard Time' => 'Asia/Baghdad',
  'Turkey Standard Time' => 'Europe/Istanbul',
  'Arab Standard Time' => 'Asia/Riyadh',
  'Belarus Standard Time' => 'Europe/Minsk',
  'Russian Standard Time' => 'Europe/Moscow',
  'E. Africa Standard Time' => 'Africa/Nairobi',
  'Iran Standard Time' => 'Asia/Tehran',
  'Arabian Standard Time' => 'Asia/Dubai',
  'Astrakhan Standard Time' => 'Europe/Astrakhan',
  'Azerbaijan Standard Time' => 'Asia/Baku',
  'Russia Time Zone 3' => 'Europe/Samara',
  'Mauritius Standard Time' => 'Indian/Mauritius',
  'Saratov Standard Time' => 'Europe/Saratov',
  'Georgian Standard Time' => 'Asia/Tbilisi',
  'Volgograd Standard Time' => 'Europe/Volgograd',
  'Caucasus Standard Time' => 'Asia/Yerevan',
  'Afghanistan Standard Time' => 'Asia/Kabul',
  'West Asia Standard Time' => 'Asia/Tashkent',
  'Ekaterinburg Standard Time' => 'Asia/Yekaterinburg',
  'Pakistan Standard Time' => 'Asia/Karachi',
  'Qyzylorda Standard Time' => 'Asia/Qyzylorda',
  'India Standard Time' => 'Asia/Calcutta',
  'Sri Lanka Standard Time' => 'Asia/Colombo',
  'Nepal Standard Time' => 'Asia/Katmandu',
  'Central Asia Standard Time' => 'Asia/Almaty',
  'Bangladesh Standard Time' => 'Asia/Dhaka',
  'Omsk Standard Time' => 'Asia/Omsk',
  'Myanmar Standard Time' => 'Asia/Rangoon',
  'SE Asia Standard Time' => 'Asia/Bangkok',
  'Altai Standard Time' => 'Asia/Barnaul',
  'W. Mongolia Standard Time' => 'Asia/Hovd',
  'North Asia Standard Time' => 'Asia/Krasnoyarsk',
  'N. Central Asia Standard Time' => 'Asia/Novosibirsk',
  'Tomsk Standard Time' => 'Asia/Tomsk',
  'China Standard Time' => 'Asia/Shanghai',
  'North Asia East Standard Time' => 'Asia/Irkutsk',
  'Singapore Standard Time' => 'Asia/Singapore',
  'W. Australia Standard Time' => 'Australia/Perth',
  'Taipei Standard Time' => 'Asia/Taipei',
  'Ulaanbaatar Standard Time' => 'Asia/Ulaanbaatar',
  'Aus Central W. Standard Time' => 'Australia/Eucla',
  'Transbaikal Standard Time' => 'Asia/Chita',
  'Tokyo Standard Time' => 'Asia/Tokyo',
  'North Korea Standard Time' => 'Asia/Pyongyang',
  'Korea Standard Time' => 'Asia/Seoul',
  'Yakutsk Standard Time' => 'Asia/Yakutsk',
  'Cen. Australia Standard Time' => 'Australia/Adelaide',
  'AUS Central Standard Time' => 'Australia/Darwin',
  'E. Australia Standard Time' => 'Australia/Brisbane',
  'AUS Eastern Standard Time' => 'Australia/Sydney',
  'West Pacific Standard Time' => 'Pacific/Port_Moresby',
  'Tasmania Standard Time' => 'Australia/Hobart',
  'Vladivostok Standard Time' => 'Asia/Vladivostok',
  'Lord Howe Standard Time' => 'Australia/Lord_Howe',
  'Bougainville Standard Time' => 'Pacific/Bougainville',
  'Russia Time Zone 10' => 'Asia/Srednekolymsk',
  'Magadan Standard Time' => 'Asia/Magadan',
  'Norfolk Standard Time' => 'Pacific/Norfolk',
  'Sakhalin Standard Time' => 'Asia/Sakhalin',
  'Central Pacific Standard Time' => 'Pacific/Guadalcanal',
  'Russia Time Zone 11' => 'Asia/Kamchatka',
  'New Zealand Standard Time' => 'Pacific/Auckland',
  'UTC+12' => 'Etc/GMT-12',
  'Fiji Standard Time' => 'Pacific/Fiji',
  'Chatham Islands Standard Time' => 'Pacific/Chatham',
  'UTC+13' => 'Etc/GMT-13',
  'Tonga Standard Time' => 'Pacific/Tongatapu',
  'Samoa Standard Time' => 'Pacific/Apia',
  'Line Islands Standard Time' => 'Pacific/Kiritimati'
}.freeze

def get_iana_from_windows(windows_tz_name)
  iana = TIME_ZONE_MAP[windows_tz_name]
  # If no mapping found, assume the supplied
  # value was already an IANA identifier
  iana || windows_tz_name
end
./app/controllers/calendar_controller.rb を開き、その内容全体を次に置き換えてください。
# Calendar controller
class CalendarController < ApplicationController
  include GraphHelper

  def index
    # Get the IANA identifier of the user's time zone
    time_zone = get_iana_from_windows(user_timezone)

    # Calculate the start and end of week in the user's time zone
    start_datetime = Date.today.beginning_of_week(:sunday).in_time_zone(time_zone).to_time
    end_datetime = start_datetime.advance(:days => 7)

    @events = get_calendar_view access_token, start_datetime, end_datetime, user_timezone || []
    render json: @events
  rescue RuntimeError => e
    @errors = [
      {
        :message => 'Microsoft Graph returned an error getting events.',
        :debug => e
      }
    ]
  end
end
サーバーを再起動します。 サインインして、ナビゲーション バー の [予定表 ] リンクをクリックします。 すべてが正常に機能していれば、ユーザーのカレンダーにイベントの JSON ダンプが表示されます。
結果の表示
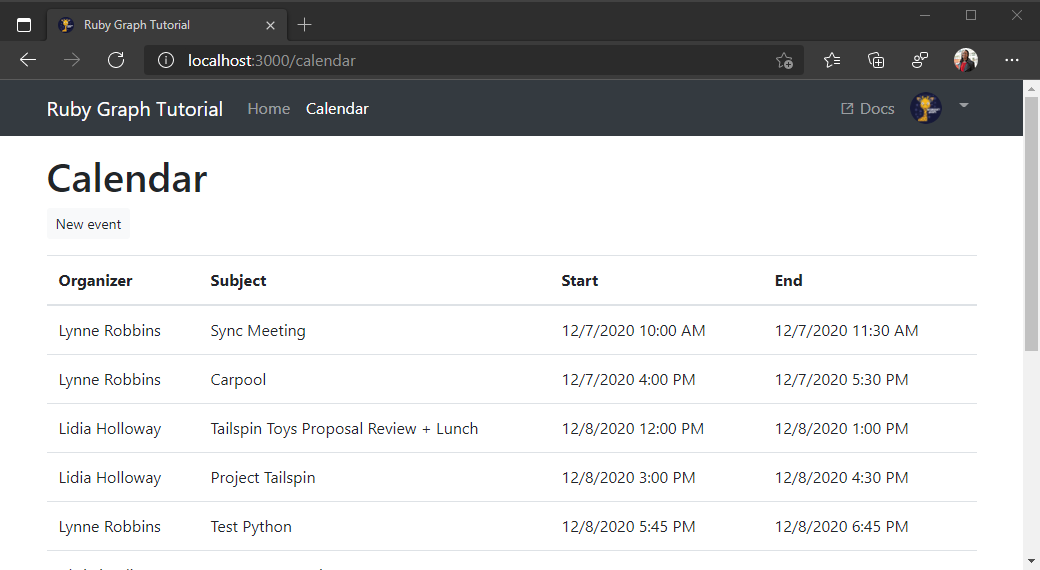
HTML を追加して、結果をユーザーフレンドリーに表示できます。
./app/views/calendar/index.html.erb を開き、その内容を次に置き換えます。
<h1>Calendar</h1>
<a href="/calendar/new" class="btn btn-light btn-sm mb-3">New event</a>
<table class="table">
  <thead>
    <tr>
      <th scope="col">Organizer</th>
      <th scope="col">Subject</th>
      <th scope="col">Start</th>
      <th scope="col">End</th>
    </tr>
  </thead>
  <tbody>
    <% @events.each do |event| %>
      <tr>
        <td><%= event['organizer']['emailAddress']['name'] %></td>
        <td><%= event['subject'] %></td>
        <td><%= event['start']['dateTime'].to_time(:utc).strftime('%-m/%-d/%Y %l:%M %p') %></td>
        <td><%= event['end']['dateTime'].to_time(:utc).strftime('%-m/%-d/%Y %l:%M %p') %></td>
      </tr>
    <% end %>
  </tbody>
</table>
これにより、イベントのコレクションがループされ、各イベントにテーブル行が追加されます。
render json: @eventsindex./app/controllers/calendar_controller.rb のアクションから行を削除します。ページを更新すると、アプリはイベントのテーブルをレンダリングする必要があります。

新しいイベントを作成する
このセクションでは、ユーザーの予定表にイベントを作成する機能を追加します。
./app/helpers/graph_helper.rb を開き、次のメソッドをクラスに Graph します。
def create_event(token, timezone, subject, start_datetime, end_datetime, attendees, body)
  create_event_url = '/v1.0/me/events'

  # Create an event object
  # https://docs.microsoft.com/graph/api/resources/event?view=graph-rest-1.0
  new_event = {
    'subject' => subject,
    'start' => {
      'dateTime' => start_datetime,
      'timeZone' => timezone
    },
    'end' => {
      'dateTime' => end_datetime,
      'timeZone' => timezone
    }
  }

  unless attendees.empty?
    attendee_array = []
    # Create an attendee object
    # https://docs.microsoft.com/graph/api/resources/attendee?view=graph-rest-1.0
    attendees.each { |email| attendee_array.push({ 'type' => 'required', 'emailAddress' => { 'address' => email } }) }
    new_event['attendees'] = attendee_array
  end

  unless body.empty?
    # Create an itemBody object
    # https://docs.microsoft.com/graph/api/resources/itembody?view=graph-rest-1.0
    new_event['body'] = {
      'contentType' => 'text',
      'content' => body
    }
  end

  response = make_api_call 'POST',
                           create_event_url,
                           token,
                           nil,
                           nil,
                           new_event

  raise response.parsed_response.to_s || "Request returned #{response.code}" unless response.code == 201
end
./app/controllers/calendar_controller を開き 、CalendarController クラスに次のルートを追加します。
def create
  # Semicolon-delimited list, split to an array
  attendees = params[:ev_attendees].split(';')

  # Create the event
  create_event access_token,
               user_timezone,
               params[:ev_subject],
               params[:ev_start],
               params[:ev_end],
               attendees,
               params[:ev_body]

  # Redirect back to the calendar list
  redirect_to({ :action => 'index' })
rescue RuntimeError => e
  @errors = [
    {
      :message => 'Microsoft Graph returned an error creating the event.',
      :debug => e
    }
  ]
end
./config/routes.rb を開き、新しいルートを追加します。
post 'calendar/new', :to => 'calendar#create'./app/views/calendar/new.html.erb を開き、その内容を次に置き換えます。
<h1>New event</h1>
<%= form_with url: "/calendar/new" do |form| %>
  <div class="form-group">
    <%= form.label :ev_subject, "Subject" %>
    <%= form.text_field :ev_subject, class: "form-control", required: true %>
  </div>
  <div class="form-group">
    <%= form.label :ev_attendees, "Attendees" %>
    <%= form.text_field :ev_attendees, class: "form-control", placeholder: "Separate multiple email addresses with a semicolon (';')" %>
  </div>
  <div class="form-row">
    <div class="col">
      <div class="form-group">
        <%= form.label :ev_start, "Start" %>
        <%= form.datetime_local_field :ev_start, class: "form-control", required: true %>
      </div>
    </div>
    <div class="col">
      <div class="form-group">
        <%= form.label :ev_end, "End" %>
        <%= form.datetime_local_field :ev_end, class: "form-control", required: true %>
      </div>
    </div>
  </div>
  <div class="form-group mb-3">
    <%= form.label :ev_body, "Body" %>
    <%= form.text_area :ev_body, class: "form-control", rows: "3" %>
  </div>
  <%= form.submit "Create", class: "btn btn-primary mr-2" %>
  <a class="btn btn-secondary" href="/calendar">Cancel</a>
<% end %>
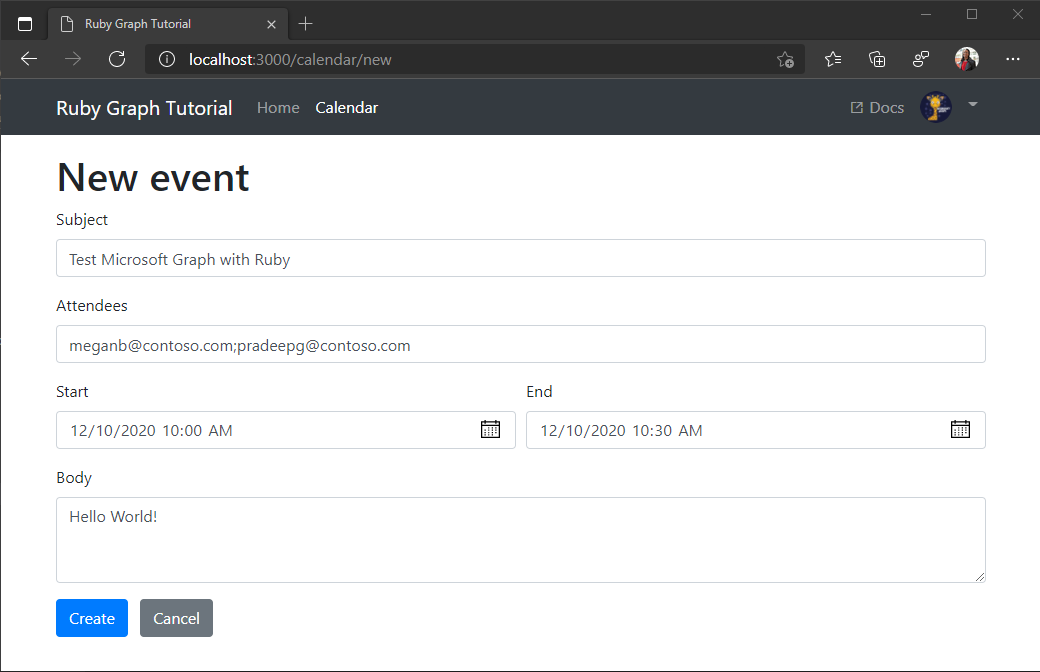
変更を保存し、アプリを更新します。 [予定表 ] ページで 、[新しいイベント] ボタンを選択 します。 フォームに入力し、[作成] を選択して 新しいイベントを作成します。

おめでとうございます。
Ruby Microsoft のこのチュートリアルはGraph完了です。 Microsoft Graphを呼び出す作業アプリが作成されたので、新しい機能を試して追加できます。 Microsoft Graphの概要を参照して、Microsoft Graphでアクセスできるすべてのデータを確認Graph。
フィードバック
このチュートリアルに関するフィードバックは、GitHubしてください。
このセクションに問題がある場合 このセクションを改善できるよう、フィードバックをお送りください。