Microsoft Graph を使って Xamarin アプリを構築する
このチュートリアルでは、Microsoft Graph API を使用してユーザーの予定表情報を取得する Xamarin アプリを構築する方法について説明します。
ヒント
完了したチュートリアルをダウンロードする場合は、リポジトリをダウンロードまたは複製GitHubできます。
前提条件
このチュートリアルを開始する前に、開発者モードVisual Studioを実行しているコンピューターにWindows 10インストールする必要があります。 インストールされていない場合はVisual Studio前のリンクにアクセスしてダウンロード オプションを確認してください。
また、Xamarin をインストールの一部としてインストールVisual Studioがあります。 Xamarin のインストールと構成の 手順については、「Xamarin のインストール」を参照してください。
必要に応じて、インストールされている Mac にもアクセスVisual Studio for Macがあります。 アクセス権を持たない場合でも、このチュートリアルを完了できますが、iOS 固有のセクションを完了できません。
また、Outlook.com 上のメールボックスを持つ個人用 Microsoft アカウント、または Microsoft の仕事用または学校用のアカウントを持っている必要があります。 Microsoft アカウントをお持ちでない場合は、無料アカウントを取得するためのオプションが 2 つご利用できます。
- 新しい 個人用 Microsoft アカウントにサインアップできます。
- 開発者プログラムにサインアップして、Microsoft 365サブスクリプションをMicrosoft 365できます。
注意
このチュートリアルは、Visual Studio 2019 バージョン 16.10.3 および Visual Studio for Mac 8.5.1 で作成されました。 両方のコンピューターに Android SDK プラットフォーム 28 がインストールされています。 このガイドの手順は、他のバージョンでも動作しますが、テストされていない場合があります。
フィードバック
このチュートリアルに関するフィードバックは、リポジトリのGitHubしてください。
Xamarin アプリの作成
Visual Studio を開き、[新しいプロジェクトの作成] を選択します。
[新しい プロジェクトの作成] ダイアログで 、[ モバイル アプリ (Xamarin.Forms)] を 選択し、[次へ] を選択 します。
![Visual Studio 2019 [新しいプロジェクトの作成] ダイアログ ボックス](xamarin/tutorial/images/new-project-dialog.png)
[新しい プロジェクトの構成] ダイアログで、プロジェクト
GraphTutorial名と ソリューションProject入力 し、[作成] を 選択 します。重要
これらのラボの手順で指定されているVisual Studio Project同じ名前を入力してください。 Visual Studio プロジェクトの名前が、コードでの名前空間の一部になります。 この手順のコードは、この手順で指定した Visual Studio プロジェクト名に一致する名前空間に応じて異なります。 異なるプロジェクト名を使用する場合には、Visual Studio プロジェクト作成時に入力したプロジェクト名に一致するようにすべての名前空間を調整しないと、コードがコンパイルされません。
![Visual Studio 2019 [新しいプロジェクトの構成] ダイアログ](xamarin/tutorial/images/configure-new-project-dialog.png)
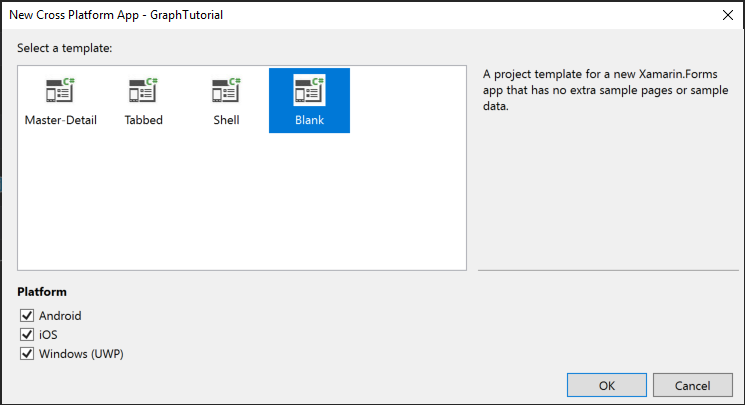
[新しい クロス プラットフォーム アプリ] ダイアログで、[空のテンプレート] を選択し、[プラットフォーム] でビルドするプラットフォーム を選択します。 [ OK] を選択 してソリューションを作成します。
パッケージのインストール
次に進む前に、後で使用NuGet追加のパッケージをインストールします。
- Microsoft.Identity.Client を使用して、認証Azure ADトークン管理を処理します。
- Microsoft。Graphを呼び出す方法について説明Graph。
- タイム ゾーンクロスプラットフォームを処理する TimeZoneConverter 。
[ツール] > [NuGet パッケージ マネージャー] > [パッケージ マネージャー コンソール] を選択します。
パッケージ マネージャー コンソールで、次のコマンドを入力します。
Install-Package Microsoft.Identity.Client -Version 4.35.1 -Project GraphTutorial
Install-Package Microsoft.Identity.Client -Version 4.35.1 -Project GraphTutorial.Android
Install-Package Microsoft.Identity.Client -Version 4.35.1 -Project GraphTutorial.iOS
Install-Package Microsoft.Graph -Version 4.1.0 -Project GraphTutorial
Install-Package TimeZoneConverter -Project GraphTutorial
アプリを設計する
まず、クラスを更新して App 、認証状態とサインインしているユーザーを追跡する変数を追加します。
ソリューション エクスプローラーで GraphTutorial プロジェクトを展開 し、 App.xaml ファイルを展開 します。 App.xaml.cs ファイルを開 き、ファイル
usingの上部に次のステートメントを追加します。using System.ComponentModel; using System.IO; using System.Reflection; using System.Threading.Tasks;インターフェイスを
INotifyPropertyChangedクラス宣言に追加します。public partial class App : Application, INotifyPropertyChangedクラスに次のプロパティを追加
Appします。// Is a user signed in? private bool isSignedIn; public bool IsSignedIn { get { return isSignedIn; } set { isSignedIn = value; OnPropertyChanged("IsSignedIn"); OnPropertyChanged("IsSignedOut"); } } public bool IsSignedOut { get { return !isSignedIn; } } // The user's display name private string userName; public string UserName { get { return userName; } set { userName = value; OnPropertyChanged("UserName"); } } // The user's email address private string userEmail; public string UserEmail { get { return userEmail; } set { userEmail = value; OnPropertyChanged("UserEmail"); } } // The user's profile photo private ImageSource userPhoto; public ImageSource UserPhoto { get { return userPhoto; } set { userPhoto = value; OnPropertyChanged("UserPhoto"); } } // The user's time zone public static TimeZoneInfo UserTimeZone;クラスに次の関数を追加
Appします。 、SignIn、SignOutおよび関数GetUserInfoは、今のところプレースホルダーにすらなっています。public async Task SignIn() { await GetUserInfo(); IsSignedIn = true; } public async Task SignOut() { UserPhoto = null; UserName = string.Empty; UserEmail = string.Empty; IsSignedIn = false; } private async Task GetUserInfo() { UserPhoto = ImageSource.FromStream(() => GetUserPhoto()); UserName = "Adele Vance"; UserEmail = "adelev@contoso.com"; } private Stream GetUserPhoto() { // Return the default photo return Assembly.GetExecutingAssembly().GetManifestResourceStream("GraphTutorial.no-profile-pic.png"); }関数
GetUserPhotoは、現在の既定の写真を返します。 独自のファイルを指定するか、サンプルで使用されているファイルをダウンロードして、GitHub。 独自のファイルを使用する場合は、ファイル名を [no-profile-pic.png] に変更します。ファイルを ./GraphTutorial/GraphTutorial ディレクトリにコピー します。
ソリューション エクスプローラーでファイルを右クリック し、[プロパティ ] を 選択します。 [プロパティ ] ウィンドウ で、[ビルド アクション] の値 を [埋め込み ] リソースに変更します。
![PNG ファイルの [プロパティ] ウィンドウのスクリーンショット](xamarin/tutorial/images/png-file-properties.png)
アプリのナビゲーション
このセクションでは、アプリケーションのメイン ページを FlyoutPage に変更します。 これにより、アプリの表示を切り替えるナビゲーション メニューが提供されます。
GraphTutorial プロジェクトで MainPage.xaml ファイルを開き、その内容を次に置き換えます。
<!-- Copyright (c) Microsoft Corporation.
     Licensed under the MIT License. -->

<!-- <MainPageXamlSnippet> -->
<?xml version="1.0" encoding="utf-8" ?>
<MasterDetailPage xmlns="http://xamarin.com/schemas/2014/forms"
             xmlns:x="http://schemas.microsoft.com/winfx/2009/xaml"
             xmlns:local="clr-namespace:GraphTutorial"
             x:Class="GraphTutorial.MainPage">

    <MasterDetailPage.Master>
        <local:MenuPage/>
    </MasterDetailPage.Master>

    <MasterDetailPage.Detail>
        <NavigationPage>
            <x:Arguments>
                <local:WelcomePage/>
            </x:Arguments>
        </NavigationPage>
    </MasterDetailPage.Detail>

</MasterDetailPage>
<!-- </MainPageXamlSnippet> -->
メニューの実装
GraphTutorial プロジェクトを右クリックし、[ 追加] 、[新しいフォルダー] の順に選択します。 フォルダーに
Modelsという名前を指定します。[モデル] フォルダーを 右クリックし、[追加] 、[Class**....] の順に選択します**。クラスに名前を付け、[
NavMenuItem追加] を 選択します。NavMenuItem.cs ファイルを開き、その内容を次に置き換えてください。
namespace GraphTutorial.Models
{
    public enum MenuItemType
    {
        Welcome,
        Calendar,
        NewEvent
    }

    public class NavMenuItem
    {
        public MenuItemType Id { get; set; }

        public string Title { get; set; }
    }
}
GraphTutorial プロジェクトを右クリックし、[ 追加]、次に[ 新しいアイテム ....]を選択します。[コンテンツ ページ] を選択 し、ページに名前を付きます
MenuPage。 [追加] を選択します。MenuPage.xaml ファイルを開 き、その内容を次に置き換えます。
<!-- Copyright (c) Microsoft Corporation.
     Licensed under the MIT License. -->

<!-- <MenuPageXamlSnippet> -->
<?xml version="1.0" encoding="utf-8" ?>
<ContentPage xmlns="http://xamarin.com/schemas/2014/forms"
             xmlns:x="http://schemas.microsoft.com/winfx/2009/xaml"
             xmlns:ios="clr-namespace:Xamarin.Forms.PlatformConfiguration.iOSSpecific;assembly=Xamarin.Forms.Core"
             ios:Page.UseSafeArea="true"
             Title="Menu"
             x:Class="GraphTutorial.MenuPage">
    <ContentPage.Padding>
        <OnPlatform x:TypeArguments="Thickness">
            <On Platform="UWP" Value="10, 10, 10, 10" />
        </OnPlatform>
    </ContentPage.Padding>
    <ContentPage.Content>
        <StackLayout VerticalOptions="Start" HorizontalOptions="Center">
            <StackLayout x:Name="UserArea" />

            <!-- Signed out UI -->
            <StackLayout IsVisible="{Binding Path=IsSignedOut, Source={x:Static Application.Current}}">
                <Label Text="Sign in to get started"
                       HorizontalOptions="Center"
                       FontAttributes="Bold"
                       FontSize="Medium"
                       Margin="10,20,10,20" />
                <Button Text="Sign in"
                        Clicked="OnSignIn"
                        HorizontalOptions="Center" />
            </StackLayout>

            <!-- Signed in UI -->
            <StackLayout IsVisible="{Binding Path=IsSignedIn, Source={x:Static Application.Current}}">
                <Image Source="{Binding Path=UserPhoto, Source={x:Static Application.Current}}"
                       HorizontalOptions="Center"
                       Margin="0,20,0,10" />
                <Label Text="{Binding Path=UserName, Source={x:Static Application.Current}}"
                       HorizontalOptions="Center"
                       FontAttributes="Bold"
                       FontSize="Small" />
                <Label Text="{Binding Path=UserEmail, Source={x:Static Application.Current}}"
                       HorizontalOptions="Center"
                       FontAttributes="Italic" />
                <Button Text="Sign out"
                        Margin="0,20,0,20"
                        Clicked="OnSignOut"
                        HorizontalOptions="Center" />
                <ListView x:Name="ListViewMenu"
                          HasUnevenRows="True"
                          HorizontalOptions="Start">
                    <ListView.ItemTemplate>
                        <DataTemplate>
                            <ViewCell>
                                <Grid Padding="10">
                                    <Label Text="{Binding Title}" FontSize="20"/>
                                </Grid>
                            </ViewCell>
                        </DataTemplate>
                    </ListView.ItemTemplate>
                </ListView>
            </StackLayout>
        </StackLayout>
    </ContentPage.Content>
</ContentPage>
<!-- </MenuPageXamlSnippet> -->
ソリューション エクスプローラーで MenuPage.xaml **を展開し、**MenuPage.xaml.cs ファイルを開 きます。 その内容を次に置き換えてください。
using System;
using System.Collections.Generic;
using System.Linq;
using System.Text;
using System.Threading.Tasks;

using Xamarin.Forms;
using Xamarin.Forms.Xaml;

using GraphTutorial.Models;

namespace GraphTutorial
{
    [XamlCompilation(XamlCompilationOptions.Compile)]
    public partial class MenuPage : ContentPage
    {
        MainPage RootPage => Application.Current.MainPage as MainPage;
        List<NavMenuItem> menuItems;

        public MenuPage()
        {
            InitializeComponent();

            // Add items to the menu
            menuItems = new List<NavMenuItem>
            {
                new NavMenuItem {Id = MenuItemType.Welcome, Title="Home" },
                new NavMenuItem {Id = MenuItemType.Calendar, Title="Calendar" },
                new NavMenuItem {Id = MenuItemType.NewEvent, Title="New event" }
            };
            ListViewMenu.ItemsSource = menuItems;

            // Initialize the selected item
            ListViewMenu.SelectedItem = menuItems[0];

            // Handle the ItemSelected event to navigate to the
            // selected page
            ListViewMenu.ItemSelected += async (sender, e) =>
            {
                if (e.SelectedItem == null)
                    return;

                var id = (int)((NavMenuItem)e.SelectedItem).Id;
                await RootPage.NavigateFromMenu(id);
            };
        }

        private async void OnSignOut(object sender, EventArgs e)
        {
            var signout = await DisplayAlert("Sign out?", "Do you want to sign out?", "Yes", "No");
            if (signout)
            {
                await (Application.Current as App).SignOut();
            }
        }

        private async void OnSignIn(object sender, EventArgs e)
        {
            try
            {
                await (Application.Current as App).SignIn();
            }
            catch (Exception ex)
            {
                await DisplayAlert("Authentication Error", ex.Message, "OK");
            }
        }
    }
}
注意
Visual Studio MenuPage.xaml.cs でエラーが報告されます。 これらのエラーは、後の手順で解決されます。
ウェルカム ページの実装
GraphTutorial プロジェクトを右クリックし、[ 追加]、次に[ 新しいアイテム ....]を選択します。[コンテンツ ページ] を選択 し、ページに名前を付きます
WelcomePage。 [追加] を選択します。 WelcomePage.xaml ファイルを開 き、その内容を次に置き換えます。<!-- Copyright (c) Microsoft Corporation. Licensed under the MIT License. --> <!-- <WelcomePageXamlSnippet> --> <?xml version="1.0" encoding="utf-8" ?> <ContentPage xmlns="http://xamarin.com/schemas/2014/forms" xmlns:x="http://schemas.microsoft.com/winfx/2009/xaml" Title="Home" x:Class="GraphTutorial.WelcomePage"> <ContentPage.Padding> <OnPlatform x:TypeArguments="Thickness"> <On Platform="UWP" Value="10, 10, 10, 10" /> </OnPlatform> </ContentPage.Padding> <ContentPage.Content> <StackLayout> <Label Text="Graph Xamarin Tutorial App" HorizontalOptions="Center" FontAttributes="Bold" FontSize="Large" Margin="10,20,10,20" /> <!-- Signed out UI --> <StackLayout IsVisible="{Binding Path=IsSignedOut, Source={x:Static Application.Current}}"> <Label Text="Please sign in to get started" HorizontalOptions="Center" FontSize="Medium" Margin="10,0,10,20"/> <Button Text="Sign in" HorizontalOptions="Center" Clicked="OnSignIn" /> </StackLayout> <!-- Signed in UI --> <StackLayout IsVisible="{Binding Path=IsSignedIn, Source={x:Static Application.Current}}"> <Label Text="{Binding Path=UserName, Source={x:Static Application.Current}, StringFormat='Welcome \{0\}!'}" HorizontalOptions="Center" FontSize="Medium"/> </StackLayout> </StackLayout> </ContentPage.Content> </ContentPage> <!-- </WelcomePageXamlSnippet> -->ソリューション エクスプローラーで WelcomePage.xaml を展開し 、 WelcomePage.xaml.cs ファイルを開 きます。 次の関数を
WelcomePageクラスに追加します。private void OnSignIn(object sender, EventArgs e) { (App.Current.MainPage as MasterDetailPage).IsPresented = true; }
予定表と新しいイベント ページを追加する
予定表ページと新しいイベント ページを追加します。 これらは今のところプレースホルダーです。
GraphTutorial プロジェクトを右クリックし、[ 追加]、次に[ 新しいアイテム ....]を選択します。[コンテンツ ページ] を選択 し、ページに名前を付きます
CalendarPage。 [追加] を選択します。GraphTutorial プロジェクトを右クリックし、[ 追加]、次に[ 新しいアイテム ....]を選択します。[コンテンツ ページ] を選択 し、ページに名前を付きます
NewEventPage。 [追加] を選択します。
MainPage のコードを更新する
すべてのページが配置されたので、MainPage.xaml の後ろの コードを更新します。
ソリューション エクスプローラーで MainPage.xaml を 展開し、 MainPage.xaml.cs ファイルを開き、その内容全体を次に置き換えます。
using System;
using System.Collections.Generic;
using System.IO;
using System.Linq;
using System.Reflection;
using System.Text;
using System.Threading.Tasks;
using Xamarin.Forms;
using GraphTutorial.Models;

namespace GraphTutorial
{
    public partial class MainPage : MasterDetailPage
    {
        Dictionary<int, NavigationPage> MenuPages = new Dictionary<int, NavigationPage>();

        public MainPage()
        {
            InitializeComponent();

            MasterBehavior = MasterBehavior.Popover;

            // Load the welcome page at start
            MenuPages.Add((int)MenuItemType.Welcome, (NavigationPage)Detail);
        }

        // Navigate to the selected page
        public async Task NavigateFromMenu(int id)
        {
            if (!MenuPages.ContainsKey(id))
            {
                switch (id)
                {
                    case (int)MenuItemType.Welcome:
                        MenuPages.Add(id, new NavigationPage(new WelcomePage()));
                        break;
                    case (int)MenuItemType.Calendar:
                        MenuPages.Add(id, new NavigationPage(new CalendarPage()));
                        break;
                    case (int)MenuItemType.NewEvent:
                        MenuPages.Add(id, new NavigationPage(new NewEventPage()));
                        break;
                }
            }

            var newPage = MenuPages[id];

            if (newPage != null && Detail != newPage)
            {
                Detail = newPage;

                if (Device.RuntimePlatform == Device.Android)
                    await Task.Delay(100);

                IsPresented = false;
            }
        }
    }
}
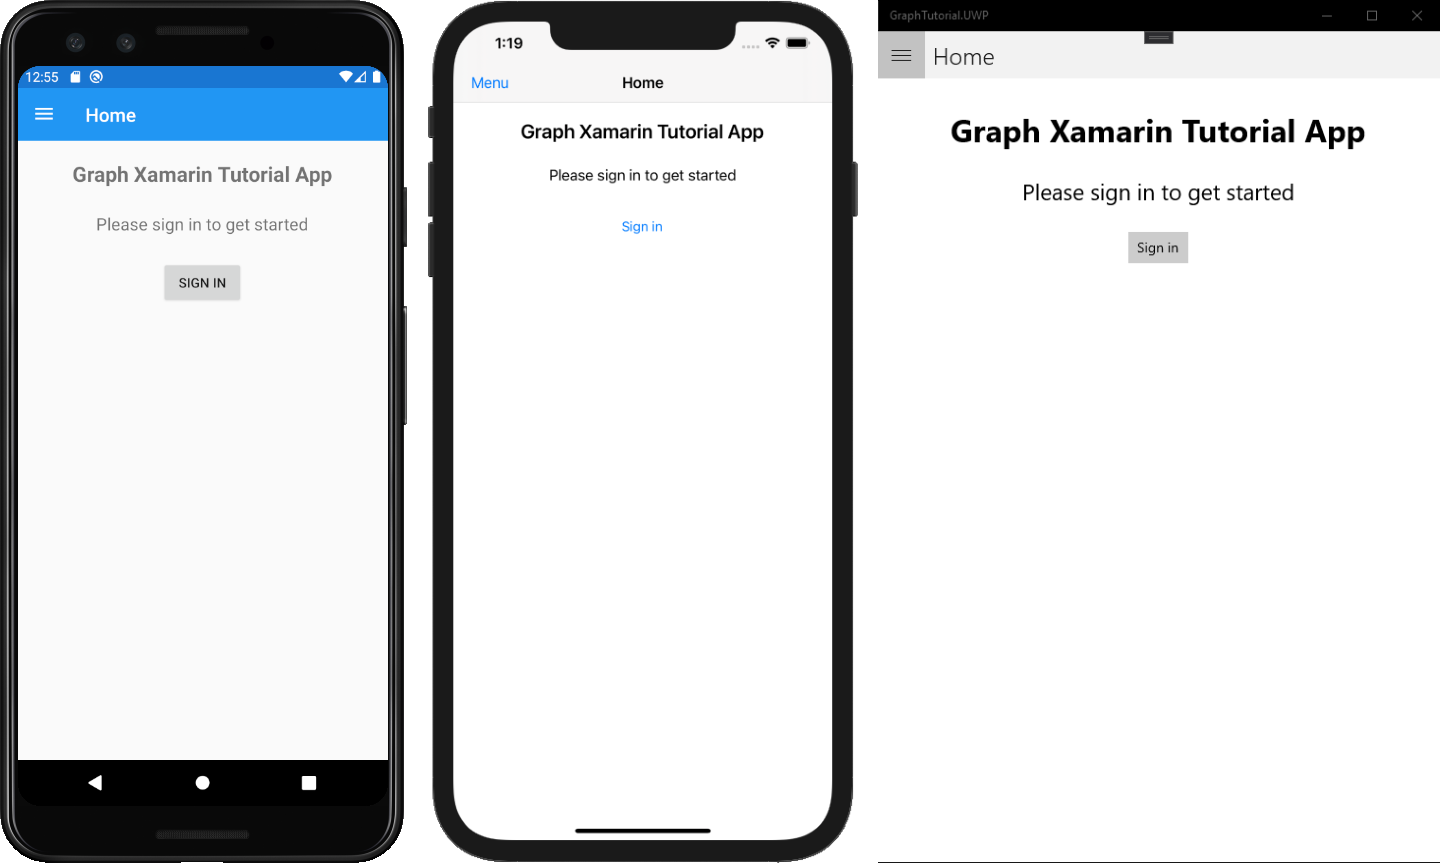
すべての変更を保存します。 実行するプロジェクト (Android、iOS、または UWP) を右クリックし、[StartUp として設定] を選択Project。 F5 キーを押 するか、または [デバッグ ] > [デバッグ の開始] を選択Visual Studio。
ポータルでアプリを登録する
この演習では、新しい Azure AD管理センターを使用Azure Active Directoryします。
ブラウザーを開き、Azure Active Directory 管理センターへ移動して、個人用アカウント (別名: Microsoft アカウント)、または 職場/学校アカウント を使用してログインします。
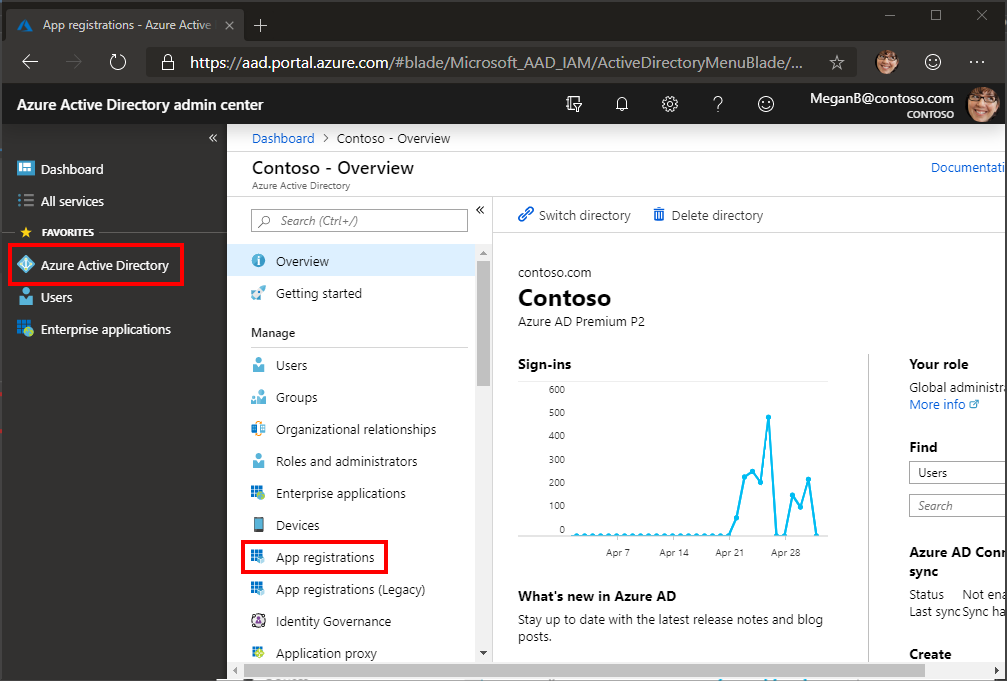
左側のナビゲーションで [Azure Active Directory] を選択し、それから [管理] で [アプリの登録] を選択します。
[新規登録] を選択します。 [アプリケーションを登録] ページで、次のように値を設定します。
Xamarin Graph Tutorialに [名前] を設定します。- [サポートされているアカウントの種類] を [任意の組織のディレクトリ内のアカウントと個人用の Microsoft アカウント] に設定します。
- [ リダイレクト URI (省略可能)] で、ドロップダウンを [パブリック クライアント (モバイル & デスクトップ) に変更し、値をに設定します
msauth://com.companyname.GraphTutorial。
![[アプリケーションを登録する] ページのスクリーンショット](xamarin/tutorial/images/aad-register-an-app.png)
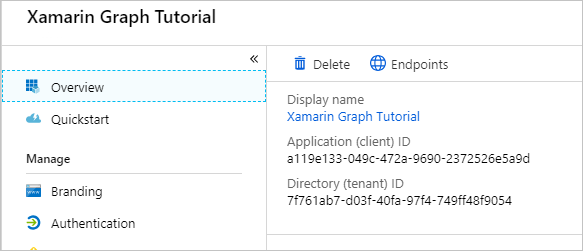
[登録] を選択します。 [Xamarin Graph チュートリアル] ページで、アプリケーション (クライアント) ID の値をコピーして保存します。次の手順で必要になります。
Azure AD 認証を追加する
この演習では、前の演習からアプリケーションを拡張して、Azure サーバーでの認証をサポートAD。 これは、Microsoft サーバーを呼び出す必要がある OAuth アクセス トークンを取得するために必要Graph。 この手順では 、Microsoft Authentication Library for .NET (MSAL) をアプリケーションに統合します。
ソリューション エクスプローラーで**、GraphTutorial** プロジェクトを展開し、[モデル] フォルダーを 右クリック します。 [Add > クラス... を選択します。クラスに名前を付
OAuthSettingsけ、[追加] を 選択します。OAuthSettings.cs ファイルを開き、その内容を次に置き換えてください。
アプリ
YOUR_APP_ID_HERE登録のアプリケーション ID に置き換える。重要
git などのソース管理を使用している場合は、誤ってアプリ ID が漏洩しないように、ソース管理からファイルを除外する良
OAuthSettings.csい時期です。
サインインの実装
GraphTutorial プロジェクトで App.xaml.cs ファイルを開き、ファイルの上部に次の
usingステートメントを追加します。using GraphTutorial.Models; using Microsoft.Identity.Client; using Microsoft.Graph; using System.Diagnostics; using System.Linq; using System.Net.Http.Headers; using TimeZoneConverter;Application の 名前の 競合を解決するには、App クラス宣言行を 変更します。
public partial class App : Xamarin.Forms.Application, INotifyPropertyChangedクラスに次のプロパティを追加
Appします。// UIParent used by Android version of the app public static object AuthUIParent = null; // Keychain security group used by iOS version of the app public static string iOSKeychainSecurityGroup = null; // Microsoft Authentication client for native/mobile apps public static IPublicClientApplication PCA; // Microsoft Graph client public static GraphServiceClient GraphClient; // Microsoft Graph permissions used by app private readonly string[] Scopes = OAuthSettings.Scopes.Split(' ');次に、クラスの
PublicClientApplicationコンストラクターに新しいオブジェクトを作成Appします。public App() { InitializeComponent(); var builder = PublicClientApplicationBuilder .Create(OAuthSettings.ApplicationId) .WithRedirectUri(OAuthSettings.RedirectUri); if (!string.IsNullOrEmpty(iOSKeychainSecurityGroup)) { builder = builder.WithIosKeychainSecurityGroup(iOSKeychainSecurityGroup); } PCA = builder.Build(); MainPage = new MainPage(); }アクセス トークン
SignInを取得するために使用PublicClientApplicationする関数を更新します。 行の上に次のコードを追加await GetUserInfo();します。// First, attempt silent sign in // If the user's information is already in the app's cache, // they won't have to sign in again. try { var accounts = await PCA.GetAccountsAsync(); var silentAuthResult = await PCA .AcquireTokenSilent(Scopes, accounts.FirstOrDefault()) .ExecuteAsync(); Debug.WriteLine("User already signed in."); Debug.WriteLine($"Successful silent authentication for: {silentAuthResult.Account.Username}"); Debug.WriteLine($"Access token: {silentAuthResult.AccessToken}"); } catch (MsalUiRequiredException msalEx) { // This exception is thrown when an interactive sign-in is required. Debug.WriteLine("Silent token request failed, user needs to sign-in: " + msalEx.Message); // Prompt the user to sign-in var interactiveRequest = PCA.AcquireTokenInteractive(Scopes); if (AuthUIParent != null) { interactiveRequest = interactiveRequest .WithParentActivityOrWindow(AuthUIParent); } var interactiveAuthResult = await interactiveRequest.ExecuteAsync(); Debug.WriteLine($"Successful interactive authentication for: {interactiveAuthResult.Account.Username}"); Debug.WriteLine($"Access token: {interactiveAuthResult.AccessToken}"); } catch (Exception ex) { Debug.WriteLine("Authentication failed. See exception messsage for more details: " + ex.Message); }このコードでは、最初にアクセス トークンをサイレント モードで取得します。 ユーザーの情報が既にアプリのキャッシュ内にある場合 (たとえば、ユーザーが以前にサインアウトせずにアプリを閉じた場合)、これは成功し、ユーザーにメッセージを表示する理由はありません。 キャッシュにユーザーの情報が含めされていない場合、
AcquireTokenSilent().ExecuteAsync()関数はMsalUiRequiredException. この場合、コードは対話型関数を呼び出してトークンを取得しますAcquireTokenInteractive。関数を
SignOut更新して、キャッシュからユーザーの情報を削除します。 関数の先頭に次のコードを追加SignOutします。// Get all cached accounts for the app // (Should only be one) var accounts = await PCA.GetAccountsAsync(); while (accounts.Any()) { // Remove the account info from the cache await PCA.RemoveAsync(accounts.First()); accounts = await PCA.GetAccountsAsync(); }
Android プロジェクトを更新してサインインを有効にする
Xamarin Android プロジェクトで使用する場合、Microsoft 認証ライブラリには Android 固有のいくつかの 要件があります。
GraphTutorial.Android プロジェクトで、[ プロパティ] フォルダー を展開 し、[プロパティ] を 開 AndroidManifest.xml。 ユーザー設定を使用している場合は、[Visual Studio for Mac] をクリックAndroidManifest.xmlをクリックし、[ファイルを開く] 、[ソース コード エディター]の順に選択します。 コンテンツ全体を次に置き換えてください。
<?xml version="1.0" encoding="utf-8"?>
<manifest xmlns:android="http://schemas.android.com/apk/res/android" android:versionCode="1" android:versionName="1.0" package="com.companyname.GraphTutorial">
    <uses-sdk android:minSdkVersion="21" android:targetSdkVersion="28" />
    <application android:label="GraphTutorial.Android">
        <activity android:name="microsoft.identity.client.BrowserTabActivity">
            <intent-filter>
                <action android:name="android.intent.action.VIEW" />
                <category android:name="android.intent.category.DEFAULT" />
                <category android:name="android.intent.category.BROWSABLE" />
                <data android:scheme="msauth" android:host="com.companyname.GraphTutorial" />
            </intent-filter>
        </activity>
    </application>
    <uses-permission android:name="android.permission.ACCESS_NETWORK_STATE" />
    <uses-permission android:name="android.permission.INTERNET" />
</manifest>
MainActivity.cs を 開き、ファイルの上部に
using次のステートメントを追加します。using Android.Content; using Microsoft.Identity.Client;MSAL
OnActivityResultライブラリにコントロールを渡す関数をオーバーライドします。 クラスに次の項目を追加MainActivityします。protected override void OnActivityResult(int requestCode, Result resultCode, Intent data) { base.OnActivityResult(requestCode, resultCode, data); AuthenticationContinuationHelper .SetAuthenticationContinuationEventArgs(requestCode, resultCode, data); }関数で
OnCreate、行の後に次の行を追加LoadApplication(new App());します。App.AuthUIParent = this;
iOS プロジェクトを更新してサインインを有効にする
重要
MSAL では Entitlements.plist ファイルの使用が必要なので、プロビジョニングを有効にVisual Studio Apple 開発者アカウントを使用して構成する必要があります。 iPhone シミュレーターでこのチュートリアルを実行している場合は 、GraphTutorial.iOS プロジェクトの設定であるビルド ->iOS バンドル署名のカスタムエンタイトルメント フィールドに Entitlements.plist を追加する必要があります。 詳細については 、「Xamarin.iOS のデバイス プロビジョニング」を参照してください。
Xamarin iOS プロジェクトで使用する場合、Microsoft 認証ライブラリには iOS 固有のいくつかの 要件があります。
ソリューション エクスプローラーで 、GraphTutorial.iOS プロジェクトを展開し 、Entitlements.plist ファイルを開 きます。
キーチェーンの 資格を 見つけて、[キー チェーンの有効化] を選択します。
[ キーチェーン グループ] で、形式のエントリを追加します
com.companyname.GraphTutorial。
GraphTutorial.iOS プロジェクトの コードを更新して、認証中にリダイレクトを処理します。 AppDelegate.cs ファイルを開き、ファイルの上部に
using次のステートメントを追加します。using Microsoft.Identity.Client;行の直前に次
FinishedLaunchingの行を関数に追加LoadApplication(new App());します。// Specify the Keychain access group App.iOSKeychainSecurityGroup = NSBundle.MainBundle.BundleIdentifier;関数を
OpenUrlオーバーライドして、URL を MSAL ライブラリに渡します。 クラスに次の項目を追加AppDelegateします。// Handling redirect URL // See: https://github.com/azuread/microsoft-authentication-library-for-dotnet/wiki/Xamarin-iOS-specifics public override bool OpenUrl(UIApplication app, NSUrl url, NSDictionary options) { AuthenticationContinuationHelper.SetAuthenticationContinuationEventArgs(url); return true; }
トークンの格納
Xamarin プロジェクトで Microsoft 認証ライブラリを使用する場合、既定ではネイティブのセキュリティで保護されたストレージを利用してトークンをキャッシュします。 詳細については 、「トークン キャッシュのシリアル化 」を参照してください。
サインインのテスト
この時点で、アプリケーションを実行して [サインイン] ボタンをタップすると、サインインを求めるメッセージが表示されます。 サインインが成功すると、デバッガーの出力にアクセス トークンが印刷されます。
![[出力] ウィンドウのスクリーンショットが表示Visual Studio](xamarin/tutorial/images/debugger-access-token.png)
ユーザーの詳細情報を取得する
新しい関数を App クラス に追加して 初期化します
GraphServiceClient。private async Task InitializeGraphClientAsync() { var currentAccounts = await PCA.GetAccountsAsync(); try { if (currentAccounts.Count() > 0) { // Initialize Graph client GraphClient = new GraphServiceClient(new DelegateAuthenticationProvider( async (requestMessage) => { var result = await PCA.AcquireTokenSilent(Scopes, currentAccounts.FirstOrDefault()) .ExecuteAsync(); requestMessage.Headers.Authorization = new AuthenticationHeaderValue("Bearer", result.AccessToken); })); await GetUserInfo(); IsSignedIn = true; } else { IsSignedIn = false; } } catch (Exception ex) { Debug.WriteLine("Failed to initialized graph client."); Debug.WriteLine($"Accounts in the msal cache: {currentAccounts.Count()}."); Debug.WriteLine($"See exception message for details: {ex.Message}"); } }代わりにこの関数を呼び出す
SignInApp.xaml.cs の関数を更新しますGetUserInfo。 関数から次の項目を削除SignInします。await GetUserInfo(); IsSignedIn = true;関数の末尾に次の項目を追加
SignInします。await InitializeGraphClientAsync();関数を
GetUserInfo更新して、Microsoft ユーザーからユーザーの詳細を取得Graph。 既存のGetUserInfo関数を、以下の関数で置き換えます。private async Task GetUserInfo() { // Get the logged on user's profile (/me) var user = await GraphClient.Me.Request() .Select(u => new { u.DisplayName, u.Mail, u.MailboxSettings, u.UserPrincipalName }) .GetAsync(); UserPhoto = ImageSource.FromStream(() => GetUserPhoto()); UserName = user.DisplayName; UserEmail = string.IsNullOrEmpty(user.Mail) ? user.UserPrincipalName : user.Mail; try { UserTimeZone = TZConvert.GetTimeZoneInfo(user.MailboxSettings.TimeZone); } catch { // Default to local time zone UserTimeZone = TimeZoneInfo.Local; } }変更内容を保存し、アプリケーションを実行します。 サインイン後、UI はユーザーの表示名と電子メール アドレスで更新されます。
予定表ビューを取得する
この演習では、アプリケーションに Microsoft Graphを組み込む必要があります。 このアプリケーションでは、Microsoft クライアント ライブラリ for .NET Graphを使用して Microsoft クライアント ライブラリを呼び出Graph。
Outlook からカレンダー イベントを取得する
GraphTutorial プロジェクトで CalendarPage.xaml を開き、その内容を次に置き換えます。
<?xml version="1.0" encoding="utf-8" ?>
<ContentPage xmlns="http://xamarin.com/schemas/2014/forms"
             xmlns:x="http://schemas.microsoft.com/winfx/2009/xaml"
             Title="Calendar"
             x:Class="GraphTutorial.CalendarPage">
    <ContentPage.Content>
        <StackLayout>
            <Editor x:Name="JSONResponse"
                    IsSpellCheckEnabled="False"
                    HorizontalOptions="FillAndExpand"
                    VerticalOptions="FillAndExpand"/>
        </StackLayout>
    </ContentPage.Content>
</ContentPage>
CalendarPage.xaml.cs を開き、ファイルの上部に
using次のステートメントを追加します。using Microsoft.Graph; using System.Collections.ObjectModel; using System.ComponentModel;次の関数をクラスに追加して、ユーザーのタイム ゾーンで現在の週
CalendarPageの開始を取得します。private static DateTime GetUtcStartOfWeekInTimeZone(DateTime today, TimeZoneInfo timeZone) { // Assumes Sunday as first day of week int diff = System.DayOfWeek.Sunday - today.DayOfWeek; // create date as unspecified kind var unspecifiedStart = DateTime.SpecifyKind(today.AddDays(diff), DateTimeKind.Unspecified); // convert to UTC return TimeZoneInfo.ConvertTimeToUtc(unspecifiedStart, timeZone); }次の関数をクラスに追加して、ユーザーのイベントを取得し
CalendarPage、JSON 応答を表示します。protected override async void OnAppearing() { base.OnAppearing(); // Get start and end of week in user's time zone var startOfWeek = GetUtcStartOfWeekInTimeZone(DateTime.Today, App.UserTimeZone); var endOfWeek = startOfWeek.AddDays(7); var queryOptions = new List<QueryOption> { new QueryOption("startDateTime", startOfWeek.ToString("o")), new QueryOption("endDateTime", endOfWeek.ToString("o")) }; var timeZoneString = Xamarin.Forms.Device.RuntimePlatform == Xamarin.Forms.Device.UWP ? App.UserTimeZone.StandardName : App.UserTimeZone.DisplayName; // Get the events var events = await App.GraphClient.Me.CalendarView.Request(queryOptions) .Header("Prefer", $"outlook.timezone=\"{timeZoneString}\"") .Select(e => new { e.Subject, e.Organizer, e.Start, e.End }) .OrderBy("start/DateTime") .Top(50) .GetAsync(); // Temporary JSONResponse.Text = App.GraphClient.HttpProvider.Serializer.SerializeObject(events.CurrentPage); }コードの実行を
OnAppearing検討します。- 呼び出される URL は
/v1.0/me/calendarviewです。- パラメーター
startDateTimeとendDateTimeパラメーターは、予定表ビューの開始と終了を定義します。 - ヘッダーを使用すると、ユーザーのタイム ゾーンでイベントと
Prefer: outlook.timezonestartendイベントが返されます。 - この
Select関数は、各イベントで返されるフィールドを、アプリが実際に使用するフィールドに制限します。 - この
OrderBy関数は、結果を開始日時で並べ替える。 - この
Top関数は、最大で 50 のイベントを要求します。
- パラメーター
- 呼び出される URL は
アプリを実行し、サインインし、メニューの [予定表 ] ナビゲーション アイテムをクリックします。 ユーザーの予定表にイベントの JSON ダンプが表示されます。
結果の表示
これで、JSON ダンプを何かに置き換え、結果をユーザーフレンドリーに表示できます。
まず、バインド値コンバーターを作成して、Microsoft Graph によって返されるdateTimeTimeZone値をユーザーが期待する日付と時刻の形式に変換します。
GraphTutorial プロジェクトの [モデル] フォルダーを右クリックし、[追加] 、[Class...] の順に選択します。 クラスに名前を付
GraphDateTimeTimeZoneConverterけ、[追加] を 選択します。ファイルの内容全体を次に置き換えてください。
using Microsoft.Graph;
using System;
using System.Globalization;
using Xamarin.Forms;

namespace GraphTutorial.Models
{
    class GraphDateTimeTimeZoneConverter : IValueConverter
    {
        public object Convert(object value, Type targetType, object parameter, CultureInfo culture)
        {
            if (value is DateTimeTimeZone date)
            {
                var parsedDateAs = DateTimeOffset.Parse(date.DateTime);
                // Return the local date time string
                return $"{parsedDateAs.LocalDateTime.ToShortDateString()} {parsedDateAs.LocalDateTime.ToShortTimeString()}";
            }

            return string.Empty;
        }

        public object ConvertBack(object value, Type targetType, object parameter, CultureInfo culture)
        {
            throw new NotImplementedException();
        }
    }
}
CalendarPage.xaml の内容全体を次に置き 換えます。
<!-- Copyright (c) Microsoft Corporation.
     Licensed under the MIT License. -->

<!-- <CalendarPageXamlSnippet> -->
<?xml version="1.0" encoding="utf-8" ?>
<ContentPage xmlns="http://xamarin.com/schemas/2014/forms"
             xmlns:x="http://schemas.microsoft.com/winfx/2009/xaml"
             xmlns:local="clr-namespace:GraphTutorial.Models"
             Title="Calendar"
             x:Class="GraphTutorial.CalendarPage">
    <ContentPage.Resources>
        <local:GraphDateTimeTimeZoneConverter x:Key="DateConverter" />
    </ContentPage.Resources>
    <ContentPage.Content>
        <StackLayout>
            <ListView x:Name="CalendarList"
                      HasUnevenRows="true"
                      Margin="10,10,10,10">
                <ListView.ItemTemplate>
                    <DataTemplate>
                        <ViewCell>
                            <StackLayout Margin="10,10,10,10">
                                <Label Text="{Binding Path=Subject}"
                                       FontAttributes="Bold"
                                       FontSize="Medium" />
                                <Label Text="{Binding Path=Organizer.EmailAddress.Name}"
                                       FontSize="Small" />
                                <StackLayout Orientation="Horizontal">
                                    <Label Text="{Binding Path=Start, Converter={StaticResource DateConverter}}"
                                       FontSize="Micro" />
                                    <Label Text="to"
                                           FontSize="Micro" />
                                    <Label Text="{Binding Path=End, Converter={StaticResource DateConverter}}"
                                       FontSize="Micro" />
                                </StackLayout>
                            </StackLayout>
                        </ViewCell>
                    </DataTemplate>
                </ListView.ItemTemplate>
            </ListView>
        </StackLayout>
    </ContentPage.Content>
</ContentPage>
<!-- </CalendarPageXamlSnippet> -->
これにより、 に置
Editorき換わるListView. 各DataTemplateアイテムのレンダリングに使用されるプロパティは、イベントGraphDateTimeTimeZoneConverterのプロパティを文字列StartEndに変換するために使用されます。CalendarPage.xaml.cs を 開き、関数から次の行を削除
OnAppearingします。// Temporary JSONResponse.Text = JsonConvert.SerializeObject(events.CurrentPage, Formatting.Indented);その場所に、次のコードを追加します。
// Add the events to the list view
CalendarList.ItemsSource = events.CurrentPage.ToList();
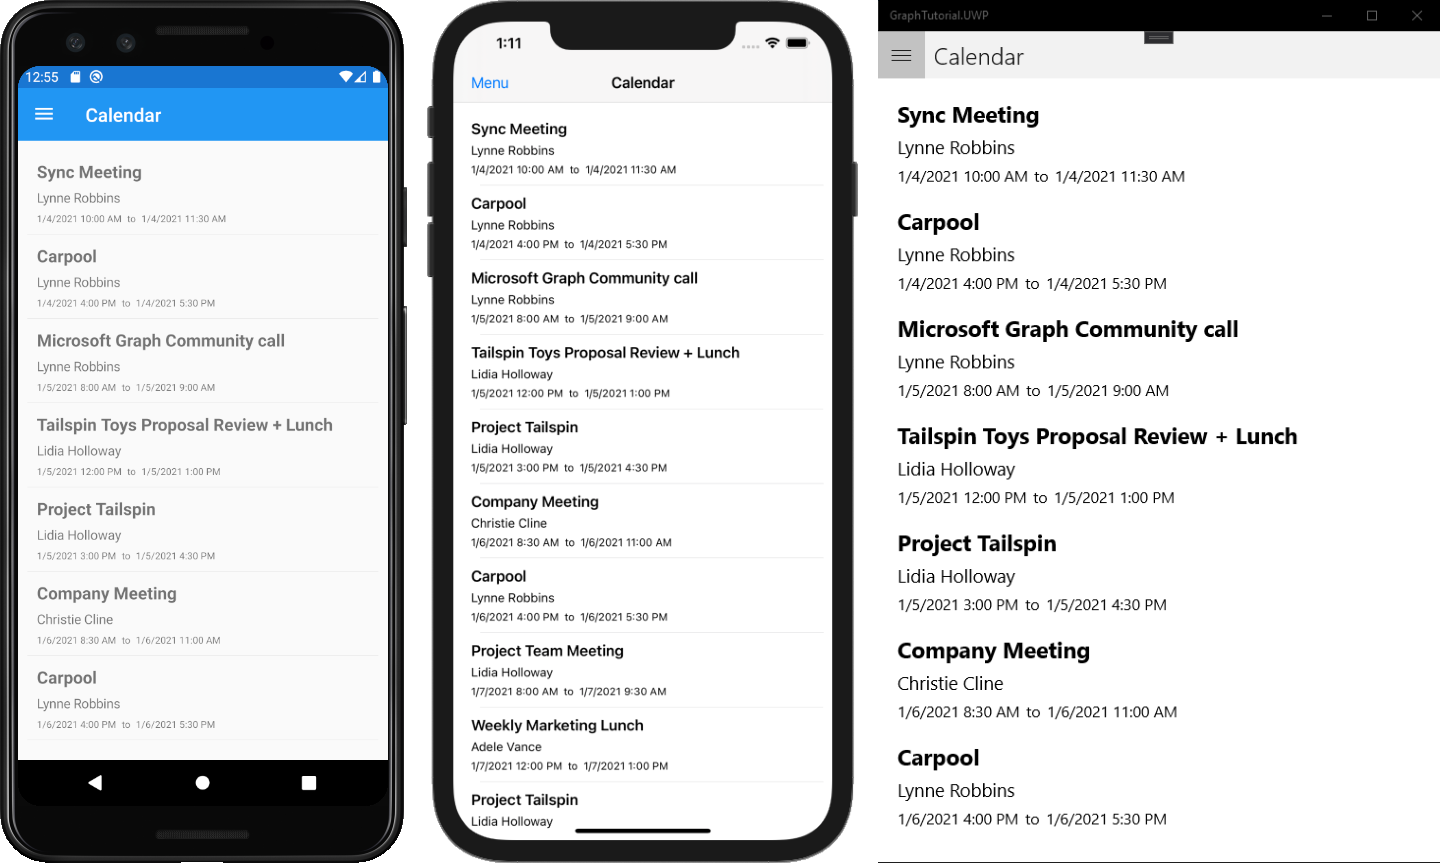
アプリを実行し、サインインし、[予定表] ナビゲーション アイテム を クリックします。 Start 値と End 値が書式設定 されたイベントの****一覧が 表示されます。
新しいイベントを作成する
このセクションでは、ユーザーの予定表にイベントを作成する機能を追加します。
NewEventPage.xaml を開 き、その内容を次に置き換えます。
<!-- Copyright (c) Microsoft Corporation.
     Licensed under the MIT License. -->

<!-- <NewEventPageXamlSnippet> -->
<?xml version="1.0" encoding="utf-8" ?>
<ContentPage xmlns="http://xamarin.com/schemas/2014/forms"
             xmlns:x="http://schemas.microsoft.com/winfx/2009/xaml"
             x:Class="GraphTutorial.NewEventPage">
    <ContentPage.Content>
        <AbsoluteLayout>
            <ScrollView
                AbsoluteLayout.LayoutBounds="0,0,1,1"
                AbsoluteLayout.LayoutFlags="All">
                <StackLayout Spacing="10" Margin="10">
                    <Label Text="Subject" />
                    <Entry Text="{Binding Subject}" />
                    <Label Text="Attendees" />
                    <Entry Text="{Binding Attendees}" Placeholder="Add multiple email addresses separated by a semicolon (';')" />
                    <Grid>
                        <Grid.ColumnDefinitions>
                            <ColumnDefinition Width="auto" />
                            <ColumnDefinition Width="auto" />
                        </Grid.ColumnDefinitions>
                        <Grid.RowDefinitions>
                            <RowDefinition Height="auto" />
                            <RowDefinition Height="auto" />
                            <RowDefinition Height="auto" />
                            <RowDefinition Height="auto" />
                        </Grid.RowDefinitions>
                        <Label Text="Start" />
                        <DatePicker Grid.Row="2" Date="{Binding StartDate, Mode=TwoWay}" />
                        <TimePicker Grid.Row="2" Grid.Column="2" Time="{Binding StartTime}" />
                        <Label Text="End" Grid.Row="3" />
                        <DatePicker Grid.Row="4" Date="{Binding EndDate, Mode=TwoWay}" />
                        <TimePicker Grid.Row="4" Grid.Column="2" Time="{Binding EndTime}" />
                    </Grid>
                    <Label Text="Body" />
                    <Editor HeightRequest="200" Text="{Binding Body}" />
                    <Button Text="Create" Clicked="CreateEvent" IsEnabled="{Binding IsValid}" />
                </StackLayout>
            </ScrollView>
            <StackLayout
                AbsoluteLayout.LayoutBounds="0,0,1,1"
                AbsoluteLayout.LayoutFlags="All"
                IsVisible="{Binding IsWorking}">
                <ActivityIndicator
                    HorizontalOptions="CenterAndExpand"
                    VerticalOptions="CenterAndExpand"
                    IsRunning="{Binding IsWorking}" />
            </StackLayout>
        </AbsoluteLayout>
    </ContentPage.Content>
</ContentPage>
<!-- </NewEventPageXamlSnippet> -->
NewEventPage.xaml.cs を 開き、ファイルの上部に
using次のステートメントを追加します。using System.ComponentModel; using Microsoft.Graph;INotifyPropertyChange インターフェイスを NewEventPage クラスに追加 します。 既存のクラス宣言を次に置き換える。
[XamlCompilation(XamlCompilationOptions.Compile)]
public partial class NewEventPage : ContentPage, INotifyPropertyChanged
{
    public NewEventPage()
    {
        InitializeComponent();
        BindingContext = this;
    }
}
NewEventPage クラスに次の プロパティを追加 します。
// Value of the Subject text box
private string _subject = "";
public string Subject
{
    get { return _subject; }
    set
    {
        _subject = value;
        OnPropertyChanged();
        IsValid = true;
    }
}

// Value of the Attendees text box
private string _attendees = "";
public string Attendees
{
    get { return _attendees; }
    set
    {
        _attendees = value;
        OnPropertyChanged();
    }
}

// Value of the Start date picker
private DateTime _startDate = DateTime.Today;
public DateTime StartDate
{
    get { return _startDate; }
    set
    {
        _startDate = value;
        OnPropertyChanged();
        IsValid = true;
    }
}

// Value of the Start time picker
private TimeSpan _startTime = TimeSpan.Zero;
public TimeSpan StartTime
{
    get { return _startTime; }
    set
    {
        _startTime = value;
        OnPropertyChanged();
        IsValid = true;
    }
}

// Value of the End date picker
private DateTime _endDate = DateTime.Today;
public DateTime EndDate
{
    get { return _endDate; }
    set
    {
        _endDate = value;
        OnPropertyChanged();
        IsValid = true;
    }
}

// Value of the End time picker
private TimeSpan _endTime = TimeSpan.Zero;
public TimeSpan EndTime
{
    get { return _endTime; }
    set
    {
        _endTime = value;
        OnPropertyChanged();
        IsValid = true;
    }
}

// Value of the Body text box
private string _body = "";
public string Body
{
    get { return _body; }
    set
    {
        _body = value;
        OnPropertyChanged();
    }
}

// Combine the date from date picker with time from time picker
private DateTimeOffset CombineDateAndTime(DateTime date, TimeSpan time)
{
    // Use the year, month, and day from the supplied DateTimeOffset
    // to create a new DateTime at midnight
    var dt = new DateTime(date.Year, date.Month, date.Day);

    // Add the TimeSpan, and use the user's timezone offset
    return new DateTimeOffset(dt + time, App.UserTimeZone.BaseUtcOffset);
}

// Combined value of Start date and time pickers
public DateTimeOffset Start
{
    get
    {
        return CombineDateAndTime(StartDate, StartTime);
    }
}

// Combined value of End date and time pickers
public DateTimeOffset End
{
    get
    {
        return CombineDateAndTime(EndDate, EndTime);
    }
}

public bool IsValid
{
    get
    {
        // Subject is required, Start must be before
        // End
        return !string.IsNullOrWhiteSpace(Subject) &&
               DateTimeOffset.Compare(Start, End) < 0;
    }
    private set
    {
        // Only used to fire event, value
        // is always calculated
        OnPropertyChanged();
    }
}

private bool _isWorking = false;
public bool IsWorking
{
    get { return _isWorking; }
    set
    {
        _isWorking = value;
        OnPropertyChanged();
    }
}
イベントを作成するには、次のコードを追加します。
private async void CreateEvent(object sender, EventArgs e)
{
    IsWorking = true;

    var timeZoneString =
        Xamarin.Forms.Device.RuntimePlatform == Xamarin.Forms.Device.UWP ?
            App.UserTimeZone.StandardName : App.UserTimeZone.DisplayName;

    // Initialize a new Event object with the required fields
    var newEvent = new Event
    {
        Subject = Subject,
        Start = new DateTimeTimeZone
        {
            DateTime = Start.ToString("yyyy'-'MM'-'dd'T'HH':'mm':'ss"),
            TimeZone = timeZoneString
        },
        End = new DateTimeTimeZone
        {
            DateTime = End.ToString("yyyy'-'MM'-'dd'T'HH':'mm':'ss"),
            TimeZone = timeZoneString
        }
    };

    // If there's a body, add it
    if (!string.IsNullOrEmpty(Body))
    {
        newEvent.Body = new ItemBody
        {
            Content = Body,
            ContentType = BodyType.Text
        };
    }

    if (!string.IsNullOrEmpty(Attendees))
    {
        var attendeeList = new List<Attendee>();

        // Treat any unrecognized text as a list of email addresses
        var emails = Attendees.Split(new[] { ';', ',', ' ' },
            StringSplitOptions.RemoveEmptyEntries);

        foreach (var email in emails)
        {
            try
            {
                // Validate the email address
                var addr = new System.Net.Mail.MailAddress(email);
                if (addr.Address == email)
                {
                    attendeeList.Add(new Attendee
                    {
                        Type = AttendeeType.Required,
                        EmailAddress = new EmailAddress
                        {
                            Address = email
                        }
                    });
                }
            }
            catch { /* Invalid, skip */ }
        }

        if (attendeeList.Count > 0)
        {
            newEvent.Attendees = attendeeList;
        }
    }

    await App.GraphClient.Me.Events.Request().AddAsync(newEvent);

    await DisplayAlert("Success", "Event created.", "OK");

    IsWorking = false;
}
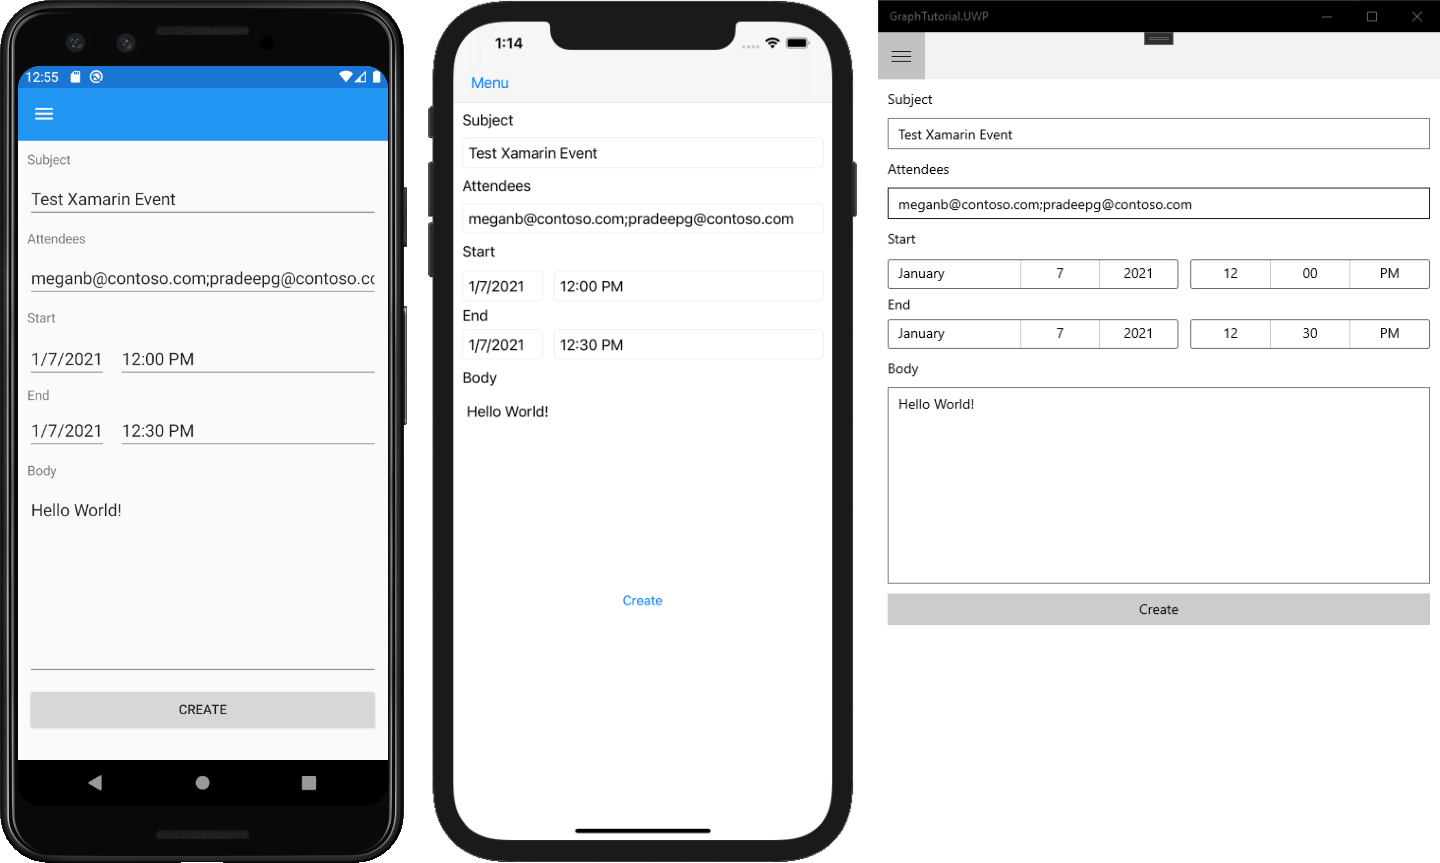
変更内容を保存し、アプリケーションを実行します。 サインインし、[新しいイベント] メニュー項目を選択し、フォームに入力し、[作成] を選択してユーザーの予定表にイベントを追加します。
おめでとうございます。
Xamarin Microsoft Graph完了です。 Microsoft Graphを呼び出す作業アプリが作成されたので、新しい機能を試して追加できます。 Microsoft Graphの概要を参照して、Microsoft Graphでアクセスできるすべてのデータを確認Graph。
フィードバック
このチュートリアルに関するフィードバックは、GitHubしてください。
このセクションに問題がある場合 このセクションを改善できるよう、フィードバックをお送りください。