概要
<ipSecurity> コレクションの <add> 要素は、一意の IP セキュリティ制限を定義します。 各制限は、IP バージョン 4 のアドレス、IP バージョン 4 のアドレスの範囲、または DNS ドメイン名に基づいて行うことができます。
互換性
| バージョン | メモ |
|---|---|
| IIS 10.0 | <add> 要素は IIS 10.0 では変更されませんでした。 |
| IIS 8.5 | <add> 要素は IIS 8.5 では変更されませんでした。 |
| IIS 8.0 | <add> 要素は IIS 8.0 では変更されませんでした。 |
| IIS 7.5 | <ipSecurity> 要素の <add> 要素は、IIS 7.5 の機能として付属しています。 |
| IIS 7.0 | <ipSecurity> 要素の <add> 要素が、IIS 7.0 用の別個のダウンロードとして FTP 7.0 で導入されました。 |
| IIS 6.0 | <system.ftpServer> 要素とその子要素は、LM/MSFTPSVC メタベース パスにある IIS 6.0 の FTP 設定を置き換えます。 |
Note
FTP 7.0 サービスと FTP 7.5 サービスは IIS 7.0 とは別に出荷され、次の URL からモジュールをダウンロードしてインストールする必要がありました。
Windows 7 と Windows Server 2008 R2 では、FTP 7.5 サービスは IIS 7.5 の機能として付属しているため、FTP サービスのダウンロードは必要なくなりました。
段取り
Web サーバーの FTP 公開をサポートするには、FTP サービスをインストールする必要があります。 そのためには、次のステップに従います。
Windows Server 2012 または Windows Server 2012 R2
タスク バーで [サーバー マネージャー]をクリックします。
[サーバー マネージャー] で、[管理] メニューを選択し、[役割と機能の追加] を選択します。
[役割と機能の追加] ウィザードで、[次へ] をクリックします。 インストールの種類を選択し、[次へ] をクリックします。 対象サーバーを選択し、[次へ] をクリックします。
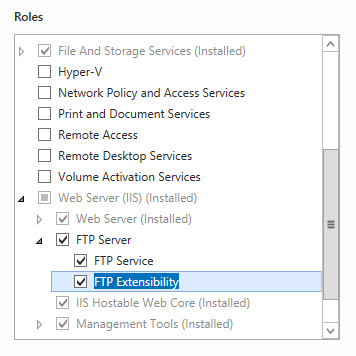
[サーバーの役割] ページで、[Web サーバー (IIS)] を展開して、[FTP サーバー] を選びます。
Note
FTP サービスに対して ASP.NET メンバーシップ認証または IIS マネージャー認証をサポートするには、[FTP Service] に加えて[FTP 拡張] も選択する必要があります。
 .
.[次へ] をクリックし、[機能の選択] ページで再度 [次へ] をクリックします。
[インストール オプションの確認] ページで、[インストール] をクリックします。
[結果] ページで、 [閉じる]をクリックします。
Windows 8 または Windows 8.1
[スタート] 画面で、ポインターを左下隅まで移動し、[スタート] ボタンを右クリックし、[コントロール パネル] をクリックします。
[コントロール パネル]で [プログラムと機能] をクリックし、[Windows の機能の有効化または無効化] をクリックします。
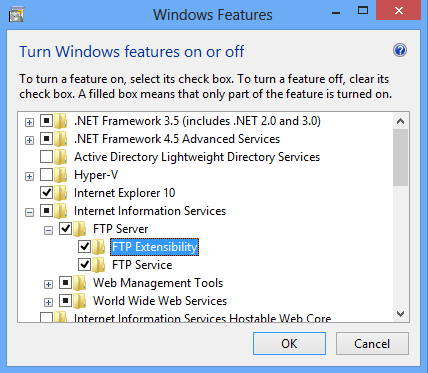
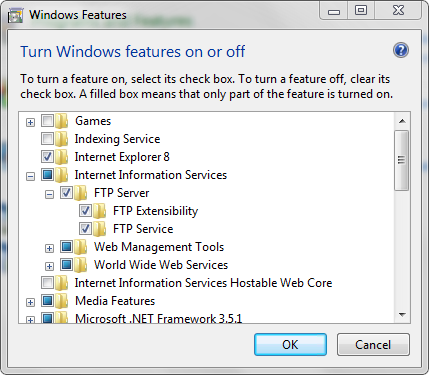
[インターネット インフォメーション サービス] を展開し、[FTP サーバー] を展開します。
Note
FTP サービスに対して ASP.NET メンバーシップ認証または IIS マネージャー認証をサポートするには、[FTP 拡張] も選択する必要があります。
OK をクリックします。
閉じるをクリックします。
Windows Server 2008 R2
タスク バーで [スタート] をクリックし、[管理ツール] をポイントして、[サーバー マネージャ] をクリックします。
[サーバー マネージャ] 階層ウィンドウで [役割] を展開し、[Web サーバー (IIS)] をクリックします。
[Web サーバー (IIS)] ウィンドウで、[役割サービス] セクションまでスクロールし、[役割サービスの追加] をクリックします。
[役割サービスの追加] ウィザードの [役割サービスの選択] ページで [FTP サーバー] を展開します。
[FTP Service] を選択します。
Note
FTP サービスに対して ASP.NET メンバーシップ認証または IIS マネージャー認証をサポートするには、[FTP 拡張] も選択する必要があります。
![[F T P サービス] オプションが強調表示されている [Web Server I I S] ペインのスクリーンショット。](add/_static/image6.png)
次へ をクリックします。
[インストール オプションの確認] ページで、[インストール] をクリックします。
[結果] ページで、 [閉じる]をクリックします。
![[F T P サービス] オプションが強調表示されている [Web Server I I S] ペインのスクリーンショット。](add/_static/image5.png)
Windows 7
タスク バーで、[スタート]、[コントロール パネル] の順にクリックします。
[コントロール パネル]で [プログラムと機能] をクリックし、[Windows の機能の有効化または無効化] をクリックします。
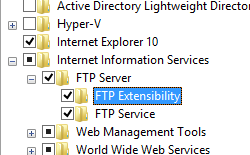
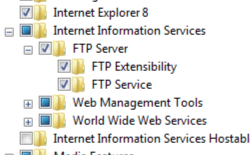
[インターネット インフォメーション サービス]、[FTP サーバー] の順に展開します。
[FTP Service] を選択します。
Note
FTP サービスに対して ASP.NET メンバーシップ認証または IIS マネージャー認証をサポートするには、[FTP 拡張] も選択する必要があります。
OK をクリックします。
Windows Server 2008 または Windows Vista
次の URL からインストール パッケージをダウンロードします。
次のチュートリアルの手順に従って、FTP サービスをインストールします。
操作方法
FTP サイトへのアクセスを許可するために IP 制限を追加する方法
インターネット インフォメーション サービス (IIS) マネージャーを開きます。
Windows Server 2012 または Windows Server 2012 R2 を使用している場合:
- タスク バーで、[サーバー マネージャー] をクリックし、[ツール]、[インターネット インフォメーション サービス (IIS) マネージャー] の順にクリックします。
Windows 8 または Windows 8.1 を使用している場合:
- Windows キーを押しながら文字 X を押し、[コントロール パネル] をクリックします。
- [管理ツール] をクリックし、[インターネット インフォメーション サービス (IIS) マネージャー] をダブルクリックします。
Windows Server 2008 または Windows Server 2008 R2 を使用している場合:
- タスク バーで、[スタート] ボタンをクリックし、[管理ツール]、[インターネット インフォメーション サービス (IIS) マネージャー] の順にクリックします。
Windows Vista または Windows 7 を使用している場合:
- タスク バーで、[スタート]、[コントロール パネル] の順にクリックします。
- [管理ツール] をダブルクリックし、次に [インターネット インフォメーション サービス (IIS) マネージャー] をダブルクリックします。
[接続] ペインでサーバー名を展開し、[サイト] を展開してから、IP 制限を追加する FTP サイトまたは URL を選びます。
[ホーム] ペインで、[FTP IPv4 アドレスとドメインの制限] 機能をダブルクリックします。
![[F T P I P v 4 アドレスとドメインの制限] 機能のスクリーンショット。](add/_static/image10.png)
FTP IPv4 アドレスとドメインの制限機能で、[操作] ペインの [許可エントリの追加] または [拒否エントリの追加] をクリックします。
![[F T P I P v 4 アドレスとドメイン制限] 機能の [操作] ウィンドウのスクリーンショット。](add/_static/image12.png)
許可または拒否する IP アドレスを入力し、[OK] をクリックします。
![[特定の I P v 4 アドレス] フィールドにフォーカスがある [拒否制限規則の追加] 画面のスクリーンショット。](add/_static/image14.png)
![[F T P I P v 4 アドレスとドメインの制限] 機能のスクリーンショット。](add/_static/image9.png)
![[F T P I P v 4 アドレスとドメイン制限] 機能の [操作] ウィンドウのスクリーンショット。](add/_static/image11.png)
![[特定の I P v 4 アドレス] フィールドにフォーカスがある [拒否制限規則の追加] 画面のスクリーンショット。](add/_static/image13.png)
FTP サイトの IP 制限機能の設定を編集する方法
インターネット インフォメーション サービス (IIS) マネージャーを開きます。
Windows Server 2012 または Windows Server 2012 R2 を使用している場合:
- タスク バーで、[サーバー マネージャー] をクリックし、[ツール]、[インターネット インフォメーション サービス (IIS) マネージャー] の順にクリックします。
Windows 8 または Windows 8.1 を使用している場合:
- Windows キーを押しながら文字 X を押し、[コントロール パネル] をクリックします。
- [管理ツール] をクリックし、[インターネット インフォメーション サービス (IIS) マネージャー] をダブルクリックします。
Windows Server 2008 または Windows Server 2008 R2 を使用している場合:
- タスク バーで、[スタート] ボタンをクリックし、[管理ツール]、[インターネット インフォメーション サービス (IIS) マネージャー] の順にクリックします。
Windows Vista または Windows 7 を使用している場合:
- タスク バーで、[スタート]、[コントロール パネル] の順にクリックします。
- [管理ツール] をダブルクリックし、次に [インターネット インフォメーション サービス (IIS) マネージャー] をダブルクリックします。
[接続] ペインでサーバー名を展開し、[サイト] を展開してから、IP 制限を構成する FTP サイトまたは URL を選びます。
[ホーム] ペインで、[FTP IPv4 アドレスとドメインの制限] 機能をダブルクリックします。
![[ホーム] ウィンドウのスクリーンショット。[F T P I P v 4 Address and Domain Restrictions]\(アドレスとドメインの制限\) 機能が強調表示されています。](add/_static/image16.png)
FTP IPv4 アドレスとドメインの制限機能で、[操作] ペインの [機能設定の編集] をクリックします。
![[F T P I P v 4 Address and Domain Restrictions]\(アドレスとドメインの制限\) 機能の [機能設定の編集] セクションの [操作] ウィンドウのスクリーンショット。](add/_static/image18.png)
不特定のクライアントに対する既定のアクセス動作を選び、ドメイン名による制限を有効にするかどうかを指定して、[OK] をクリックします。
![[O K] オプションにフォーカスがある [I P とドメイン制限の設定の編集] 画面のスクリーンショット。](add/_static/image20.png)
![[ホーム] ウィンドウのスクリーンショット。[F T P I P v 4 Address and Domain Restrictions]\(アドレスとドメインの制限\) 機能が強調表示されています。](add/_static/image15.png)
![[F T P I P v 4 Address and Domain Restrictions]\(アドレスとドメインの制限\) 機能の [機能設定の編集] セクションの [操作] ウィンドウのスクリーンショット。](add/_static/image17.png)
![[O K] オプションにフォーカスがある [I P とドメイン制限の設定の編集] 画面のスクリーンショット。](add/_static/image19.png)
構成
<add> 要素はサイトまたは URL レベルで構成されます。
規則は、一覧に表示される順序で上から下に処理されます。 allowunlisted 属性は最後に処理されます。 インターネット プロトコル セキュリティ (IPsec) の制限のベスト プラクティスは、最初に拒否規則の一覧を作成することです。 allowunlisted 属性が false に設定されている場合は、これをクリアすることはできません。
属性
| 属性 | 説明 |
|---|---|
allowed |
省略可能で、 Boolean 型の属性。 アドレス空間へのアクセスを許可するかどうかを指定します。 既定値は false です。 |
domainName |
省略可能な文字列属性。 制限規則を適用するドメイン名を指定します。 アスタリスク (*) をワイルドカードとして使用できます。 |
ipAddress |
省略可能な文字列属性。 制限規則を適用する IP バージョン 4 のアドレスを指定します。 |
subnetMask |
省略可能な文字列属性。 この制限規則の IP アドレスを評価するために使うサブネット マスクを指定します。 サブネット マスクを使って、アドレス空間内の IP アドレスの範囲を特定できます。 既定値では、評価される IP アドレスが直接一致する必要があります (実質的に、単一アドレスの範囲)。 既定値は 255.255.255.255 です。 |
子要素
なし。
構成サンプル
次のサンプルは、FTP サイトの <system.ftpServer> 要素内のいくつかのセキュリティ関連の構成設定を示しています。 具体的には、この例の <location> 設定は、次の方法を示します。
- 管理者グループの読み取りと書き込みアクセス許可に対する FTP 承認規則を指定します。
- *.exe、*.bat、および *.cmd の各ファイルを拒否する FTP 要求フィルター・オプションを指定します。
- 最大コンテンツ長が 100 万バイト、URL の最大長が 1024 バイトの FTP 要求制限を指定します。
- FrontPage Server Extensions で使われる _vti_bin 仮想ディレクトリへの FTP アクセスをブロックします。
- 127.0.0.1 からのアクセスを許可し、169.254.0.0/255.255.0.0 の範囲の IP アドレスからのアクセスを拒否する FTP IP フィルター処理オプションを指定します。
<location path="ftp.example.com">
  <system.ftpServer>
    <security>
      <authorization>
        <add accessType="Allow" roles="administrators" permissions="Read, Write" />
      </authorization>
      <requestFiltering>
        <fileExtensions allowUnlisted="true">
          <add fileExtension=".exe" allowed="false" />
          <add fileExtension=".bat" allowed="false" />
          <add fileExtension=".cmd" allowed="false" />
        </fileExtensions>
        <requestLimits maxAllowedContentLength="1000000" maxUrl="1024" />
        <hiddenSegments>
          <add segment="_vti_bin" />
        </hiddenSegments>
      </requestFiltering>
      <ipSecurity enableReverseDns="false" allowUnlisted="true">
        <add ipAddress="127.0.0.1" allowed="true" />
        <add ipAddress="169.254.0.0" subnetMask="255.255.0.0" allowed="false" />
      </ipSecurity>
    </security>
  </system.ftpServer>
</location>
サンプル コード
次の例では、一覧にない IP アドレスを許可するように FTP IP セキュリティを構成し、127.0.0.1 からのアクセスを許可し、169.254.0.0/255.255.0.0 の範囲の IP アドレスからのアクセスを拒否する IP 制限を指定します。
AppCmd.exe
appcmd.exe set config "Default Web Site" -section:system.ftpServer/security/ipSecurity /allowUnlisted:"True" /commit:apphost

appcmd.exe set config "Default Web Site" -section:system.ftpServer/security/ipSecurity /+"[ipAddress='127.0.0.1',allowed='True']" /commit:apphost

appcmd.exe set config "Default Web Site" -section:system.ftpServer/security/ipSecurity /+"[ipAddress='169.254.0.0',subnetMask='255.255.0.0']" /commit:apphost
Note
AppCmd.exe を使用してこれらの設定を構成するときは、commit パラメーターを必ず apphost に設定する必要があります。 これで、ApplicationHost.config ファイルの適切な場所セクションに構成設定がコミットされます。
C#
using System;
using System.Text;
using Microsoft.Web.Administration;

internal static class Sample
{
   private static void Main()
   {
      using (ServerManager serverManager = new ServerManager())
      {
         Configuration config = serverManager.GetApplicationHostConfiguration();
         ConfigurationSection ipSecuritySection = config.GetSection("system.ftpServer/security/ipSecurity", "Default Web Site");
         ConfigurationElementCollection ipSecurityCollection = ipSecuritySection.GetCollection();

         ipSecuritySection["allowUnlisted"] = true;

         ConfigurationElement addElement = ipSecurityCollection.CreateElement("add");
         addElement["ipAddress"] = @"127.0.0.1";
         addElement["allowed"] = true;
         ipSecurityCollection.Add(addElement);

         ConfigurationElement addElement1 = ipSecurityCollection.CreateElement("add");
         addElement1["ipAddress"] = @"169.254.0.0";
         addElement1["subnetMask"] = @"255.255.0.0";
         ipSecurityCollection.Add(addElement1);

         serverManager.CommitChanges();
      }
   }
}
VB.NET
Imports System
Imports System.Text
Imports Microsoft.Web.Administration


Module Sample
   Sub Main()
      Dim serverManager As ServerManager = New ServerManager
      Dim config As Configuration = serverManager.GetApplicationHostConfiguration
      Dim ipSecuritySection As ConfigurationSection = config.GetSection("system.ftpServer/security/ipSecurity", "Default Web Site")
      Dim ipSecurityCollection As ConfigurationElementCollection = ipSecuritySection.GetCollection

      ipSecuritySection("allowUnlisted") = True

      Dim addElement As ConfigurationElement = ipSecurityCollection.CreateElement("add")
      addElement("ipAddress") = "127.0.0.1"
      addElement("allowed") = True
      ipSecurityCollection.Add(addElement)

      Dim addElement1 As ConfigurationElement = ipSecurityCollection.CreateElement("add")
      addElement1("ipAddress") = "169.254.0.0"
      addElement1("subnetMask") = "255.255.0.0"
      ipSecurityCollection.Add(addElement1)

      serverManager.CommitChanges()
   End Sub
End Module
JavaScript
var adminManager = new ActiveXObject('Microsoft.ApplicationHost.WritableAdminManager');
adminManager.CommitPath = "MACHINE/WEBROOT/APPHOST";
var ipSecuritySection = adminManager.GetAdminSection("system.ftpServer/security/ipSecurity", "MACHINE/WEBROOT/APPHOST/Default Web Site");
var ipSecurityCollection = ipSecuritySection.Collection;

ipSecuritySection.Properties.Item("allowUnlisted").Value = true;

var addElement = ipSecurityCollection.CreateNewElement("add");
addElement.Properties.Item("ipAddress").Value = "127.0.0.1";
addElement.Properties.Item("allowed").Value = true;
ipSecurityCollection.AddElement(addElement);

var addElement1 = ipSecurityCollection.CreateNewElement("add");
addElement1.Properties.Item("ipAddress").Value = "169.254.0.0";
addElement1.Properties.Item("subnetMask").Value = "255.255.0.0";
ipSecurityCollection.AddElement(addElement1);

adminManager.CommitChanges();
VBScript
Set adminManager = createObject("Microsoft.ApplicationHost.WritableAdminManager")
adminManager.CommitPath = "MACHINE/WEBROOT/APPHOST"
Set ipSecuritySection = adminManager.GetAdminSection("system.ftpServer/security/ipSecurity", "MACHINE/WEBROOT/APPHOST/Default Web Site")
Set ipSecurityCollection = ipSecuritySection.Collection

ipSecuritySection.Properties.Item("allowUnlisted").Value = True

Set addElement = ipSecurityCollection.CreateNewElement("add")
addElement.Properties.Item("ipAddress").Value = "127.0.0.1"
addElement.Properties.Item("allowed").Value = True
ipSecurityCollection.AddElement(addElement)

Set addElement1 = ipSecurityCollection.CreateNewElement("add")
addElement1.Properties.Item("ipAddress").Value = "169.254.0.0"
addElement1.Properties.Item("subnetMask").Value = "255.255.0.0"
ipSecurityCollection.AddElement(addElement1)

adminManager.CommitChanges()