辞書の作業ウィンドウ アドインを作成する
この記事では、Word ドキュメント内のユーザーの現在の選択に辞書定義または類義語辞典のシノニムを提供する付随する Web サービスを含む作業ウィンドウ アドインの例を示します。
辞書の Office アドインは、標準的な作業ウィンドウ アドインを基盤として、辞書の XML Web サービスに対するクエリの機能と、取得した定義を Office アプリケーションの UI 上の別の場所に表示する機能が追加されたものです。
一般的な辞書作業ウィンドウ アドインでは、ユーザーが文書内の単語または語句を選択し、アドインの背後にある JavaScript ロジックがこの選択をディクショナリ プロバイダーの XML Web サービスに渡します。 これにより、辞書プロバイダーの Web ページが更新され、選択範囲に対応する定義をユーザーに表示できます。
XML Web サービス コンポーネントは、OfficeDefinitions XML スキーマの例で定義された形式で最大 3 つの定義を返します。これにより、ホスティング Office アプリケーションの UI 内の他の場所のユーザーに表示されます。
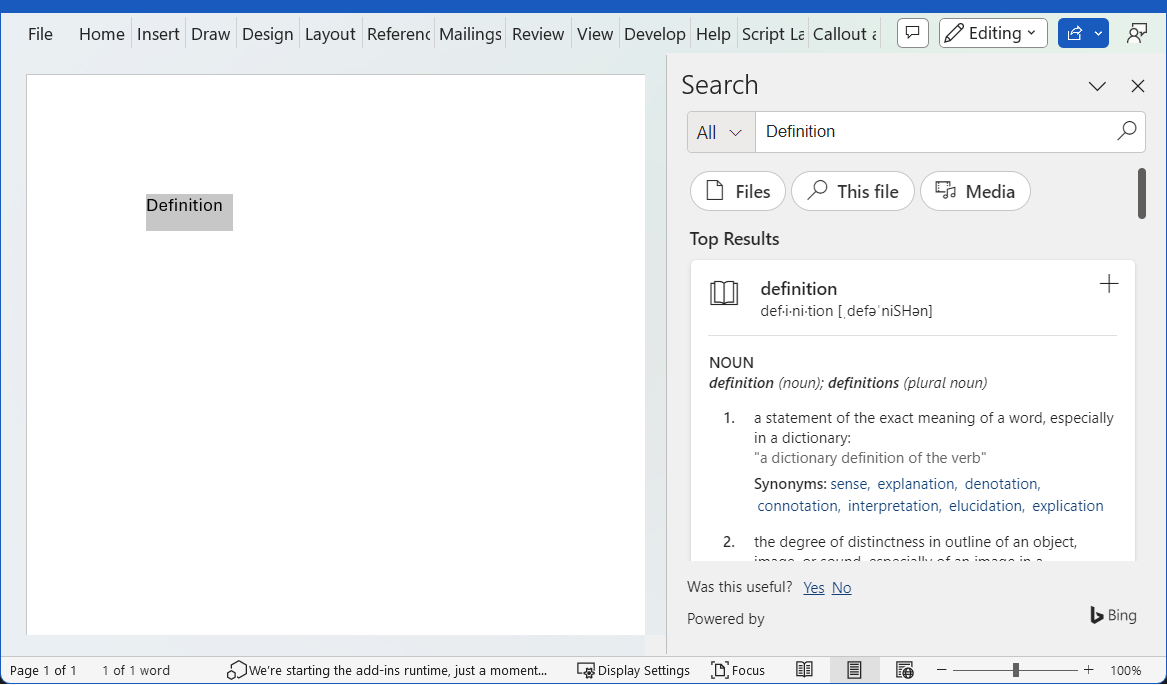
図 1 は、Wordで実行されているBingブランドの辞書アドインの選択と表示のエクスペリエンスを示しています。
図 1. 選択した語句の定義を表示する辞書アドイン
辞書アドインの HTML UI で [ 詳細 ] リンクを選択すると、作業ウィンドウ内に詳細情報が表示されるか、選択した単語または語句の完全な Web ページに別のウィンドウが開くかは、ユーザーが判断できます。
図 2 は、ユーザーがインストールされているディクショナリをすばやく起動できるようにするコンテキスト メニューの [定義] コマンドを示しています。 図 3 から図 5 は、Wordで定義を提供するために辞書 XML サービスが使用される Office UI の場所を示しています。
図 2. コンテキスト メニューの [Define] コマンド
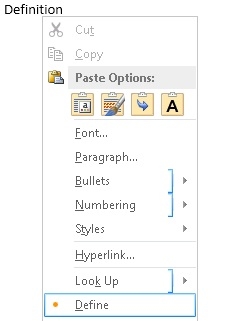
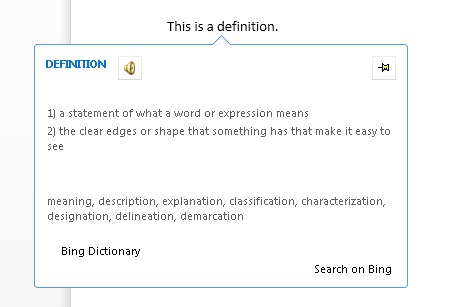
図 3. スペル チェック ウィンドウと文章校正ウィンドウでの定義の表示
![[スペル チェック] ウィンドウと [文章校正] ウィンドウの定義。](../images/dictionary-agave-03.jpg)
図 4. 類義語辞典ウィンドウでの定義の表示
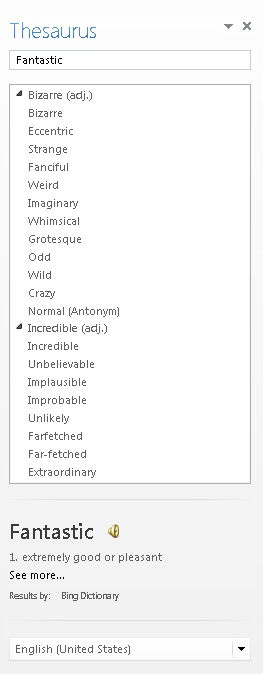
図 5. 閲覧モードでの定義の表示
ディクショナリ参照を提供する作業ウィンドウ アドインを作成するには、2 つのメイン コンポーネントを作成します。
- XML Web サービス。辞書サービスで定義を検索し、辞書アドインが利用および表示できる XML 形式でその定義を返します。
- 作業ウィンドウ アドイン。ユーザーの現在の選択範囲を辞書の Web サービスに送信し、定義を表示します。必要に応じてその値をドキュメントに挿入することもできます。
以下のセクションでは、これらのコンポーネントの作成方法の例を示します。
前提条件
Office/SharePoint 開発ワークロードがインストールされた Visual Studio 2019 以降。
注:
既に Visual Studio がインストールされている場合は、Visual Studio インストーラーを使用して、Office/SharePoint 開発ワークロードがインストールされていることを確認してください。
Microsoft 365 サブスクリプションに接続されている Office (Office for the web を含む)。
次に、Visual Studio でWord アドイン プロジェクトを作成します。
Visual Studio で、[新しいプロジェクトの作成] を選択します。
検索ボックスを使用して、アドインと入力します。 [Word Web アドイン] を選択し、[次へ] を選択します。
プロジェクトに名前を付けて、[作成] を選択します。
ソリューションが Visual Studio によって作成され、2 つのプロジェクトがソリューション エクスプローラーに表示されます。 Home.html ファイルが Visual Studio で開きます。
Word アドイン ソリューションのプロジェクトの詳細については、クイック スタートに関するページを参照してください。
ディクショナリ XML Web サービスを作成する
XML Web サービスでは、クエリを OfficeDefinitions XML スキーマに準拠した XML で Web サービスに返す必要があります。 以下の 2 つのセクションでは、OfficeDefinitions XML スキーマについて説明し、この XML 形式でクエリを返す XML Web サービスのコーディング方法の例を示します。
OfficeDefinitions XML スキーマ
次のコードは、OfficeDefinitions XML スキーマのサンプル XSD の例を示しています。
<?xml version="1.0" encoding="utf-8"?>
<xs:schema
  xmlns:xsi="http://www.w3.org/2001/XMLSchema-instance"
  xmlns:xs="https://www.w3.org/2001/XMLSchema"
  targetNamespace="http://schemas.microsoft.com/contoso/OfficeDefinitions"
  xmlns="http://schemas.microsoft.com/contoso/OfficeDefinitions">
  <xs:element name="Result">
    <xs:complexType>
      <xs:sequence>
        <xs:element name="SeeMoreURL" type="xs:anyURI"/>
        <xs:element name="Definitions" type="DefinitionListType"/>
      </xs:sequence>
    </xs:complexType>
  </xs:element>
  <xs:complexType name="DefinitionListType">
    <xs:sequence>
      <xs:element name="Definition" maxOccurs="3">
        <xs:simpleType>
          <xs:restriction base="xs:normalizedString">
            <xs:maxLength value="400"/>
          </xs:restriction>
        </xs:simpleType>
      </xs:element>
    </xs:sequence>
  </xs:complexType>
</xs:schema>
返される XML は、0 から 3 つの<> Definition 子要素を持つ Definitions> 要素を<含むルート <Result> 要素で構成されます。 各子要素には、最大 400 文字の長さの定義が含まれています。 さらに、ディクショナリ サイトの完全なページへの URL は、SeeMoreURL> 要素に指定する<必要があります。 次の例は、OfficeDefinitions スキーマに準拠する、返される XML の構造を示しています。
<?xml version="1.0" encoding="utf-8"?>
<Result xmlns="http://schemas.microsoft.com/contoso/OfficeDefinitions">
  <SeeMoreURL xmlns="">https://www.bing.com/search?q=example</SeeMoreURL>
  <Definitions xmlns="">
    <Definition>Definition1</Definition>
    <Definition>Definition2</Definition>
    <Definition>Definition3</Definition>
  </Definitions>
 </Result>
辞書の XML Web サービスのサンプル
次の C# コードは、辞書クエリの結果を OfficeDefinitions XML 形式で返す XML Web サービスのコードを記述する方法の例を示しています。
using System;
using System.Collections.Generic;
using System.Linq;
using System.Web;
using System.Web.Services;
using System.Xml;
using System.Text;
using System.IO;
using System.Net;
using System.Web.Script.Services;

/// <summary>
/// Summary description for _Default.
/// </summary>
[WebService(Namespace = "http://tempuri.org/")]
[WebServiceBinding(ConformsTo = WsiProfiles.BasicProfile1_1)]
// To allow this web service to be called from script, using ASP.NET AJAX, include the following line.
[ScriptService]
public class WebService : System.Web.Services.WebService {

    public WebService () {

        // Uncomment the following line if using designed components.
        // InitializeComponent();
    }

    // You can replace this method entirely with your own method that gets definitions
    // from your data source and then formats it into the example OfficeDefinitions XML format.
    // If you need a reference for constructing the returned XML, you can use this example as a basis.
    [WebMethod]
    public XmlDocument Define(string word)
    {

        StringBuilder sb = new StringBuilder();
        XmlWriter writer = XmlWriter.Create(sb);
        {
            writer.WriteStartDocument();

                writer.WriteStartElement("Result", "http://schemas.microsoft.com/contoso/OfficeDefinitions");

                    // See More URL should be changed to the dictionary publisher's page for that word on
                    // their website.
                    writer.WriteElementString("SeeMoreURL", "https://www.bing.com/search?q=" + word);

                    writer.WriteStartElement("Definitions");

                        writer.WriteElementString("Definition", "Definition 1 of " + word);
                        writer.WriteElementString("Definition", "Definition 2 of " + word);
                        writer.WriteElementString("Definition", "Definition 3 of " + word);

                    writer.WriteEndElement(); // End of Definitions element.

                writer.WriteEndElement(); // End of Result element.

            writer.WriteEndDocument();
        }
        writer.Close();

        XmlDocument doc = new XmlDocument();
        doc.LoadXml(sb.ToString());

        return doc;
    }
}
開発を開始するには、次の操作を行います。
Web サービスを作成する
- Visual Studio のアドインの Web アプリケーション プロジェクトに Web サービス (ASMX) を追加し、 DictionaryWebService という名前を付けます。
- 関連付けられている.asmx.cs ファイルの内容全体を、前の C# コード サンプルに置き換えます。
Web サービスのマークアップを更新する
ソリューション エクスプローラーで、DictionaryWebService.asmx ファイルを選択し、コンテキスト メニューを開き、[マークアップの表示] を選択します。
DictionaryWebService.asmx の内容を次のコードに置き換えます。
<%@ WebService Language="C#" CodeBehind="DictionaryWebService.asmx.cs" Class="WebService" %>
web.config を更新する
アドインの Web アプリケーション プロジェクトの Web.config で、system.web> ノードに次を<追加します。
<webServices>
  <protocols>
    <add name="HttpGet" />
    <add name="HttpPost" />
  </protocols>
</webServices>
変更内容を保存します。
ディクショナリ アドインのコンポーネント
辞書アドインは 3 つの主要なコンポーネント ファイルで構成されます。
- アドインについての情報を記述した XML マニフェスト ファイル。
- アドインの UI を記述した HTML ファイル
- ユーザーの選択範囲をドキュメントから取得し、選択範囲をクエリとして Web サービスに送信し、返された結果をアドインの UI に表示するロジックを記述した JavaScript ファイル。
ディクショナリ アドインのマニフェスト ファイルの例
辞書アドインのマニフェスト ファイルの例を次に示します。
<?xml version="1.0" encoding="utf-8"?>
<OfficeApp xmlns="http://schemas.microsoft.com/office/appforoffice/1.0"
           xmlns:xsi="http://www.w3.org/2001/XMLSchema-instance"
           xsi:type="TaskPaneApp">
  <Id>7164e750-dc86-49c0-b548-1bac57abdc7c</Id>
  <Version>15.0</Version>
  <ProviderName>Microsoft Office Demo Dictionary</ProviderName>
  <DefaultLocale>en-us</DefaultLocale>
  <!--DisplayName is the name that will appear in the user's list of applications.-->
  <DisplayName DefaultValue="Microsoft Office Demo Dictionary" />
  <!--Description is a 2-3 sentence description of this dictionary. -->
  <Description DefaultValue="The Microsoft Office Demo Dictionary is an example built to demonstrate how a
    publisher can create a dictionary that integrates with Office. It doesn't return real definitions." />
  <!--IconUrl is the URI for the icon that will appear in the user's list of applications.-->
  <IconUrl DefaultValue="http://contoso/_layouts/images/general/office_logo.jpg" />
  <SupportUrl DefaultValue="[Insert the URL of a page that provides support information for the app]" />
  <!--Hosts specifies the kind of Office application your dictionary add-in will support.
      You shouldn't have to modify this area.-->
  <Hosts>
    <Host Name="Document"/>
  </Hosts>
  <DefaultSettings>
    <!--SourceLocation is the URL for your dictionary.-->
    <SourceLocation DefaultValue="http://contoso/ExampleDictionary/DictionaryHome.html" />
  </DefaultSettings>
  <!--Permissions is the set of permissions a user will have to give your dictionary.
      If you need write access, such as to allow a user to replace the highlighted word with a synonym,
      use ReadWriteDocument. -->
  <Permissions>ReadDocument</Permissions>
  <Dictionary>
    <!--TargetDialects is the set of regional languages your dictionary contains. For example, if your
        dictionary applies to Spanish (Mexico) and Spanish (Peru), but not Spanish (Spain), you can specify
        that here. Do not put more than one language (for example, Spanish and English) here. Publish
        separate languages as separate dictionaries. -->
    <TargetDialects>
      <TargetDialect>EN-AU</TargetDialect>
      <TargetDialect>EN-BZ</TargetDialect>
      <TargetDialect>EN-CA</TargetDialect>
      <TargetDialect>EN-029</TargetDialect>
      <TargetDialect>EN-HK</TargetDialect>
      <TargetDialect>EN-IN</TargetDialect>
      <TargetDialect>EN-ID</TargetDialect>
      <TargetDialect>EN-IE</TargetDialect>
      <TargetDialect>EN-JM</TargetDialect>
      <TargetDialect>EN-MY</TargetDialect>
      <TargetDialect>EN-NZ</TargetDialect>
      <TargetDialect>EN-PH</TargetDialect>
      <TargetDialect>EN-SG</TargetDialect>
      <TargetDialect>EN-ZA</TargetDialect>
      <TargetDialect>EN-TT</TargetDialect>
      <TargetDialect>EN-GB</TargetDialect>
      <TargetDialect>EN-US</TargetDialect>
      <TargetDialect>EN-ZW</TargetDialect>
    </TargetDialects>
    <!--QueryUri is the address of this dictionary's XML web service (which is used to put definitions in
        additional contexts, such as the spelling checker.)-->
    <QueryUri DefaultValue="http://contoso/ExampleDictionary/WebService.asmx/Define?word="/>
    <!--Citation Text, Dictionary Name, and Dictionary Home Page will be combined to form the citation line
        (for example, this would produce "Examples by: Contoso",
        where "Contoso" is a hyperlink to http://www.contoso.com).-->
    <CitationText DefaultValue="Examples by: " />
    <DictionaryName DefaultValue="Contoso" />
    <DictionaryHomePage DefaultValue="http://www.contoso.com" />
  </Dictionary>
</OfficeApp>
辞書アドインのマニフェスト ファイルの作成に固有の Dictionary> 要素とその子要素については、次のセクションで説明します。< マニフェスト ファイルのその他の要素の詳細については、「Office アドイン XML マニフェスト」を参照してください。
Dictionary 要素
辞書アドインの設定を指定します。
親要素
<OfficeApp>
子要素
<TargetDialects>、 <QueryUri>、 <CitationText>、 <Name>、 <DictionaryHomePage>
注釈
ディクショナリ アドインを作成すると、Dictionary> 要素とその子要素が作業ウィンドウ アドインのマニフェストに追加されます。<
TargetDialects 要素
この辞書がサポートする地域言語を指定します。 辞書アドインでは必須です。
親要素
<Dictionary>
子要素
<TargetDialect>
注釈
TargetDialects> 要素とその子要素は<、ディクショナリに含まれる地域言語のセットを指定します。 たとえば、スペイン語 (メキシコ) とスペイン語 (ペルー) の両方、ただしスペイン語 (スペイン) は含まないというような指定を、この要素で行うことができます。 このマニフェストでは、複数の言語 (たとえば、スペイン語と英語) は指定しないでください。 異なる言語は、別の辞書として発行してください。
例
<TargetDialects>
  <TargetDialect>EN-AU</TargetDialect>
  <TargetDialect>EN-BZ</TargetDialect>
  <TargetDialect>EN-CA</TargetDialect>
  <TargetDialect>EN-029</TargetDialect>
  <TargetDialect>EN-HK</TargetDialect>
  <TargetDialect>EN-IN</TargetDialect>
  <TargetDialect>EN-ID</TargetDialect>
  <TargetDialect>EN-IE</TargetDialect>
  <TargetDialect>EN-JM</TargetDialect>
  <TargetDialect>EN-MY</TargetDialect>
  <TargetDialect>EN-NZ</TargetDialect>
  <TargetDialect>EN-PH</TargetDialect>
  <TargetDialect>EN-SG</TargetDialect>
  <TargetDialect>EN-ZA</TargetDialect>
  <TargetDialect>EN-TT</TargetDialect>
  <TargetDialect>EN-GB</TargetDialect>
  <TargetDialect>EN-US</TargetDialect>
  <TargetDialect>EN-ZW</TargetDialect>
</TargetDialects>
TargetDialect 要素
この辞書がサポートする地域言語を指定します。 辞書アドインでは必須です。
親要素
<TargetDialects>
注釈
EN-US など、RFC1766 language タグ形式で地域言語の値を指定します。
例
<TargetDialect>EN-US</TargetDialect>
QueryUri 要素
辞書のクエリ サービスのエンドポイントを指定します。 辞書アドインでは必須です。
親要素
<Dictionary>
注釈
これは、辞書プロバイダーの XML Web サービスの URI です。 この URI の末尾に、適切にエスケープされたクエリが付加されます。
例
<QueryUri DefaultValue="http://msranlc-lingo1/proof.aspx?q="/>
CitationText 要素
引用で使用するテキストを指定します。 辞書アドインでは必須です。
親要素
<Dictionary>
注釈
この要素では、Web サービスから返されたコンテンツの下の行に表示される引用テキストの冒頭部分を指定します (たとえば "Results by: "、"Powered by: " など)。
この要素では、Override> 要素を使用して、追加のロケールの値を<指定できます。 たとえば、スペイン語版の SKU の Office を利用しているユーザーが英語の辞書を使用している場合に、引用行を "Results by: Bing" ではなく "Resultados por: Bing" と表示できます。 追加のロケールの値を指定する方法の詳細については、「 ローカライズ」を参照してください。
例
<CitationText DefaultValue="Results by: " />
DictionaryName 要素
この辞書の名前を指定します。 辞書アドインでは必須です。
親要素
<Dictionary>
注釈
この要素では、引用テキスト内のリンク テキストを指定します。 引用テキストは、Web サービスから返されたコンテンツの下の行に表示されます。
この要素では、別のロケールに対応する値も指定できます。
例
<DictionaryName DefaultValue="Bing Dictionary" />
DictionaryHomePage 要素
辞書のホーム ページの URL を指定します。 辞書アドインでは必須です。
親要素
<Dictionary>
注釈
この要素では、引用テキスト内のリンクの URL を指定します。 引用テキストは、Web サービスから返されたコンテンツの下の行に表示されます。
この要素では、別のロケールに対応する値も指定できます。
例
<DictionaryHomePage DefaultValue="https://www.bing.com" />
ディクショナリ アドインのマニフェスト ファイルを更新する
アドイン プロジェクト内の XML マニフェスト ファイルを開きます。
ProviderName> 要素の値を<自分の名前で更新します。
DisplayName 要素の DefaultValue> 属性の<<値を、"Microsoft Office Demo Dictionary" などの適切な名前に置き換えます。>
Description 要素の DefaultValue 属性の<値を適切な説明に置き換えます。たとえば、「Microsoft Office Demo Dictionary は、発行元が Office と統合するディクショナリを作成する方法を示すために構築された例です。>>< 実際の定義は返されません。
[アクセス許可]> ノードの後に次のコードを<追加し、"contoso" 参照を自分の会社名に置き換えてから、変更を保存します。
<Dictionary>
  <!--TargetDialects is the set of regional languages your dictionary contains. For example, if your
      dictionary applies to Spanish (Mexico) and Spanish (Peru), but not Spanish (Spain), you can
      specify that here. Do not put more than one language (for example, Spanish and English) here.
      Publish separate languages as separate dictionaries. -->
  <TargetDialects>
    <TargetDialect>EN-AU</TargetDialect>
    <TargetDialect>EN-BZ</TargetDialect>
    <TargetDialect>EN-CA</TargetDialect>
    <TargetDialect>EN-029</TargetDialect>
    <TargetDialect>EN-HK</TargetDialect>
    <TargetDialect>EN-IN</TargetDialect>
    <TargetDialect>EN-ID</TargetDialect>
    <TargetDialect>EN-IE</TargetDialect>
    <TargetDialect>EN-JM</TargetDialect>
    <TargetDialect>EN-MY</TargetDialect>
    <TargetDialect>EN-NZ</TargetDialect>
    <TargetDialect>EN-PH</TargetDialect>
    <TargetDialect>EN-SG</TargetDialect>
    <TargetDialect>EN-ZA</TargetDialect>
    <TargetDialect>EN-TT</TargetDialect>
    <TargetDialect>EN-GB</TargetDialect>
    <TargetDialect>EN-US</TargetDialect>
    <TargetDialect>EN-ZW</TargetDialect>
  </TargetDialects>
  <!--QueryUri is the address of this dictionary's XML web service (which is used to put definitions in
      additional contexts, such as the spelling checker.)-->
  <QueryUri DefaultValue="~remoteAppUrl/DictionaryWebService.asmx"/>
  <!--Citation Text, Dictionary Name, and Dictionary Home Page will be combined to form the citation
      line (for example, this would produce "Examples by: Contoso", where "Contoso" is a hyperlink to
      http://www.contoso.com).-->
  <CitationText DefaultValue="Examples by: " />
  <DictionaryName DefaultValue="Contoso" />
  <DictionaryHomePage DefaultValue="http://www.contoso.com" />
</Dictionary>
ディクショナリ アドインの HTML ユーザー インターフェイスを作成する
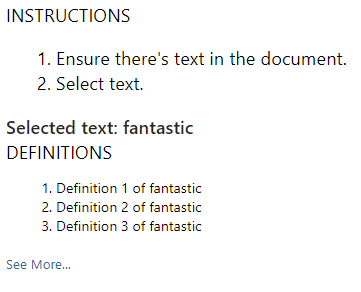
次の 2 つの例は、デモの辞書アドインの UI の HTML ファイルと CSS ファイルを示します。 アドインの作業ウィンドウでの UI の表示については、コードの下の図 6 を参照してください。 JavaScript の実装がこの HTML UI のプログラミング ロジックを提供する方法については、「このセクションの直後 に JavaScript 実装を記述する 」を参照してください。
Visual Studio のアドインの Web アプリケーション プロジェクトでは、 ./Home.html ファイルの内容を次のサンプル HTML に置き換えることができます。
<!DOCTYPE html>
<html>

<head>
    <meta http-equiv="X-UA-Compatible" content="IE=Edge" />

    <!--The title will not be shown but is supplied to ensure valid HTML.-->
    <title>Example Dictionary</title>

    <!--Required library includes.-->
    <script type="text/javascript" src="https://ajax.microsoft.com/ajax/4.0/1/MicrosoftAjax.js"></script>
    <script src="https://appsforoffice.microsoft.com/lib/1/hosted/office.js" type="text/javascript"></script>

    <!--Optional library includes.-->
    <script type="text/javascript" src="https://ajax.aspnetcdn.com/ajax/jQuery/jquery-1.5.1.js"></script>

    <!--App-specific CSS and JS.-->
    <link rel="Stylesheet" type="text/css" href="Home.css" />
    <script type="text/javascript" src="Home.js"></script>
</head>

<body>
    <div id="mainContainer">
        <div>INSTRUCTIONS</div>
        <ol>
            <li>Ensure there's text in the document.</li>
            <li>Select text.</li>
        </ol>
        <div id="header">
            <span id="headword"></span>
        </div>
        <div>DEFINITIONS</div>
        <ol id="definitions">
        </ol>
        <div id="SeeMore">
            <a id="SeeMoreLink" target="_blank">See More...</a>
        </div>
        <div id="message"></div>
    </div>
</body>

</html>
次の例は、.css ファイルの内容を示しています。
Visual Studio のアドインの Web アプリケーション プロジェクトでは、 ./Home.css ファイルの内容を次のサンプル CSS に置き換えることができます。
#mainContainer
{
    font-family: Segoe UI;
    font-size: 11pt;
}

#headword
{
    font-family: Segoe UI Semibold;
    color: #262626;
}

#definitions
{
    font-size: 8.5pt;
}
a
{
    font-size: 8pt;
    color: #336699;
    text-decoration: none;
}
a:visited
{
    color: #993366;
}
a:hover, a:active
{
    text-decoration: underline;
}
図 6. デモの辞書アプリの UI
JavaScript 実装を記述する
次の例は、デモ ディクショナリ アドインのプログラミング ロジックを提供するためにアドインの HTML ページから呼び出される、.js ファイル内の JavaScript 実装を示しています。 このスクリプトでは、前に説明した XML Web サービスを使用します。 Web サービスの例と同じディレクトリに配置すると、スクリプトはそのサービスから定義を取得します。 ファイルの先頭にある変数を変更 xmlServiceURL することで、パブリック OfficeDefinitions 準拠の XML Web サービスで使用できます。
この実装から呼び出される Office JavaScript API (Office.js) のプライマリ メンバーを次の一覧に示します。
- アドイン コンテキストの 初期化 時に
Office発生し、アドインが操作しているドキュメントを表す Document オブジェクト インスタンスへのアクセスを提供する オブジェクトの initialize イベント。 - オブジェクトの
DocumentaddHandlerAsync メソッド。これは関数でinitialize呼び出され、ユーザー選択の変更をリッスンするためにドキュメントの SelectionChanged イベントのイベント ハンドラーを追加します。 - オブジェクトの
DocumentgetSelectedDataAsync メソッド。これは、イベント ハンドラーが発生したときにSelectionChanged関数でtryUpdatingSelectedWord()呼び出され、ユーザーが選択した単語または語句を取得し、プレーン テキストに強制してから非同期コールバック関数をselectedTextCallback実行します。 - メソッドの
selectTextCallbackコールバック引数getSelectedDataAsyncとして渡される非同期コールバック関数が実行されると、コールバックが返されるときに、選択したテキストの値を取得します。 返されたAsyncResultオブジェクトの value プロパティを使用して、コールバックの selectedText 引数 (AsyncResult 型) からその値を取得します。 - 関数内の残りのコードは、
selectedTextCallbackXML Web サービスに対して定義のクエリを実行します。 - .js ファイルの残りのコードには、アドインの HTML UI の定義の一覧が表示されます。
Visual Studio のアドインの Web アプリケーション プロジェクトでは、 ./Home.js ファイルの内容を次のサンプル JavaScript に置き換えることができます。
// The document the dictionary add-in is interacting with.
let _doc;
// The last looked-up word, which is also the currently displayed word.
let lastLookup;

// The base URL for the OfficeDefinitions-conforming XML web service to query for definitions.
const xmlServiceUrl = "DictionaryWebService.asmx/Define";

// Initialize the add-in.
// Office.initialize or Office.onReady is required for all add-ins.
Office.initialize = function (reason) {
    // Checks for the DOM to load using the jQuery ready method.
    $(document).ready(function () {
        // After the DOM is loaded, app-specific code can run.
        // Store a reference to the current document.
        _doc = Office.context.document;
        // Check whether text is already selected.
        tryUpdatingSelectedWord();
        // Add a handler to refresh when the user changes selection.
        _doc.addHandlerAsync("documentSelectionChanged", tryUpdatingSelectedWord);
    });
}

// Executes when event is raised on the user's selection changes, and at initialization time.
// Gets the current selection and passes that to asynchronous callback function.
function tryUpdatingSelectedWord() {
    _doc.getSelectedDataAsync(Office.CoercionType.Text, selectedTextCallback);
}

// Async callback that executes when the add-in gets the user's selection. Determines whether anything should
// be done. If so, it makes requests that will be passed to various functions.
function selectedTextCallback(selectedText) {
    selectedText = $.trim(selectedText.value);
    // Be sure user has selected text. The SelectionChanged event is raised every time the user moves
    // the cursor, even if no selection.
    if (selectedText != "") {
        // Check whether the user selected the same word the pane is currently displaying to
        // avoid unnecessary web calls.
        if (selectedText != lastLookup) {
            // Update the lastLookup variable.
            lastLookup = selectedText;
            // Set the "headword" span to the word you looked up.
            $("#headword").text("Selected text: " + selectedText);
            // AJAX request to get definitions for the selected word; pass that to refreshDefinitions.
            $.ajax(xmlServiceUrl,
                {
                    data: { word: selectedText },
                    dataType: 'xml',
                    success: refreshDefinitions,
                    error: errorHandler
                });
    }
}

// This function is called when the add-in gets back the definitions target word.
// It removes the old definitions and replaces them with the definitions for the current word.
// It also sets the "See More" link.
function refreshDefinitions(data, textStatus, jqXHR) {
    $(".definition").remove();

    // Make a new list item for each returned definition that was returned, set the CSS class,
    // and append it to the definitions div.
    $(data).find("Definition").each(function () {
        $(document.createElement("li"))
            .text($(this).text())
            .addClass("definition")
            .appendTo($("#definitions"));
    });

    // Change the "See More" link to direct to the correct URL.
    $("#SeeMoreLink").attr("href", $(data).find("SeeMoreURL").text());
}

// Basic error handler that writes to a div with id='message'.
function errorHandler(jqXHR, textStatus, errorThrown) {
    document.getElementById('message').innerText
      += ("textStatus:- " + textStatus
          + "\nerrorThrown:- " + errorThrown
          + "\njqXHR:- " + JSON.stringify(jqXHR));
}
試してみる
Visual Studio を使用して、新しく作成したWord アドインをテストするには、F5 キーを押すか、デバッグ>開始デバッグを選択して、リボンに [タスクウィンドウ アドインの表示] ボタンを使用してWordを起動します。 アドインは IIS 上でローカルにホストされます。
Wordで、アドイン作業ウィンドウがまだ開いていない場合は、[ホーム] タブを選択し、[タスクウィンドウの表示] ボタンを選択してアドイン作業ウィンドウを開きます。 (ボリューム ライセンスの永続的なバージョンの Office を使用している場合、Microsoft 365 バージョンまたは製品版の永続的なバージョンではなく、カスタム ボタンはサポートされません。代わりに、作業ウィンドウがすぐに開きます)。
![[タスクウィンドウの表示] ボタンが強調表示されているWord アプリケーション。](../images/word-quickstart-addin-0.png)
Wordで、ドキュメントにテキストを追加し、そのテキストの一部またはすべてを選択します。
Office Add-ins
フィードバック
以下は間もなく提供いたします。2024 年を通じて、コンテンツのフィードバック メカニズムとして GitHub の issue を段階的に廃止し、新しいフィードバック システムに置き換えます。 詳細については、「https://aka.ms/ContentUserFeedback」を参照してください。
フィードバックの送信と表示