第 5 章: Azure での Web API の作成と公開
技術者のアプリのデータは Web API を介して既存のシステムから取得する必要があることを確認した後、Maria と Kiana は必要な情報と形式を、協力しながら正確に決定します。 次に、Kiana は、適切な Web API を公開する Web アプリを作成し、Azure でホストされるように調整します。 このアプリは、ワイヤレス接続があればどこからでも Azure に接続できます。
Web API 操作の定義: フィールド在庫管理
アプリのフィールド在庫管理セクションの参照画面には、ボイラーと空調システムのパーツ リストが表示されます (単にボイラー パーツと呼ばれる)。 詳細画面を使用すると、技術者は選択したパーツに関する詳細情報を表示できます。
既存のインベントリ データベース (InventoryDB) では、パーツに関する情報は BoilerParts という名前の 1 つのテーブルに保持されます。 Kiana は、Web API が次の要求をサポートする必要があると判断しました。
- すべてのボイラー パーツを入手する。
- パーツ ID を指定して、パーツの詳細を取得する。
Web API 操作の定義: フィールド サポート情報
既存のシステムでは、サポート情報データベース (KnowledgeDB) に、ヒント、エンジニア、およびパーツ間でリレーションシップを記録および管理する 3 つのテーブルが含まれています。
- ヒントには、ヒントの詳細が含まれています。 各ヒントは、特定の問題を特定する 1 行の要約 (件名) と、問題の解決方法を説明するより詳細な説明 (本文) で構成されています。 各ヒントは、ヒントを記録したパーツとエンジニアも参照します。
- BoilerParts には、ヒントで参照されているパーツのリストが含まれています。 パーツ自体の詳細は、InventoryDB データベースの BoilerParts テーブルに保存されます。
- エンジニアには、各ヒントを作成した技術者が一覧表示されます。
アプリのサポート情報には現在、プレースホルダー ブラウザー画面のみが含まれています。 Maria は、次の機能を実装したいと考えています。
技術者は、参照画面で検索語句を指定して、一致するすべてのヒントを検索します。 一致するのは、ヒントが参照するパーツの名前、ヒントの件名または本文のテキスト、または特定の機器のエキスパートである技術者の名前です。
一致するすべてのヒントが見つかったら、技術者はヒントを選択して詳細を表示できます。
技術者は、サポート情報に新しいヒントを追加したり、既存のヒントにメモやコメントを追加したりすることもできます。
サポート情報は大きく増加しており、複数のテーブルや列にまたがるクエリには、かなりの計算能力を必要とする複雑なロジックが含まれる場合があります。 Web API の負荷を軽減するために、Kiana は、前述のように Azure Cognitive Search を使用して検索機能を提供することにしました。 アプリをサポートするために、Kiana は Web API で次の操作が必要であると判断しました。
ヒント テーブルから、指定されたサポート情報のヒントの詳細を見つけます。
ヒント テーブルの既存のサポート情報のヒントを更新します。
ヒント テーブルに新しいサポート情報のヒントを追加します。指定されたパーツまたはエンジニアに現在ヒントが記録されていない場合は、BoilerParts およびエンジニア テーブルに行を追加する必要があります。 新しいヒントの追加の背後にあるロジックを実際に実行するルーチンは、Power Apps から呼び出されるロジック アプリとして実装されます。
Web API 操作の定義: フィールド スケジュール
技術者の予定をスケジュールするには、予定の照会、追加、削除だけでなく、顧客に関する情報の記録も必要です。 既存の予定システムは、このデータを SchedulesDB データベースの 3 つのテーブルに記録します。
- 予定: タスクに割り当てられた日付、時刻、問題、メモ、技術者など、各予定の詳細が含まれます。
- 顧客: 名前、住所、連絡先など、各顧客の詳細を保持します。
- エンジニア: 予定に参加している各技術者を一覧表示します。
注意
データベースには、実際には AppointmentsStatus という名前の 4 番目のテーブルが含まれています。 このテーブルには、予定の状態の有効な値の一覧が含まれており、既存の予定システムの他の部分で使用されるルックアップにすぎません。
Kiana は、次の操作がアプリのフィールド スケジュールの部分に役立つと判断しました。
- 指定された技術者のすべての予定を検索する。
- 指定された技術者の当日のすべての予定を検索する。
- 指定された技術者の次に予定されている予定を見つける。
- メモや写真の追加など、予定の詳細を更新する。
- 顧客に関する詳細を検索する。
Web API の構築: フィールド在庫管理
既存のシステムは、Azure SQL Database を使用してデータを格納します。 Kiana は、Entity Framework Core を使用して Web API を構築することを決定しました。このアプローチにより、データを自動的にクエリ、挿入、更新する多くのコードが生成される可能性があるためです。 Microsoft が提供する Web API テンプレートは、API の各操作を説明する Swagger の説明を作成することもできます。 これらの説明は、API 操作のテストに役立ちます。 多くのツールはこの情報を使用して、API を Azure API Management などの他のサービスと統合できます。
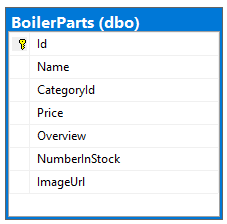
これが最も簡単な部分であるため、Kiana はフィールド在庫機能から始めました。 Web API のフィールド在庫操作は、InventoryDB データベース内の単一のテーブル BoilerParts をクエリします。 このテーブルには、次の画像に示す列が含まれています。
Kiana は、Web API を構築するために「コードファースト」 アプローチを採用し、次のことを実行しました。
InventoryDB データベース内の BoilerParts テーブルの構造を反映した独自の C# モデル クラスを定義。
Web API がデータベースに接続し、クエリを実行するために使用する Entity Framework コンテキスト クラスを作成。
Azure の InventoryDB データベースに接続するようにコンテキスト クラスを構成。
Entity Framework コマンド ライン ツールを使用して、BoilerParts テーブルに対して実行できる各操作の HTTP REST 要求を実装する Web API コントローラー クラスを生成。
Swagger API を使用した Web API のテスト。
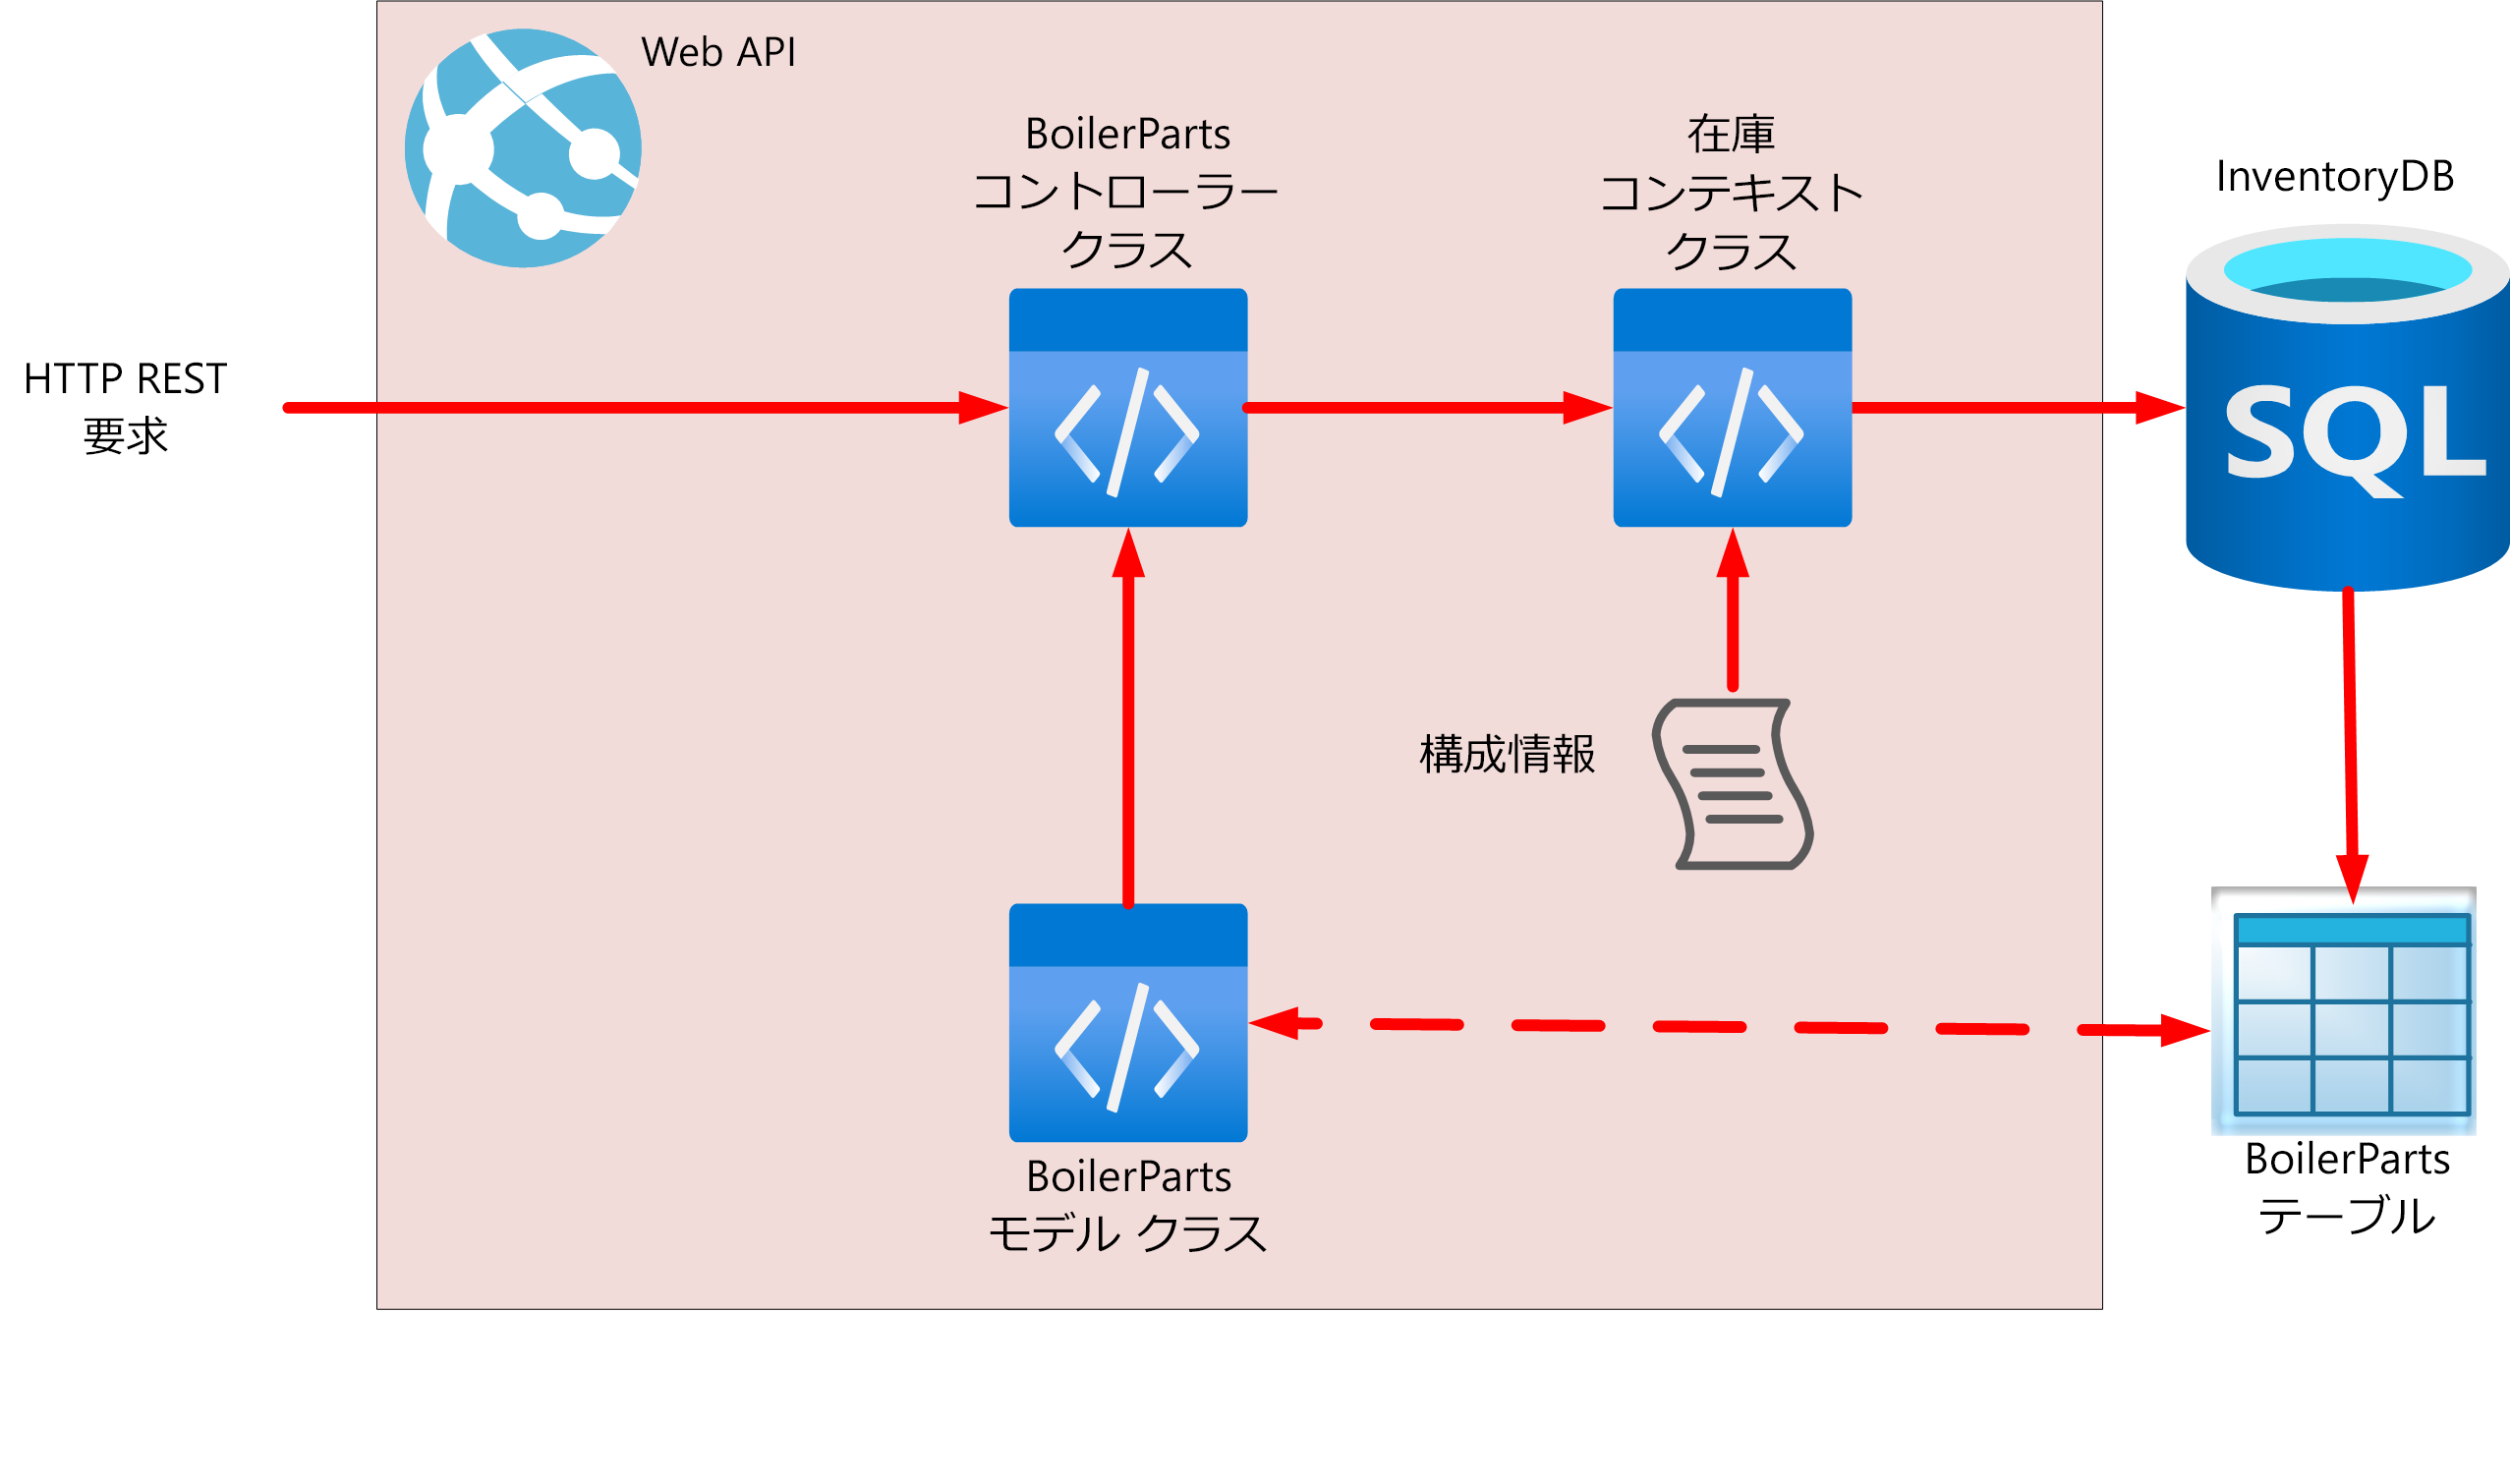
次の画像は、Web API の高レベル構造を示しています。
Kiana は、次の手順を採用して、.NET 6.0 コマンド ライン ツールと Visual Studio Code を使用して Web API を作成しました。
ターミナル ウィンドウを Visual Studio Code で開きます。
次のコマンドを実行して、FieldEngineerApi という名前の新しい Web API プロジェクトを作成します。
dotnet new webapi -o FieldEngineerApiFieldEngineerApi フォルダーを開きます。
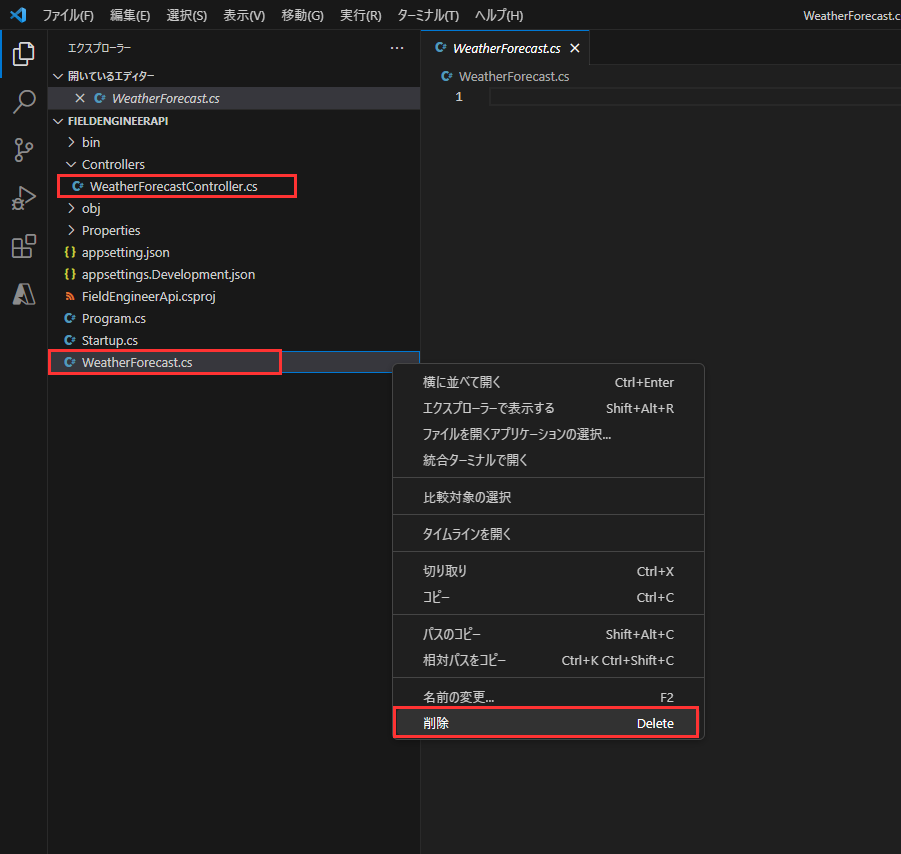
Web API テンプレートによって作成された WeatherForecastController.cs コントローラと WeatherForecast.cs クラス ファイルを削除します。
ターミナル ウィンドウで、次の Entity Framework パッケージとツールを、SQL Server 使用サポートと共にプロジェクトに追加します。
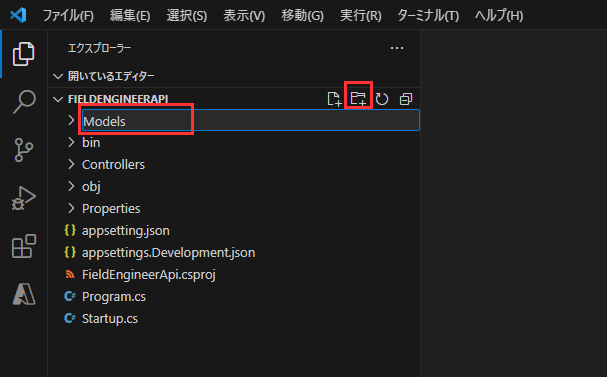
dotnet add package Microsoft.EntityFrameworkCore.SqlServer

dotnet add package Microsoft.VisualStudio.Web.CodeGeneration.Design

dotnet add package Microsoft.EntityFrameworkCore.Design

dotnet add package Microsoft.AspNetCore.Mvc.NewtonsoftJson

dotnet tool install --global dotnet-ef

dotnet tool install --global dotnet-aspnet-codegenerator
FieldEngineerApi フォルダーに、モデルという名前の新しいフォルダーを作成します。
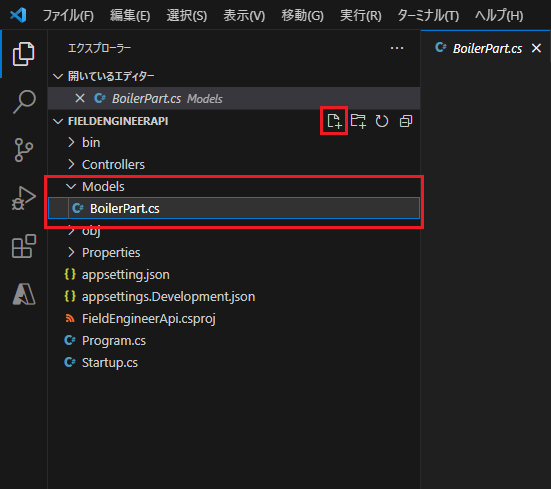
モデル フォルダーに、BoilerPart.cs という名前の C# コード ファイルを作成します。
このファイルに、次のプロパティとフィールドを追加します。 これらのプロパティとフィールドは、InventoryDB データベースの BoilerParts テーブルの構造を反映しています。
using System.Collections.Generic;
using System.ComponentModel.DataAnnotations;
using System.ComponentModel.DataAnnotations.Schema;

namespace FieldEngineerApi.Models
{

    public class BoilerPart
    {
        [Key]
        public long Id { get; set; }

        public string Name { get; set; }

        public string CategoryId { get; set; }

        [Column(TypeName = "money")]
        public decimal Price { get; set; }

        public string Overview { get; set; }

        public int NumberInStock { get; set; }

        public string ImageUrl { get; set; }
    }
}
モデル フォルダーに、InventoryContext.cs という名前の別の C# コード ファイルを作成します。 次のコードをこのクラスに追加します。 このクラスは、コントローラー (次に作成される) とデータベース間の接続を提供します。
using Microsoft.EntityFrameworkCore;

namespace FieldEngineerApi.Models
{
    public class InventoryContext : DbContext
    {
        public InventoryContext(DbContextOptions<InventoryContext> options)
            : base(options)
        {

        }

        public DbSet\<BoilerPart\> BoilerParts { get; set; }
    }
}
プロジェクトの appsettings.Development.json ファイルを編集し、次の InventoryDB 接続文字列を含む ConnectionStrings セクションを追加します。 <server name> を、InventoryDB データベースを保持するために作成した SQL Database サーバーの名前に置き換えます。
{
    "ConnectionStrings": {
        "InventoryDB": "Server=tcp*:<server name>*.database.windows.net,1433;Initial Catalog=InventoryDB;Persist Security Info=False;User ID=sqladmin;Password=Pa55w.rd;MultipleActiveResultSets=False;Encrypt=True;TrustServerCertificate=False;Connection Timeout=30;"
    },
    "Logging": {
        "LogLevel": {
            "Default": "Information",
            "Microsoft": "Warning",
            "Microsoft.Hosting.Lifetime": "Information"
        }
    }
}
重要
このガイドの目的のためだけに、接続文字列にはデータベースのユーザー ID とパスワードが含まれています。 実稼働システムでは、これらのアイテムを構成ファイルにクリア テキストで保存しないでください。
Startup.cs ファイルを作成し、次の using ディレクティブをファイルの先頭にあるリストに追加します。
using FieldEngineerApi.Models;
using Microsoft.EntityFrameworkCore;
Startup クラスで、ConfigureServices メソッドを見つけます。 次のステートメントをこのメソッドに追加します。
public void ConfigureServices(IServiceCollection services) { services.AddDbContext<InventoryContext>(options => options.UseSqlServer(Configuration.GetConnectionString("InventoryDB"))); services.AddControllers(); ... }図に示すように、構成メソッドを変更し、アプリが実稼働モードで実行されている場合でも Swagger UI を有効にします (この変更には、if ステートメントの外部にある 2 つの app.UseSwagger メソッド呼び出しの再配置が含まれます)。
public void Configure(IApplicationBuilder app, IWebHostEnvironment env)
{
    if (env.IsDevelopment())
    {
        app.UseDeveloperExceptionPage();
    }
    app.UseSwagger();
    app.UseSwaggerUI(c => c.SwaggerEndpoint("/swagger/v1/swagger.json", "FieldEngineerApi v1"));

    ...
}
重要
この変更により、Swagger エンドポイントを API Management 統合用に公開できるようになります。 API Management を構成した後、このコードを if ステートメント内に戻し、Web API を再展開します。 実稼働システムで Swagger エンドポイントを開いたままにしないでください。
ターミナル ウィンドウで、BoilerPart モデル クラスと InventoryContext コンテキスト クラスから BoilerParts コントローラーを生成します。
dotnet aspnet-codegenerator controller ^
    -name BoilerPartsController -async -api ^
     -m BoilerPart -dc InventoryContext -outDir Controllers
BoilerParts コントローラーは、コントローラー フォルダーで作成する必要があります。
[!NOTE] 行終端記号文字 ^ は、Windows でのみ認識されます。 Linux システムで Visual Studio Code 実行している場合は、代わりに \ 文字を使用してください。
コントローラー フォルダーにある BoilerParts.cs ファイルを開き、その内容を確認します。 BoilerPartsController クラスは、次の REST メソッドを公開します。
- GetBoilerParts() データベースからすべての BoilerPart オブジェクトの一覧を返します。
- GetBoilerPart(long id) 指定したボイラー パーツの詳細を取得します。
- PutBoilerPart(long id, BoilerPart boilerPart) データベース内のボイラー パーツを、パラメーターとして指定された BoilerPart オブジェクトの詳細で更新します。
- PostBoilerPart(BoilerPart boilerPart) 新しいボイラー パーツを作成します。
- DeleteBoilerPart(long id) 指定されたボイラー パーツをデータベースから削除します。
注意
技術者のアプリは 2 つの GET メソッドのみを必要としますが、他のメソッドはデスクトップ在庫管理アプリに役立ちます (このガイドでは説明していません)。
Web API をコンパイルし、ビルドします。
dotnet build
Web API は、エラーや警告を報告せずにビルドする必要があります。
Web API の Azure への展開: フィールド在庫管理
Kiana は、次のタスクを実行して Web API を展開およびテストしました。
Visual Studio Code の Azure アカウントを使用し、Azure サブスクリプションにサインインします。
Visual Studio Code のターミナル ウィンドウから、Azure サブスクリプションに webapi_rg という名前の新しいリソース グループを作成します。 次のコマンドで、<location> を最も近い Azure リージョンに置き換えます。
az group create ^
    --name webapi_rg ^
    --location <location>
Azure App Service プランを作成して、Web API をホストするためのリソースを提供します。
az appservice plan create ^
    --name webapi_plan ^
    --resource-group webapi_rg ^
    --sku F1
注意
F1 は、App Service プランの無料 SKU です。 スループットと容量が制限されており、開発目的にのみ適しています。
App Service プランを使用して Azure Web アプリを作成します。 <webapp name> を Web アプリの一意の名前に置き換えます。
az webapp create ^
    --name <webapp name> ^
    --resource-group webapi_rg ^
    --plan webapi_plan
Visual Studio Code で、appSettings.json ファイルを編集し、以前に書き込んだものと同じ接続文字列を appSettings.Development.json ファイルに追加します。 <server name> を、InventoryDB データベースを保持するために作成した SQL Database サーバーの名前に置き換えることを忘れないでください。
{
    "ConnectionStrings": {
        "InventoryDB": "Server=tcp:<server name>.database.windows.net,1433;Initial Catalog=InventoryDB;Persist Security Info=False;User ID=sqladmin;Password=Pa55w.rd;MultipleActiveResultSets=False;Encrypt=True;TrustServerCertificate=False;Connection Timeout=30;"**
    },
    "Logging": {
        "LogLevel": {
            "Default\: "Information",
            "Microsoft": "Warning",
            "Microsoft.Hosting.Lifetime": "Information"
        }
    },
    "AllowedHosts": "*"
}
ターミナル ウィンドウで、Azure に展開するための Web API をパッケージ化します。
dotnet publish -c Release -o ./publishこのコマンドは、パッケージ化されたファイルを公開という名前のフォルダーに保存します。
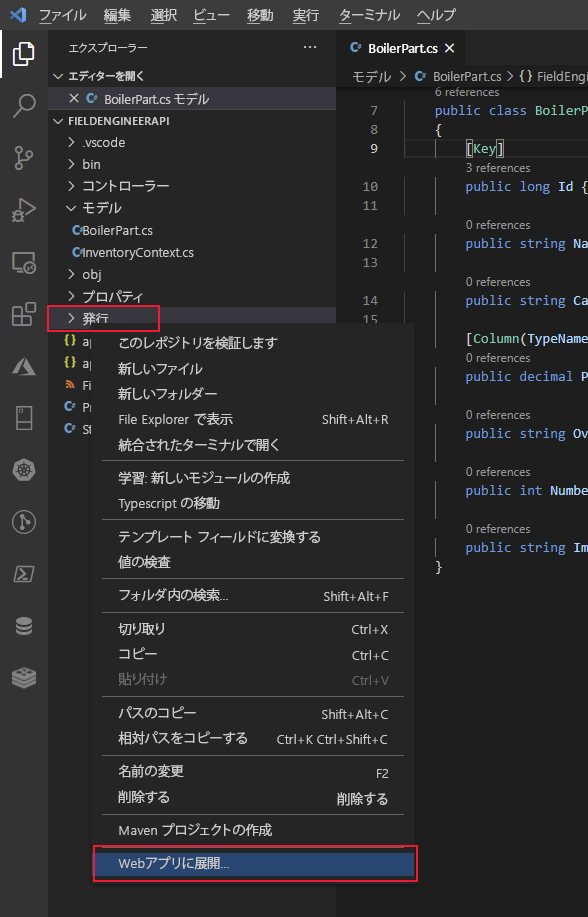
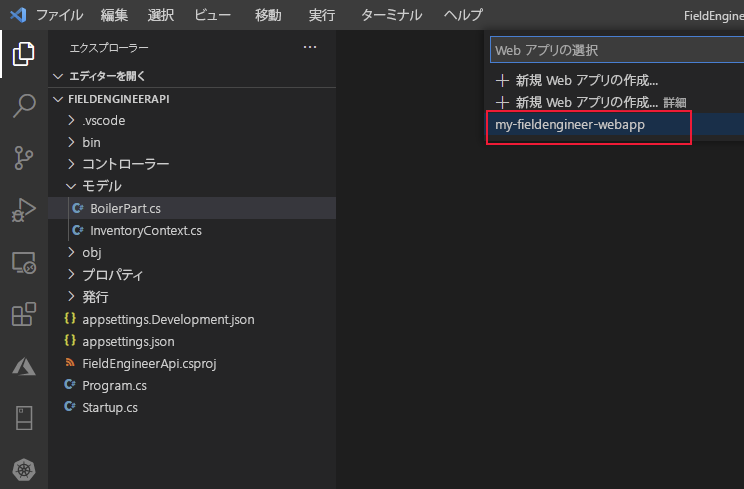
Visual Studio Code で公開フォルダーを右クリックし、Web アプリに展開を選択します。
手順 4 で以前に作成した Web アプリの名前を選択します (<webapp name>)。 次の例では、Web アプリの名前は my-fieldengineer-webapp です。
Visual Studio Code ダイアログのプロンプトが表示されてから展開を選択し、警告を受け入れて Web アプリを展開します。
Web アプリが正常に展開されていることを確認してから、Web サイトを参照します。
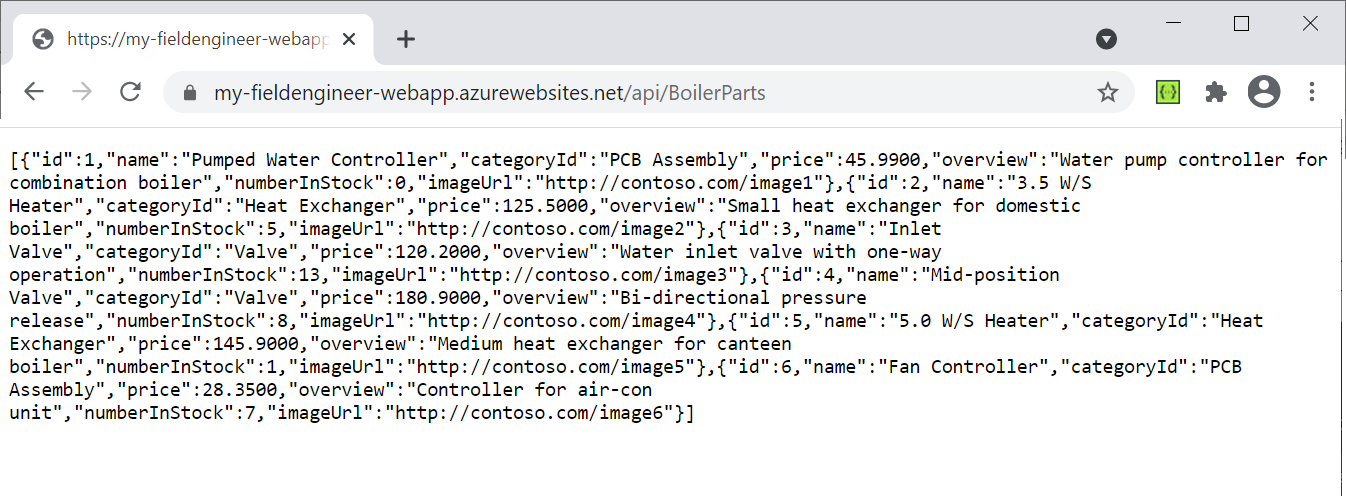
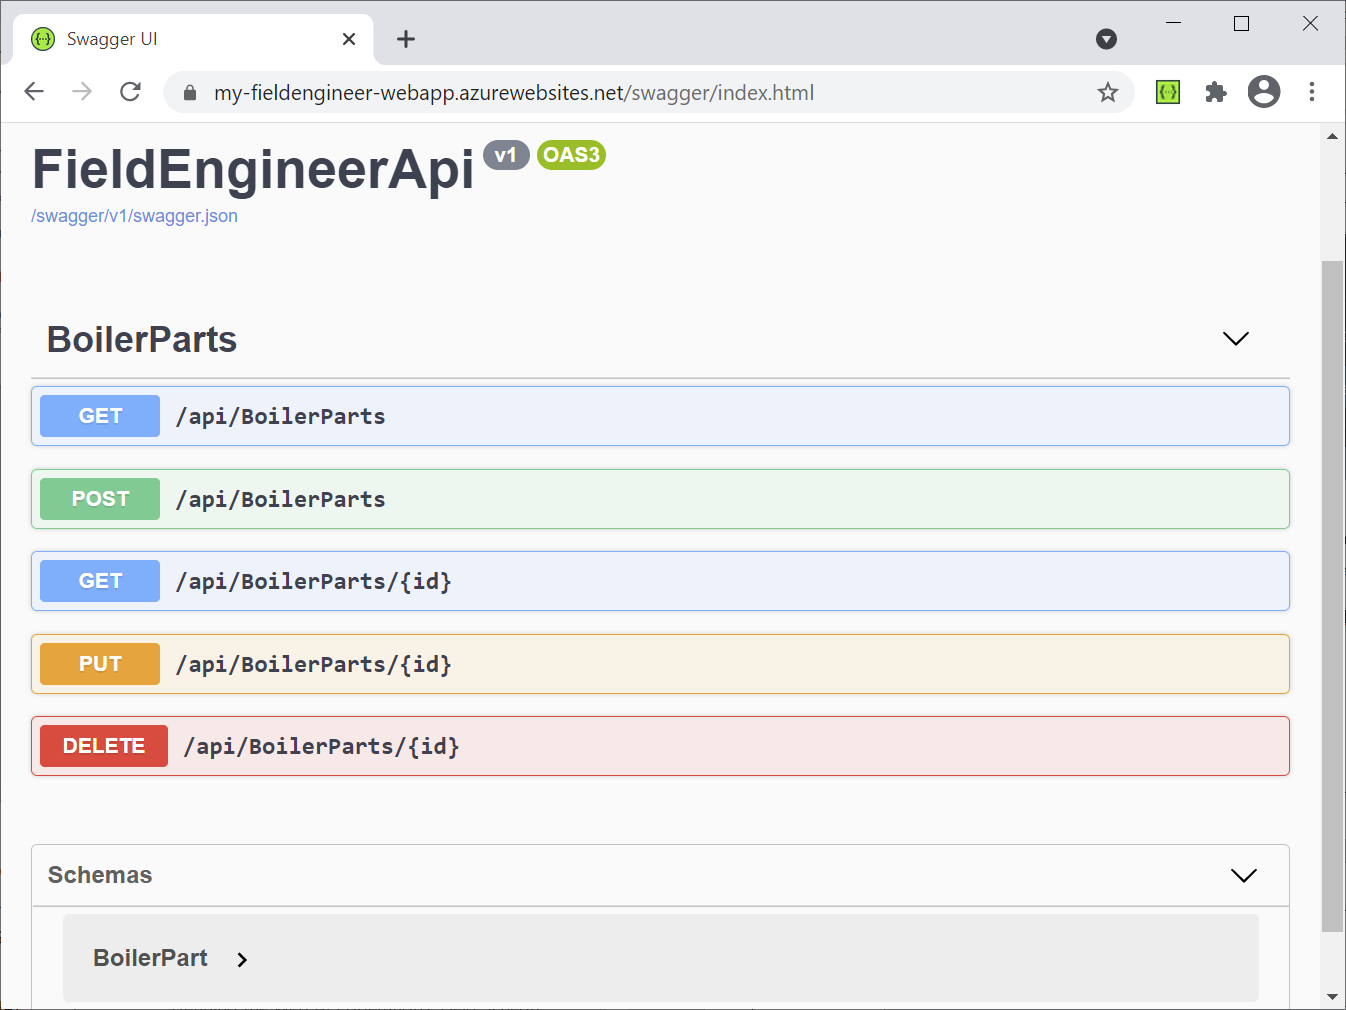
Web サイトは新しいブラウザー ウィンドウで開きますが、HTTP 404 エラー (見つかりません) が表示されます。 これは、Web サイトのルートではなく、API エンドポイントを介して Web API 操作ができるためです。 URL を https://<webapp name>.azurewebsites.net/api/BoilerParts に変更します。 この URI は、BoilerParts コントローラーの GetBoilerParts メソッドを呼び出します。 Web API は、InventoryDB データベースのすべてのボイラー パーツを一覧表示した JSON ドキュメントで応答する必要があります。
ブラウザーの URL を、https://<webapp name>.azurewebsites.net/swagger に変更します。 Swagger API が表示されます。 これは、開発者が Web API の各操作を検証およびテストできるようにするグラフィカル ユーザー インターフェイスです。 また、ドキュメント ツールとしても役に立ちます。
/api/BoilerParts/{id} エンドポイントに隣接する GET を選択し、試してみるを選択します。
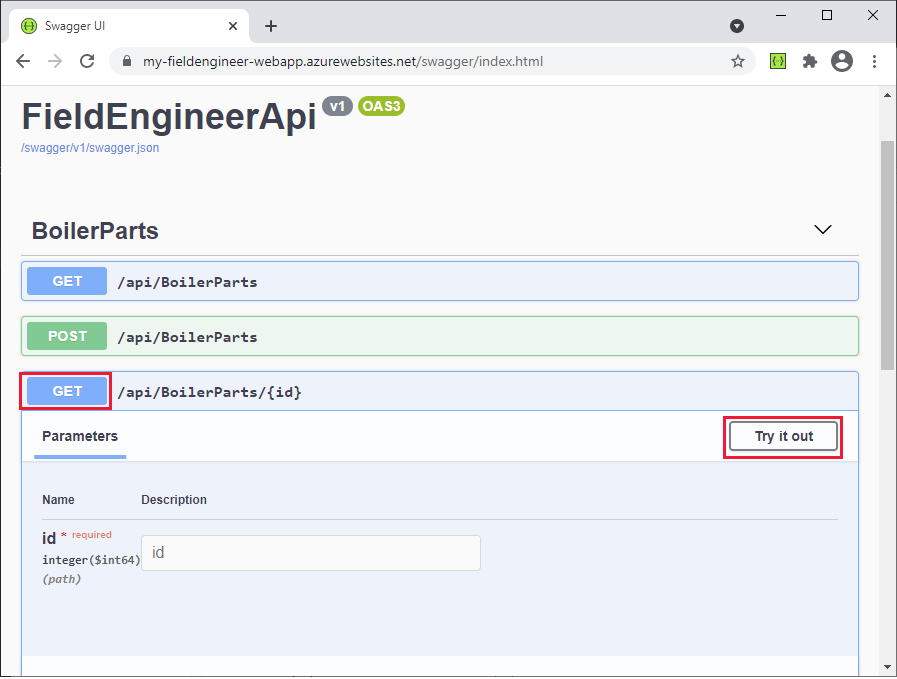
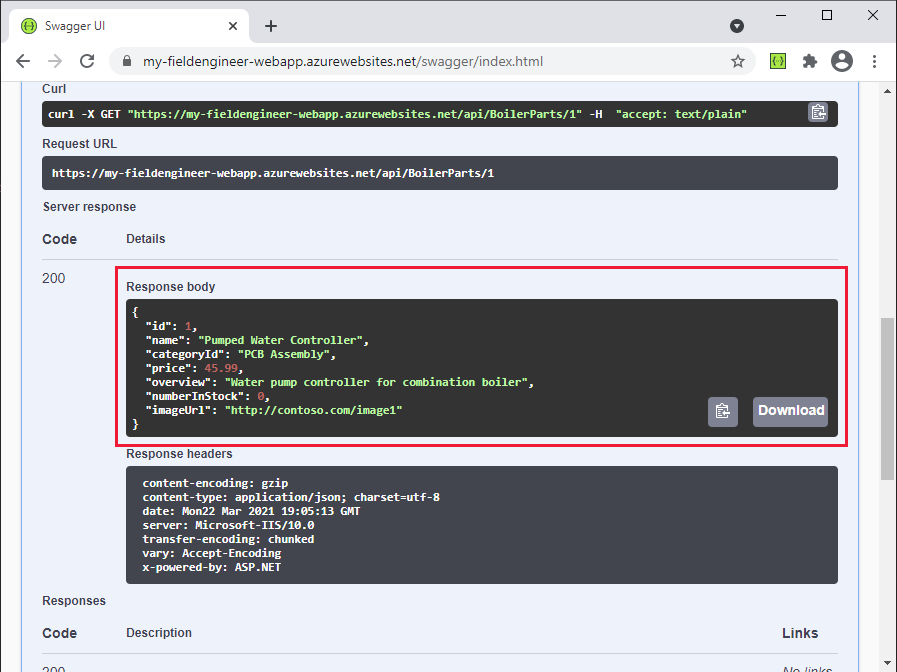
ID フィールドにパーツ ID を入力し、実行を選択します。 このアクションは、BoilerParts コントローラーの GetBoilerPart(long id) メソッドを呼び出します。 パーツの詳細を含む JSON ドキュメントを返すか、データベースに一致するパーツが見つからない場合は HTTP 404 エラーを返します。
Web ブラウザーを閉じて、Visual Studio Code に戻ります。
Web API の構築と展開: フィールド サポート情報
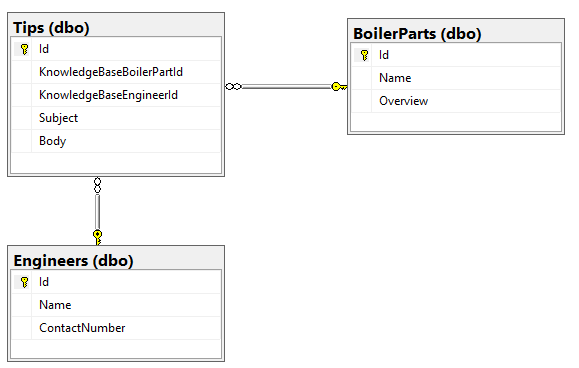
Web API のフィールド サポート情報操作は、KnowledgeDB データベースの 3 つのテーブル (ヒント、BoilerParts、およびエンジニア) で機能します。 次の画像は、これらのテーブルとそれに含まれる列の間のリレーションシップを示しています。
Kiana は、フィールド在庫管理データベースに対して採用した同様のアプローチを、フィールド サポート情報データベースに採用し、次のタスクを実行しました。
KnowledgeDB データベースのヒント、BoilerParts、およびエンジニア テーブルの構造を反映する C# モデル クラスを作成します。 これらの各クラスのコードを以下に示します。
注意
KnowledgeDB データベースの BoilerParts テーブルは、InventoryDB データベースの BoilerParts テーブルとは異なります。 名前の競合を避けるために、KnowledgeDB データベースのテーブルのモデル クラスには接頭辞 KnowledgeBase が付いています。
// KnowledgeBaseTips.cs

using System.ComponentModel.DataAnnotations;

namespace FieldEngineerApi.Models
{
    public class KnowledgeBaseTip
    {
        [Key]
        public long Id { get; set; }

        public long KnowledgeBaseBoilerPartId { get; set; }

        public virtual KnowledgeBaseBoilerPart KnowledgeBaseBoilerPart { get; set; }

        public string KnowledgeBaseEngineerId { get; set; }

        public virtual KnowledgeBaseEngineer KnowledgeBaseEngineer { get; set; }

        public string Subject { get; set; }

        public string Body { get; set; }
    }
}
注意
エンジニア ID は文字列であり、数値ではありません。 これは、既存のシステムが GUID を使用して技術者や他のユーザーを識別するためです。
// KnowledgeBaseBoilerPart.cs

using System.Collections.Generic;
using System.ComponentModel.DataAnnotations;

namespace FieldEngineerApi.Models
{
    public class KnowledgeBaseBoilerPart
    {
        [Key]
        public long Id { get; set; }

        public string Name { get; set; }

        public string Overview { get; set; }

        public virtual ICollection<KnowledgeBaseTip> KnowledgeBaseTips { get; set; }
    }
}
// KnowledgeBaseEngineer.cs using System.Collections.Generic; using System.ComponentModel.DataAnnotations; namespace FieldEngineerApi.Models { public class KnowledgeBaseEngineer { [Key] public string Id { get; set; } [Required] public string Name { get; set; } public string ContactNumber { get; set; } public virtual ICollection<KnowledgeBaseTip> KnowledgeBaseTips { get; set; } } }Web API が KnowledgeDB データベースに接続するために使用する別の Entity Framework コンテキスト クラスを作成します。
// KnowledgeBaseContext.cs

using Microsoft.EntityFrameworkCore;

namespace FieldEngineerApi.Models
{
    public class KnowledgeBaseContext : DbContext
    {
        public KnowledgeBaseContext(DbContextOptions<KnowledgeBaseContext> options)
            : base(options)
        {

        }

        public DbSet<KnowledgeBaseBoilerPart> BoilerParts { get; set; }

        public DbSet<KnowledgeBaseEngineer> Engineers { get; set; }

        public DbSet<KnowledgeBaseTip> Tips { get; set; }
    }
}
プロジェクトの appsettings.Development.json ファイルを編集し、次の KnowledgDB 接続文字列を ConnectionStrings セクションに追加します。 <server name> を、KnowledgeDB データベースを保持するために作成した SQL Database サーバーの名前に置き換えます。
{
    "ConnectionStrings": {
        "InventoryDB": "Server=tcp:...",
        "KnowledgeDB": "Server=tcp:<server name>.database.windows.net,1433;Initial Catalog=KnowledgeDB;Persist Security Info=False;User ID=sqladmin;Password=Pa55w.rd;MultipleActiveResultSets=False;Encrypt=True;TrustServerCertificate=False;Connection Timeout=30;"
    },
    "Logging": {
        ...
        }
    }
}
重要
このガイドの目的のためだけに、接続文字列にはデータベースのユーザー ID とパスワードが含まれています。 実稼働システムでは、これらのアイテムを構成ファイルにクリア テキストで保存しないでください。
Startup.cs ファイルを編集し、ConfigureServices メソッドに、次のステートメントを追加します。
public void ConfigureServices(IServiceCollection services)
{
    services.AddDbContext<InventoryContext>...;

    services.AddDbContext<KnowledgeBaseContext>(options =>
        options.UseSqlServer(Configuration.GetConnectionString("KnowledgeD")));

    services.AddControllers().AddNewtonsoftJson(
        options => options.SerializerSettings.ReferenceLoopHandling = Newtonsoft.Json.ReferenceLoopHandling.Ignore**
    );

    services.AddControllers();
    ...
}
2 番目のステートメントは、データを取得するときにシリアル化する方法を制御します。 一部のモデル クラスには他のモデル クラスへの参照があり、他のモデル クラスはさらにモデル クラスを参照できます。 これらの参照の一部は、再帰的なループを引き起こす可能性があります (エンティティ A はエンティティ B を参照し、エンティティ B はエンティティ A を参照する、ということを繰り返すなど)。 ReferenceLoopHandling オプションを使用すると、シリアル化するツールはデータ内のそのようなループを無視し、エンティティとそれがすぐに参照するオブジェクトのみを返しますが、その他は返しません。
ターミナル ウィンドウで次のコマンドを実行して、KnowledgeBaseBoilerTip、KnowledgeBaseBoilerPart、および KnowledgeBaseEngineer モデル クラス、KnowledgeBaseContext コンテキスト クラスからコントローラーを生成します。
dotnet aspnet-codegenerator controller ^
    -name KnowledgeBaseTipController -async -api ^
    -m KnowledgeBaseTip ^
    -dc KnowledgeBaseContext -outDir Controllers

dotnet aspnet-codegenerator controller ^
    -name KnowledgeBaseBoilerPartController -async -api ^
    -m KnowledgeBaseBoilerPart ^
    -dc KnowledgeBaseContext -outDir Controllers

dotnet aspnet-codegenerator controller ^
    -name KnowledgeBaseEngineerController -async -api ^
    -m KnowledgeBaseEngineer ^
    -dc KnowledgeBaseContext -outDir Controllers
3 つのコントローラーはすべて、コントローラー フォルダーに作成する必要があります。
KnowledgeBaseBoilerPartController.cs ファイルを編集します。 このファイルには、KnowledgeBaseBoilerPart コントローラーのコードが含まれています。 以前に作成した BoilerPartsController クラスと同じパターンに従い、クライアントがエンティティを一覧表示、クエリ、挿入、更新、および削除できるようにする REST メソッドを公開する必要があります。 次の GetTipsForPart メソッドをコントローラーに追加します。
[Route("api/[controller]")]
[ApiController]

public class KnowledgeBaseBoilerPartController : ControllerBase
{
    private readonly KnowledgeBaseContext _context;

    public KnowledgeBaseBoilerPartController(KnowledgeBaseContext context)
    {
        _context = context;
    }

    // GET: api/KnowledgeBaseBoilerPart/5/Tips
    [HttpGet("{id}/Tips")]
    public async Task<ActionResult<IEnumerable<KnowledgeBaseTip>>>GetTipsForPart(long id)
    {
        return await _context.Tips.Where(
            t => t.KnowledgeBaseBoilerPartId == id).ToListAsync();
    }
    ...
}
このメソッドは、指定されたパーツを参照するすべてのサポート情報のヒントを返します。 この情報を見つけるために、KnowledgeBaseContext オブジェクトを介してデータベース内のヒント テーブルにクエリを実行します。
KnowledgeBaseEngineerController.cs ファイルを作成し、次のメソッドを KnowledgeBaseEngineerController クラスに追加します。
[Route("api/[controller]")]
[ApiController]
public class KnowledgeBaseEngineerController : ControllerBase
{
    private readonly KnowledgeBaseContext _context;

    public KnowledgeBaseEngineerController(KnowledgeBaseContext context)
    {
        _context = context;
    }

    // GET: api/KnowledgeBaseEngineer/5/Tips
    [HttpGet("{id}/Tips")]
    public async Task\<ActionResult<IEnumerable<KnowledgeBaseTip>>> GetTipsForEngineer(string id)
    {
        return await _context.Tips.Where(t =>
            t.KnowledgeBaseEngineerId == id).ToListAsync();
    }

    ...
}
GetTipsForEngineer メソッドは、指定されたエンジニアによって投稿されたすべてのサポート情報のヒントを検索します。
ターミナル ウィンドウで、Web API をコンパイルしてビルドします。
dotnet buildWeb API は、エラーや警告を報告せずにビルドする必要があります。
appSettings.json ファイルを編集し、KnowledgeDB データベースの接続文字列を追加します。 この文字列は、以前に appSettings.Development.json ファイルに書き込んだものと同じである必要があります。
{
    "ConnectionStrings": {
        "InventoryDB": ...,
        "KnowledgeDB": "Server=tcp:<server name>.database.windows.net,1433;Initial Catalog=KnowledgeDB;Persist Security Info=False;User ID=sqladmin;Password=Pa55w.rd;MultipleActiveResultSets=False;Encrypt=True;TrustServerCertificate=False;Connection Timeout=30;"
    },
    "Logging": {
        ...
    },
    "AllowedHosts": "*"
}
ターミナル ウィンドウで、Azure に展開するための Web API をパッケージ化します。
dotnet publish -c Release -o ./publishVisual Studio Code で公開フォルダーを右クリックし、Web アプリに展開を選択します。 以前に作成したものと同じ Azure Web アプリに展開します。 ウィザードが既存の Web アプリを新しいコードで上書きできるようにします。
展開が完了したら、Web サイトを参照しますが、ブラウザーの URL を https://<webapp name>.azurewebsites.net/swagger に変更します。 KnowledgeBaseBoilerPart、KnowledgeBaseEngineer、および KnowldgeBaseTip コントローラーの操作は、既存の BoilerParts 操作に加えて一覧表示する必要があります。 KnowledgeBaseBoilerPart 操作に URI /api/KnowledgeBaseBoilerPart/{id}/Tips の GET 操作が含まれ、KnowledgeBaseEngineer 操作に URI /api/KnowledgeBaseEngineer/{id}/Tips の GET 操作が含まれていることを確認します。

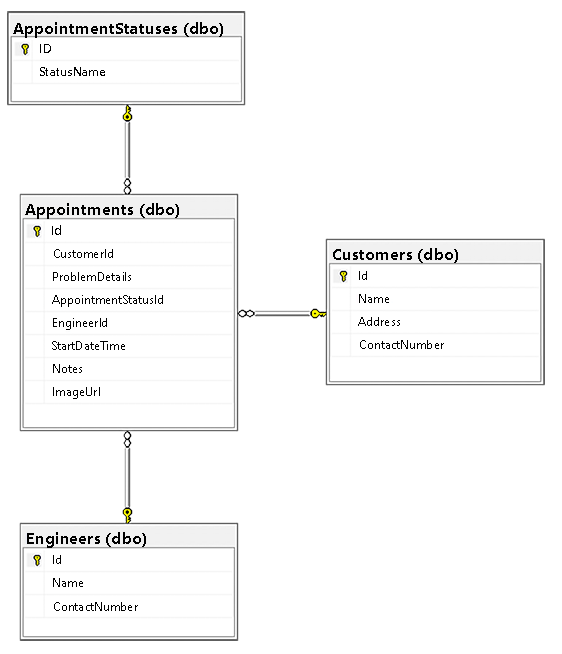
Web API の構築と展開: フィールド スケジュール
フィールド スケジュール操作では、次の図のようにテーブル予定、AppointmentStatuses (これは、有効な予定の状態値を一覧表示するシンプルなルックアップ テーブルです)、顧客、およびエンジニアを使用します。 これらのテーブルは、SchedulesDB データベースに保存されます。
システムのフィールド スケジュール部分の Web API 操作を作成するために、Kiana は次のタスクを実行しました。
SchedulesDB データベースの AppointmentStatus、予定、顧客、およびエンジニア テーブルの構造を反映する C# モデルクラスを作成します。 次のコードは、これらの各クラスを示しています。
注意
エンジニア テーブルのモデル クラスは ScheduleEngineer という名前で、InventoryDB データベースの エンジニア テーブルのモデルと区別されます。
// AppointmentStatus.cs

using Newtonsoft.Json;
using System.Collections.Generic;
using System.ComponentModel.DataAnnotations;

namespace FieldEngineerApi.Models
{
    public class AppointmentStatus {
        [Key]
        public long Id { get; set; }

        public string StatusName { get; set; }
        [JsonIgnore]
        public virtual ICollection<Appointment> Appointments { get; set; }
    }
}
// Appointment.cs using System; using System.ComponentModel.DataAnnotations; namespace FieldEngineerApi.Models { public class Appointment { [Key] public long Id { get; set; } [Required] public long CustomerId { get; set; } public virtual Customer Customer { get; set; } public string ProblemDetails { get; set; } [Required] public long AppointmentStatusId { get; set; } public virtual AppointmentStatus AppointmentStatus { get; set; } public string EngineerId { get; set; } public virtual ScheduleEngineer Engineer { get ; set; } [Display(Name = "StartTime")] [DataType(DataType.DateTime)] [DisplayFormat(DataFormatString = "{0:MM/dd/yyyy H:mm:ss}")] public DateTime StartDateTime { get; set; } public string Notes { get; set; } public string ImageUrl { get; set; } } }// Customer.cs using System.Collections.Generic; using System.ComponentModel.DataAnnotations; namespace FieldEngineerApi.Models { public class Customer { [Key] public long Id { get; set; } [Required] public string Name { get; set; } public string Address { get; set; } public string ContactNumber { get; set; } public virtual ICollection<Appointment> Appointments { get; set; } } }// ScheduleEngineer.cs using Newtonsoft.Json; using System.ComponentModel.DataAnnotations; using System.Collections.Generic; namespace FieldEngineerApi.Models { public class ScheduleEngineer { [Key] public string Id { get; set; } [Required] public string Name { get; set; } public string ContactNumber { get; set; } [JsonIgnore] public virtual ICollection<Appointment> Appointments { get; set; } } }Web API が SchedulesDB データベースに接続するために使用する Entity Framework コンテキスト クラスを作成します。
// ScheduleContext.cs

using System;
using Microsoft.EntityFrameworkCore;

namespace FieldEngineerApi.Models
{
    public class ScheduleContext : DbContext
    {
        public ScheduleContext(DbContextOptions<ScheduleContext> options)
            : base(options)
        {

        }

        public DbSet<Appointment> Appointments { get; set; }

        public DbSet<AppointmentStatus> AppointmentStatuses { get; set; }

        public DbSet<Customer> Customers { get; set; }

        public DbSet<ScheduleEngineer> Engineers { get; set; }
    }
}
プロジェクトの appsettings.Development.json ファイルを編集し、次の SchedulesDB 接続文字列を ConnectionStrings セクションに追加します。 <server name> を、KnowledgeDB データベースを保持するために作成した SQL Database サーバーの名前に置き換えます。
{
    "ConnectionStrings": {
        "InventoryDB": "Server=tcp*: ...",
        "KnowledgeDB": "Server=tcp; ... ",
        "SchedulesDB": "Server=tcp:<server name>.database.windows.net,1433;Initial Catalog=SchedulesDB;Persist Security Info=False;User ID=sqladmin;Password=Pa55w.rd;MultipleActiveResultSets=False;Encrypt=True;TrustServerCertificate=False;Connection Timeout=30;"
    },
    "Logging": {
        ...
        }
    }
}
Startup.cs ファイルを編集し、ConfigureServices メソッドに、次のステートメントを追加します。
public void ConfigureServices(IServiceCollection services)
{
    services.AddDbContext<InventoryContext>...;

    services.AddDbContex\<KnowledgeBaseContext>...;

    services.AddDbContext<ScheduleContext>(options =>
        options.UseSqlServer(Configuration.GetConnectionString("SchedulesDB")));

    services.AddControllers().AddNewtonsoftJson(...);

    ...
}
ターミナル ウィンドウで次のコマンドを実行して、予定、顧客、および ScheduleEngineer モデル クラス、ScheduleContext コンテキスト クラスからコントローラーを生成します。
注意
AppointmentStatus モデル専用のコントローラーを作成しないでください。
dotnet aspnet-codegenerator controller ^
    -name AppointmentsController -async -api ^
    -m Appointment ^
    -dc ScheduleContext -outDir Controllers

dotnet aspnet-codegenerator controller ^
    -name CustomerController -async -api ^
    -m Customer ^
    -dc ScheduleContext -outDir Controllers

dotnet aspnet-codegenerator controller ^
    -name ScheduleEngineerController -async -api ^
    -m ScheduleEngineer ^
    -dc ScheduleContext -outDir Controllers
AppointmentsController.cs ファイルを編集します。 AppointmentsController クラスで、GetAppointments メソッドを検索します。 次のように、戻るステートメントを変更します。 この変更により、顧客、エンジニア、および AppointmentStatus の情報は、GET 操作の一部として取得されるようになります。これらのフィールドは、Entity Framework の遅延読み込みメカニズムのために null のままになる他のエンティティを参照します。
public class AppointmentsController : ControllerBase
{
    private readonly ScheduleContext _context;

    public AppointmentsController(ScheduleContext context)
    {
        _context = context;
    }

    // GET: api/Appointments

    [HttpGet]
    public async Task<ActionResult<IEnumerable<Appointment>>> GetAppointments()
    {
        return await _context.Appointments
            .Include(c => c.Customer)
            .Include(e => e.Engineer)
            .Include(s => s.AppointmentStatus)
            .ToListAsync();
    }

    ...
}
同じファイルで、次のように GetAppointment(long id) メソッドを変更します。
// GET: api/Appointments/5 [HttpGet("{id}")] public async Task<ActionResult<Appointment>> GetAppointment(long id) { var appointment = _context.Appointments .Where(a => a.Id == id) .Include(c => c.Customer) .Include(e => e.Engineer) .Include(s => s.AppointmentStatus); var appData = await appointment.FirstOrDefaultAsync(); if (appData == null) { return NotFound(); } return appData; }このバージョンのメソッドは、取得時に予定の顧客、エンジニア、および AppointmentStatus フィールドにデータを入力します (遅延読み込みでは、これらのフィールドは空のままになります)。
PutAppointment メソッドを検索し、次のコードに置き換えます。 このバージョンの PutAppointment メソッドは、完全な予定オブジェクトではなく、ユーザーがアプリで変更できる予定のフィールドを取得します。
[HttpPut("{id}")]
public async Task<IActionResult> PutAppointment(long id,
    string problemDetails, string statusName,
    string notes, string imageUrl)
{

    var statusId = _context.AppointmentStatuses.First(s =>
        s.StatusName == statusName).Id;

    var appointment = _context.Appointments.First(e =>
        e.Id == id);

    if (appointment == null)
    {
        return BadRequest();
    }

    appointment.ProblemDetails = problemDetails;
    appointment.AppointmentStatusId = statusId;
    appointment.Notes = notes;
    appointment.ImageUrl = imageUrl;
    _context.Entry(appointment).State = EntityState.Modified;

    try
    {
        await _context.SaveChangesAsync();
    }
    catch (DbUpdateConcurrencyException)
    {
        if (!AppointmentExists(id))
        {
            return NotFound();
        }
        else
        {
            throw;
        }
    }

    return NoContent();
}
注意
原則として、PUT 操作では、ユーザーが更新を許可されているデータのみを変更する必要があります。必ずしもエンティティ内のすべてのフィールドを変更する必要はありません。
ScheduleEngineerController.cs ファイルを開き、次の GetScheduleEngineerAppointments メソッドを ScheduleEngineerController クラスに追加します。
[Route("api/[controller]")]
[ApiController]
public class ScheduleEngineerController : ControllerBase
{
    private readonly ScheduleContext _context;

    public ScheduleEngineerController(ScheduleContext context)
    {
        _context = context;
    }

    // GET: api/ScheduleEngineer/5/Appointments
    [HttpGet("{id}/Appointments")]

    public async Task<ActionResult<IEnumerable<Appointment>>> GetScheduleEngineerAppointments(string id)
    {
        return await _context.Appointments
            .Where(a => a.EngineerId == id)
            .OrderByDescending(a => a.StartDateTime)
            .Include(c => c.Customer)
            .Include(e => e.Engineer)
            .Include(s => s.AppointmentStatus)
            .ToListAsync();
    }

    ...
}

These methods retrieve the appointments for the specified technician.
Edit the CustomerController.cs file and add the GetAppointments and GetNotes methods, as shown, to the CustomerController class.
[Route("api/[controller]")]
[ApiController]
public class CustomerController : ControllerBase
{
    private readonly ScheduleContext _context;

    public CustomerController(ScheduleContext context)
    {
        _context = context;
    }

    //GET: api/Customers/5/Appointments
    [HttpGet("{id}/Appointments")]
    public async Task<ActionResult<IEnumerable<Appointment>>> GetAppointments(long id)
    {
        return await _context.Appointments
            .Where(a => a.CustomerId == id)
            .OrderByDescending(a => a.StartDateTime)
            .ToListAsync();
    }

    //GET: api/Customers/5/Notes
    [HttpGet("{id}/Notes")]
    public async Task<ActionResult<IEnumerable<object>>> GetNotes(long id)
    {
        return await _context.Appointments
            .Where(a => a.CustomerId == id)
            .OrderByDescending(a => a.StartDateTime)
            .Select(a =>
                new {a.StartDateTime, a.ProblemDetails, a.Notes})
            .ToListAsync();
    }

    ...
}
GetAppointments メソッドは、指定された顧客のすべての予定を検索します。 GetNotes メソッドは、技術者が以前に顧客を訪問したときに作成したすべてのメモを取得します。
appSettings.json ファイルを編集し、KnowledgeDB データベースの接続文字列を追加します。 この文字列は、以前に appSettings.Development.json ファイルに書き込んだものと同じである必要があります。
{
    "ConnectionStrings": {
        "InventoryDB": ...,
        "KnowledgeDB": ...,
        "SchedulesDB": "Server=tcp:<server name>.database.windows.net,1433;Initial Catalog=SchedulesDB;Persist Security Info=False;User ID=sqladmin;Password=Pa55w.rd;MultipleActiveResultSets=False;Encrypt=True;TrustServerCertificate=False;Connection Timeout=30;"
    },
    "Logging": {
        ...
    },
    "AllowedHosts": "*"
}
ターミナル ウィンドウで、Web API をコンパイルしてビルドします。
dotnet buildWeb API は、エラーや警告を報告せずにビルドする必要があります。
ターミナル ウィンドウで、Azure に展開するための Web API をパッケージ化します。
dotnet publish -c Release -o ./publishVisual Studio Code で公開フォルダーを右クリックし、Web アプリに展開を選択します。 以前に作成したものと同じ Azure Web アプリに展開します。 ウィザードが既存の Web アプリを新しいコードで上書きできるようにします。
展開が完了したら、Web サイトを参照しますが、ブラウザーの URL を https://<webapp name>.azurewebsites.net/swagger に変更します。 予定、顧客、および ScheduleEngineer コントローラーの操作が使用可能になったことを確認します。
これで、Web API をアプリに組み込む準備が整いました。
フィードバック
以下は間もなく提供いたします。2024 年を通じて、コンテンツのフィードバック メカニズムとして GitHub の issue を段階的に廃止し、新しいフィードバック システムに置き換えます。 詳細については、「https://aka.ms/ContentUserFeedback」を参照してください。
フィードバックの送信と表示