Power BI でサービス タグを使用する
Power BI で Azure サービス タグを使用すると、Azure SQL Managed Instance (MI) を有効にして、Power BI サービスからの受信接続を許可することができます。 Azure では、サービス タグは IP アドレスの定義済みグループであり、ネットワーク セキュリティ規則の更新や変更の複雑さを最小限に抑えるために、グループとして自動的に管理されるように構成することができます。 Power BI でサービス タグを使用して、SQL マネージド インスタンスを有効にし、Power BI サービスからの受信接続を許可することができます。
エンドポイントを Power BI サービスで使用できるようにするには、次の構成が必要です。
- Azure SQL Managed Instance でパブリック エンドポイントを有効にします。
- 受信トラフィックを許可するネットワーク セキュリティ グループ規則を作成します。
- Power BI で資格情報を入力します。
以下のセクションでは、これらの各手順について説明していきます。
パブリック エンドポイントを有効にする
このプロセスの最初の部分は、SQL Managed Instance でパブリック エンドポイントを有効にすることです。 次の手順を実行します。
Azure portal にサインインし、SQL Managed Instance に移動します。
ページの左側で、[ネットワーク] を選びます。
[パブリック エンドポイント (データ)] を [有効] にスライドして、[TLS の最小バージョン] を 1.2 に設定します。 次の画像は、Azure portal の画面を示しています。
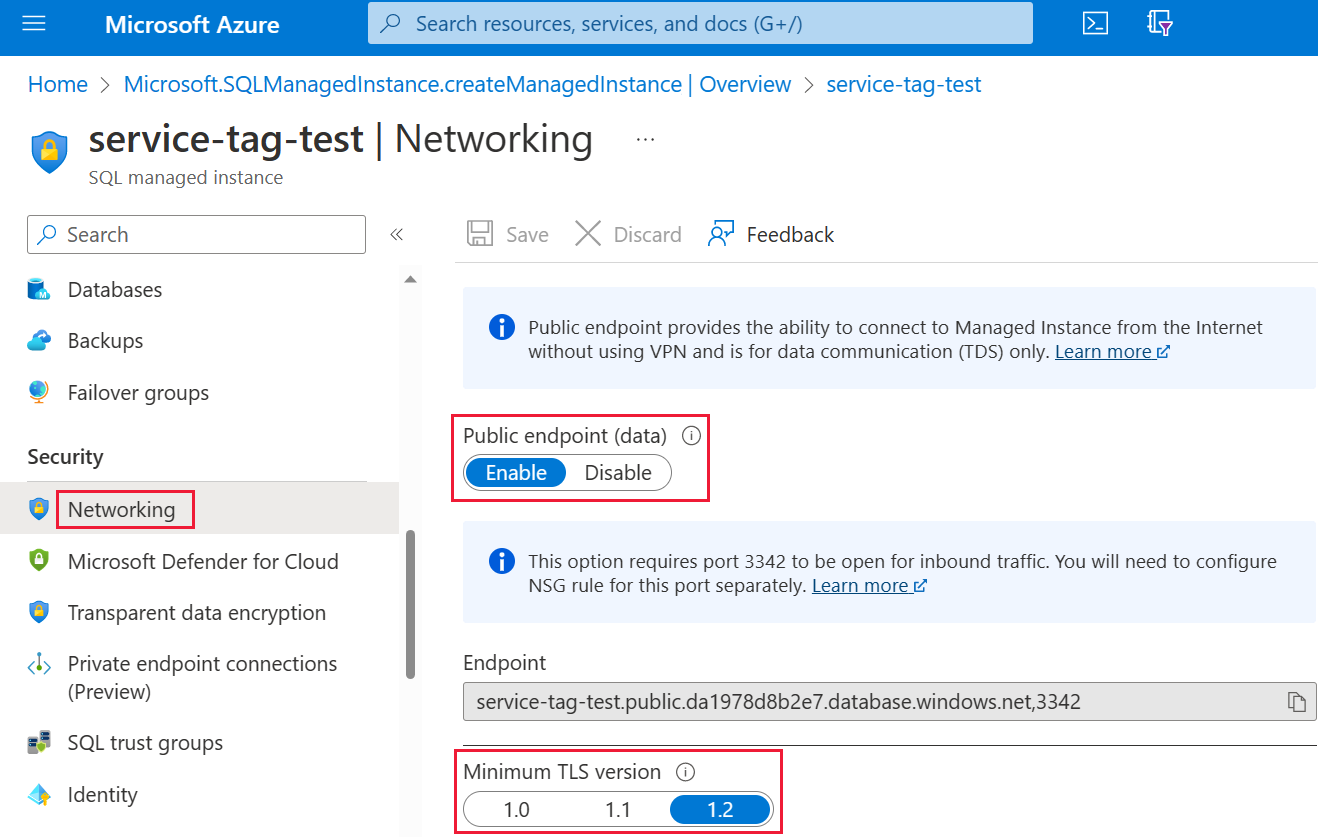
[Save](保存) を選択して設定を保存します。
ネットワーク セキュリティ グループ規則を作成する
次の一連の手順では、Power BI サービスの受信トラフィックを許可するネットワーク セキュリティ グループ (NSG) 規則を作成する必要があります。 このアクションは、Power BI の "ソース サービス タグ" を利用するか、"コマンド ライン インターフェイス (CLI)" または PowerShell を使用して、Azure portal で完了できます。
Note
設定する規則の優先度は、4096 deny_all_inbound 規則よりも高くする必要があります。つまり、優先度の値は 4096 よりも低くする必要があります。 次の例では、優先度値 400 が使用されています。
次の CLI スクリプトは、参考例として用意したものです。 詳細については、「az network nsg rule」を参照してください。 実際の状況でこの例を適切に機能させるには、複数の値を変更することが必要な場合があります。 その後に PowerShell スクリプトが用意されています。
#login to azure
az login

#set subscription that contains SQL MI instance
$subname = "mysubscriptionname"
az account set --subscription $subname

#set NSG rule for inbound PowerBI traffic

#update $RG to your resource group name
$rg = 'myresourcegroup'
#update $nsg to your Network Security Group name
$nsg = 'nsgresourcename'
# Name the NSG rule
$rule = 'allow_inbound_PowerBI'
#set the priority - this must be higher priority (lower number) than the deny_all_inbound rule
$priority = 400
#specifiy the service tag to use
$servicetag = 'PowerBI'
#specify the public endpoint port defined in step 1
$port = 3342
#set the rule to inbound direction
$direction = 'Inbound'
#set the access type to "Allow"
$access = 'Allow'
#Set the protocol as TCP
$protocol = 'tcp'
#Provide a description for the rule
$desc = 'Allow PowerBI Access to SQL MI for Direct Query or Data Refresh.'

#create the NSG rule
az network nsg rule create -g $rg \
--nsg-name $nsg -n $rule --priority $priority \
--source-address-prefixes $servicetag --destination-address-prefixes '*' \
--destination-port-ranges $port --direction $direction --access $access \
--protocol $protocol --description $desc
次の PowerShell スクリプトは、NSG 規則を作成するための別の参考例として提供されています。 詳細については、PowerShell でのネットワーク セキュリティ グループ規則の追加に関するページを参照してください。 実際の状況でこの例を適切に機能させるには、複数の値を変更することが必要な場合があります。
#login to azure
Login-AzAccount

#get your subscription ID
Get-AzSubscription

####
#Script to create Network Security Group Rule
###

#enter your subscription ID
Set-AzContext -SubscriptionId "yoursubscriptionID"

#Provide the resource group for your Network Security Group
$RGname="yourRG"
#Enter the port for the SQL Managed Instance Public Endpoint
$port=3342
#name the NSG rule
$rulename="allow_inbound_PowerBI"
#provide the name of the Network Security Group to add the rule to
$nsgname="yourNSG"
#set direction to inbound to allow PowerBI to access SQL MI
$direction ="Inbound"
#set the priority of the rule. Priority must be higher (ie. lower number) than the deny_all_inbound (4096)
$priority=400
#set the service tags for the source to \u201cPowerBI\u201d
$serviceTag = "PowerBI"

# Get the NSG resource
$nsg = Get-AzNetworkSecurityGroup -Name $nsgname -ResourceGroupName $RGname

# Add the inbound security rule.
$nsg | Add-AzNetworkSecurityRuleConfig -Name $rulename -Description "Allow app port" -Access Allow `
    -Protocol * -Direction $direction -Priority $priority -SourceAddressPrefix $serviceTag -SourcePortRange * `
    -DestinationAddressPrefix * -DestinationPortRange $port

# Update the NSG.
$nsg | Set-AzNetworkSecurityGroup
Power BI で資格情報を入力します
このプロセスの最後の部分は、Power BI サービスへの資格情報の入力です。
Power BI サービスにサインインし、SQL Managed Instance を使っているデータセットを含むワークスペースに移動します。 次の例では、そのワークスペースは ASAdataset という名前であり、データセットは Contoso SQL MI Demo という名前です。
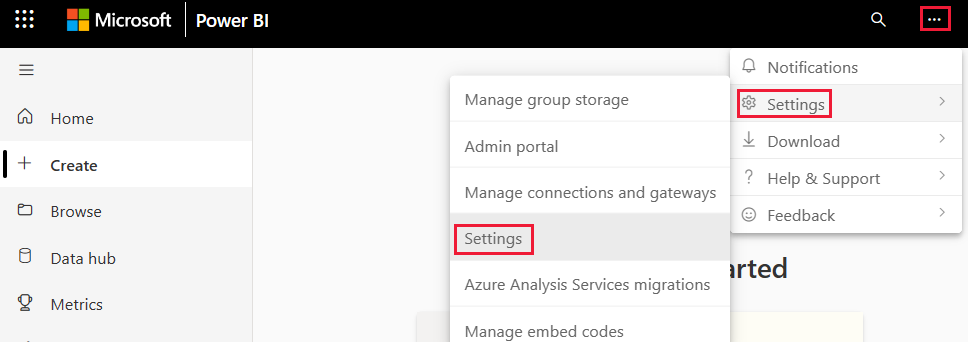
右上隅の [設定] を選び、ドロップダウン メニューから [設定] を選びます。
[データセット] で、[データ ソースの資格情報] セクションを展開します。
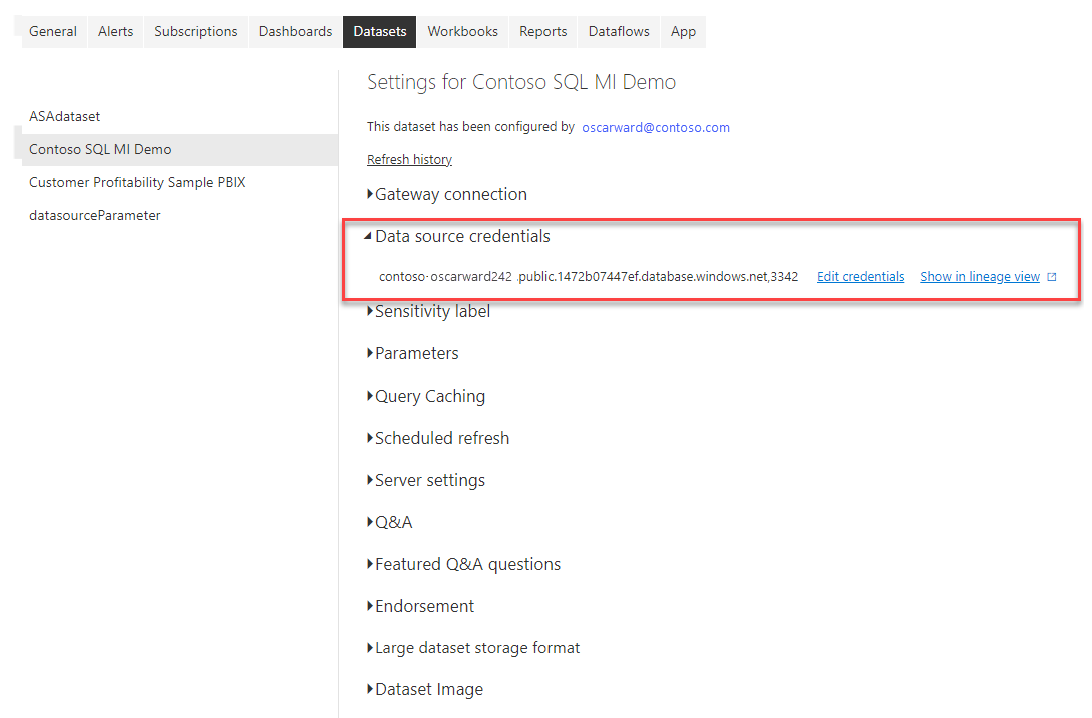
[資格情報を編集] リンクを選びます。 表示されるダイアログ ボックスで、有効な資格情報を入力します。
設定を保存し、終了します。 これで、Power BI サービスからの受信接続を許可するように SQL マネージド インスタンスが構成されました。