Batch AI から Azure Machine Learning service に移行する
Azure Batch AI サービスは 3 月に提供が停止されます。 Batch AI の大規模トレーニングとスコアリング機能は、Azure Machine Learning service (2018 年 12 月 4 日に一般公開) で利用できるようになりました。
他の多くの機械学習機能と同様に、Azure Machine Learning service には、機械学習モデルのトレーニング、デプロイ、スコアリングのためのクラウドベースのマネージド コンピューティング ターゲットが含まれています。 このコンピューティング ターゲットは、Azure Machine Learning コンピューティングと呼ばれています。 今すぐ移行して使ってみましょう。 Azure Machine Learning service との対話には、Python SDK、コマンドライン インターフェイス、および Azure portal を使用できます。
プレビューの Batch AI から GA の Azure Machine Learning service にアップグレードすると、Estimator やデータストアなどの使いやすい概念によるより優れたエクスペリエンスが提供されます。 また、GA レベルの Azure サービスの SLA とカスタマー サポートが保証されます。
Azure Machine Learning service では、機械学習の自動化、ハイパーパラメーターの調整、ML パイプラインなどの新しい機能も提供され、ほとんどの大規模な AI ワークロードで役に立ちます。 別のサービスに切り替えずにトレーニング済みモデルをデプロイする機能は、データの準備 (Data Prep SDK を使用) から、運用化とモデルの監視までの、完全なデータ サイエンス ループを作成するのに役立ちます。
移行を始める
アプリケーションの中断を回避し、最新の機能を利用するには、2019 年 3 月 31 日より前に次の手順を実行します。
Azure Machine Learning service のワークスペースを作成し、次を開始します。
Azure Machine Learning SDK と Data Prep SDK をインストールします。
モデルのトレーニング用に Azure Machine Learning コンピューティングを設定します。
Azure Machine Learning コンピューティングを使用するようにスクリプトを更新します。 以下のセクションでは、Batch AI に使用している一般的なコードが、Azure Machine Learning のコードにどのように対応するのかを示します。
ワークスペースを作成する
Azure Batch AI での configuration.json を使用したワークスペースの初期化の概念は、Azure Machine Learning service での構成ファイルの使用に対応します。
Batch AI では、次の方法で行いました。
sys.path.append('../../..')
import utilities as utils

cfg = utils.config.Configuration('../../configuration.json')
client = utils.config.create_batchai_client(cfg)

utils.config.create_resource_group(cfg)
_ = client.workspaces.create(cfg.resource_group, cfg.workspace, cfg.location).result()
Azure Machine Learning service では、次を試してください。
from azureml.core.workspace import Workspace

ws = Workspace.from_config()
print('Workspace name: ' + ws.name,
      'Azure region: ' + ws.location,
      'Subscription id: ' + ws.subscription_id,
      'Resource group: ' + ws.resource_group, sep = '\n')
さらに、次のように構成パラメーターを指定することで、ワークスペースを直接作成することもできます
from azureml.core import Workspace
# Create the workspace using the specified parameters
ws = Workspace.create(name = workspace_name,
                      subscription_id = subscription_id,
                      resource_group = resource_group,
                      location = workspace_region,
                      create_resource_group = True,
                      exist_ok = True)
ws.get_details()

# write the details of the workspace to a configuration file to the notebook library
ws.write_config()
Azure Machine Learning の Workspace クラスについて詳しくは、SDK リファレンス ドキュメントをご覧ください。
コンピューティング クラスターを作成する
Azure Machine Learning では、複数のコンピューティング先がサポートされており、その一部はサービスによって管理され、他はワークスペースにアタッチできます (例: HDInsight クラスター、リモート VM)。 詳しくは、コンピューティング先に関する記事をご覧ください。 Azure Batch AI のコンピューティング クラスター作成の概念は、Azure Machine Learning service では AmlCompute クラスターの作成に対応します。 Amlcompute の作成では、Azure Batch AI にパラメーターを渡す方法と同じように、コンピューティングの構成を渡します。 注意が必要な点の 1 つは、自動スケーリングが AmlCompute クラスターでは既定でオンになるのに対し、Azure Batch AI では既定でオフになることです。
Batch AI では、次の方法で行いました。
nodes_count = 2
cluster_name = 'nc6'

parameters = models.ClusterCreateParameters(
    vm_size='STANDARD_NC6',
    scale_settings=models.ScaleSettings(
        manual=models.ManualScaleSettings(target_node_count=nodes_count)
    ),
    user_account_settings=models.UserAccountSettings(
        admin_user_name=cfg.admin,
        admin_user_password=cfg.admin_password or None,
        admin_user_ssh_public_key=cfg.admin_ssh_key or None,
    )
)
_ = client.clusters.create(cfg.resource_group, cfg.workspace, cluster_name, parameters).result()
Azure Machine Learning service では、次を試してください。
from azureml.core.compute import ComputeTarget, AmlCompute
from azureml.core.compute_target import ComputeTargetException

# Choose a name for your CPU cluster
gpu_cluster_name = "nc6"

# Verify that cluster does not exist already
try:
    gpu_cluster = ComputeTarget(workspace=ws, name=gpu_cluster_name)
    print('Found existing cluster, use it.')
except ComputeTargetException:
    compute_config = AmlCompute.provisioning_configuration(vm_size='STANDARD_NC6',
                                                           vm_priority='lowpriority',
                                                           min_nodes=1,
                                                           max_nodes=2,
                                                           idle_seconds_before_scaledown='300',
                                                           vnet_resourcegroup_name='<my-resource-group>',
                                                           vnet_name='<my-vnet-name>',
                                                           subnet_name='<my-subnet-name>')
    gpu_cluster = ComputeTarget.create(ws, gpu_cluster_name, compute_config)

gpu_cluster.wait_for_completion(show_output=True)
AML の Compute クラスについて詳しくは、SDK リファレンス ドキュメントをご覧ください。 上の構成で、必須のプロパティは vm_size と max_nodes だけであり、VNets などの他のプロパティは高度なクラスターのセットアップ専用であることに注意してください。
クラスターの状態を監視する
後述するように、これは Azure Machine Learning service での方が簡単です。
Batch AI では、次の方法で行いました。
cluster = client.clusters.get(cfg.resource_group, cfg.workspace, cluster_name)
utils.cluster.print_cluster_status(cluster)
Azure Machine Learning service では、次を試してください。
gpu_cluster.get_status().serialize()
ストレージ アカウントへの参照を取得する
BLOB のようなデータ ストレージの概念は、Azure Machine Learning service では DataStore オブジェクトを使用することで簡略化されています。 Azure Machine Learning service ワークスペースでは既定でストレージ アカウントが作成されますが、ワークスペース作成の一部として独自のストレージをアタッチすることもできます。
Batch AI では、次の方法で行いました。
azure_blob_container_name = 'batchaisample'
blob_service = BlockBlobService(cfg.storage_account_name, cfg.storage_account_key)
blob_service.create_container(azure_blob_container_name, fail_on_exist=False)
Azure Machine Learning service では、次を試してください。
ds = ws.get_default_datastore()
print(ds.datastore_type, ds.account_name, ds.container_name)
追加ストレージ アカウントの登録または別の登録済みデータストアへの参照の取得について詳しくは、Azure Machine Learning service のドキュメントをご覧ください。
データをダウンロードおよびアップロードする
どちらのサービスでも、上記のデータストアの参照を使用して、データをストレージ アカウントに簡単にアップロードできます。 Azure Batch AI では、ファイル共有の一部としてトレーニング スクリプトもデプロイされますが、Azure Machine Learning service の場合は、ジョブ構成の一部として指定する方法が示されます。
Batch AI では、次の方法で行いました。
mnist_dataset_directory = 'mnist_dataset'
utils.dataset.download_and_upload_mnist_dataset_to_blob(
    blob_service, azure_blob_container_name, mnist_dataset_directory)

script_directory = 'tensorflow_samples'
script_to_deploy = 'mnist_replica.py'

blob_service.create_blob_from_path(azure_blob_container_name,
                                   script_directory + '/' + script_to_deploy,
                                   script_to_deploy)
Azure Machine Learning service では、次を試してください。
import os
import urllib
os.makedirs('./data', exist_ok=True)
download_url = 'https://s3.amazonaws.com/img-datasets/mnist.npz'
urllib.request.urlretrieve(download_url, filename='data/mnist.npz')

ds.upload(src_dir='data', target_path='mnist_dataset', overwrite=True, show_progress=True)

path_on_datastore = ' mnist_dataset/mnist.npz' ds_data = ds.path(path_on_datastore) print(ds_data)
実験を作成する
前に示したように、Azure Machine Learning service には Azure Batch AI と似た実験の概念があります。 Azure Batch AI でのジョブと同じように、実験ごとに実行を個別に作成できます。 また、Azure Machine Learning service では、各親実行の下に、子実行ごとに階層を作成することもできます。
Batch AI では、次の方法で行いました。
experiment_name = 'tensorflow_experiment'
experiment = client.experiments.create(cfg.resource_group, cfg.workspace, experiment_name).result()
Azure Machine Learning service では、次を試してください。
from azureml.core import Experiment

experiment_name = 'tensorflow_experiment'
experiment = Experiment(ws, name=experiment_name)
ジョブの送信
実験を作成した後、実行を送信するには、いくつかの方法があります。 この例では、TensorFlow を使用してディープ ラーニング モデルを作成し、Azure Machine Learning service Estimator を使用してそれを行っています。 Estimator は基になる実行構成に対する単なるラッパー関数であり、実行の送信が容易になります。現在は、Pytorch と TensorFlow のみでサポートされています。 データストアの概念により、マウント パスの指定も簡単になることがわかります
Batch AI では、次の方法で行いました。
azure_file_share = 'afs'
azure_blob = 'bfs'
args_fmt = '--job_name={0} --num_gpus=1 --train_steps 10000 --checkpoint_dir=$AZ_BATCHAI_OUTPUT_MODEL --log_dir=$AZ_BATCHAI_OUTPUT_TENSORBOARD --data_dir=$AZ_BATCHAI_INPUT_DATASET --ps_hosts=$AZ_BATCHAI_PS_HOSTS --worker_hosts=$AZ_BATCHAI_WORKER_HOSTS --task_index=$AZ_BATCHAI_TASK_INDEX'

parameters = models.JobCreateParameters(
     cluster=models.ResourceId(id=cluster.id),
     node_count=2,
     input_directories=[
        models.InputDirectory(
            id='SCRIPT',
            path='$AZ_BATCHAI_JOB_MOUNT_ROOT/{0}/{1}'.format(azure_blob, script_directory)),
        models.InputDirectory(
            id='DATASET',
            path='$AZ_BATCHAI_JOB_MOUNT_ROOT/{0}/{1}'.format(azure_blob, mnist_dataset_directory))],
     std_out_err_path_prefix='$AZ_BATCHAI_JOB_MOUNT_ROOT/{0}'.format(azure_file_share),
     output_directories=[
        models.OutputDirectory(
            id='MODEL',
            path_prefix='$AZ_BATCHAI_JOB_MOUNT_ROOT/{0}'.format(azure_file_share),
            path_suffix='Models'),
        models.OutputDirectory(
            id='TENSORBOARD',
            path_prefix='$AZ_BATCHAI_JOB_MOUNT_ROOT/{0}'.format(azure_file_share),
            path_suffix='Logs')
     ],
     mount_volumes=models.MountVolumes(
            azure_file_shares=[
                models.AzureFileShareReference(
                    account_name=cfg.storage_account_name,
                    credentials=models.AzureStorageCredentialsInfo(
                        account_key=cfg.storage_account_key),
                    azure_file_url='https://{0}.file.core.windows.net/{1}'.format(
                        cfg.storage_account_name, azure_file_share_name),
                    relative_mount_path=azure_file_share)
            ],
            azure_blob_file_systems=[
                models.AzureBlobFileSystemReference(
                    account_name=cfg.storage_account_name,
                    credentials=models.AzureStorageCredentialsInfo(
                        account_key=cfg.storage_account_key),
                    container_name=azure_blob_container_name,
                    relative_mount_path=azure_blob)
            ]
        ),
     container_settings=models.ContainerSettings(
         image_source_registry=models.ImageSourceRegistry(image='tensorflow/tensorflow:1.8.0-gpu')),
     tensor_flow_settings=models.TensorFlowSettings(
         parameter_server_count=1,
         worker_count=nodes_count,
         python_script_file_path='$AZ_BATCHAI_INPUT_SCRIPT/'+ script_to_deploy,
         master_command_line_args=args_fmt.format('worker'),
         worker_command_line_args=args_fmt.format('worker'),
         parameter_server_command_line_args=args_fmt.format('ps'),
     )
)
Azure Batch AI では、ジョブ自体の送信は create 関数で行います。
job_name = datetime.utcnow().strftime('tf_%m_%d_%Y_%H%M%S')
job = client.jobs.create(cfg.resource_group, cfg.workspace, experiment_name, job_name, parameters).result()
print('Created Job {0} in Experiment {1}'.format(job.name, experiment.name))
このトレーニング コード スニペットの完全な情報 (上記のファイル共有にアップロードされている mnist_replica.py ファイルを含む) は、Azure Batch AI サンプル ノートブックの GitHub リポジトリにあります。
Azure Machine Learning service では、次を試してください。
from azureml.train.dnn import TensorFlow

script_params={
    '--num_gpus': 1,
    '--train_steps': 500,
    '--input_data': ds_data.as_mount()

}

estimator = TensorFlow(source_directory=project_folder,
                       compute_target=gpu_cluster,
                       script_params=script_params,
                       entry_script='tf_mnist_replica.py',
                       node_count=2,
                       worker_count=2,
                       parameter_server_count=1,
                       distributed_backend='ps',
                       use_gpu=True)
このトレーニング コード スニペットの完全な情報 (tf_mnist_replica.py ファイルを含む) は、Azure Machine Learning service サンプル ノートブックの GitHub リポジトリにあります。 データストア自体を個々のノードにマウントするか、またはノード自体にトレーニング データをダウンロードすることができます。 Estimator でのデータストアの参照について詳しくは、Azure Machine Learning service のドキュメントをご覧ください。
Azure Machine Learning service での実行の送信は、submit 関数で行います。
run = experiment.submit(estimator)
print(run)
実行のパラメーターを指定するには、実行構成を使用する方法もあります。これは、カスタム トレーニング環境を定義する場合に特に便利です。 これについて詳しくは、サンプルの AmlCompute ノートブックをご覧ください。
実行を監視する
実行を送信した後は、完了するまで待つか、またはコードから直接呼び出すことができる便利な Jupyter ウィジェットを使用して Azure Machine Learning service 内の実行を監視することができます。 ワークスペース内のさまざまな実験および各実験内の個別の実行をループして、以前の実行のコンテキストを取得することもできます。
Batch AI では、次の方法で行いました。
utils.job.wait_for_job_completion(client, cfg.resource_group, cfg.workspace,
                                  experiment_name, job_name, cluster_name, 'stdouterr', 'stdout-wk-0.txt')

files = client.jobs.list_output_files(cfg.resource_group, cfg.workspace, experiment_name, job_name,
                                      models.JobsListOutputFilesOptions(outputdirectoryid='stdouterr'))
for f in list(files):
    print(f.name, f.download_url or 'directory')
Azure Machine Learning service では、次を試してください。
run.wait_for_completion(show_output=True)

from azureml.widgets import RunDetails
RunDetails(run).show()
ログをリアルタイムで確認するためにウィジェットをノートブックに読み込む方法のスナップショットを次に示します。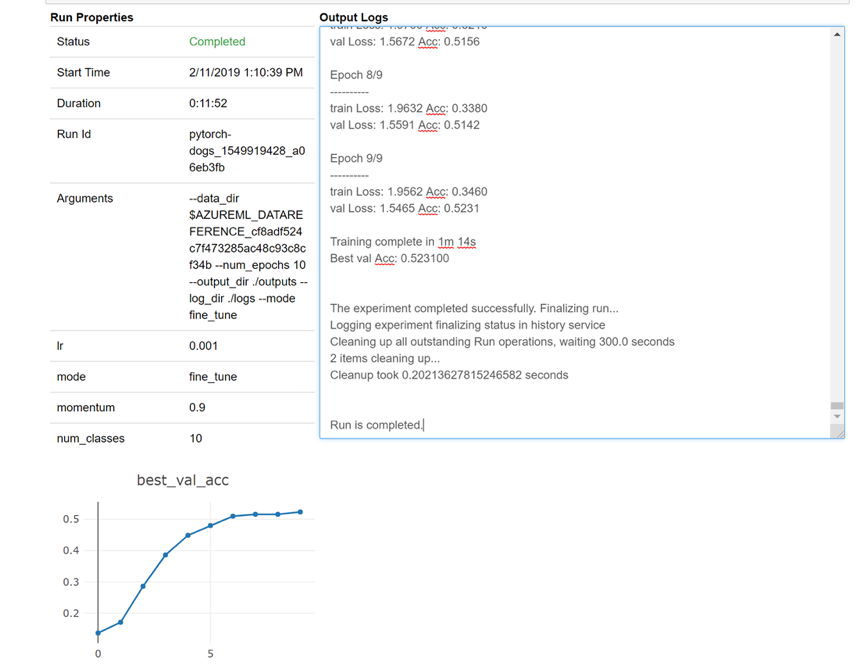
クラスターを編集する
簡単にクラスターを削除できます。 さらに、Azure Machine Learning service では、ノードの数を増やしたい場合や、クラスターをスケールダウンする前のアイドル待機時間を長くしたい場合など、ノートブック内からクラスターを更新できます。 クラスター自体の VM サイズの変更は、実質的にバックエンドでの新しいデプロイが必要になるため、できません。
Batch AI では、次の方法で行いました。
_ = client.clusters.delete(cfg.resource_group, cfg.workspace, cluster_name)
Azure Machine Learning service では、次を試してください。
gpu_cluster.delete()

gpu_cluster.update(min_nodes=2, max_nodes=4, idle_seconds_before_scaledown=600)
サポートを受ける
Batch AI は 3 月 31 日に廃止される予定であり、サポートを通じて例外を発生させて許可リストに登録されない限り、新しいサブスクリプションがサービスに対して登録されるのを既にブロックしています。 Azure Machine Learning service への移行に関して質問やフィードバックがある場合は、Azure Batch AI Training Preview でお問い合わせください。
Azure Machine Learning service は一般提供のサービスです。 これは、コミットされた SLA があり、さまざまなサポート プランから選択できることを意味します。
Azure Batch AI サービスまたは Azure Machine Learning サービスを介して Azure インフラストラクチャを使用する場合の価格は変わるべきではありません。どちらの場合も、基になるコンピューティングの料金のみが課金されます。 詳しくは、料金計算ツールに関するページをご覧ください。
Azure portal で 2 つのサービスを利用できるリージョンについては、こちらをご覧ください。
次のステップ
「Azure Machine Learning サービスの概要」を読みます。
Azure Machine Learning service を使用してモデルのトレーニング用のコンピューティング ターゲットを構成します。
Azure のロードマップで、他の Azure サービスの更新情報を確認します。