クイック スタート:Connector/C++ を使用して Azure Database for MySQL に接続してデータを照会する
適用対象:  Azure Database for MySQL - 単一サーバー
重要
Azure Database for MySQL シングル サーバーは廃止パスにあります。 Azure Database for MySQL フレキシブル サーバーにアップグレードすることを強くお勧めします。 Azure Database for MySQL フレキシブル サーバーへの移行の詳細については、Azure Database for MySQL シングル サーバーの現状に関するページを参照してください
このクイックスタートでは、C++ アプリケーションを使用して Azure Database for MySQL に接続する方法を紹介します。 ここでは、SQL ステートメントを使用してデータベース内のデータを照会、挿入、更新、削除する方法を説明します。 このトピックでは、C++ を使用した開発には慣れているものの、Azure Database for MySQL の使用は初めてであることを前提としています。
前提条件
このクイックスタートでは、次のいずれかのガイドで作成されたリソースを出発点として使用します。
- Azure Portal を使用した Azure Database for MySQL サーバーの作成
- Azure CLI を使用した Azure Database for MySQL サーバーの作成
さらに、以下を実行する必要があります。
- .NET Framework のインストール
- Visual Studio
- MySQL Connector/C++ のインストール
- Boost のインストール
重要
Azure portal または Azure CLI を使用して、接続元の IP アドレスにサーバーのファイアウォール規則が追加されていることを確認します。
Visual Studio と .NET のインストール
このセクションの手順では、.NET を使用した開発に慣れていることを前提としています。
Windows
- Visual Studio 2019 Community をインストールします。 Visual Studio 2019 Community は、フル機能を備えた拡張可能な無料 IDE です。 この IDE を使用すると、Android、iOS、Windows 向けの最新のアプリケーション、Web およびデータベース アプリケーション、クラウド サービスを作成できます。 完全な .NET Framework または .NET Core のみをインストールすることができます。どちらの場合も、このクイック スタートのコード スニペットは正しく動作します。 既にコンピューターに Visual Studio がインストールされている場合、次の 2 つの手順はスキップします。
- Visual Studio 2019 インストーラーをダウンロードします。
- インストーラーを実行し、表示されるインストールの指示に従って、インストールを完了します。
Visual Studio の構成
- Visual Studio から [プロジェクト] -> [プロパティ] -> [リンカー] -> [全般] -> [追加のライブラリ ディレクトリ] の順に移動して、C++ コネクタの "\lib\opt" ディレクトリを追加します (例: C:\Program Files (x86)\MySQL\MySQL Connector C++ 1.1.9\lib\opt)。
- Visual Studio から [プロジェクト] -> [プロパティ] -> [C/C++] -> [全般] -> [追加のインクルード ディレクトリ] の順に移動します。
- C++ コネクタの "\include" ディレクトリを追加します (例: C:\Program Files (x86)\MySQL\MySQL Connector C++ 1.1.9\include)。
- Boost ライブラリのルート ディレクトリを追加します (例: C:\boost_1_64_0)。
- Visual Studio から [プロジェクト] -> [プロパティ] -> [リンカー] -> [入力] -> [追加の依存ファイル] の順に移動し、テキスト フィールドに mysqlcppconn.lib を追加します。
- 手順 3. の C++ コネクタ ライブラリ フォルダーからアプリケーションの実行可能ファイルと同じディレクトリに mysqlcppconn.dll をコピーします。または、アプリケーションから検出できるよう、それを環境変数に追加してください。
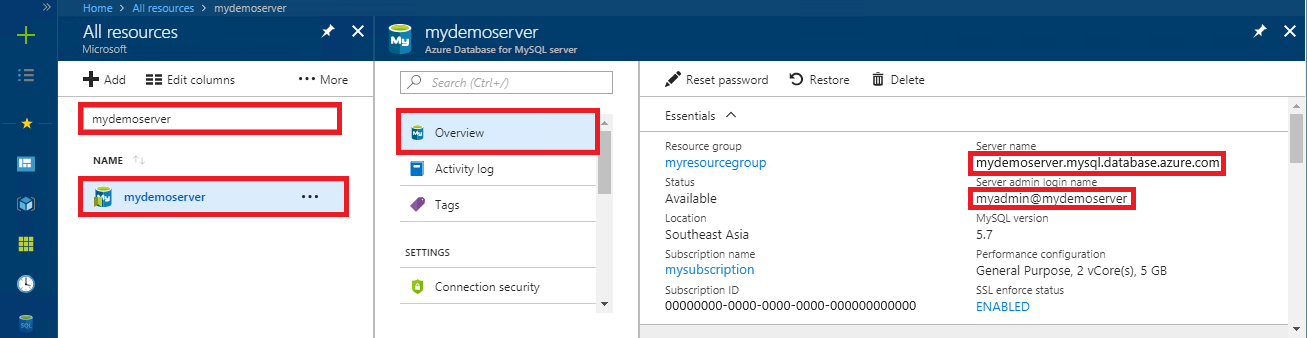
接続情報の取得
Azure Database for MySQL に接続するために必要な接続情報を取得します。 完全修飾サーバー名とログイン資格情報が必要です。
- Azure portal にサインインします。
- Azure Portal の左側のメニューにある [すべてのリソース] をクリックし、作成したサーバー (例: mydemoserver) を検索します。
- サーバー名をクリックします。
- サーバーの [概要] パネルから、 [サーバー名] と [サーバー管理者ログイン名] を書き留めます。 パスワードを忘れた場合も、このパネルからパスワードをリセットすることができます。
接続、テーブルの作成、データの挿入
接続し、SQL ステートメント CREATE TABLE および INSERT INTO を使用してデータを読み込むには、次のコードを使用します。 このコードでは、sql::Driver クラスとその connect() メソッドを使って MySQL との接続を確立しています。 その後、createStatement() メソッドと execute() メソッドを使用して、データベース コマンドを実行します。
Host、DBName、User、Password パラメーターを置き換えます。 これらのパラメーターの値は、サーバーとデータベースの作成時に指定した値に置き換えることができます。
#include <stdlib.h>
#include <iostream>
#include "stdafx.h"

#include "mysql_connection.h"
#include <cppconn/driver.h>
#include <cppconn/exception.h>
#include <cppconn/prepared_statement.h>
using namespace std;

//for demonstration only. never save your password in the code!
const string server = "tcp://yourservername.mysql.database.azure.com:3306";
const string username = "username@servername";
const string password = "yourpassword";

int main()
{
	sql::Driver *driver;
	sql::Connection *con;
	sql::Statement *stmt;
	sql::PreparedStatement *pstmt;

	try
	{
		driver = get_driver_instance();
		con = driver->connect(server, username, password);
	}
	catch (sql::SQLException e)
	{
		cout << "Could not connect to server. Error message: " << e.what() << endl;
		system("pause");
		exit(1);
	}

	//please create database "quickstartdb" ahead of time
	con->setSchema("quickstartdb");

	stmt = con->createStatement();
	stmt->execute("DROP TABLE IF EXISTS inventory");
	cout << "Finished dropping table (if existed)" << endl;
	stmt->execute("CREATE TABLE inventory (id serial PRIMARY KEY, name VARCHAR(50), quantity INTEGER);");
	cout << "Finished creating table" << endl;
	delete stmt;

	pstmt = con->prepareStatement("INSERT INTO inventory(name, quantity) VALUES(?,?)");
	pstmt->setString(1, "banana");
	pstmt->setInt(2, 150);
	pstmt->execute();
	cout << "One row inserted." << endl;

	pstmt->setString(1, "orange");
	pstmt->setInt(2, 154);
	pstmt->execute();
	cout << "One row inserted." << endl;

	pstmt->setString(1, "apple");
	pstmt->setInt(2, 100);
	pstmt->execute();
	cout << "One row inserted." << endl;

	delete pstmt;
	delete con;
	system("pause");
	return 0;
}
データの読み取り
接続し、SELECT SQL ステートメントを使用してデータを読み取るには、次のコードを使用します。 このコードでは、sql::Driver クラスとその connect() メソッドを使って MySQL との接続を確立しています。 その後、prepareStatement() メソッドと executeQuery() メソッドを使用して、select コマンドを実行します。 次に、next() を使用して、結果のレコードに進みます。 最後に、getInt() と getString() を使用して、レコード内の値を解析します。
Host、DBName、User、Password パラメーターを置き換えます。 これらのパラメーターの値は、サーバーとデータベースの作成時に指定した値に置き換えることができます。
#include <stdlib.h>
#include <iostream>
#include "stdafx.h"

#include "mysql_connection.h"
#include <cppconn/driver.h>
#include <cppconn/exception.h>
#include <cppconn/resultset.h>
#include <cppconn/prepared_statement.h>
using namespace std;

//for demonstration only. never save your password in the code!
const string server = "tcp://yourservername.mysql.database.azure.com:3306";
const string username = "username@servername";
const string password = "yourpassword";

int main()
{
	sql::Driver *driver;
	sql::Connection *con;
	sql::PreparedStatement *pstmt;
	sql::ResultSet *result;

	try
	{
		driver = get_driver_instance();
		//for demonstration only. never save password in the code!
		con = driver->connect(server, username, password);
	}
	catch (sql::SQLException e)
	{
		cout << "Could not connect to server. Error message: " << e.what() << endl;
		system("pause");
		exit(1);
	}

	con->setSchema("quickstartdb");

	//select
	pstmt = con->prepareStatement("SELECT * FROM inventory;");
	result = pstmt->executeQuery();

	while (result->next())
		printf("Reading from table=(%d, %s, %d)\n", result->getInt(1), result->getString(2).c_str(), result->getInt(3));

	delete result;
	delete pstmt;
	delete con;
	system("pause");
	return 0;
}
データの更新
接続し、UPDATE SQL ステートメントを使用してデータを読み取るには、次のコードを使用します。 このコードでは、sql::Driver クラスとその connect() メソッドを使って MySQL との接続を確立しています。 その後、prepareStatement() メソッドと executeQuery() メソッドを使用して、update コマンドを実行します。
Host、DBName、User、Password パラメーターを置き換えます。 これらのパラメーターの値は、サーバーとデータベースの作成時に指定した値に置き換えることができます。
#include <stdlib.h>
#include <iostream>
#include "stdafx.h"

#include "mysql_connection.h"
#include <cppconn/driver.h>
#include <cppconn/exception.h>
#include <cppconn/resultset.h>
#include <cppconn/prepared_statement.h>
using namespace std;

//for demonstration only. never save your password in the code!
const string server = "tcp://yourservername.mysql.database.azure.com:3306";
const string username = "username@servername";
const string password = "yourpassword";

int main()
{
	sql::Driver *driver;
	sql::Connection *con;
	sql::PreparedStatement *pstmt;

	try
	{
		driver = get_driver_instance();
		//for demonstration only. never save password in the code!
		con = driver->connect(server, username, password);
	}
	catch (sql::SQLException e)
	{
		cout << "Could not connect to server. Error message: " << e.what() << endl;
		system("pause");
		exit(1);
	}

	con->setSchema("quickstartdb");

	//update
	pstmt = con->prepareStatement("UPDATE inventory SET quantity = ? WHERE name = ?");
	pstmt->setInt(1, 200);
	pstmt->setString(2, "banana");
	pstmt->executeQuery();
	printf("Row updated\n");

	delete con;
	delete pstmt;
	system("pause");
	return 0;
}
データの削除
接続し、DELETE SQL ステートメントを使用してデータを読み取るには、次のコードを使用します。 このコードでは、sql::Driver クラスとその connect() メソッドを使って MySQL との接続を確立しています。 その後、prepareStatement() メソッドと executeQuery() メソッドを使用して、delete コマンドを実行します。
Host、DBName、User、Password パラメーターを置き換えます。 これらのパラメーターの値は、サーバーとデータベースの作成時に指定した値に置き換えることができます。
#include <stdlib.h>
#include <iostream>
#include "stdafx.h"

#include "mysql_connection.h"
#include <cppconn/driver.h>
#include <cppconn/exception.h>
#include <cppconn/resultset.h>
#include <cppconn/prepared_statement.h>
using namespace std;

//for demonstration only. never save your password in the code!
const string server = "tcp://yourservername.mysql.database.azure.com:3306";
const string username = "username@servername";
const string password = "yourpassword";

int main()
{
	sql::Driver *driver;
	sql::Connection *con;
	sql::PreparedStatement *pstmt;
	sql::ResultSet *result;

	try
	{
		driver = get_driver_instance();
		//for demonstration only. never save password in the code!
		con = driver->connect(server, username, password);
	}
	catch (sql::SQLException e)
	{
		cout << "Could not connect to server. Error message: " << e.what() << endl;
		system("pause");
		exit(1);
	}

	con->setSchema("quickstartdb");

	//delete
	pstmt = con->prepareStatement("DELETE FROM inventory WHERE name = ?");
	pstmt->setString(1, "orange");
	result = pstmt->executeQuery();
	printf("Row deleted\n");

	delete pstmt;
	delete con;
	delete result;
	system("pause");
	return 0;
}
リソースをクリーンアップする
このクイックスタートで使用したすべてのリソースをクリーンアップするには、次のコマンドを使用してリソース グループを削除します。
az group delete \
    --name $AZ_RESOURCE_GROUP \
    --yes