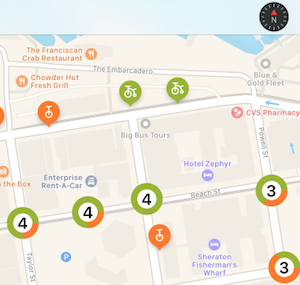
iOS 11 では、MapKit に次の新機能が追加されます。

ズーム中にマーカーを自動的にグループ化する
サンプルは、新しい iOS 11 注釈クラスタリング機能を実装する方法を示しています。
1.MKPointAnnotation サブクラスを作成する
ポイント注釈クラスは、マップ上の各マーカーを表します。 これらは、MapView.AddAnnotation() を使用して個別に追加することも、MapView.AddAnnotations() を使用して配列から追加することもできます。
ポイント注釈クラスには視覚的表現はありません。マーカーに関連付けられているデータ (最も重要なのは、マップ上の緯度と経度を表す Coordinate プロパティ) と任意のカスタム プロパティを表すためにのみ必要です。
public class Bike : MKPointAnnotation
{
  public BikeType Type { get; set; } = BikeType.Tricycle;
  public Bike(){}
  public Bike(NSNumber lat, NSNumber lgn, NSNumber type)
  {
    Coordinate = new CLLocationCoordinate2D(lat.NFloatValue, lgn.NFloatValue);
    switch(type.NUIntValue) {
      case 0:
        Type = BikeType.Unicycle;
        break;
      case 1:
        Type = BikeType.Tricycle;
        break;
    }
  }
}
2.単一マーカーの MKMarkerAnnotationView サブクラスを作成する
マーカー注釈ビューは、各注釈の視覚的表現であり、次のようなプロパティを使用してスタイルが設定されます。
- MarkerTintColor – マーカーの色。
- GlyphText – マーカーに表示されるテキスト。
- GlyphImage – マーカーに表示されるイメージを設定します。
- DisplayPriority – マップがマーカーで混雑している場合の z オーダー (積み重ね動作) を決定します。
Required、DefaultHigh、DefaultLowのいずれかを使用します。
自動クラスタリングをサポートするには、次の設定も必要です。
- ClusteringIdentifier – これは、まとめてクラスター化されるマーカーを制御します。 すべてのマーカーに同じ識別子を使用することも、異なる識別子を使用してグループ化する方法を制御することもできます。
[Register("BikeView")]
public class BikeView : MKMarkerAnnotationView
{
  public static UIColor UnicycleColor = UIColor.FromRGB(254, 122, 36);
  public static UIColor TricycleColor = UIColor.FromRGB(153, 180, 44);
  public override IMKAnnotation Annotation
  {
    get {
      return base.Annotation;
    }
    set {
      base.Annotation = value;

      var bike = value as Bike;
      if (bike != null){
        ClusteringIdentifier = "bike";
        switch(bike.Type){
          case BikeType.Unicycle:
            MarkerTintColor = UnicycleColor;
            GlyphImage = UIImage.FromBundle("Unicycle");
            DisplayPriority = MKFeatureDisplayPriority.DefaultLow;
            break;
          case BikeType.Tricycle:
            MarkerTintColor = TricycleColor;
            GlyphImage = UIImage.FromBundle("Tricycle");
            DisplayPriority = MKFeatureDisplayPriority.DefaultHigh;
            break;
        }
      }
    }
  }
3.マーカーのクラスターを表す MKAnnotationView を作成する
マーカーのクラスターを表す注釈ビューは単純なイメージにすることができますが、ユーザーは、アプリにグループ化されたマーカーの数に関する視覚的な手掛かりが提供されることを期待しています。
サンプルでは、CoreGraphics を使用して、クラスター内のマーカーの数と、各マーカーの種類の割合の円グラフ表現をレンダリングします。
また、次を設定する必要があります。
- DisplayPriority – マップがマーカーで混雑している場合の z オーダー (積み重ね動作) を決定します。
Required、DefaultHigh、DefaultLowのいずれかを使用します。 - CollisionMode –
CircleまたはRectangle。
[Register("ClusterView")]
public class ClusterView : MKAnnotationView
{
  public static UIColor ClusterColor = UIColor.FromRGB(202, 150, 38);
  public override IMKAnnotation Annotation
  {
    get {
      return base.Annotation;
    }
    set {
      base.Annotation = value;
      var cluster = MKAnnotationWrapperExtensions.UnwrapClusterAnnotation(value);
      if (cluster != null)
      {
        var renderer = new UIGraphicsImageRenderer(new CGSize(40, 40));
        var count = cluster.MemberAnnotations.Length;
        var unicycleCount = CountBikeType(cluster.MemberAnnotations, BikeType.Unicycle);

        Image = renderer.CreateImage((context) => {
          // Fill full circle with tricycle color
          BikeView.TricycleColor.SetFill();
          UIBezierPath.FromOval(new CGRect(0, 0, 40, 40)).Fill();
          // Fill pie with unicycle color
          BikeView.UnicycleColor.SetFill();
          var piePath = new UIBezierPath();
          piePath.AddArc(new CGPoint(20,20), 20, 0, (nfloat)(Math.PI * 2.0 * unicycleCount / count), true);
          piePath.AddLineTo(new CGPoint(20, 20));
          piePath.ClosePath();
          piePath.Fill();
          // Fill inner circle with white color
          UIColor.White.SetFill();
          UIBezierPath.FromOval(new CGRect(8, 8, 24, 24)).Fill();
          // Finally draw count text vertically and horizontally centered
          var attributes = new UIStringAttributes() {
            ForegroundColor = UIColor.Black,
            Font = UIFont.BoldSystemFontOfSize(20)
          };
          var text = new NSString($"{count}");
          var size = text.GetSizeUsingAttributes(attributes);
          var rect = new CGRect(20 - size.Width / 2, 20 - size.Height / 2, size.Width, size.Height);
          text.DrawString(rect, attributes);
        });
      }
    }
  }
  public ClusterView(){}
  public ClusterView(MKAnnotation annotation, string reuseIdentifier) : base(annotation, reuseIdentifier)
  {
    DisplayPriority = MKFeatureDisplayPriority.DefaultHigh;
    CollisionMode = MKAnnotationViewCollisionMode.Circle;
    // Offset center point to animate better with marker annotations
    CenterOffset = new CoreGraphics.CGPoint(0, -10);
  }
  private nuint CountBikeType(IMKAnnotation[] members, BikeType type) {
    nuint count = 0;
    foreach(Bike member in members){
      if (member.Type == type) ++count;
    }
    return count;
  }
}
4.ビュー クラスを登録する
マップ ビュー コントロールを作成してビューに追加する場合は、マップの拡大/縮小時に自動クラスタリング動作を有効にするために注釈ビューの種類を登録します。
MapView.Register(typeof(BikeView), MKMapViewDefault.AnnotationViewReuseIdentifier);
MapView.Register(typeof(ClusterView), MKMapViewDefault.ClusterAnnotationViewReuseIdentifier);
5.マップをレンダリングします。
マップがレンダリングされると、ズーム レベルに応じて注釈マーカーがクラスター化またはレンダリングされます。 ズーム レベルが変わると、マーカーはクラスター内およびクラスター外でアニメーション化されます。

MapKit を使用したデータの表示に関する詳細については、マップ セクションを参照してください。
コンパス ボタン
iOS 11 では、コンパスをマップからポップ アウトしてビュー内の別の場所にレンダリングする機能が追加されています。
コンパスのようなボタン (マップの向きが変更されたときのライブ アニメーションを含む) を作成し、別のコントロールにレンダリングします。
![ナビゲーション バーの [コンパス] ボタン](mapkit-images/compass-sml.png)
次のコードでは、コンパス ボタンを作成し、ナビゲーション バーにレンダリングします。
var compass = MKCompassButton.FromMapView(MapView);
compass.CompassVisibility = MKFeatureVisibility.Visible;
NavigationItem.RightBarButtonItem = new UIBarButtonItem(compass);
MapView.ShowsCompass = false; // so we don't have two compasses!
ShowsCompass プロパティは、マップ ビュー内の既定のコンパスの表示を制御するために使用できます。
スケール ビュー
MKScaleView.FromMapView() メソッドを使用してビューの他の場所にスケールを追加し、ビュー階層内の他の場所に追加するスケール ビューのインスタンスを取得します。

var scale = MKScaleView.FromMapView(MapView);
scale.LegendAlignment = MKScaleViewAlignment.Trailing;
scale.TranslatesAutoresizingMaskIntoConstraints = false;
View.AddSubview(scale); // constraints omitted for simplicity
MapView.ShowsScale = false; // so we don't have two scale displays!
ShowsScale プロパティは、マップ ビュー内の既定のコンパスの参照可能範囲を制御するために使用できます。
ユーザー追跡ボタン
ユーザー追跡ボタンは、ユーザーの現在の場所を中心にしてマップを配置します。 MKUserTrackingButton.FromMapView() メソッドを使用して、ボタンのインスタンスを取得し、書式設定の変更を適用し、ビュー階層内の他の場所に追加します。
![マップ上にオーバーレイされた [ユーザーの場所] ボタン](mapkit-images/user-location-sml.png)
var button = MKUserTrackingButton.FromMapView(MapView);
button.Layer.BackgroundColor = UIColor.FromRGBA(255,255,255,80).CGColor;
button.Layer.BorderColor = UIColor.White.CGColor;
button.Layer.BorderWidth = 1;
button.Layer.CornerRadius = 5;
button.TranslatesAutoresizingMaskIntoConstraints = false;
View.AddSubview(button); // constraints omitted for simplicity