Apple でのサインインは、サードパーティの認証サービスのユーザーに ID 保護を提供する新しいサービスです。 iOS 13 以降、Apple では、サードパーティの認証サービスを使用する新しいアプリでも、Apple でのサインインを提供するよう要求します。 更新中の既存のアプリでは、2020 年 4 月まで Apple でのサインインを追加する必要はありません。
このドキュメントでは、iOS 13 アプリケーションに Apple でのサインインを追加する方法について説明します。
Apple 開発者のセットアップ
Apple でのサインインを使用してアプリをビルドして実行する前に、これらの手順を完了する必要があります。 Apple Developer Certificates, Identifiers & Profiles ポータルで:
- 新しいアプリ ID 識別子を作成します。
- [説明] フィールドで説明を設定します。
- 明示的なバンドル ID を選択し、フィールドに
com.xamarin.AddingTheSignInWithAppleFlowToYourAppを設定します。 - Apple でのサインイン機能を有効にし、新しい ID を登録します。
- 新しい ID を使用して新しいプロビジョニング プロファイルを作成します。
- デバイスにダウンロードしてインストールします。
- Visual Studio で、Entitlements.plist ファイルで Apple でのサインイン機能を有効にします。
サインインの状態を確認する
アプリが開始されたとき、またはユーザーの認証状態を最初に確認する必要がある場合は、ASAuthorizationAppleIdProvider のインスタンスを作成して現在の状態を確認します。
var appleIdProvider = new ASAuthorizationAppleIdProvider ();
appleIdProvider.GetCredentialState (KeychainItem.CurrentUserIdentifier, (credentialState, error) => {
    switch (credentialState) {
    case ASAuthorizationAppleIdProviderCredentialState.Authorized:
        // The Apple ID credential is valid.
        break;
    case ASAuthorizationAppleIdProviderCredentialState.Revoked:
        // The Apple ID credential is revoked.
        break;
    case ASAuthorizationAppleIdProviderCredentialState.NotFound:
        // No credential was found, so show the sign-in UI.
        InvokeOnMainThread (() => {
            var storyboard = UIStoryboard.FromName ("Main", null);

            if (!(storyboard.InstantiateViewController (nameof (LoginViewController)) is LoginViewController viewController))
                return;

            viewController.ModalPresentationStyle = UIModalPresentationStyle.FormSheet;
            viewController.ModalInPresentation = true;
            Window?.RootViewController?.PresentViewController (viewController, true, null);
        });
        break;
    }
});
このコードでは、AppDelegate.cs の FinishedLaunching の間に呼び出されるアプリで、状態が NotFound のときに処理し、LoginViewController をユーザーに表示します。 Authorized または Revoked の状態が返された場合、別のアクションがユーザーに表示される可能性があります。
Apple でのサインインの LoginViewController
ログイン ロジックを実装し、Apple でのサインインを提供する UIViewController では、次の LoginViewController の例のように、IASAuthorizationControllerDelegate と IASAuthorizationControllerPresentationContextProviding を実装する必要があります。
public partial class LoginViewController : UIViewController, IASAuthorizationControllerDelegate, IASAuthorizationControllerPresentationContextProviding {
    public LoginViewController (IntPtr handle) : base (handle)
    {
    }

    public override void ViewDidLoad ()
    {
        base.ViewDidLoad ();
        // Perform any additional setup after loading the view, typically from a nib.

        SetupProviderLoginView ();
    }

    public override void ViewDidAppear (bool animated)
    {
        base.ViewDidAppear (animated);

        PerformExistingAccountSetupFlows ();
    }

    void SetupProviderLoginView ()
    {
        var authorizationButton = new ASAuthorizationAppleIdButton (ASAuthorizationAppleIdButtonType.Default, ASAuthorizationAppleIdButtonStyle.White);
        authorizationButton.TouchUpInside += HandleAuthorizationAppleIDButtonPress;
        loginProviderStackView.AddArrangedSubview (authorizationButton);
    }

    // Prompts the user if an existing iCloud Keychain credential or Apple ID credential is found.
    void PerformExistingAccountSetupFlows ()
    {
        // Prepare requests for both Apple ID and password providers.
        ASAuthorizationRequest [] requests = {
            new ASAuthorizationAppleIdProvider ().CreateRequest (),
            new ASAuthorizationPasswordProvider ().CreateRequest ()
        };

        // Create an authorization controller with the given requests.
        var authorizationController = new ASAuthorizationController (requests);
        authorizationController.Delegate = this;
        authorizationController.PresentationContextProvider = this;
        authorizationController.PerformRequests ();
    }

    private void HandleAuthorizationAppleIDButtonPress (object sender, EventArgs e)
    {
        var appleIdProvider = new ASAuthorizationAppleIdProvider ();
        var request = appleIdProvider.CreateRequest ();
        request.RequestedScopes = new [] { ASAuthorizationScope.Email, ASAuthorizationScope.FullName };

        var authorizationController = new ASAuthorizationController (new [] { request });
        authorizationController.Delegate = this;
        authorizationController.PresentationContextProvider = this;
        authorizationController.PerformRequests ();
    }
}
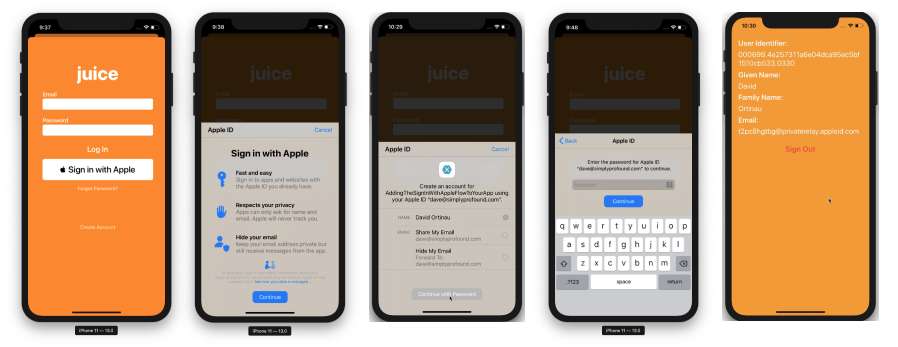
次のコード例では、PerformExistingAccountSetupFlows で現在のログイン状態を確認し、現在のビューにデリゲートとして接続します。 既存の iCloud キーチェーン資格情報または Apple ID 資格情報が見つかった場合、ユーザーはその資格情報を使用するように求められます。
Apple では、この目的専用のボタンである ASAuthorizationAppleIdButton を提供します。 タッチすると、このボタンによって、メソッド HandleAuthorizationAppleIDButtonPress で処理されたワークフローがトリガーされます。
認可の処理
IASAuthorizationController では、ユーザーのアカウントを保存するカスタム ロジックを実装します。 次の例では、Apple 独自のストレージ サービスであるキーチェーンにユーザーのアカウントを保存します。
#region IASAuthorizationController Delegate

[Export ("authorizationController:didCompleteWithAuthorization:")]
public void DidComplete (ASAuthorizationController controller, ASAuthorization authorization)
{
    if (authorization.GetCredential<ASAuthorizationAppleIdCredential> () is ASAuthorizationAppleIdCredential appleIdCredential) {
        var userIdentifier = appleIdCredential.User;
        var fullName = appleIdCredential.FullName;
        var email = appleIdCredential.Email;

        // Create an account in your system.
        // For the purpose of this demo app, store the userIdentifier in the keychain.
        try {
            new KeychainItem ("com.example.apple-samplecode.juice", "userIdentifier").SaveItem (userIdentifier);
        } catch (Exception) {
            Console.WriteLine ("Unable to save userIdentifier to keychain.");
        }

        // For the purpose of this demo app, show the Apple ID credential information in the ResultViewController.
        if (!(PresentingViewController is ResultViewController viewController))
            return;

        InvokeOnMainThread (() => {
            viewController.UserIdentifierText = userIdentifier;
            viewController.GivenNameText = fullName?.GivenName ?? "";
            viewController.FamilyNameText = fullName?.FamilyName ?? "";
            viewController.EmailText = email ?? "";

            DismissViewController (true, null);
        });
    } else if (authorization.GetCredential<ASPasswordCredential> () is ASPasswordCredential passwordCredential) {
        // Sign in using an existing iCloud Keychain credential.
        var username = passwordCredential.User;
        var password = passwordCredential.Password;

        // For the purpose of this demo app, show the password credential as an alert.
        InvokeOnMainThread (() => {
            var message = $"The app has received your selected credential from the keychain. \n\n Username: {username}\n Password: {password}";
            var alertController = UIAlertController.Create ("Keychain Credential Received", message, UIAlertControllerStyle.Alert);
            alertController.AddAction (UIAlertAction.Create ("Dismiss", UIAlertActionStyle.Cancel, null));

            PresentViewController (alertController, true, null);
        });
    }
}

[Export ("authorizationController:didCompleteWithError:")]
public void DidComplete (ASAuthorizationController controller, NSError error)
{
    Console.WriteLine (error);
}

#endregion
認可コントローラー
この実装の最後の部分は、プロバイダーの認可要求を管理する ASAuthorizationController です。
#region IASAuthorizationControllerPresentation Context Providing

public UIWindow GetPresentationAnchor (ASAuthorizationController controller) => View.Window;

#endregion