第 5 部 データ バインディングから MVVM まで
Model-View-ViewModel (MVVM) アーキテクチャ パターンは、XAML を念頭に置いて考案されました。 このパターンは、3 つのソフトウェア レイヤー (ビューと呼ばれる XAML ユーザー インターフェイスと、モデルと呼ばれる基になるデータと、ViewModel と呼ばれるビューとモデルの中間) の間に分離を適用します。 ビューと ViewModel は多くの場合、XAML ファイルで定義されているデータ バインディング経由で接続されます。 通常、ビューの BindingContext は ViewModel のインスタンスです。
シンプルな ViewModel
ViewModel の導入として、まず、それがないプログラムを見てみましょう。
前に、XAML ファイルが他のアセンブリのクラスを参照できるように、新しい XML 名前空間宣言を定義する方法について説明しました。 System 名前空間の XML 名前空間宣言を定義するプログラムを次に示します。
xmlns:sys="clr-namespace:System;assembly=netstandard"
プログラムは、x:Static を使用して静的な DateTime.Now プロパティから現在の日付と時刻を取得し、その DateTime 値を StackLayout の BindingContext に設定できます。
<StackLayout BindingContext="{x:Static sys:DateTime.Now}" …>
BindingContext は特殊なプロパティです。要素に BindingContext を設定すると、その要素のすべての子に継承されます。 つまり、StackLayout のすべての子がこの同じ BindingContext を持つということであり、そのオブジェクトのプロパティへの単純なバインディングを含めることができます。
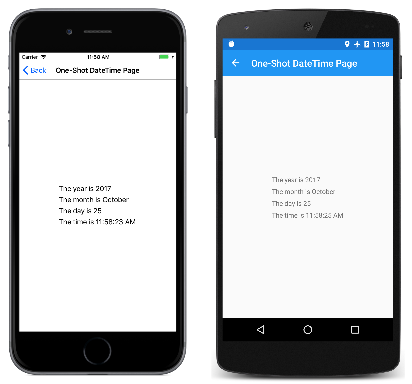
One-Shot DateTime プログラムでは、子のうちの 2 つにはその DateTime 値のプロパティへのバインディングがありますが、他の 2 つの子にはバインディング パスが不足していると思われるバインディングがあります。 これは、DateTime 値自体が StringFormat に使用されることを意味します。
<ContentPage xmlns="http://xamarin.com/schemas/2014/forms"
             xmlns:x="http://schemas.microsoft.com/winfx/2009/xaml"
             xmlns:sys="clr-namespace:System;assembly=netstandard"
             x:Class="XamlSamples.OneShotDateTimePage"
             Title="One-Shot DateTime Page">

    <StackLayout BindingContext="{x:Static sys:DateTime.Now}"
                 HorizontalOptions="Center"
                 VerticalOptions="Center">

        <Label Text="{Binding Year, StringFormat='The year is {0}'}" />
        <Label Text="{Binding StringFormat='The month is {0:MMMM}'}" />
        <Label Text="{Binding Day, StringFormat='The day is {0}'}" />
        <Label Text="{Binding StringFormat='The time is {0:T}'}" />

    </StackLayout>
</ContentPage>
問題は、ページが最初にビルドされたときに日付と時刻が 1 回設定され、変更されないということです。
XAML ファイルは、常に現在の時刻を表示するクロックを表示できますが、解決に役立てるにはコードが必要です。MVVM の観点から考えると、モデルと ViewModel は完全にコードで記述されたクラスです。 ビューは多くの場合、ViewModel に定義されたプロパティをデータ バインディング経由で参照する XAML ファイルです。
正統なモデルには ViewModel についての情報がなく、正統な ViewModel にはビューについての情報がありません。 ただし、多くの場合、プログラマは ViewModel によって公開されるデータ型を、特定のユーザー インターフェイスに関連付けられているデータ型に合わせて調整します。 たとえば、モデルが 8 ビット文字 ASCII 文字列を含むデータベースにアクセスする場合、ViewModel は、ユーザー インターフェイスで Unicode が排他的に使用されることに対応するために、それらの文字列間を Unicode 文字列に変換する必要があります。
MVVM の単純な例 (ここに示すようなもの) では多くの場合、モデルがまったく存在せず、パターンにはデータ バインディングでリンクされたビューと ViewModel だけが含まれます。
DateTime という名前の 1 つのプロパティだけを持つクロックの ViewModel を次に示します。この DateTime プロパティは毎秒更新されます。
using System;
using System.ComponentModel;
using Xamarin.Forms;

namespace XamlSamples
{
    class ClockViewModel : INotifyPropertyChanged
    {
        DateTime dateTime;

        public event PropertyChangedEventHandler PropertyChanged;

        public ClockViewModel()
        {
            this.DateTime = DateTime.Now;

            Device.StartTimer(TimeSpan.FromSeconds(1), () =>
                {
                    this.DateTime = DateTime.Now;
                    return true;
                });
        }

        public DateTime DateTime
        {
            set
            {
                if (dateTime != value)
                {
                    dateTime = value;

                    if (PropertyChanged != null)
                    {
                        PropertyChanged(this, new PropertyChangedEventArgs("DateTime"));
                    }
                }
            }
            get
            {
                return dateTime;
            }
        }
    }
}
ViewModel は通常 INotifyPropertyChanged インターフェイスを実装します。つまり、そのプロパティのいずれかが変更されるたびに PropertyChanged イベントが発生します。 Xamarin.Forms のデータ バインディング メカニズムは、プロパティが変更されたときに通知を受け取り、ターゲットを更新して常に新しい値に維持できるように、ハンドラーをこの PropertyChanged イベントにアタッチします。
この ViewModel に基づくクロックは、次のように簡潔にできます。
<ContentPage xmlns="http://xamarin.com/schemas/2014/forms"
             xmlns:x="http://schemas.microsoft.com/winfx/2009/xaml"
             xmlns:local="clr-namespace:XamlSamples;assembly=XamlSamples"
             x:Class="XamlSamples.ClockPage"
             Title="Clock Page">

    <Label Text="{Binding DateTime, StringFormat='{0:T}'}"
           FontSize="Large"
           HorizontalOptions="Center"
           VerticalOptions="Center">
        <Label.BindingContext>
            <local:ClockViewModel />
        </Label.BindingContext>
    </Label>
</ContentPage>
プロパティ要素タグを使用して、ClockViewModel を Label の BindingContext に設定する方法に注目してください。 別の方法として、Resources コレクション内の ClockViewModel をインスタンス化して、それを StaticResource マークアップ拡張経由で BindingContext に設定することもできます。 あるいは、分離コード ファイルで ViewModel をインスタンス化できます。
Label の Text プロパティの Binding マークアップ拡張機能によって、DateTime のプロパティを書式設定できます。 表示は次のようになります。
プロパティをピリオドで区切ることで、ViewModel の DateTime プロパティの個々のプロパティにアクセスすることもできます。
<Label Text="{Binding DateTime.Second, StringFormat='{0}'}" … >
対話的な MVVM
MVVM は、多くの場合、基になるデータ モデルに基づく対話型ビューの双方向データ バインディングで使用されます。
Color 値の Hue、Saturation、Luminosity の各値への変換と、その逆を行う HslViewModel という名前のクラスを次に示します。
using System;
using System.ComponentModel;
using Xamarin.Forms;

namespace XamlSamples
{
    public class HslViewModel : INotifyPropertyChanged
    {
        double hue, saturation, luminosity;
        Color color;

        public event PropertyChangedEventHandler PropertyChanged;

        public double Hue
        {
            set
            {
                if (hue != value)
                {
                    hue = value;
                    OnPropertyChanged("Hue");
                    SetNewColor();
                }
            }
            get
            {
                return hue;
            }
        }

        public double Saturation
        {
            set
            {
                if (saturation != value)
                {
                    saturation = value;
                    OnPropertyChanged("Saturation");
                    SetNewColor();
                }
            }
            get
            {
                return saturation;
            }
        }

        public double Luminosity
        {
            set
            {
                if (luminosity != value)
                {
                    luminosity = value;
                    OnPropertyChanged("Luminosity");
                    SetNewColor();
                }
            }
            get
            {
                return luminosity;
            }
        }

        public Color Color
        {
            set
            {
                if (color != value)
                {
                    color = value;
                    OnPropertyChanged("Color");

                    Hue = value.Hue;
                    Saturation = value.Saturation;
                    Luminosity = value.Luminosity;
                }
            }
            get
            {
                return color;
            }
        }

        void SetNewColor()
        {
            Color = Color.FromHsla(Hue, Saturation, Luminosity);
        }

        protected virtual void OnPropertyChanged(string propertyName)
        {
            PropertyChanged?.Invoke(this, new PropertyChangedEventArgs(propertyName));
        }
    }
}
Hue、Saturation、Luminosity の各プロパティを変更すると、Color プロパティが変更され、Color を変更すると、他の 3 つのプロパティが変更されます。 プロパティが変更されない限りはクラスが PropertyChanged イベントを呼び出さない点を除くと、これは無限ループのように見えるかもしれません。 呼び出さないことにより、それがなければ制御不能なフィードバック ループが終わります。
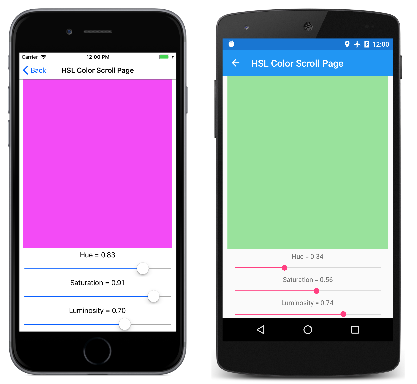
次の XAML ファイルには、Color プロパティが ViewModel の Color プロパティにバインドされている BoxView と、Hue、Saturation、Luminosity の各プロパティにバインドされた 3 つの Slider ビューと 3 つの Label ビューが含まれています。
<ContentPage xmlns="http://xamarin.com/schemas/2014/forms"
             xmlns:x="http://schemas.microsoft.com/winfx/2009/xaml"
             xmlns:local="clr-namespace:XamlSamples;assembly=XamlSamples"
             x:Class="XamlSamples.HslColorScrollPage"
             Title="HSL Color Scroll Page">
    <ContentPage.BindingContext>
        <local:HslViewModel Color="Aqua" />
    </ContentPage.BindingContext>

    <StackLayout Padding="10, 0">
        <BoxView Color="{Binding Color}"
                 VerticalOptions="FillAndExpand" />

        <Label Text="{Binding Hue, StringFormat='Hue = {0:F2}'}"
               HorizontalOptions="Center" />

        <Slider Value="{Binding Hue, Mode=TwoWay}" />

        <Label Text="{Binding Saturation, StringFormat='Saturation = {0:F2}'}"
               HorizontalOptions="Center" />

        <Slider Value="{Binding Saturation, Mode=TwoWay}" />

        <Label Text="{Binding Luminosity, StringFormat='Luminosity = {0:F2}'}"
               HorizontalOptions="Center" />

        <Slider Value="{Binding Luminosity, Mode=TwoWay}" />
    </StackLayout>
</ContentPage>
それぞれの Label のバインドは、既定の OneWay です。 値を表示するだけで済みます。 しかし、それぞれの Slider のバインディングは TwoWay です。 これにより、ViewModel から Slider を初期化できます。 ViewModel がインスタンス化されるときに、Color プロパティが Aqua に設定されます。 しかし、Slider が変更されると、ViewModel のプロパティに新しい値を設定して、新しい色を計算することも必要になります。
ViewModel を使用したコマンド実行
多くの場合、MVVM パターンは、ViewModel のビュー並列データ オブジェクト内のユーザー インターフェイス オブジェクトというデータ項目の操作に制限されます。
ただし、ビューには、ViewModel のさまざまなアクションをトリガーするボタンが含まれていることが必要な場合があります。 しかし、ViewModel にボタンに対する Clicked ハンドラーを含めないようにする必要があります。これは、ViewModel を特定のユーザー インターフェイス パラダイムに結び付けるからです。
ViewModel が特定のユーザー インターフェイス オブジェクトからは独立しているが、ViewModel 内でメソッドを呼び出せるようにするために、"コマンド" インターフェイスが存在します。 このコマンド インターフェイスは、Xamarin.Forms の次の要素でサポートされます。
ButtonMenuItemToolbarItemSearchBarTextCell(およびこれに従ってImageCellも)ListViewTapGestureRecognizer
SearchBar 要素と ListView 要素を除き、これらの要素は次の 2 つのプロパティを定義します。
Command(System.Windows.Input.ICommand型)CommandParameter(Object型)
SearchBar は SearchCommand プロパティと SearchCommandParameter プロパティを定義し、ListView は型 ICommand の RefreshCommand プロパティを定義します。
ICommand インターフェイスは、次の 2 つのメソッドと 1 つのイベントを定義します。
void Execute(object arg)bool CanExecute(object arg)event EventHandler CanExecuteChanged
ViewModel は、型 ICommand のプロパティを定義できます。 その後、これらのプロパティを各 Button の Command プロパティ、または他の要素のプロパティ、またはこのインターフェイスを実装するカスタム ビューにバインドできます。 必要に応じて、CommandParameter プロパティを設定して、この ViewModel プロパティにバインドされている個々の Button オブジェクト (またはその他の要素) を識別できます。 内部的には、Button はユーザーが Button をタップするたびに Execute メソッドを呼び出し、Execute メソッドに CommandParameter を渡します。
CanExecute メソッドと CanExecuteChanged イベントは、Button タップが現在無効かもしれない場合に使用されます、その場合、Button はそれ自体を無効にする必要があります。 Button は、Command プロパティが最初に設定されたときと、CanExecuteChanged イベントが発生するたびに CanExecute を呼び出します。 CanExecute が false を返した場合、Button はそれ自体を無効にし、Execute 呼び出しを発生させません。
ViewModels へのコマンド実行の追加に役立つように、Xamarin.Forms は ICommand を実装する 2 つのクラス Command および Command<T> を定義します。ここで T は Execute と CanExecute に対する引数の型です。 これら 2 つのクラスは、CanExecuteChanged イベントの起動を Command オブジェクトに強制するために、いくつかのコンストラクターと、ViewModel が呼び出すことができる ChangeCanExecute メソッドを定義します。
電話番号の入力を意図した単純なキーパッドの ViewModel を次に示します。 Execute メソッドと CanExecute メソッドが、ラムダ関数としてコンストラクター内に直接定義されています。
using System;
using System.ComponentModel;
using System.Windows.Input;
using Xamarin.Forms;

namespace XamlSamples
{
    class KeypadViewModel : INotifyPropertyChanged
    {
        string inputString = "";
        string displayText = "";
        char[] specialChars = { '*', '#' };

        public event PropertyChangedEventHandler PropertyChanged;

        // Constructor
        public KeypadViewModel()
        {
            AddCharCommand = new Command<string>((key) =>
                {
                    // Add the key to the input string.
                    InputString += key;
                });

            DeleteCharCommand = new Command(() =>
                {
                    // Strip a character from the input string.
                    InputString = InputString.Substring(0, InputString.Length - 1);
                },
                () =>
                {
                    // Return true if there's something to delete.
                    return InputString.Length > 0;
                });
        }

        // Public properties
        public string InputString
        {
            protected set
            {
                if (inputString != value)
                {
                    inputString = value;
                    OnPropertyChanged("InputString");
                    DisplayText = FormatText(inputString);

                    // Perhaps the delete button must be enabled/disabled.
                    ((Command)DeleteCharCommand).ChangeCanExecute();
                }
            }

            get { return inputString; }
        }

        public string DisplayText
        {
            protected set
            {
                if (displayText != value)
                {
                    displayText = value;
                    OnPropertyChanged("DisplayText");
                }
            }
            get { return displayText; }
        }

        // ICommand implementations
        public ICommand AddCharCommand { protected set; get; }

        public ICommand DeleteCharCommand { protected set; get; }

        string FormatText(string str)
        {
            bool hasNonNumbers = str.IndexOfAny(specialChars) != -1;
            string formatted = str;

            if (hasNonNumbers || str.Length < 4 || str.Length > 10)
            {
            }
            else if (str.Length < 8)
            {
                formatted = String.Format("{0}-{1}",
                                          str.Substring(0, 3),
                                          str.Substring(3));
            }
            else
            {
                formatted = String.Format("({0}) {1}-{2}",
                                          str.Substring(0, 3),
                                          str.Substring(3, 3),
                                          str.Substring(6));
            }
            return formatted;
        }

        protected void OnPropertyChanged(string propertyName)
        {
            PropertyChanged?.Invoke(this, new PropertyChangedEventArgs(propertyName));
        }
    }
}
この ViewModel は、AddCharCommand プロパティが複数のボタン (またはコマンド インターフェイスを持つその他の何か) の Command プロパティにバインドされ、それぞれが CommandParameterによって識別されることを前提としています。 これらのボタンによって InputString プロパティに文字が追加され、DisplayText プロパティの電話番号として書式設定されます。
DeleteCharCommand という名前の ICommand 型の 2 番めのプロパティもあります。 これはバックスペース ボタンにバインドされますが、削除する文字がない場合は、ボタンを無効にする必要があります。
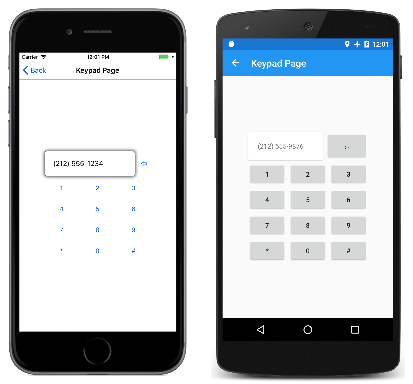
次のキーパッドは、視覚的にはあまり洗練されていません。 その代わりに、コマンド インターフェイスの使用方法をより明確に示すために、マークアップが最小限に減らされています。
<ContentPage xmlns="http://xamarin.com/schemas/2014/forms"
xmlns:x="http://schemas.microsoft.com/winfx/2009/xaml"
xmlns:local="clr-namespace:XamlSamples;assembly=XamlSamples"
x:Class="XamlSamples.KeypadPage"
Title="Keypad Page">
<Grid HorizontalOptions="Center"
VerticalOptions="Center">
<Grid.BindingContext>
<local:KeypadViewModel />
</Grid.BindingContext>
<Grid.RowDefinitions>
<RowDefinition Height="Auto" />
<RowDefinition Height="Auto" />
<RowDefinition Height="Auto" />
<RowDefinition Height="Auto" />
<RowDefinition Height="Auto" />
</Grid.RowDefinitions>
<Grid.ColumnDefinitions>
<ColumnDefinition Width="80" />
<ColumnDefinition Width="80" />
<ColumnDefinition Width="80" />
</Grid.ColumnDefinitions>
<!-- Internal Grid for top row of items -->
<Grid Grid.Row="0" Grid.Column="0" Grid.ColumnSpan="3">
<Grid.ColumnDefinitions>
<ColumnDefinition Width="*" />
<ColumnDefinition Width="Auto" />
</Grid.ColumnDefinitions>
<Frame Grid.Column="0"
OutlineColor="Accent">
<Label Text="{Binding DisplayText}" />
</Frame>
<Button Text="⇦"
Command="{Binding DeleteCharCommand}"
Grid.Column="1"
BorderWidth="0" />
</Grid>
<Button Text="1"
Command="{Binding AddCharCommand}"
CommandParameter="1"
Grid.Row="1" Grid.Column="0" />
<Button Text="2"
Command="{Binding AddCharCommand}"
CommandParameter="2"
Grid.Row="1" Grid.Column="1" />
<Button Text="3"
Command="{Binding AddCharCommand}"
CommandParameter="3"
Grid.Row="1" Grid.Column="2" />
<Button Text="4"
Command="{Binding AddCharCommand}"
CommandParameter="4"
Grid.Row="2" Grid.Column="0" />
<Button Text="5"
Command="{Binding AddCharCommand}"
CommandParameter="5"
Grid.Row="2" Grid.Column="1" />
<Button Text="6"
Command="{Binding AddCharCommand}"
CommandParameter="6"
Grid.Row="2" Grid.Column="2" />
<Button Text="7"
Command="{Binding AddCharCommand}"
CommandParameter="7"
Grid.Row="3" Grid.Column="0" />
<Button Text="8"
Command="{Binding AddCharCommand}"
CommandParameter="8"
Grid.Row="3" Grid.Column="1" />
<Button Text="9"
Command="{Binding AddCharCommand}"
CommandParameter="9"
Grid.Row="3" Grid.Column="2" />
<Button Text="*"
Command="{Binding AddCharCommand}"
CommandParameter="*"
Grid.Row="4" Grid.Column="0" />
<Button Text="0"
Command="{Binding AddCharCommand}"
CommandParameter="0"
Grid.Row="4" Grid.Column="1" />
<Button Text="#"
Command="{Binding AddCharCommand}"
CommandParameter="#"
Grid.Row="4" Grid.Column="2" />
</Grid>
</ContentPage>
このマークアップに現れる最初の Button の Command プロパティは DeleteCharCommand にバインドされ、残りのプロパティは、AddCharCommand 面に表示される文字と同じ Button を持つ CommandParameter にバインドされます。 動作中のプログラムを次に示します。
非同期メソッドの呼び出し
コマンドは非同期メソッドを呼び出すこともできます。 これは、Execute メソッドを指定するときに、async キーワードと await キーワードを使用することで実現されます。
DownloadCommand = new Command (async () => await DownloadAsync ());
次は、DownloadAsync メソッドが Task であり、待機する必要があることを示します。
async Task DownloadAsync ()
{
    await Task.Run (() => Download ());
}

void Download ()
{
    ...
}
ナビゲーション メニューの実装
この一連の記事のすべてのソース コードを含むサンプル プログラムは、ホーム ページに ViewModel を使用します。 この ViewModel は、各サンプル ページの型、タイトル、および簡単な説明を含む、Type、Title、Description という名前の 3 つのプロパティを持つ短いクラスの定義です。 ViewModel はさらに、プログラム内のすべてのページのコレクションである All という名前の静的プロパティを定義します。
public class PageDataViewModel
{
    public PageDataViewModel(Type type, string title, string description)
    {
        Type = type;
        Title = title;
        Description = description;
    }

    public Type Type { private set; get; }

    public string Title { private set; get; }

    public string Description { private set; get; }

    static PageDataViewModel()
    {
        All = new List<PageDataViewModel>
        {
            // Part 1. Getting Started with XAML
            new PageDataViewModel(typeof(HelloXamlPage), "Hello, XAML",
                                  "Display a Label with many properties set"),

            new PageDataViewModel(typeof(XamlPlusCodePage), "XAML + Code",
                                  "Interact with a Slider and Button"),

            // Part 2. Essential XAML Syntax
            new PageDataViewModel(typeof(GridDemoPage), "Grid Demo",
                                  "Explore XAML syntax with the Grid"),

            new PageDataViewModel(typeof(AbsoluteDemoPage), "Absolute Demo",
                                  "Explore XAML syntax with AbsoluteLayout"),

            // Part 3. XAML Markup Extensions
            new PageDataViewModel(typeof(SharedResourcesPage), "Shared Resources",
                                  "Using resource dictionaries to share resources"),

            new PageDataViewModel(typeof(StaticConstantsPage), "Static Constants",
                                  "Using the x:Static markup extensions"),

            new PageDataViewModel(typeof(RelativeLayoutPage), "Relative Layout",
                                  "Explore XAML markup extensions"),

            // Part 4. Data Binding Basics
            new PageDataViewModel(typeof(SliderBindingsPage), "Slider Bindings",
                                  "Bind properties of two views on the page"),

            new PageDataViewModel(typeof(SliderTransformsPage), "Slider Transforms",
                                  "Use Sliders with reverse bindings"),

            new PageDataViewModel(typeof(ListViewDemoPage), "ListView Demo",
                                  "Use a ListView with data bindings"),

            // Part 5. From Data Bindings to MVVM
            new PageDataViewModel(typeof(OneShotDateTimePage), "One-Shot DateTime",
                                  "Obtain the current DateTime and display it"),

            new PageDataViewModel(typeof(ClockPage), "Clock",
                                  "Dynamically display the current time"),

            new PageDataViewModel(typeof(HslColorScrollPage), "HSL Color Scroll",
                                  "Use a view model to select HSL colors"),

            new PageDataViewModel(typeof(KeypadPage), "Keypad",
                                  "Use a view model for numeric keypad logic")
        };
    }

    public static IList<PageDataViewModel> All { private set; get; }
}
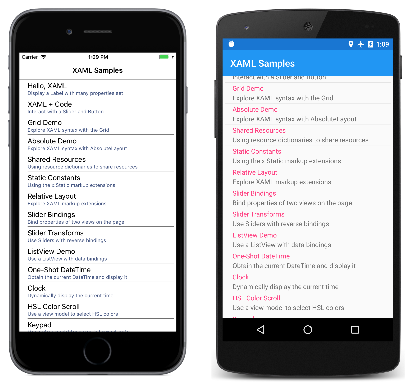
MainPage の XAML ファイルは、所有する ItemsSource プロパティがその All プロパティに設定され、各ページの Title プロパティと Description プロパティを表示するための TextCell が含まれている ListBox を定義します。
<ContentPage xmlns="http://xamarin.com/schemas/2014/forms"
             xmlns:x="http://schemas.microsoft.com/winfx/2009/xaml"
             xmlns:local="clr-namespace:XamlSamples"
             x:Class="XamlSamples.MainPage"
             Padding="5, 0"
             Title="XAML Samples">

    <ListView ItemsSource="{x:Static local:PageDataViewModel.All}"
              ItemSelected="OnListViewItemSelected">
        <ListView.ItemTemplate>
            <DataTemplate>
                <TextCell Text="{Binding Title}"
                          Detail="{Binding Description}" />
            </DataTemplate>
        </ListView.ItemTemplate>
    </ListView>
</ContentPage>
ページは次のようにスクロール可能なリストに表示されます。
分離コード ファイル内のハンドラーは、ユーザーが項目を選択したときにトリガーされます。 ハンドラーは、ListBox の SelectedItem プロパティを null に戻してから、選択したページをインスタンス化して、そこに移動します。
private async void OnListViewItemSelected(object sender, SelectedItemChangedEventArgs args)
{
    (sender as ListView).SelectedItem = null;

    if (args.SelectedItem != null)
    {
        PageDataViewModel pageData = args.SelectedItem as PageDataViewModel;
        Page page = (Page)Activator.CreateInstance(pageData.Type);
        await Navigation.PushAsync(page);
    }
}
ビデオ
Xamarin Evolve 2016: Xamarin.Forms と Prism によって MVVM が簡潔に
まとめ
XAML は、特にデータ バインディングと MVVM を使用するときに、Xamarin.Forms アプリケーションでユーザー インターフェイスを定義するのに効果的ななツールです。 その成果は、コードにすべてのバックグラウンド サポートが含まれた、クリーンかつエレガントで、ツールで使用できる可能性があるユーザー インターフェイス表現です。


