Azure Cognitive Services の利用
Azure Cognitive Services は、AI アプリケーションとデータ フローで使用できるクラウドベースの API のセットです。 事前トレーニング済みのモデルが提供され、アプリケーションで使用する準備が整っており、データを必要とせず、モデルのトレーニングも必要ありません。 これらは、HTTP REST インターフェイスを介してアプリケーションに簡単に統合できます。
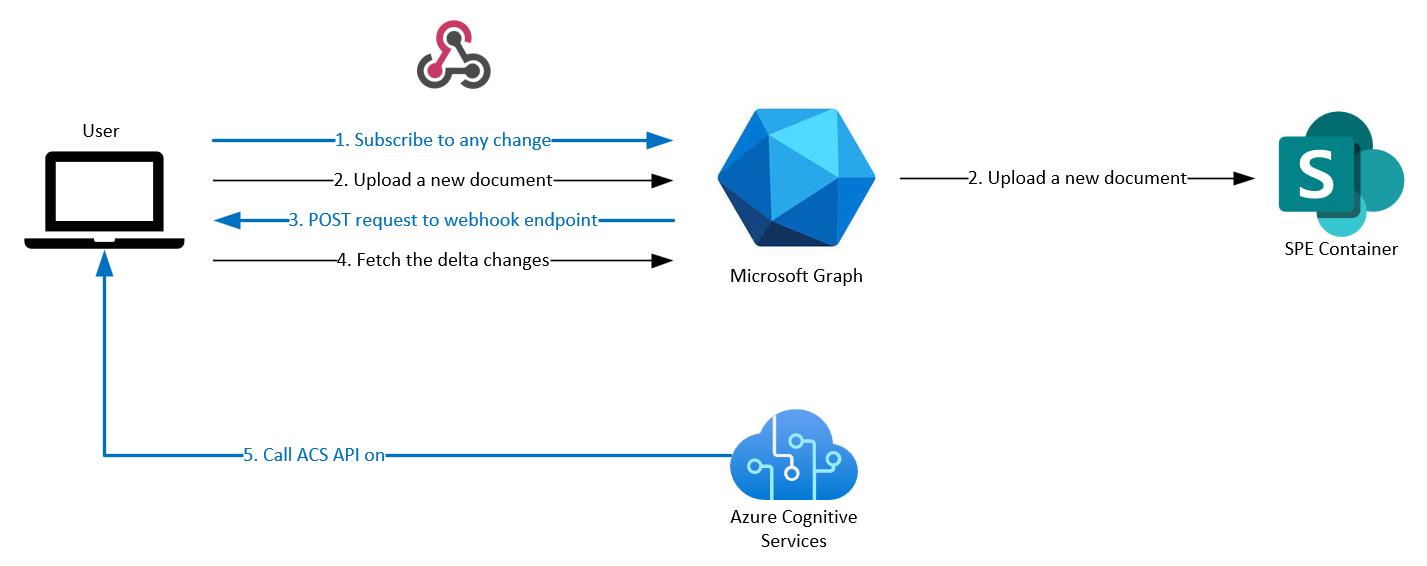
Webhook を アプリケーション で使用して、既存のファイルが更新されたとき、または Webhook の使用に関するチュートリアルで新しいファイルがアップロードされるたびに通知を受け取る方法を既に学習しました。 このチュートリアルでは、Azure Cognitive Services と接続して請求書からデータを抽出する方法について説明します。
コンテナーの変更時に現在の SharePoint アプリケーションで AI の自動処理を設定するには、 Webhook の使用 に従って次の操作を行う必要があります。
- コンテナーの差分変更を取得します。 現在、コンテナーに変更があるたびに通知を受け取ることができ、追加または更新されたファイルが取得されます。
- Azure Cognitive Services のドキュメント インテリジェンス サービス API を呼び出します。 API を使用してイメージからフィールドを抽出し、抽出されたファイルを取得するには、Azure AI リソースを作成する必要があります。 このチュートリアルに示すように保存することも、必要に応じて処理することもできます。
ヒント
このチュートリアルで使用される Microsoft Graph API の詳細については、「 ドライブの変更を追跡する」、「 DriveItem リソースを取得する」、および「 DriveItem の内容をアップロードまたは置き換える」を参照してください。
コンテナーの差分変更を取得する
GraphProvider.tsを開き、メソッド getDriveChangesを実装して、変更された項目の一覧を取得します。
public static async getDriveChanges(driveId: string): Promise<any[]> {
  let changedItems: any[] = [];
  const driveDeltaBasePath: string = `/drives/${driveId}/items/root/delta`;
  let driveDeltaTokenParams: string = "";
  let hasMoreChanges: boolean = true;
  try{
    do {
      if (this.changeTokens.has(driveId)) {
        driveDeltaTokenParams = `?token=${this.changeTokens.get(driveId)}`
      }
      const response = await this.graphClient.api(driveDeltaBasePath + driveDeltaTokenParams).get();
      changedItems.push(...response.value);
      if (response['@odata.nextLink']) {
        const token = new URL(response['@odata.nextLink']).searchParams.get('token');
        this.changeTokens.set(driveId, token);
      } else {
        hasMoreChanges = false;
        const token = new URL(response['@odata.deltaLink']).searchParams.get('token');
        this.changeTokens.set(driveId, token);
      }
      console.log(this.changeTokens.get(driveId));
    } while (hasMoreChanges);
  }
  catch(err){
    console.log(err);
  }
  return changedItems;
}
メソッド getDriveItem を実装して、コンテナーからファイルをフェッチします。
public static async getDriveItem(driveId: string, itemId: string): Promise<any> {
  return await this.graphClient.api(`/drives/${driveId}/items/${itemId}`).get();
}
新しいファイル ReceiptProcessor.ts を作成し、 processDriveメソッドを実装します。
export abstract class ReceiptProcessor {

  public static async processDrive(driveId: string): Promise<void> {
    const changedItems = await GraphProvider.getDriveChanges(driveId);
    for (const changedItem of changedItems) {
      try {
        const item = await GraphProvider.getDriveItem(driveId, changedItem.id);
        const extension = this.getFileExtension(item.name);
        if (this.SUPPORTED_FILE_EXTENSIONS.includes(extension.toLowerCase())) {
          console.log(item.name);
          const url = item["@microsoft.graph.downloadUrl"];
          const receipt = await this.analyzeReceiptStream(await this.getDriveItemStream(url));
          const receiptString = JSON.stringify(receipt, null, 2)
          const fileName = this.getFileDisplayName(item.name) + "-extracted-fields.json";
          const parentId = item.parentReference.id;
          await GraphProvider.addDriveItem(driveId, parentId, fileName, receiptString);
        }
      } catch (error) {
        console.log(error);
      }
    }
  }
}
この時点で、トンネリングとサブスクリプションと共にアプリを再起動すると、最近追加/更新されたファイルがコンソールに一覧表示されます。
Azure Cognitive Services のドキュメント インテリジェンス サービス API を呼び出す
Azure Cognitive Services ドキュメント インテリジェンス API を使用するには、Azure AI サービス用のマルチサービスまたはドキュメント インテリジェンス リソースを作成する必要があります。 リソースを作成するには、次のチュートリアルを参照してください。
この手順の後、エンドポイントとキーを使用する準備ができている必要があります。
次に、ReceiptProcessor.tsを開き、Azure Cognitive Services 資格情報を格納するメソッド dacを作成します。
private static dac = new DocumentAnalysisClient(
  `${process.env["DAC_RESOURCE_ENDPOINT"]}`,
  new AzureKeyCredential(`${process.env["DAC_RESOURCE_KEY"]}`)
);
メソッド getDriveItemStreamを作成します。
private static async getDriveItemStream(url: string): Promise<Readable> {
  const token = GraphProvider.graphAccessToken;
  const config: AxiosRequestConfig = {
    method: "get",
    url: url,
    headers: {
      "Authorization": `Bearer ${token}`
    },
    responseType: 'stream'
  };
  const response = await axios.get<Readable>(url, config);
  return response.data;
}
Azure Cognitive Services 処理を使用して OCR フィールドを取得するためのメソッド analyzeReceiptStream を作成します。 ここでは、 prebuilt-invoice モデルを使用していますが、他のモデルを選択できます。
private static async analyzeReceiptStream(stream: Readable): Promise<any> {
  const poller = await this.dac.beginAnalyzeDocument("prebuilt-invoice", stream, {
    onProgress: ({ status }) => {
      console.log(`status: ${status}`);
    },
  });

  const {
    documents: [result] = [],
  } = await poller.pollUntilDone();

  const fields = result?.fields;
  this.removeUnwantedFields(fields);
  return fields;
}
Azure Cognitive Services の応答で望ましくないフィールドを削除するメソッド removeUnwantedFields を作成します。
private static removeUnwantedFields(fields: any) {
  for (const prop in fields) {
    if (prop === 'boundingRegions' || prop === 'content' || prop === 'spans') {
      delete fields[prop];
    }
    if (typeof fields[prop] === 'object') {
      this.removeUnwantedFields(fields[prop]);
    }
  }
}
最後に、GraphProvider.tsを開き、GraphProvider クラスの末尾に addDriveItem メソッドを追加します。
public static async addDriveItem(driveId: string, parentId: any, fileName: string, receiptString: string) {
  await this.graphClient.api(`/drives/${driveId}/items/${parentId}:/${fileName}:/content`).put(receiptString);
}
次に、デモ アプリを再起動し、コンテナーで ngrok と差分変更サブスクリプションを使用してトンネリングを再度設定します。
このコンテナー内の任意のファイル (サポートされている形式: JPEG、JPG、PNG、BMP、TIFF、PDF) を追加/更新すると、新しい JSON ファイルが作成され、ファイルから抽出されたフィールドが含まれていることがわかります。