適用対象: 2016 2019 Subscription Edition
  SharePoint in Microsoft 365
SharePoint Server でフェデレーション認証を実装する
このステップ バイ ステップ ガイドでは、Active Directory フェデレーション サービス (AD FS) (AD FS) を使用して SharePoint でフェデレーション認証を構成する方法について説明します。
フェデレーション認証の概要
フェデレーション認証では、SharePoint は信頼された外部セキュリティ トークン サービス (STS) によって発行された SAML トークンを処理します。 サインインを試みるユーザーは、その STS にリダイレクトされます。これにより、ユーザーが認証され、認証が成功すると SAML トークンが生成されます。 その後、SharePoint はこのトークンを処理し、それを使用して独自のトークンを作成し、ユーザーがサイトにアクセスすることを承認します。
前提条件
構成を実行するには、次のリソースが必要です。
- SharePoint 2013 ファーム以降。
- AD FS ファーム バージョン 2 以降 (既に作成済み)、.CER ファイルにエクスポートされた AD FS 署名証明書の公開キー。
この記事では、次の値を使用します。
- SharePoint サイト URL:
https://spsites.contoso.local/ - AD FS サイト URL:
https://adfs.contoso.local/adfs/ls/ - 領域 (証明書利用者識別子):
urn:contoso:spsites - ID 要求の種類:
http://schemas.xmlsoap.org/ws/2005/05/identity/claims/emailaddress - ロール要求の種類:
http://schemas.microsoft.com/ws/2008/06/identity/claims/role - Windows サイト コレクション管理者:
contoso\yvand - フェデレーション (AD FS) サイト コレクション管理者のEmail値:
yvand@contoso.local
AD FS で証明書利用者を作成する
この手順では、AD FS で証明書利用者を作成します。 証明書利用者は、SharePoint を操作するために必要な構成と、認証が成功したときに SAML トークンに挿入される要求を定義する要求規則を格納します。
AD FS サーバーで PowerShell を起動し、次のスクリプトを実行します。
### STEP 1: Create the relying party
# Name of the Relying Party
$name = "SPSites"
# Unique identifier of the Relying Party (in SharePoint it's referred to as the realm)
$identifier = "urn:contoso:spsites"
# Authority that authenticates users
$identityProvider = "Active Directory"
# SharePoint URL where user is redirected upon successful authentication
$redirectURL = "https://spsites.contoso.local/_trust/default.aspx"
# Allow everyone to use this relying party
$allowEveryoneRule = '=> issue (Type = "http://schemas.microsoft.com/authorization/claims/permit", value = "true");'
# Create the Relying Party
Add-ADFSRelyingPartyTrust -Name $name -Identifier $identifier -ClaimsProviderName $identityProvider -Enabled $true -WSFedEndpoint $redirectURL -IssuanceAuthorizationRules $allowEveryoneRule -Confirm:$false

### STEP 2: Add claim rules to the relying party
# Rule below configured relying party to issue 2 claims in the SAML token: email and role
$claimsRule = @"
@RuleTemplate = "LdapClaims"
@RuleName = "AD"
c:[Type == "http://schemas.microsoft.com/ws/2008/06/identity/claims/windowsaccountname", Issuer == "AD AUTHORITY"]
=> issue(
store = "Active Directory",
types = ("http://schemas.xmlsoap.org/ws/2005/05/identity/claims/emailaddress", "http://schemas.microsoft.com/ws/2008/06/identity/claims/role"),
query = ";mail,tokenGroups(fullDomainQualifiedName);{0}",
param = c.Value);
"@
# Apply the rule to the Relying Party
Set-ADFSRelyingPartyTrust -TargetName $name -IssuanceTransformRules $claimsRule
スクリプトが完了すると、AD FS の証明書利用者は次のようになります。

AD FS を信頼するように SharePoint を構成する
この手順では、SharePoint が AD FS を信頼するために必要な構成を格納する SPTrustedLoginProvider を作成します。 SharePoint 管理シェルを起動し、次のスクリプトを実行して作成します。
# Define claim types
$email = New-SPClaimTypeMapping "http://schemas.xmlsoap.org/ws/2005/05/identity/claims/emailaddress" -IncomingClaimTypeDisplayName "EmailAddress" -SameAsIncoming
$role = New-SPClaimTypeMapping "http://schemas.microsoft.com/ws/2008/06/identity/claims/role" -IncomingClaimTypeDisplayName "Role" -SameAsIncoming

# Public key of the AD FS signing certificate
$signingCert = New-Object System.Security.Cryptography.X509Certificates.X509Certificate2("C:\Data\Claims\ADFS Signing.cer")
# Unique realm (corresponds to the unique identifier of the AD FS Relying Party)
$realm = "urn:contoso:spsites"
# Set the AD FS URL where users are redirected to authenticate
$signinurl = "https://adfs.contoso.local/adfs/ls/"

# Create a new SPTrustedIdentityTokenIssuer in SharePoint
New-SPTrustedIdentityTokenIssuer -Name "Contoso.local" -Description "Contoso.local" -Realm $realm -ImportTrustCertificate $signingCert -ClaimsMappings $email,$role -SignInUrl $signinurl -IdentifierClaim $email.InputClaimType
重要
オプション -UseDefaultConfiguration とコマンドレット New-SPTrustedIdentityTokenIssuer を使用しないでください。 このオプションは、ユーザーの ID を内部的に設定する方法により、予期しない副作用を引き起こします。
次に、関連する証明書を SharePoint ルート証明機関の証明書ストアに追加する必要があります。 次の 2 つのオプションがあります。
- AD FS 署名証明書が証明機関によって発行された場合 (セキュリティ上の理由からベスト プラクティス)
発行者の証明書 (およびすべての中間者) の公開キーをストアに追加する必要があります。 SharePoint 管理シェル を起動し、次のスクリプトを実行して追加します。
$rootCert = New-Object System.Security.Cryptography.X509Certificates.X509Certificate2("C:\Data\Claims\ADFS Signing issuer.cer")
New-SPTrustedRootAuthority -Name "adfs.contoso.local signing root authority" -Certificate $rootCert
- ADFS 署名証明書が自己署名証明書である場合 (セキュリティ上の理由から推奨されません)
ADFS 署名証明書自体の公開キーをストアに追加する必要があります。 SharePoint 管理シェル を起動し、次のスクリプトを実行して追加します。
$rootCert = New-Object System.Security.Cryptography.X509Certificates.X509Certificate2("C:\Data\Claims\ADFS Signing.cer")
New-SPTrustedRootAuthority -Name "adfs.contoso.local signing certificate" -Certificate $rootCert
SharePoint Web アプリケーションを構成する
この手順では、上記で作成した SPTrustedLoginProvider を使用して、SharePoint の Web アプリケーションを AD FS 信頼とフェデレーションするように構成します。
考慮すべき重要な規則がいくつかあります。
- SharePoint Web アプリケーションの既定のゾーンでは、Windows 認証が有効になっている必要があります。 これは、検索クローラーに必要です。
- AD FS フェデレーションを使用する SharePoint URL は、HTTPS で構成する必要があります。
次の 2 つの構成が考えられます。
新しい Web アプリケーションを作成し、既定のゾーンで Windows と AD FS の両方の認証を使用する場合:
SharePoint 管理シェルを起動し、次のスクリプトを実行します。
# This script creates a new web application and sets Windows and AD FS authentication on the Default zone
# URL of the SharePoint site federated with ADFS
$trustedSharePointSiteUrl = "https://spsites.contoso.local/"
$applicationPoolManagedAccount = "Contoso\spapppool"

$winAp = New-SPAuthenticationProvider -UseWindowsIntegratedAuthentication -DisableKerberos:$true
$sptrust = Get-SPTrustedIdentityTokenIssuer "Contoso.local"
$trustedAp = New-SPAuthenticationProvider -TrustedIdentityTokenIssuer $sptrust

New-SPWebApplication -Name "SharePoint - ADFS on contoso.local" -Port 443 -SecureSocketsLayer -URL $trustedSharePointSiteUrl -ApplicationPool "SharePoint - ADFS on contoso.local" -ApplicationPoolAccount (Get-SPManagedAccount $applicationPoolManagedAccount) -AuthenticationProvider $winAp, $trustedAp
SharePoint サーバーの全体管理サイトを開きます。
[システム設定] で、[代替アクセス マッピングの構成] を選択します。 [ 代替アクセス マッピング コレクション ] ボックスが開きます。
新しい Web アプリケーションでディスプレイをフィルター処理し、次のような内容が表示されることを確認します。

既存の Web アプリケーションを拡張して、新しいゾーンで AD FS 認証を設定する場合:
SharePoint 管理シェルを起動し、次のスクリプトを実行します。
# This script extends an existing web application to set AD FS authentication on a new zone
# URL of the default zone of the web application
$webAppDefaultZoneUrl = "http://spsites/"
# URL of the SharePoint site federated with ADFS
$trustedSharePointSiteUrl = "https://spsites.contoso.local/"

$sptrust = Get-SPTrustedIdentityTokenIssuer "Contoso.local"
$ap = New-SPAuthenticationProvider -TrustedIdentityTokenIssuer $sptrust
$wa = Get-SPWebApplication $webAppDefaultZoneUrl
New-SPWebApplicationExtension -Name "SharePoint - ADFS on contoso.local" -Identity $wa -SecureSocketsLayer -Zone Intranet -Url $trustedSharePointSiteUrl -AuthenticationProvider $ap
SharePoint サーバーの全体管理サイトを開きます。
[システム設定] で、[代替アクセス マッピングの構成] を選択します。 [ 代替アクセス マッピング コレクション ] ボックスが開きます。
拡張された Web アプリケーションでディスプレイをフィルター処理し、次のような内容が表示されることを確認します。


IIS で HTTPS 証明書を設定する
SharePoint URL は HTTPS プロトコル (https://spsites.contoso.local/) を使用するため、対応するインターネット インフォメーション サービス (IIS) サイトで証明書を設定する必要があります。
サイト証明書を生成する
注:
証明書を既に生成している場合は、この手順をスキップできます。
Windows PowerShell コンソールを開きます。
次のスクリプトを実行して自己署名証明書を生成し、それをコンピューターの MY ストアに追加します。
New-SelfSignedCertificate -DnsName "spsites.contoso.local" -CertStoreLocation "cert:\LocalMachine\My"
重要
自己署名証明書は、テスト目的にのみ適しています。 運用環境では、代わりに証明機関によって発行された証明書を使用することを強くお勧めします。
証明書を設定する
Internet Information Services Manager コンソールを開きます。
ツリー ビューでサーバーを展開し、[ サイト] を展開し、 contoso.local サイトで SharePoint - ADFS を選択し、[バインド] を選択 します。
[ https バインド ] を選択し、[編集] を選択 します。
[TLS/SSL 証明書] フィールドで、[ spsites.contoso.local certificate]\(spsites.contoso.local 証明書\) を選択し、[ OK] を選択します。
サイト コレクションを作成する
この手順では、2 人の管理者 (1 人は Windows 管理者、もう 1 人はフェデレーション (AD FS) 管理者) でチーム サイト コレクションを作成します。
SharePoint サーバーの全体管理サイトを開きます。
[アプリケーション構成の管理] で、[サイト コレクションの作成] を選択します。 [ サイト コレクションの作成] ページが 開きます。
[タイトル]、[URL] を入力し、テンプレートの [チーム サイト] を選択します。
[ プライマリ サイト コレクション管理者 ] セクションで、ブック アイコンをクリックして、ユーザー選択ダイアログを開きます。
[ユーザー 選択ウィンドウ] ダイアログで、Windows 管理者アカウントを入力します (例:
yvand)。左側で、[ 組織] をクリックして一覧をフィルター処理します。 次のような出力が表示されます。
アカウントを選択し、[ OK] をクリックします。
[ セカンダリ サイト コレクション管理者 ] セクションで、ブック アイコンをクリックしてユーザー 選択ダイアログを開きます。
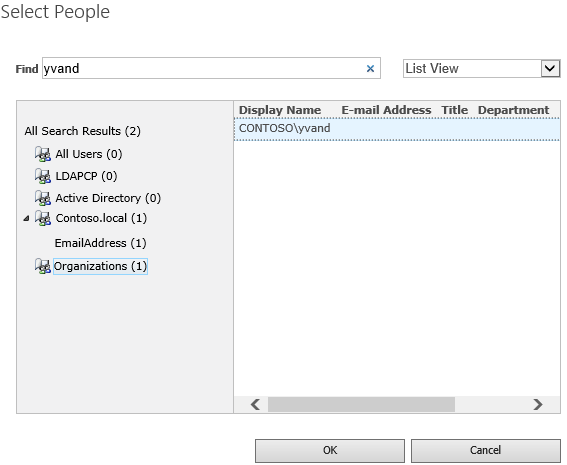
[ユーザー選択] ダイアログで、AD FS 管理者アカウントの 正確な メール値を入力します (例:
yvand@contoso.local)。左側で、[ Contoso.local] をクリックして一覧をフィルター処理します。 次のような出力が表示されます。

アカウントを選択し、[ OK] をクリックします。
[OK] をクリックしてサイト コレクションを作成します。


サイト コレクションが作成されたら、Windows またはフェデレーション サイト コレクション管理者アカウントを使用して、サイト コレクションにサインインできます。
次の手順
フェデレーション認証では、ユーザー 選択ウィンドウで入力が検証されないため、スペルミスやユーザーが誤って間違った要求の種類を選択する可能性があります。 これは、カスタム要求プロバイダーを使用して対処できます。たとえば、 LDAPCP です。
重要
LDAPCP は Microsoft 製品ではなく、Microsoft サポートではサポートされていません。 オンプレミスの SharePoint ファームで LDAPCP をダウンロード、インストール、構成するには、LDAPCP Web サイトを参照してください。
SharePoint Server サブスクリプション エディションでは、ネイティブユーザーピッカーは、フェデレーション認証にユーザー プロファイル サービス アプリケーションを使用してユーザーを検索および解決できます。 フェデレーション認証を使用するようにユーザー 選択ウィンドウを構成する方法について説明します。