コード コンポーネントの作成についての概要
Power Apps には、アプリ作成のための機能が数多く組み込まれていますが、特殊な要件を満たすためにカスタムなユーザー エクスペリエンスを作成することが必要になる場合もあります。 たとえば、割合の値をゲージに置き換える、ID ではなくバー コードを表示する、または既存のコントロールをドラッグ アンド ドロップ グリッド ビューなど、より多くの機能を持つコントロールに置き換えることがあります。 また、React や Angular など、他の Web フレームワークで書かれた既存のコンポーネントについて、Power Apps Component Framework を折り返すことができます。
これらのコンポーネントを作成すると、幅広い最新の Web 開発エコシステム (プラットフォームの標準部分であるかのように、アプリ開発者が自身のコードを使用してアプリをビルドできる、使い慣れたライブラリ、フレームワーク、および他のツール、およびフォームに機能を組み込むことができるパッケージ) を活用できます。
メモ
その他のサンプル コンポーネント (Angular や React を使用するものなど) も参照できます。
カスタム Power Apps コンポーネントは、作成にカスタム コードを必要とするため、コード コンポーネントと呼ばれることがよくあります。 それらは、マニフェスト、実装、リソースという 3 つの要素で構成されます。
次の演習では、ある要件を満たすために、企業でカスタム コード コンポーネントを作成します。 アプリケーションのフォームに表示されるいくつかのフィールドに対し、ユーザーが手動でデータの編集を開始するまで、その値を読み取り専用にしておく必要があるとします。 開発チームは組み込みのどのコントロールでも要件を満たすことができないと判断し、カスタム コード コンポーネントを作成することにしました。
そのため、次の画像に示すような、編集可能なフィールド カスタム コンポーネントを作成します。 この値を、ユーザーが編集を選択するまで読み取り専用にする必要があります。
このコンポーネントは、ホスト アプリからの変更をリッスンしてから、ホスト アプリにプッシュされる変更をユーザーが行うのを許可します。 このコンポーネントを作成するには、次の手順に従います。
Power Platform CLI をインストールする
コード コンポーネントをビルドするためにコンピューターを準備するには、次の手順に従います。
Node.js (npm に付属) をインストールします。 LTS (長期サポート) バージョン (こちらにあるバージョンなど) を使用することをお勧めします。 Node/NPM が既にインストールされていないか確認する必要があります。 これを実行するには、コマンド プロンプトに移動して次の情報を入力します。
// Launch a standard command prompt and type both of the following

npm --version
Node --version
これらのコマンドの実行中にエラーが発生した場合は、上記のリンクを使用して Node.js をインストールする必要があります。
node を正常にインストールすると、上記のコマンドを入力した際に、コマンド ウィンドウに次のようにバージョン番号が返されます。
// If installed properly you will see something like the output below. The version numbers may be slightly different based on the version installed.

C:\npm --version
10.5.0

C:\Node --version
v20.12.2
Visual Studio Code をインストールします。
Power Platform Tools 拡張機能をインストールします。 Power Platform Tools をインストールする前に、Visual Studio Code のインストールが完了している必要があります。
Power Platform Tools では、Visual Studio Code の外部のコマンド プロンプトで Power Platform の CLI コマンドを実行することはできません。 Power Platform 用の CLI MSI もインストールすることをお勧めします。
Windows レベルで CLI をインストールするには、次の手順に従います。 CLI と Power Platform Tools 拡張機能は同時にインストールできます。
新しいコンポーネント プロジェクトを作成する
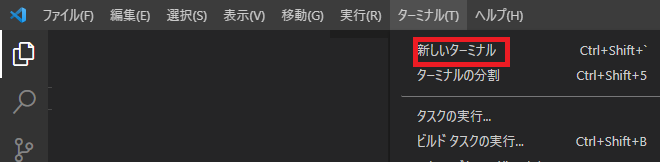
コンポーネントのビルドを開始する前に、インストールされた上記のコンポーネントが正常に動作していることを確認します。 NPM および CLI コマンドは、Visual Studio Code 内のターミナル ウィンドウから動作します。 VS Code 内からこれらを正しく実行できない場合は、Power Platform 用の CLI をインストールしていれば、次の手順でコマンド プロンプトからターミナル コマンドを実行することもできます。
Visual Studio Code で、ターミナル > 新しいターミナルに移動します (または、Ctrl + Shft + ` キーを押します)。 VS Code のターミナル ウィンドウで、npm と Node バージョンのステートメントを繰り返します。 すべて適切なバージョン番号が返される場合は、ソリューションの作成に進むことができます。
// Test installs from Steps 1-3 listed above

// This will verify NPM installation
C:\npm --version
10.5.0

// This will verify Node installation
C:\Node --version
v20.12.2

// This will launch Visual Studio Code from the command line.
C:\Code
新しいコンポーネント プロジェクトを作成する準備が整ったので、次の手順に従って開始してください。
コンポーネントをビルドするディレクトリを作成します。 このサンプルでは、コンポーネントを C:\source\Editable-pcf に配置します。 独自のディレクトリを作成するには、Visual Studio Code を使用します。 VS Code ターミナルの使用に問題がある場合は、コマンド プロンプトを使用してフォルダーを作成することもできます。
Visual Studio Code を起動します。
ターミナル、新しいターミナルの順に選択します。
ターミナル セッションの既定値は、使用した最後のフォルダーになります。 これは、ターミナル コマンド プロンプト領域に次のように表示されます。
//Note Your PS will not list exactly what is seen below, but will be specific to your starting path.

PS C:\Users\Name\Folder
ディレクトリを、このソリューションをビルドする場所に変更します。 CD コマンドを使用して、適切な場所に移動できます。
メモ
NPM などのコマンドを実行するフォルダーが重要です。 ビルド コマンドを実行する前に、必ず Projects フォルダーにいることを確認してください。 そうしないと、ビルドが破損し、最適な結果が得られない可能性があります。
既定の場所に新しいフォルダーを作成するには、VS Code ターミナル ウィンドウで、次に示すように md (make directory) を使用します。
md source
cd source
これにより、ソースとなるディレクトリが作成され、cd (change directory) コマンドを使用してそのディレクトリに移動します。
作成されたソース ディレクトリから、editable-pcf という名前のディレクトリを作成します。 これは、すべてのプロジェクト ファイルが格納されるプロジェクト ディレクトリになります。 また、このディレクトリを新しいプロジェクト ディレクトリに変更します。
md editable-pcf
cd editable-pcf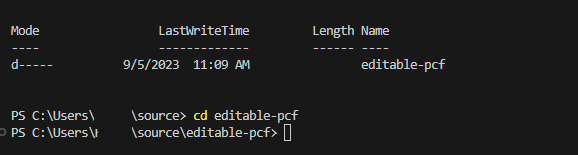
Power Platform CLI で次のコマンドを使用して、コンポーネント プロジェクトを初期化します。
pac pcf init --namespace SampleNamespace --name EditablePCF --template field次の図では、表示される出力の例を示します。

注意事項
PAC PCF INIT コマンドが VS Code のターミナル ウィンドウで実行されず、Power Platform CLI をインストールしてある場合は、コマンド プロンプトを実行し、CD を使用して editable-pcf ディレクトリに移動することもできます。 そこでコマンド プロンプトにコマンドを入力すると、適切に機能します。 上記と同じ出力が表示されます。
コマンド
npm installを使用して、プロジェクト ビルド ツールをインストールします。 警告がいくつか表示される場合がありますが、無視してかまいません。 このコマンドを発行する前に、プロジェクト ディレクトリにいることを確認してください。npm install注意事項
npm install が VS Code のターミナル ウィンドウで実行されず、Power Platform CLI をインストールしてある場合は、コマンド プロンプトを実行し、CD を使用して editable-pcf ディレクトリに移動することもできます。 そこでコマンド プロンプトにコマンドを入力すると、適切に機能します。
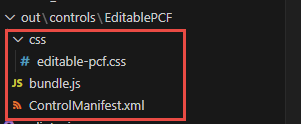
VS Code のターミナル ウィンドウで DIR コマンドを実行するか、またはコマンド プロンプトで DIR コマンドを実行する (Visual Studio Code の外部でビルドする場合) ことで、すべてが機能していることを確認できます。 editable-pcf ディレクトリに、一連のファイルとフォルダーが表示されます。 これは、上記の手順で作成したプロジェクトであり、VS Code を使用してこれに対してビルドを行います。
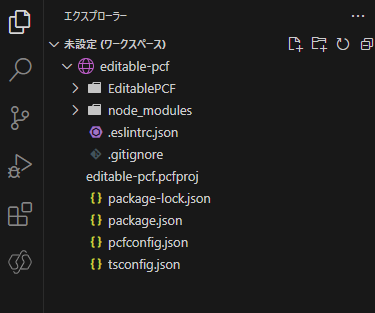
次のコマンドを実行し、プロジェクトを Visual Studio Code で開くか、またはコマンド プロンプト ウィンドウ (コマンド プロンプトを使用している場合) で開きます。 作成したプロジェクトが VS Code で起動します。
code -a .プロジェクトの内容は、次の図のようになります。

コード コンポーネントのマニフェストを更新する
コントロールを正確に表すように、マニフェスト ファイルを更新します。
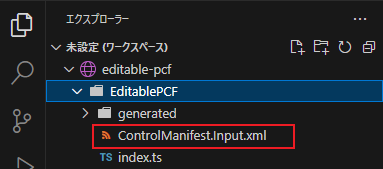
EditablePCF フォルダーを展開し、ControlManifest.Input.xml ファイルを開きます。
バージョンを 1.0.0 に変更し、description-key を Edits project name に変更します。

property ノードを探します。
name 値を Name、display-name-key を Name、description-key を A name に変更します。

resources ノードを見つけます。
以下の手順で作成する editable-pcf.css という名前の CSS ファイルへの参照を含めます。
<css path="css/EditablePCF.css" order="1" />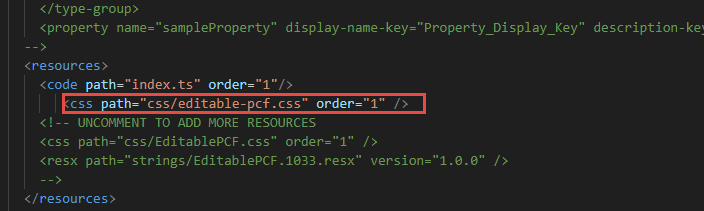
ファイル、保存の順に選択するか、または Ctrl + S キーを押して、ファイルを保存します。


コード コンポーネントにスタイル設定を追加する
コード コンポーネントにスタイル設定を追加するには、次の手順に従います。
ControlManifest.Input.xml ファイルが選択されたままになっていることを確認し、新しいフォルダー を選択します。
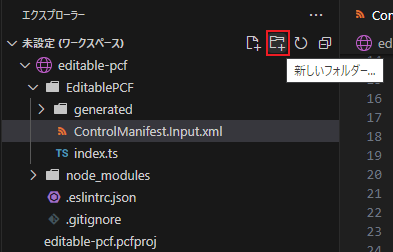
新しいフォルダーに css という名前を付けます。
作成した css フォルダー を選択し、新しいファイル を選択します。
新しいファイルに editable-pcf.css という名前 (または、上記の手順 6 で css ファイルに付けた名前) を付けます。
作成した新しい editable-pcf.css ファイルを開き、次の CSS スニペットを貼り付けます。 これは、以前にマニフェスト ファイルに css パス コードを追加したときに使用したリソース参照名です。
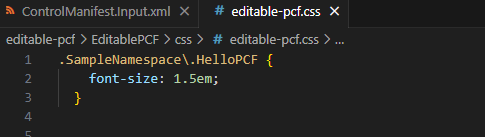
.SampleNamespace\.HelloPCF {
      font-size: 1.5em;
    }
CSS ファイルの内容は、次の図のようになります。
ファイル、保存の順に選択するか、または Ctrl + S キーを押して、ファイルを保存します。
コード コンポーネントをビルドする
コンポーネント ロジックを実装する前に、コンポーネント上でビルドを実行する必要があります。 これにより、適切な TypeScript タイプが、ControlManifest.xml ドキュメントのプロパティに合わせて生成されることを確認します。
VS Code のターミナルに戻り、次のコマンドを使用してプロジェクトをビルドします。 何らかの理由で、Visual Studio Code のターミナルを使用する際に問題が発生した場合は、コマンド プロンプトを使用してフォルダーに移動し、そこからコマンドを実行することができます。
注意事項
このコマンドを発行する前に、ターミナルのプロジェクト フォルダーにいることを確認してください。
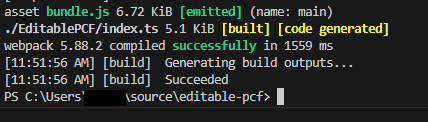
npm run build
コンパイルされたコンポーネントは、out/controls/EditablePCF ディレクトリに作成されます。 ビルド成果物には次のものが含まれます。
css フォルダー
bundle.js - バンドルされたコンポーネントのソース コード
ControlManifest.xml - Microsoft Dataverse 組織にアップロードされる実際のコンポーネント マニフェスト ファイル
警告
ここでよくあるエラーは、先ほど作成した CSS ファイルのファイル名のタイプミスです。 その場合は、ファイル名を適宜変更し、エラーなしで完了するまで npm run build コマンドを再実行します。 COntrolManifest.Input.xml ファイルの RESOURCE セクションを、CSS フォルダーに作成されたファイルと照合します。 これらは 100% 一致する必要があります。
コード コンポーネントのロジックを実装する
コード コンポーネントのロジックを実装するには、上記の手順でビルドが完了した後、次の手順に従います。 Visual Studio Code のエクスプローラーで、index.ts という名前のファイルを見つけます。 そこで、コンポーネントのコードの記述を開始します。
Visual Studio Code で、index.ts ファイルを開きます。
constructor メソッドの上に、次のプライベート変数を挿入します。
// The PCF context object\
private context: ComponentFramework.Context<IInputs>;
// The wrapper div element for the component\
private container: HTMLDivElement;
// The callback function to call whenever your code has made a change to a bound or output property\
private notifyOutputChanged: () => void;
// Flag to track if the component is in edit mode or not\
private isEditMode: boolean;
// Tracking variable for the name property\
private name: string | null;
public init メソッドを見つけ、次のメソッドに置き換えます。
public init(context: ComponentFramework.Context<IInputs>, notifyOutputChanged: () => void, state: ComponentFramework.Dictionary, container: HTMLDivElement) {

    // Track all the things
    this.context = context;
    this.notifyOutputChanged = notifyOutputChanged;
    this.container = container;
    this.isEditMode = false;

    // Create the span element to hold the project name
    const message = document.createElement("span");
    message.innerText = `Project name ${this.isEditMode ? "" :context.parameters.Name.raw}`;

    // Create the textbox to edit the name
    const text = document.createElement("input");
    text.type = "text";
    text.style.display = this.isEditMode ? "block" : "none";

    if (context.parameters.Name.raw) {
        text.value = context.parameters.Name.raw;
        // Wrap the two above elements in a div to box out the content
        const messageContainer = document.createElement("div");
        messageContainer.appendChild(message);
        messageContainer.appendChild(text);

        // Create the button element to switch between edit and read modes

        const button = document.createElement("button");
        button.textContent = this.isEditMode ? "Save" : "Edit";
        button.addEventListener("click", () => { this.buttonClick(); });

        // Add the message container and button to the overall control container
        this.container.appendChild(messageContainer);
        this.container.appendChild(button);
    }

}
警告
buttonClick の EventListener に赤い下線が引かれています。 そのイベントのメソッドを以下で作成します。 他のセクションが赤で表示されている場合は、すべてがコピーされたか、正しく入力されたことを確認する必要があります。
ボタン選択ハンドラー メソッドを追加します。 次のメソッドを init メソッドの下に追加します。
public buttonClick() {
    // Get our controls via DOM queries
    const text = this.container.querySelector("input")!;
    const message = this.container.querySelector("span")!;
    const button = this.container.querySelector("button")!;

    // If not in edit mode, copy the current name value to the textbox
    if (!this.isEditMode) {
        text.value = this.name ?? "";
    }
    else if (text.value != this.name) {
        // if in edit mode, copy the textbox value to name and call the notify callback
        this.name = text.value;
        this.notifyOutputChanged();
    }

    // flip the mode flag
    this.isEditMode = !this.isEditMode;

    // Set up the new output based on changes
    message.innerText = `Project name ${this.isEditMode ? "" : this.name}`;
    text.style.display = this.isEditMode ? "inline" : "none";
    text.value = this.name ?? "";
    button.textContent = this.isEditMode ? "Save" : "Edit";
}
updateView メソッドを見つけ、次のメソッドに置き換えます。
public updateView(context: ComponentFramework.Context<IInputs>): void {

// Checks for updates coming in from outside

this.name = context.parameters.Name.raw;
const message = this.container.querySelector("span")!;
message.innerText = `Project name ${this.name}`;
}
置き換える getOutputs メソッドを見つけ、次のメソッドに置き換えます。
public getOutputs(): IOutputs {
return {
// If our name variable is null, return undefined instead
Name: this.name ?? undefined
};
}
destroy メソッドを見つけ、次のメソッドに置き換えます。
public destroy() {
// Remove the event listener we created in init
this.container.querySelector("button")!.removeEventListener("click", this.buttonClick);
}
最終的な Index.ts は、次のコードのようになります。
import { IInputs, IOutputs } from "./generated/ManifestTypes";

export class EditablePCF implements ComponentFramework.StandardControl<IInputs, IOutputs> {

    /**
    * Empty constructor.
    */

    // The PCF context object\
    private context: ComponentFramework.Context<IInputs>;
    // The wrapper div element for the component\
    private container: HTMLDivElement;
    // The callback function to call whenever your code has made a change to a bound or output property\
    private notifyOutputChanged: () => void;
    // Flag to track if the component is in edit mode or not\
    private isEditMode: boolean;
    // Tracking variable for the name property\
    private name: string | null;

    constructor()
    {

    }

    /**
    * Used to initialize the control instance. Controls can kick off remote server calls and other initialization actions here.
    * Data-set values are not initialized here, use updateView.
    * @param context The entire property bag available to control via Context Object; It contains values as set up by the customizer mapped to property names defined in the manifest, as well as utility functions.
    * @param notifyOutputChanged A callback method to alert the framework that the control has new outputs ready to be retrieved asynchronously.
    * @param state A piece of data that persists in one session for a single user. Can be set at any point in a controls life cycle by calling 'setControlState' in the Mode interface.
    * @param container If a control is marked control-type='standard', it will receive an empty div element within which it can render its content.
    */
    public init(context: ComponentFramework.Context<IInputs>, notifyOutputChanged: () => void, state: ComponentFramework.Dictionary, container: HTMLDivElement) {

        // Track all the things
        this.context = context;
        this.notifyOutputChanged = notifyOutputChanged;
        this.container = container;
        this.isEditMode = false;

        // Create the span element to hold the project name

        const message = document.createElement("span");
        message.innerText = `Project name ${this.isEditMode ? "" :context.parameters.Name.raw}`;

        // Create the textbox to edit the name
        const text = document.createElement("input");
        text.type = "text";
        text.style.display = this.isEditMode ? "block" : "none";

        if (context.parameters.Name.raw) {
            text.value = context.parameters.Name.raw;
            // Wrap the two above elements in a div to box out the content
            const messageContainer = document.createElement("div");
            messageContainer.appendChild(message);
            messageContainer.appendChild(text);

            // Create the button element to switch between edit and read modes

            const button = document.createElement("button");
            button.textContent = this.isEditMode ? "Save" : "Edit";
            button.addEventListener("click", () => { this.buttonClick(); });

            // Add the message container and button to the overall control container
            this.container.appendChild(messageContainer);
            this.container.appendChild(button);
        }

    }

    public buttonClick() {
        // Get our controls via DOM queries

        const text = this.container.querySelector("input")!;
        const message = this.container.querySelector("span")!;
        const button = this.container.querySelector("button")!;

        // If not in edit mode, copy the current name value to the textbox

        if (!this.isEditMode) {
            text.value = this.name ?? "";
        }
        else if (text.value != this.name) {

            // if in edit mode, copy the textbox value to name and call the notify callback
            this.name = text.value;
            this.notifyOutputChanged();
        }

        // flip the mode flag
        this.isEditMode = !this.isEditMode;

        // Set up the new output based on changes
        message.innerText = `Project name ${this.isEditMode ? "" : this.name}`;
        text.style.display = this.isEditMode ? "inline" : "none";
        text.value = this.name ?? "";
        button.textContent = this.isEditMode ? "Save" : "Edit";
    }

    /**
    * Called when any value in the property bag has changed. This includes field values, data-sets, global values such as container height and width, offline status, control metadata values such as label, visible, etc.
    * @param context The entire property bag available to control via Context Object; It contains values as set up by the customizer mapped to names defined in the manifest, as well as utility functions
    */
    public updateView(context: ComponentFramework.Context<IInputs>): void {

        // Checks for updates coming in from outside
        this.name = context.parameters.Name.raw;
        const message = this.container.querySelector("span")!;
        message.innerText = `Project name ${this.name}`;
    }

    /**
    * It is called by the framework prior to a control receiving new data.
    * @returns an object based on nomenclature defined in manifest, expecting object[s] for property marked as "bound" or "output"
    */
    public getOutputs(): IOutputs {
        return {
        // If our name variable is null, return undefined instead
        Name: this.name ?? undefined
        };
    }

    /**
    * Called when the control is to be removed from the DOM tree. Controls should use this call for cleanup.
    * i.e. cancelling any pending remote calls, removing listeners, etc.
    */
    public destroy() {
        // Remove the event listener we created in init
        this.container.querySelector("button")!.removeEventListener("click", this.buttonClick);
    }
}
コード コンポーネントをリビルドして実行する
コード コンポーネントをリビルドして実行するには、次の手順に従います。
コンポーネントのロジックが実装されたので、ターミナルに戻り、次のコマンドを使用してリビルドします。 最初に editable-pcf フォルダーに移動すれば、これは VS Code で直接実行することも、コマンド プロンプトから実行することもできます。
npm run buildビルドが成功します。
次のコマンドを実行して、Node のテスト ハーネスでコンポーネントを実行します。 新しく作成したコンポーネントが表示されたブラウザーを起動する前に、この機能を実行したことがない場合は、この機能を使用してください。
npm startメモ
npm start watchコマンドを使用してウォッチ モードを有効にすることにより、テスト ハーネスを再起動しなくても、次の資産に対し、自動的に変更が行われるようにできます。index.ts ファイル。
ControlManifest.Input.xml ファイル
index.ts にインポートされたライブラリ
マニフェスト ファイルに列記されているすべてのリソース
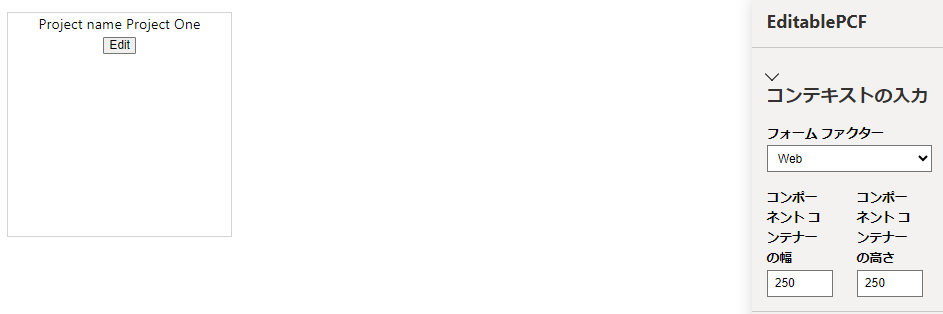
新しいブラウザー ウィンドウに、テスト ハーネスが読み込まれます。 (ウィンドウは自動的に開きますが、コマンド ウィンドウで見つかったアドレスを参照することもできます)。
編集 を選択します。
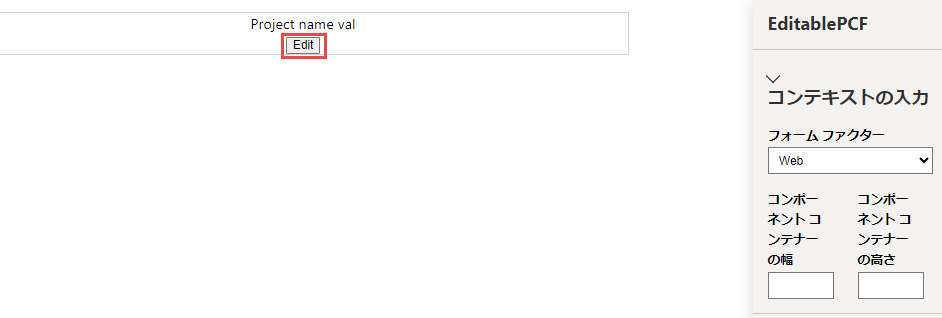
Project One と入力し、保存 を選択します。
コンテナーのサイズは変更できます。
テスト ハーネスは次の図のようになります。

テスト ハーネスのブラウザー セッションを閉じます。
ターミナル、またはコマンド プロンプト (VS Code ターミナルを使用していない場合) に戻り、Ctrl + C キーを押して Watcher を停止します。
Y と入力し、Enter キーを押します。