演習 - データをアップロードする
ここでは、機械学習モデルのトレーニングに使用する画像をアップロードします。 画像をアップロードするには、2 つの方法があります。
- Custom Vision ポータルで、画像を選択し、アップロードして、タグを付けます。
- Jupyter Notebook のようなツールで、Custom Vision SDK に含まれる画像を使用します。
アップロードするデータ、画像クラス、タグが大量にある場合は、Custom Vision SDK を使用する方が高速です。 ただし、次のセクションで説明するいずれかのオプションを選択できます。 最適な方法で、データセットの画像をアップロードする手順を完了します。
オプション 1: Custom Vision ポータルを使用して画像をアップロードしてタグを付ける
画像は、サブフォルダーごとに個別にアップロードしてタグを付ける必要があります。 この演習では、アップロードの速度に応じて、4 つまたは 5 つのサブフォルダーのみの画像をアップロードできます。 機械学習モジュールをトレーニングするときは、例の数が多く、多様である方が、よりよい結果が得られることに注意してください。
Custom Vision ポータルでプロジェクトを作成します。
https://www.customvision.ai/projects にアクセスしてサインインします。 [新しいプロジェクト] を選択します。
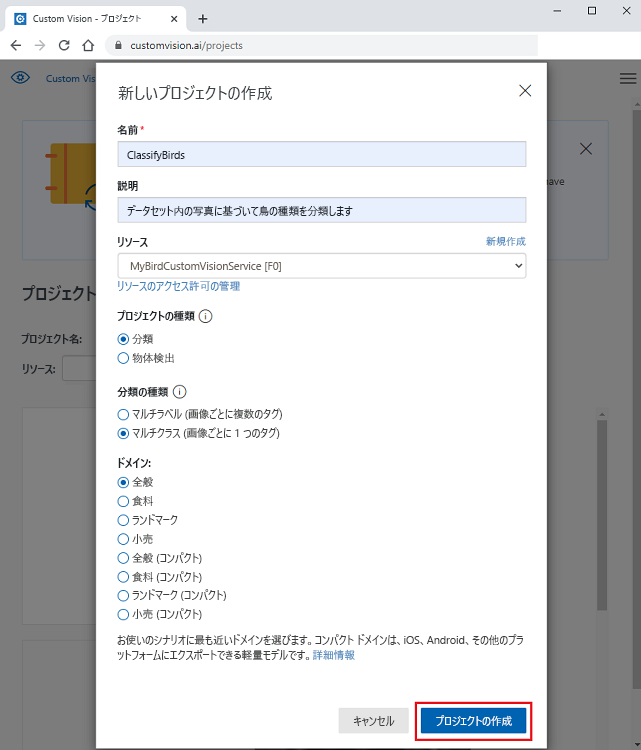
[新しいプロジェクトの作成] で:
[名前] には、任意のプロジェクト名を入力します。
[説明] には、モデルの簡単な説明を入力します。
[リソース グループ] では、Azure portal で作成したリソース グループを選択します。
[プロジェクトの種類] では、[分類] を選択します。
[分類の種類] では、[マルチクラス (画像ごとに 1 つのタグ)] を選択します。
[ドメイン] では、[全般] を選択します。
[プロジェクトの作成] を選択します。
Note
モバイル デバイス、TensorFlow.js、または IoT にデプロイするモデルをエクスポートする場合は、[ドメイン] で "コンパクト" モデルのオプションを選択します。 プロジェクトの作成後、このオプションは設定で変更できます。
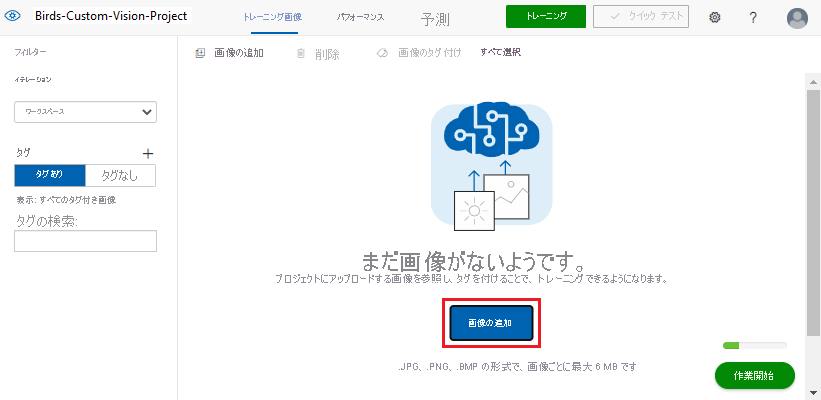
鳥の種の画像とタグを追加します。
Custom Vision プロジェクトで、[画像の追加] を選択します。
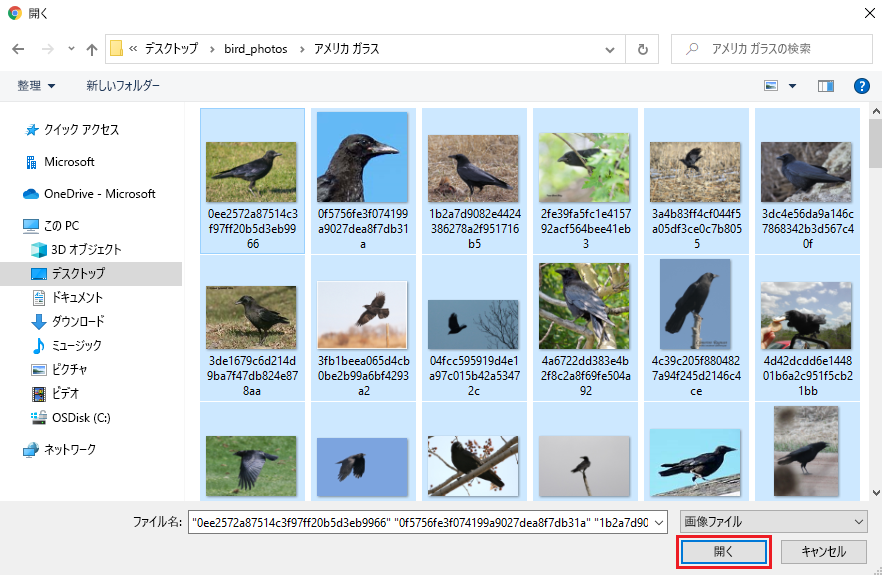
[開く] で、データセットの zip ファイルから画像ファイルを抽出した birds-photo フォルダーに移動します。
鳥の種のフォルダーを開きます。
種のフォルダーで Ctrl + A キーを押してすべての画像を選択し、[開く] を選択します。
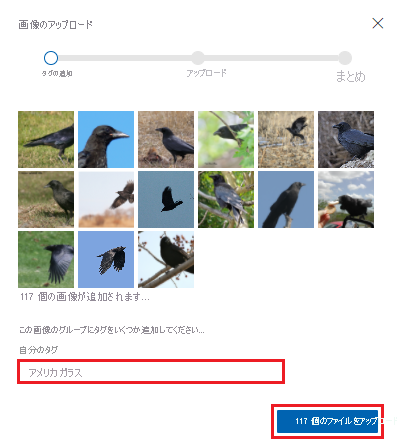
[画像のアップロード] で、[自分のタグ] に説明を追加して、写真に表示された鳥の種を示します。
[Upload <number> files](<数> 個のファイルのアップロード) を選択します。
前の手順を繰り返して、ダウンロードしたデータセットの鳥の種の各フォルダーの写真をアップロードします。
オプション 2: Python と Custom Vision SDK を使用して画像をアップロードしてタグを付ける
Custom Vision SDK を使用できるプログラミング言語は、Python、.NET、Node.js、Go、Java です。 ここでは Python を使います。 Python をまだインストールしていない場合は、Anaconda のインストールで入手することをお勧めします。 Anaconda をダウンロードすると Python を入手できます。
代わりに GitHub からコードをダウンロードしたい場合は、次のコマンドを使用してリポジトリをクローンできます。
git clone https://github.com/MicrosoftDocs/mslearn-cv-classify-bird-species.git
次の手順に従って、仮想環境を作成し、コードを環境に貼り付けます。
任意の IDE を開きます。 次に、次のコマンドを実行してパッケージをインポートします。
!pip install azure-cognitiveservices-vision-customvisionスクリプトの実行に必要なパッケージをインポートします。
from azure.cognitiveservices.vision.customvision.training import CustomVisionTrainingClient
from azure.cognitiveservices.vision.customvision.training.models import ImageFileCreateEntry
from azure.cognitiveservices.vision.customvision.training.models import ImageFileCreateBatch
from msrest.authentication import ApiKeyCredentials
import numpy as np
それから、次のコードを使用して、Custom Vision プロジェクトを作成します。 コードを実行する前に、プレースホルダー
<endpoint>と<key>を、自分の Custom Vision リソースの値に置き換えます。Custom Vision リソースの値を取得します。
Azure portal で、お使いの Custom Vision リソースに移動します。
リソース メニューで、[リソース管理] の [Keys and Endpoint](キーとエンドポイント) を選択します。
[エンドポイント] ボックスから値をコピーします。 コードで、
<endpoint>プレースホルダーをこの値に置き換えます。[キー 1] で、コピー アイコンを選択してキーをコピーします。 コードで、
<key>プレースホルダーをこの値に置き換えます。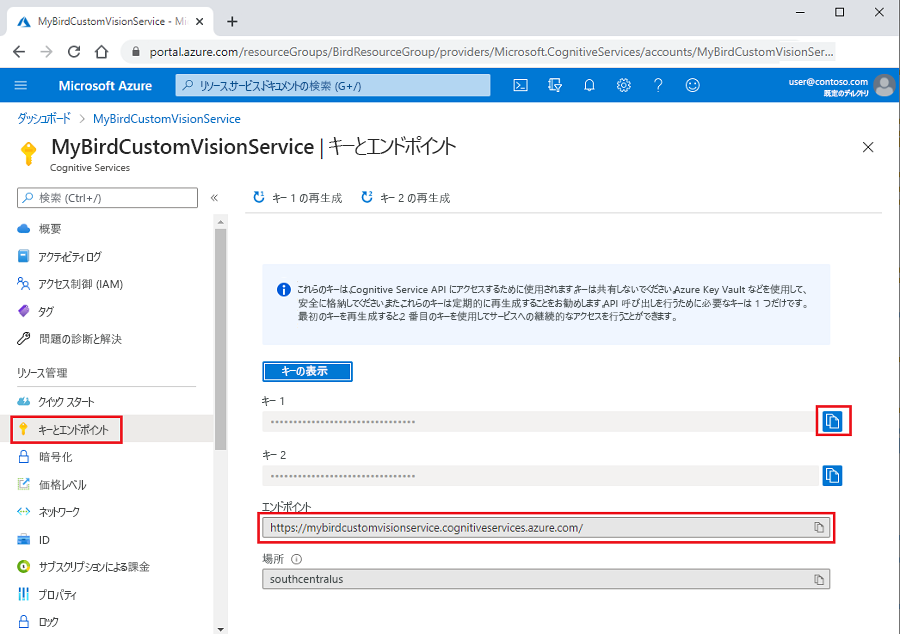
コードは次の例のようになります。
ENDPOINT = "<endpoint>"

# Replace with a valid key
training_key = "<key>"
credentials = ApiKeyCredentials(in_headers={"Training-key": training_key})
publish_iteration_name = "classifyBirdModel"

trainer = CustomVisionTrainingClient(ENDPOINT, credentials)

# Create a new project
print ("Creating project...")
project = trainer.create_project("Bird Classification")

print("Project created!")
ダウンロードした bird-photos.zip ファイルを、Jupyter Notebook ファイルを保存したのと同じディレクトリに解凍します。 次のコードを追加して、自分のプロジェクトでの鳥の写真のディレクトリに移動します。
# Change to the directory for the bird photos
import os
os.chdir('./bird-photos/custom-photos')
警告
このセルのコードは 1 回だけ実行します。 Python カーネルを再起動せずに、セルを複数回実行しようとすると、セルの実行は失敗します。
次のコードを追加して、鳥の種のタグの一覧を取得します。 タグは、bird-photos/custom-photos ディレクトリのフォルダー名に基づいて作成されます。
# Create a tag list from folders in bird directory
tags = [name for name in os.listdir('.') if os.path.isdir(name)]
print(tags)
次に、
forループで呼び出す 3 つの関数を作成します。createTag関数により、Custom Vision プロジェクトにクラス タグが作成されます。createImageList関数により、タグ名とタグ ID を使用して画像のリストが作成されます。image_list関数により、リストの画像がバッチでアップロードされます。
3 つの関数を作成します。
Jupyter Notebook ファイルで、
createTag関数のコードを追加します。 この関数により、Custom Vision プロジェクトに画像名のタグが作成されます。tag_id = createTag(tag) print(f"tag creation done with tag id {tag_id}") image_list = createImageList(tag, tag_id) print("image_list created with length " + str(len(image_list))) # Break list into lists of 25 and upload in batches for i in range(0, len(image_list), 25): batch = ImageFileCreateBatch(images=image_list[i:i + 25]) print(f'Upload started for batch {i} total items {len(image_list)} for tag {tag}...') uploadImageList(batch) print(f"Batch {i} Image upload completed. Total uploaded {len(image_list)} for tag {tag}")次に、
createImageList関数のコードを追加します。 この関数は、2 つのパラメーターを受け取ります。 まず、tagの名前をフォルダー名のリストから取得し、tag_idを Custom Vision プロジェクトで作成したタグから取得します。 関数により、base_image_urlの値を使用して、フォルダー名から作成したtagの画像が含まれるフォルダーにディレクトリが設定されます。 次に、各画像をリストに追加します。それを使用して、作成したtagにバッチでアップロードします。def createImageList(tag, tag_id): # Set directory to current tag. base_image_url = f"./{tag}/" photo_name_list = os.listdir(base_image_url) image_list = [] for file_name in photo_name_list: with open(base_image_url+file_name, "rb") as image_contents: image_list.append(ImageFileCreateEntry(name=base_image_url+file_name, contents=image_contents.read(), tag_ids=[tag_id])) return image_list追加する最後のコードは、
uploadImageList関数を作成するものです。 フォルダーから作成したimage_listを渡してから、そのリストをtagにアップロードします。def uploadImageList(image_list): upload_result = trainer.create_images_from_files(project_id=project.id, batch=image_list) if not upload_result.is_batch_successful: print("Image batch upload failed.") for image in upload_result.images: print("Image status: ", image.status) exit(-1)
次に、main メソッドのコードを追加します。 タグごとに、作成した 3 つの関数がそのメソッドによって呼び出されます。 bird-photos/custom-photos ディレクトリのフォルダーから作成した
tagsコレクションの各タグ (フォルダー名) をループ処理します。forループの手順は次のようになります。前の手順で作成した
createTag関数を呼び出して、Custom Vision プロジェクトにtagクラスを作成します。Custom Vision から返された
tag名とtag_id値を使用して、前の手順で作成したcreateImageList関数を呼び出します。 関数からは、アップロードする画像のリストが返されます。前の手順で作成した
imageListを呼び出して、25 個のバッチでimage_listから画像をアップロードします。 データセット全体を一度にアップロードしようとすると Custom Vision がタイムアウトするため、25 個のバッチでアップロードします。for tag in tags: tag_id = createTag(tag) print(f"tag creation done with tag id {tag_id}") image_list = createImageList(tag, tag_id) print("image_list created with length " + str(len(image_list))) # Break list into lists of 25 and upload in batches. for i in range(0, len(image_list), 25): batch = ImageFileCreateBatch(images=image_list[i:i + 25]) print(f'Upload started for batch {i} total items {len (image_list)} for tag {tag}...') uploadImageList(batch) print(f"Batch {i} Image upload completed. Total uploaded {len(image_list)} for tag {tag}")警告
このセルのコードは 1 回だけ実行します。 Custom Vision プロジェクトを削除せずに、セルを複数回実行しようとすると、セルの実行は失敗します。