演習 - Azure CLI から Azure VM のイメージを作成し、新しい VM をプロビジョニングする
あなたの組織は、このサンプルのシナリオで、仮想マシンを使用する新しい環境を Azure 内にロールアウトします。 組織の機能をサポートするために必要なソフトウェアとツールが含まれる仮想マシンは既に構築済みです。 あなたは、この仮想マシンを使用してカスタム イメージを生成してから、それを使用して新しい仮想マシン インスタンスを作成する必要があります。
この演習では、仮想マシンを作成して、それを一般化します。 次に、一般化された仮想マシンからイメージを作成し、このイメージを使用して別の仮想マシンを作成します。 前述のボックスでプラットフォームの種類を選択することにより、Windows または Linux (またはその両方) でこれを試すことができます。
既定のリソース グループを設定する
Azure Sandbox にサインインして、右側の Cloud Shell ウィンドウをアクティブにします。
右側の Cloud Shell に次のコマンドを入力して、既定のリソース グループが機能するように設定します。 これにより、すべてのコマンドでリソース グループ名を省略できます。
az configure --defaults group="<rgn>[Sandbox resource group name]</rgn>"
仮想マシンを作成する
このタスクでは、簡単な Web アプリを実行する仮想マシンをすばやく作成します。 Web アプリには、ホスト コンピューターの名前が表示されます。 この仮想マシンは、残りの演習の基礎として使用します。
Azure Cloud Shell で次のコマンドを実行し、IIS を実行する Windows Server Datacenter 仮想マシンを作成します。 azureuser のパスワードの入力を求められたら、任意のパスワードを入力します。
az vm create \
    --name MyWindowsVM \
    --image Win2019Datacenter \
    --admin-username azureuser
VM の作成が完了したら、次のコマンドを実行して IIS をインストールし、既定の Web ページを設定します。
az vm extension set \
    --name CustomScriptExtension \
    --vm-name MyWindowsVM \
    --publisher Microsoft.Compute \
    --settings '{"commandToExecute":"powershell Add-WindowsFeature Web-Server; Add-Content -Path \"C:\\inetpub\\wwwroot\\Default.htm\" -Value $(hostname)"}'
IIS のインストールが完了したら、次のコマンドを実行して、Web サーバーに対してポート 80 を開きます。
az vm open-port \
    --name MyWindowsVM \
    --port 80
次のコマンドを実行して、新しい仮想マシンのパブリック IP アドレスを調べます。
echo http://$(az vm list-ip-addresses \
             --name MyWindowsVM \
             --query "[].virtualMachine.network.publicIpAddresses[*].ipAddress" \
             --output tsv)
Web ブラウザーで、仮想マシンのパブリック IP アドレスに移動します。 仮想マシンの名前 MyWindowsVM が表示されている Web ページが開いていることを確認します。

Cloud Shell で次のコマンドを実行し、Nginx を実行する Ubuntu Server 仮想マシンを作成します。
az vm create \
    --name MyUbuntuVM \
    --image Ubuntu2204 \
    --generate-ssh-keys

az vm open-port \
    --name MyUbuntuVM \
    --port 80

az vm extension set \
    --publisher Microsoft.Azure.Extensions \
    --name CustomScript \
    --vm-name MyUbuntuVM \
    --settings '{"commandToExecute":"apt-get -y update && apt-get -y install nginx && hostname > /var/www/html/index.html"}'
VM の作成が完了したら、次のコマンドを実行して、新しい仮想マシンのパブリック IP アドレスを調べます。
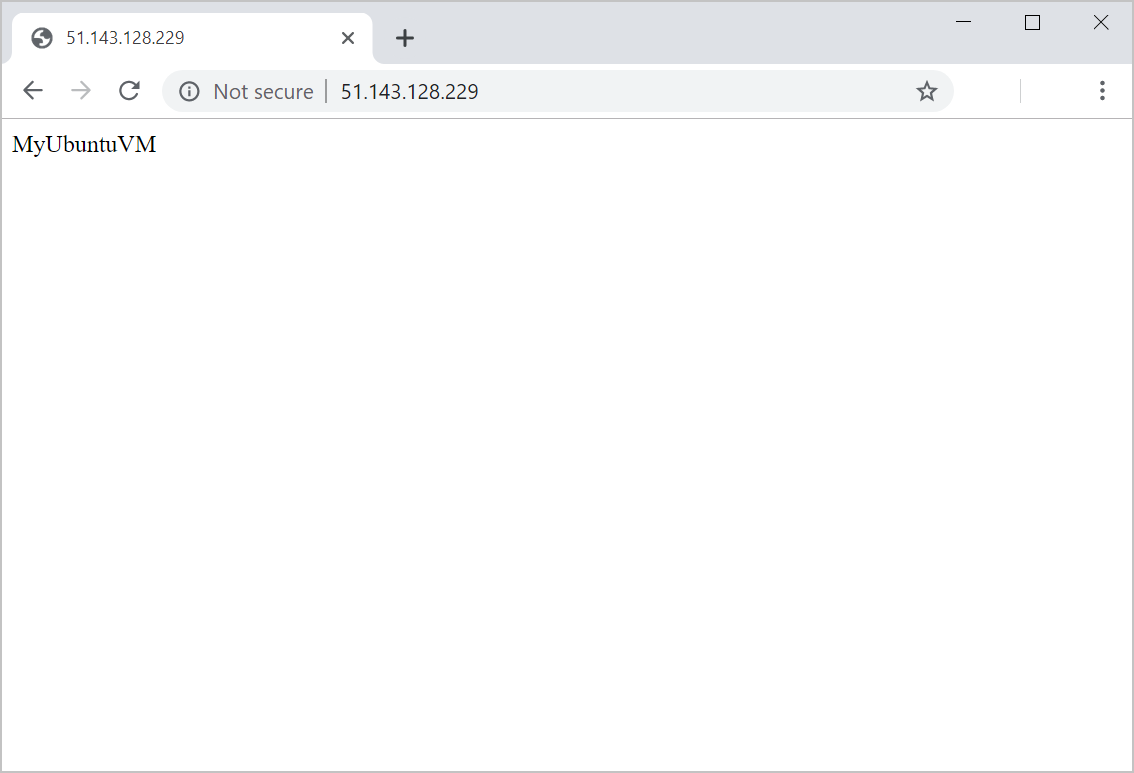
echo http://$(az vm list-ip-addresses \
             --name MyUbuntuVM \
             --query "[].virtualMachine.network.publicIpAddresses[*].ipAddress" \
             --output tsv)
Web ブラウザーで、仮想マシンのパブリック IP アドレスに移動します。 Web ページが開き、仮想マシンの名前 MyUbuntuVM が表示されることを確認します。
仮想マシンの一般化
Azure portal にサインインします。
Azure portal のメニューまたは [ホーム] ページから [リソース グループ] を選択し、
[サンドボックス リソース グループ名] リソース グループを選択します。MyWindowsVM 仮想マシンを選択します。
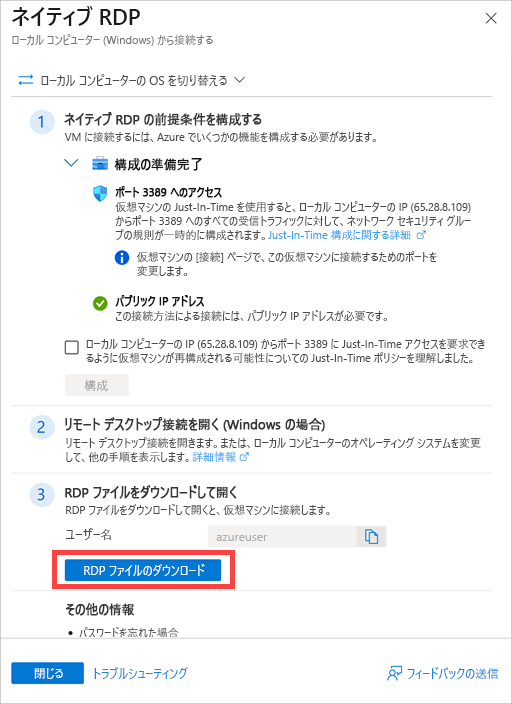
[MyWindowsVM] ページで [接続] を選択し、[ネイティブ RDP] ボックスの [選択] ボタンを選択します。
[ネイティブ RDP] ウィンドウで、[RDP ファイルのダウンロード] を選択します。
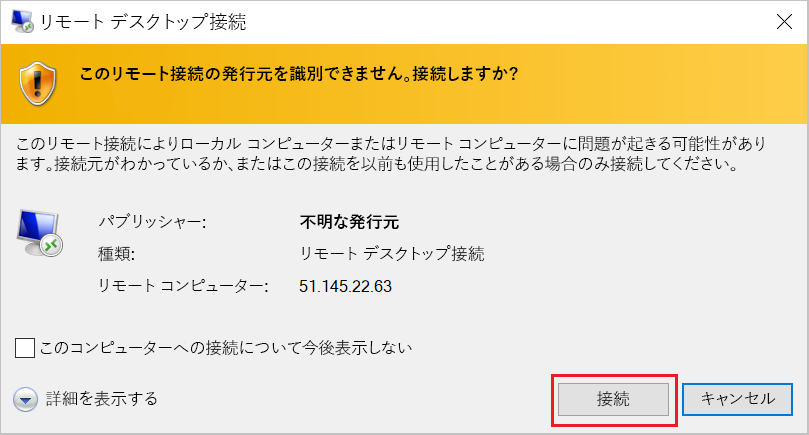
RDP ファイルがダウンロードされたら、それを選択して、仮想マシンへの RDP 接続を開きます。
[リモート デスクトップ接続] ダイアログ ボックスで、[接続] を選択します。
[Windows セキュリティ] ダイアログ ボックスで、[その他]、[別のアカウントを使用する] の順に選択します。
ユーザー名 azureuser と、元の仮想マシンを作成したときに使用した管理者パスワードを使用して、サインインします。
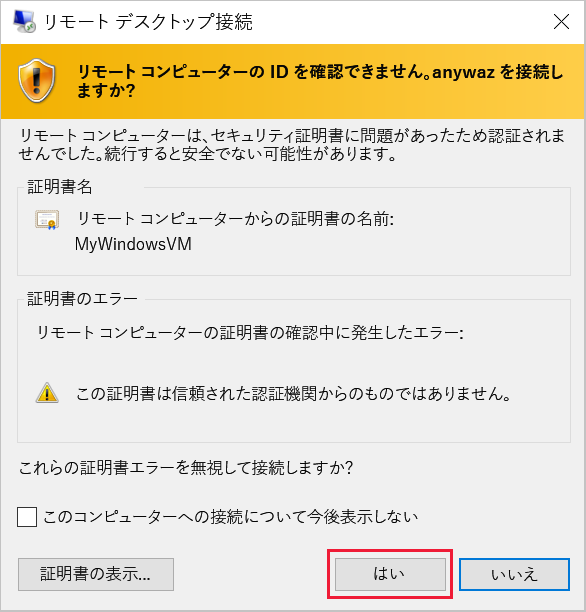
[リモート デスクトップ接続] ダイアログ ボックスで、[はい] を選択して先に進みます。
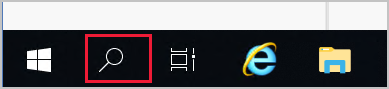
仮想マシンで、画面の左下隅にある [検索] ボタンを選択します。
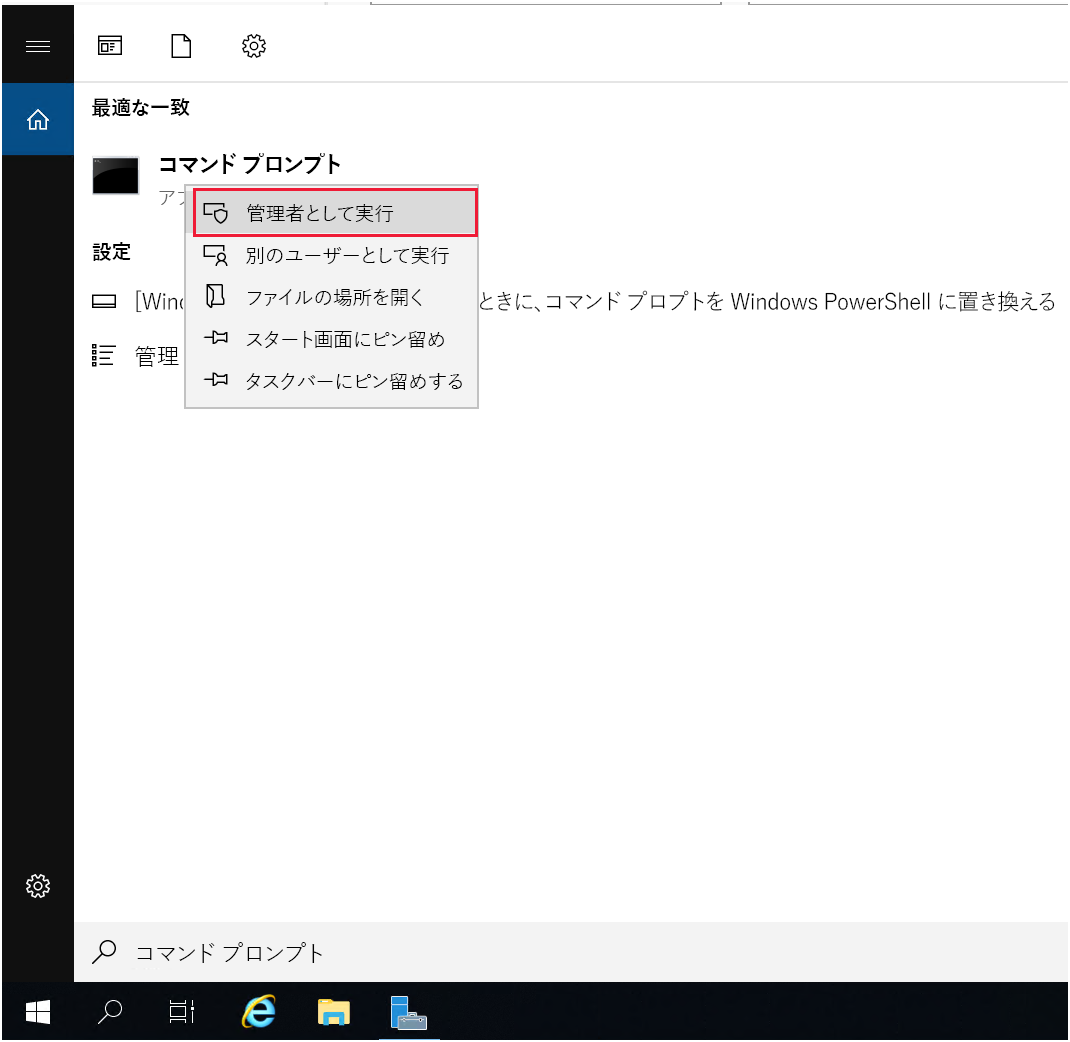
[検索する語句をここに入力] ボックスに「コマンド プロンプト」と入力します。ただし、Enter キーは "選択しないでください"。
[Best match](最適一致) ウィンドウで、[コマンド プロンプト] アプリを右クリックして、[管理者として実行] を選択します。
コマンド プロンプト ウィンドウで、次のコマンドを使用して Sysprep ツールを実行します。
C:\windows\system32\sysprep\sysprep[システム準備ツール] ダイアログ ボックスで、次の設定を選択して、[OK] を選択します。
プロパティ 値 システム クリーンアップ アクション システムの OOBE (Out-of-Box Experience) に入る 一般化 選択 シャットダウン オプション シャットダウン 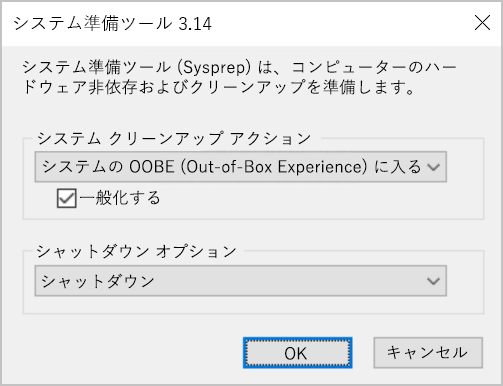
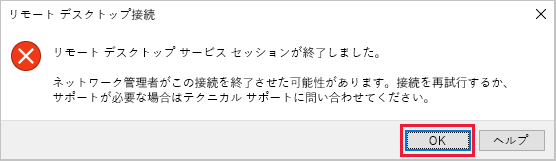
Sysprep ツールが終了し、仮想マシンへの接続が終了するまで待ちます。 次に、[リモート デスクトップ接続] メッセージ ボックスで、[OK] を選択します。
Cloud Shell ウィンドウで次のコマンドを実行して、仮想マシンの割り当てを解除します。
az vm deallocate \
    --name MyWindowsVM
VM の割り当て解除が完了したら、次のコマンドを実行して仮想マシンを一般化します。
az vm generalize \
    --name MyWindowsVM
Cloud Shell ウィンドウで次のコマンドを実行して、Ubuntu 仮想マシンに接続します。
<ip address>は、設定タスクの間に書き留めた仮想マシンのパブリック IP アドレスに置き換えます。ssh -o StrictHostKeyChecking=no <ip address>次のコマンドを実行して、一般化用に仮想マシンを準備します。
sudo waagent -deprovision+user[Do you want to proceed (y/n)] (続行しますか (y/n)) と表示されたら、「y」と入力して Enter キーを押します。
操作が完了したら、次のコマンドを実行して、仮想マシンへの接続を終了します。
exitCloud Shell で次のコマンドを実行して、仮想マシンの割り当てを解除します。
az vm deallocate \
    --name MyUbuntuVM
VM の割り当て解除が完了したら、次のコマンドを実行して仮想マシンを一般化します。
az vm generalize \
    --name MyUbuntuVM
仮想マシン イメージを作成する
次のコマンドを実行して、一般化された仮想マシンから MyVMImage という名前の仮想マシン イメージを作成します。
az image create \
    --name MyVMIMage \
    --source MyWindowsVM
次のコマンドを実行して、一般化された仮想マシンから MyVMImage という名前の仮想マシン イメージを作成します。
az image create \
    --name MyVMIMage \
    --source MyUbuntuVM
新しいイメージを使用して仮想マシンを作成する
次のコマンドを実行し、MyVMImage イメージを使用して、新しい仮想マシンを作成します。
az vm create \
  --name MyVMFromImage \
  --computer-name MyVMFromImage \
  --image MyVMImage \
  --admin-username azureuser \
  --generate-ssh-keys
VM の作成が完了したら、次のコマンドを実行して、既定の Web ページをサーバー名で更新します。
    az vm extension set \
    --publisher Microsoft.Azure.Extensions \
    --name CustomScript \
    --vm-name MyVMFromImage \
    --settings '{"commandToExecute":"hostname > /var/www/html/index.html"}'
既定の Web ページの更新が完了したら、次のコマンドを実行して、新しい仮想マシンでポート 80 を開きます。
az vm open-port \
    --name MyVMFromImage \
    --port 80
次のコマンドを実行して、新しい仮想マシンのパブリック IP アドレスを調べます。
echo http://$(az vm list-ip-addresses \
                --name MyVMFromImage \
                --query "[].virtualMachine.network.publicIpAddresses[*].ipAddress" \
                --output tsv)
Web ブラウザーで、新しい仮想マシンのパブリック IP アドレスに移動します。 Web ページに、イメージ構築元の仮想マシンの名前 MyVMFromImage が表示されることを確認します。
次のコマンドを実行し、MyVMImage イメージを使用して新しい仮想マシンを作成します。 元の仮想マシンを作成するときに使用した azureuser のパスワードを入力します。
az vm create \
  --name MyVMFromImage \
  --computer-name MyVMFromImage \
  --image MyVMImage \
  --admin-username azureuser
VM の作成が完了したら、次のコマンドを実行して、既定の Web ページをサーバー名で更新します。
az vm extension set \
    --name CustomScriptExtension \
    --vm-name MyVMFromImage \
    --publisher Microsoft.Compute \
    --settings '{"commandToExecute":"powershell Clear-Content -Path \"C:\\inetpub\\wwwroot\\Default.htm\"; Add-Content -Path \"C:\\inetpub\\wwwroot\\Default.htm\" -Value $(hostname)"}'
既定の Web ページの更新が完了したら、次のコマンドを実行して、新しい仮想マシンでポート 80 を開きます。
az vm open-port \
    --name MyVMFromImage \
    --port 80
次のコマンドを実行して、新しい仮想マシンのパブリック IP アドレスを調べます。
echo http://$(az vm list-ip-addresses \
                --name MyVMFromImage \
                --query "[].virtualMachine.network.publicIpAddresses[*].ipAddress" \
                --output tsv)
Web ブラウザーで、新しい仮想マシンのパブリック IP アドレスに移動します。 Web ページに、イメージ構築元の仮想マシンの名前 MyVMFromImage が表示されていることを確認します。
リソースをクリーンアップする
サンド ボックスは、このモジュールが完了すると、リソースを自動的にクリーンアップします。
独自のサブスクリプションを使用している場合は、プロジェクトの最後に、作成したリソースがまだ必要かどうかを確認してください。 リソースを実行したままにすると、お金がかかる場合があります。 リソースは個別に削除することも、リソース グループを削除してリソースのセット全体を削除することもできます。