AD FS 2019 によって認証され、MSAL ライブラリを使用して Web API を呼び出すためのトークンを取得するネイティブ アプリ サインイン ユーザーを構築する方法について説明します。
この記事を読む前に、ADFS の概念と認証コードの付与フローについて理解しておく必要があります。
概要
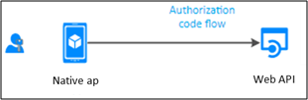
このフローでは、ネイティブ アプリ (パブリック クライアント) に認証を追加します。これにより、ユーザーのサインインが可能になり、Web API が呼び出されます。 ユーザーをサインインするネイティブ アプリから Web API を呼び出すには、MSAL の AcquireTokenInteractive トークン取得メソッドを使用できます。 この対話を有効にするために、MSAL では Web ブラウザーが利用されます。
AD FS でネイティブ アプリを構成してアクセス トークンを対話形式で取得する方法を理解するには、ここで入手できるサンプルを使用して、アプリの登録とコード構成の手順を説明します。
前提条件
- GitHub クライアント ツール
- AD FS 2019 以降が構成および実行されている
- Visual Studio 2013 以降
AD FS でのアプリの登録
このセクションでは、ネイティブ アプリをパブリック クライアントとして登録し、Web API を AD FS で証明書利用者 (RP) としてクライアントに登録する方法について説明します
[AD FS の管理] で、[アプリケーション グループ] を右クリックし、[アプリケーション グループの追加] を選択します。
アプリケーション グループ ウィザードで、[名前] に「NativeAppToWebApi」と入力し、[クライアント/サーバー アプリケーション] で [Web API にアクセスするネイティブ アプリケーション] テンプレートを選択します。 [次へ] をクリックします。
![Web API テンプレートにアクセスするネイティブ アプリケーションが強調表示されているアプリケーション グループの追加ウィザードの [ようこそ] ページのスクリーンショット。](media/adfs-msal-native-app-web-api/native2.png)
[クライアント識別子] の値をコピーします。 これは、後でアプリケーションの App.config ファイル内の ClientId の値として使用されます。 [リダイレクト URI] に次を入力します: https://ToDoListClient. [追加] をクリックします。 [次へ] をクリックします。
![リダイレクト URI が表示されている、アプリケーション グループの追加ウィザードの [ネイティブ アプリケーション] ページのスクリーンショット。](media/adfs-msal-native-app-web-api/native3.png)
[Web API の構成] 画面で、[識別子] に次のように入力します: https://localhost:44321/. [追加] をクリックします。 [次へ] をクリックします。 この値は、後でアプリケーションのファイル App.config および Web.config で使用されます。
![正しい識別子が表示されている、アプリケーション グループの追加ウィザードの [Web API の構成] ページのスクリーンショット。](media/adfs-msal-native-app-web-api/native4.png)
[アクセス制御ポリシーの適用] 画面で、[すべてのユーザーを許可] を選んで、[次へ] をクリックします。
![[すべてのユーザーを許可] オプションが強調表示されている、アプリケーション グループの追加ウィザードの [アクセス制御ポリシーの選択] ページのスクリーンショット。](media/adfs-msal-native-app-web-api/native5.png)
[アプリケーションのアクセス許可の構成] 画面で、openid が選択されていることを確認し、[次へ] をクリックします。
![openid が選択されている、アプリケーション グループの追加ウィザードの [アプリケーションのアクセス許可の構成] ページのスクリーンショット。](media/adfs-msal-native-app-web-api/native6.png)
[概要] 画面で、[次へ] をクリックします。
[完了] 画面で、[閉じる] をクリックします。
[AD FS の管理] で、[アプリケーション グループ] をクリックし、[NativeAppToWebApi] アプリケーション グループを選択します。 右クリックし、[プロパティ] を選択します。
![NativeAppToWebApi グループが強調表示され、ドロップダウン リストの [プロパティ] オプションが表示されている、[AD FS の管理] ダイアログ ボックスのスクリーンショット。](media/adfs-msal-native-app-web-api/native7.png)
[NativeAppToWebApi] プロパティ画面で、[Web API] の下の [NativeAppToWebApi – Web API] を選択し、[編集] をクリックします。
![NativeAppToWebApi - Web API アプリケーションが強調表示されている [NativeAppToWebApi のプロパティ] ダイアログ ボックスのスクリーンショット。](media/adfs-msal-native-app-web-api/native8.png)
[NativeAppToWebApi – Web API のプロパティ] 画面で、[発行変換規則] タブを選択し、[規則の追加] をクリックします。
![[発行変換規則] タブが表示されている [NativeAppToWebApi - Web API プロパティ] ダイアログ ボックスのスクリーンショット。](media/adfs-msal-native-app-web-api/native9.png)
変換要求規則の追加ウィザード上で、[要求規則テンプレート] ドロップダウンから [入力方向の要求を変換する] を選択し、[次へ] をクリックします。
![[変換要求規則の追加ウィザード] の [規則テンプレートの選択] ページにおいて、[入力方向の要求を変換] オプションが選択されているスクリーンショット。](media/adfs-msal-native-app-web-api/native10.png)
[要求規則名] フィールドに「NameID」と入力します。 [入力方向の要求の種類] には [名前] を、[出力方向の要求タイプ] には [名前 ID] を、[出力方向の名前 ID 形式:] には [共通名] を選択します。 [完了] をクリックします。
![上記の構成を示す変換要求規則の追加ウィザードの [規則の構成] ページのスクリーンショット。](media/adfs-msal-native-app-web-api/native11.png)
[NativeAppToWebApi – Web API のプロパティ] 画面で [OK] をクリックしてから、[NativeAppToWebApi のプロパティ] 画面をクリックします。
コード構成
このセクションでは、ユーザーをサインインし、Web API を呼び出すトークンを取得するネイティブ アプリを構成する方法について説明します
こちらからサンプルをダウンロードする
Visual Studio を使用してサンプルを開く
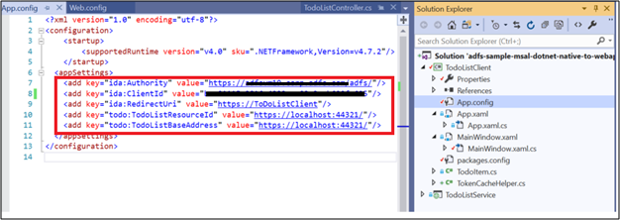
App.config ファイルを開きます。 次の変更を行います。
ida:Authority - 「h
ttps://[your AD FS hostname]/adfs」と入力しますida:ClientId - 上記の AD FS セクションの [アプリの登録] の #3 からの [クライアント識別子] 値を入力します。
ida:RedirectUri - 上記の AD FS セクションの [アプリの登録] の #3 からの [リダイレクト URI] 値を入力します。
todo:TodoListResourceId – 上記の AD FS セクションの [アプリの登録] の #4 からの [識別子] 値を入力します。
ida: todo:TodoListBaseAddress – 上記の AD FS セクションの [アプリの登録] の #4 からの [識別子] 値を入力します。
Web.config ファイルを開きます。 次の変更を行います。
ida:Audience – 上記の AD FS セクションの [アプリの登録] の #4 からの [識別子] 値を入力します。
ida: AdfsMetadataEndpoint - 「
https://[your AD FS hostname]/federationmetadata/2007-06/federationmetadata.xml」と入力します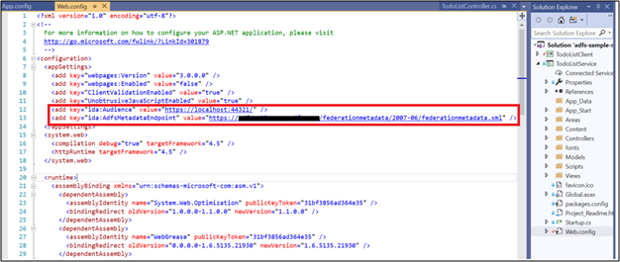
サンプルをテストする
このセクションでは、上で構成したサンプルをテストする方法を示します。
コードの変更が行われたら、ソリューションをリビルドします
Visual Studio 上で、ソリューションを右クリックし、[スタートアップ プロジェクトの設定] を選択します…
![[スタートアップ プロジェクトの設定] オプションが強調表示されている、ソリューションを右クリックしたときに表示される一覧のスクリーンショット。](media/adfs-msal-native-app-web-api/native14.png)
[プロパティ] ページで、各プロジェクトに対して [アクション] が [開始] に設定されていることを確認します
![[マルチ スタートアップ プロジェクト] オプションが選択され、すべてのプロジェクトのアクションが [開始] に設定されている、ソリューションのプロパティ ページ ダイアログ ボックスのスクリーンショット。](media/adfs-msal-native-app-web-api/native15.png)
Visual Studio の上部で、緑色の矢印をクリックします。
![[開始] オプションが強調表示されている Visual Studio UI のスクリーンショット。](media/adfs-msal-native-app-web-api/native16.png)
ネイティブ アプリのメイン画面で、[サインイン] をクリックします。
![[To Do リスト クライアント] ダイアログ ボックスのスクリーンショット。](media/adfs-msal-native-app-web-api/native17.png)
ネイティブ アプリ画面が表示されていない場合は、プロジェクト リポジトリが保存されているシステム上で *msalcache.bin ファイルを検索して削除します。
AD FS サインイン ページにリダイレクトされます。 どうぞサインインしてください。
![[サインイン] ページのスクリーンショット。](media/adfs-msal-native-app-web-api/native18.png)
サインインしたら、[ToDo 項目の作成] にテキスト「Build Native App to Web Api」を入力します。 [項目の追加] をクリックします。 これにより、To Do List Service (Web API) が呼び出され、キャッシュに項目が追加されます。
![[To Do 項目] セクションに新しい作業項目が設定されている、[To Do リスト クライアント] ダイアログ ボックスのスクリーンショット。](media/adfs-msal-native-app-web-api/native19.png)