オペレーティング システムのサポート、モデルのサポートなど、WebNN の概要については、 WebNN の概要を参照してください。
このチュートリアルでは、ONNX Runtime Web で WebNN を使用して、デバイス上の GPU を使用してハードウェアによって高速化される画像分類システムを Web 上に構築する方法について説明します。 画像の分類に使用される Hugging Face のオープンソース モデルである MobileNetV2 モデルを活用します。
このチュートリアルの最後のコードを表示して実行する場合は、 WebNN Developer Preview GitHub で見つけることができます。
注
WebNN API は W3C 候補の推奨事項であり、開発者プレビューの初期段階にあります。 一部の機能は制限されています。 現在のサポートと 実装の状態の一覧があります。
要件とセットアップ:
Windows のセットアップ
「WebNN 要件」セクションで詳しく説明されているように、正しいバージョンの Edge、Windows、およびハードウェア ドライバーがあることを確認します。
エッジの設定
Microsoft Edge Dev をダウンロードしてインストールします。
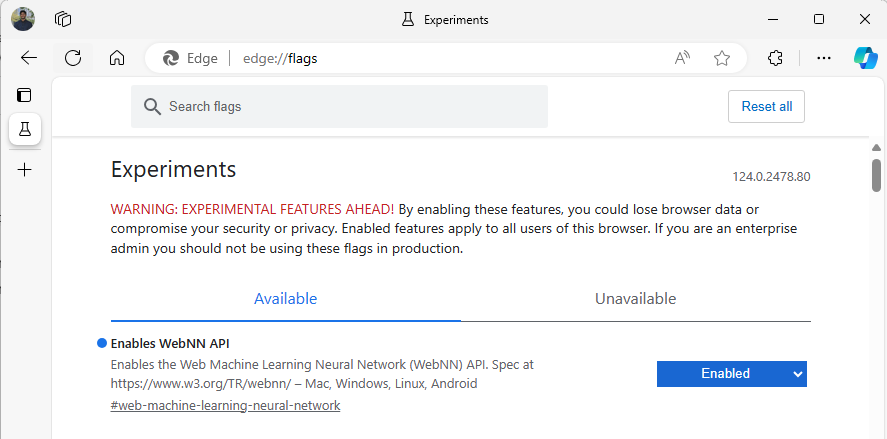
Edge Beta を起動し、アドレス バーの
about:flagsに移動します。"WebNN API" を検索し、ドロップダウンをクリックして [有効] に設定します。
メッセージが表示されたら、Edge を再起動します。
開発環境の設定
Visual Studio Code (VSCode) をダウンロードしてインストールします。
VSCode を起動します。
VSCode 内で VSCode の Live Server 拡張機能を ダウンロードしてインストールします。
File --> Open Folderを選択し、目的の場所に空のフォルダーを作成します。
手順 1: Web アプリを初期化する
- まず、新しい
index.htmlページを作成します。 次の定型コードを新しいページに追加します。
<!DOCTYPE html>
<html lang="en">
  <head>
    <meta charset="UTF-8">
    <meta name="viewport" content="width=device-width, initial-scale=1.0">
    <title>My Website</title>
  </head>
  <body>
    <main>
        <h1>Welcome to My Website</h1>
    </main>
  </body>
</html>
- VSCode の右下にある [ライブに移動 ] ボタンを選択して、定型コードと開発者のセットアップが機能したことを確認します。 これにより、定型コードを実行しているエッジ ベータでローカル サーバーが起動されます。
- 次に、
main.jsという名前の新しいファイルを作成します。 これには、アプリの JavaScript コードが含まれます。 - 次に、
imagesという名前のルート ディレクトリからサブフォルダーを作成します。 フォルダー内のイメージをダウンロードして保存します。 このデモでは、image.jpgの既定の名前を使用します。 - ONNX Model Zoo から mobilenet モデルをダウンロードします。 このチュートリアルでは、 mobilenet2-10.onnx ファイルを使用します。 このモデルを Web アプリのルート フォルダーに保存します。
- 最後に、この イメージ クラス ファイルをダウンロードして保存
imagenetClasses.js。 これにより、モデルで使用する画像の 1000 の一般的な分類が提供されます。
手順 2: UI 要素と親関数を追加する
- 前の手順で追加した
<main>html タグの本文内で、既存のコードを次の要素に置き換えます。 これにより、ボタンが作成され、既定の画像が表示されます。
<h1>Image Classification Demo!</h1>
<div><img src="./images/image.jpg"></div>
<button onclick="classifyImage('./images/image.jpg')"  type="button">Click Me to Classify Image!</button>
<h1 id="outputText"> This image displayed is ... </h1>
- 次に、 ページに ONNX Runtime Web を追加します。これは、WebNN API へのアクセスに使用する JavaScript ライブラリです。
<head>html タグの本文内に、次の javascript ソース リンクを追加します。
<script src="./main.js"></script>
<script src="imagenetClasses.js"></script>
<script src="https://cdn.jsdelivr.net/npm/onnxruntime-web@1.18.0-dev.20240311-5479124834/dist/ort.webgpu.min.js"></script>
-
main.jsファイルを開き、次のコード スニペットを追加します。
async function classifyImage(pathToImage){
  var imageTensor = await getImageTensorFromPath(pathToImage); // Convert image to a tensor
  var predictions = await runModel(imageTensor); // Run inference on the tensor
  console.log(predictions); // Print predictions to console
  document.getElementById("outputText").innerHTML += predictions[0].name; // Display prediction in HTML
}
手順 3: データを前処理する
- 先ほど呼び出しを追加した関数
getImageTensorFromPath、実装する必要がある別の関数です。 以下に、イメージ自体を取得するために呼び出す別の非同期関数と同様に、それを追加します。
  async function getImageTensorFromPath(path, width = 224, height = 224) {
    var image = await loadImagefromPath(path, width, height); // 1. load the image
    var imageTensor = imageDataToTensor(image); // 2. convert to tensor
    return imageTensor; // 3. return the tensor
  }

  async function loadImagefromPath(path, resizedWidth, resizedHeight) {
    var imageData = await Jimp.read(path).then(imageBuffer => { // Use Jimp to load the image and resize it.
      return imageBuffer.resize(resizedWidth, resizedHeight);
    });

    return imageData.bitmap;
  }
- また、上記で参照されている
imageDataToTensor関数を追加する必要があります。これによって、読み込まれたイメージが ONNX モデルで動作するテンソル形式でレンダリングされます。 これはより複雑な機能ですが、以前に同様の画像分類アプリを使用したことがある場合は、使い慣れているように見えるかもしれません。 詳細な説明については、 この ONNX チュートリアルを参照してください。
  function imageDataToTensor(image) {
    var imageBufferData = image.data;
    let pixelCount = image.width * image.height;
    const float32Data = new Float32Array(3 * pixelCount); // Allocate enough space for red/green/blue channels.

    // Loop through the image buffer, extracting the (R, G, B) channels, rearranging from
    // packed channels to planar channels, and converting to floating point.
    for (let i = 0; i < pixelCount; i++) {
      float32Data[pixelCount * 0 + i] = imageBufferData[i * 4 + 0] / 255.0; // Red
      float32Data[pixelCount * 1 + i] = imageBufferData[i * 4 + 1] / 255.0; // Green
      float32Data[pixelCount * 2 + i] = imageBufferData[i * 4 + 2] / 255.0; // Blue
      // Skip the unused alpha channel: imageBufferData[i * 4 + 3].
    }
    let dimensions = [1, 3, image.height, image.width];
    const inputTensor = new ort.Tensor("float32", float32Data, dimensions);
    return inputTensor;
  }
手順 4: ONNX ランタイム Web を呼び出す
- これで、イメージを取得してテンソルとしてレンダリングするために必要なすべての関数が追加されました。 ここで、上記で読み込んだ ONNX ランタイム Web ライブラリを使用して、モデルを実行します。 ここで WebNN を使用するには、
executionProvider = "webnn"を指定するだけです。ONNX ランタイムのサポートにより、WebNN を有効にするのは非常に簡単です。
  async function runModel(preprocessedData) {
    // Set up environment.
    ort.env.wasm.numThreads = 1;
    ort.env.wasm.simd = true;
    // Uncomment for additional information in debug builds:
    // ort.env.wasm.proxy = true;
    // ort.env.logLevel = "verbose";
    // ort.env.debug = true;

    // Configure WebNN.
    const modelPath = "./mobilenetv2-10.onnx";
    const devicePreference = "gpu"; // Other options include "npu" and "cpu".
    const options = {
        executionProviders: [{ name: "webnn", deviceType: devicePreference, powerPreference: "default" }],
      freeDimensionOverrides: {"batch": 1, "channels": 3, "height": 224, "width": 224}
      // The key names in freeDimensionOverrides should map to the real input dim names in the model.
      // For example, if a model's only key is batch_size, you only need to set
      // freeDimensionOverrides: {"batch_size": 1}
    };
    modelSession = await ort.InferenceSession.create(modelPath, options);

    // Create feeds with the input name from model export and the preprocessed data.
    const feeds = {};
    feeds[modelSession.inputNames[0]] = preprocessedData;
    // Run the session inference.
    const outputData = await modelSession.run(feeds);
    // Get output results with the output name from the model export.
    const output = outputData[modelSession.outputNames[0]];
    // Get the softmax of the output data. The softmax transforms values to be between 0 and 1.
    var outputSoftmax = softmax(Array.prototype.slice.call(output.data));
    // Get the top 5 results.
    var results = imagenetClassesTopK(outputSoftmax, 5);

    return results;
  }
手順 5: データの後処理
- 最後に、
softmax関数を追加し、最終的な関数を追加して、最も可能性の高い画像分類を返します。softmaxでは、値が 0 から 1 の間に変換されます。これは、この最終的な分類に必要な確率形式です。
最初に、ヘルパー ライブラリ Jimp と Lodash の次のソース ファイルを main.js のヘッド タグに追加します。
<script src="https://cdnjs.cloudflare.com/ajax/libs/jimp/0.22.12/jimp.min.js" integrity="sha512-8xrUum7qKj8xbiUrOzDEJL5uLjpSIMxVevAM5pvBroaxJnxJGFsKaohQPmlzQP8rEoAxrAujWttTnx3AMgGIww==" crossorigin="anonymous" referrerpolicy="no-referrer"></script>
<script src="https://cdn.jsdelivr.net/npm/lodash@4.17.21/lodash.min.js"></script>
次に、次の関数を main.jsに追加します。
// The softmax transforms values to be between 0 and 1.
function softmax(resultArray) {
  // Get the largest value in the array.
  const largestNumber = Math.max(...resultArray);
  // Apply the exponential function to each result item subtracted by the largest number, using reduction to get the
  // previous result number and the current number to sum all the exponentials results.
  const sumOfExp = resultArray
    .map(resultItem => Math.exp(resultItem - largestNumber))
    .reduce((prevNumber, currentNumber) => prevNumber + currentNumber);

  // Normalize the resultArray by dividing by the sum of all exponentials.
  // This normalization ensures that the sum of the components of the output vector is 1.
  return resultArray.map((resultValue, index) => {
    return Math.exp(resultValue - largestNumber) / sumOfExp
  });
}

function imagenetClassesTopK(classProbabilities, k = 5) {
  const probs = _.isTypedArray(classProbabilities)
    ? Array.prototype.slice.call(classProbabilities)
    : classProbabilities;

  const sorted = _.reverse(
    _.sortBy(
      probs.map((prob, index) => [prob, index]),
      probIndex => probIndex[0]
    )
  );

  const topK = _.take(sorted, k).map(probIndex => {
    const iClass = imagenetClasses[probIndex[1]]
    return {
      id: iClass[0],
      index: parseInt(probIndex[1].toString(), 10),
      name: iClass[1].replace(/_/g, " "),
      probability: probIndex[0]
    }
  });
  return topK;
}
- これで、基本的な Web アプリで WebNN で画像分類を実行するために必要なすべてのスクリプトが追加されました。 VS Code の Live Server 拡張機能を使用して、基本的な Web ページをアプリ内で起動し、分類の結果を自分で確認できるようになりました。