AppWindow を使用して複数のビューを表示する
AppWindow とその関連 API を使用すると、アプリのコンテンツをセカンダリ ウィンドウに表示しながら、引き続き各ウィンドウにわたって同じ UI スレッドで作業できるため、マルチウィンドウ アプリの作成が簡略化されます。
注意
AppWindow は現在、プレビュー段階です。 つまり、AppWindow を使用するアプリを Store に送信することはできますが、一部のプラットフォームおよびフレームワーク コンポーネントが AppWindow では動作しないことがわかっています (「制限事項」を参照)。
ここでは、HelloAppWindow という名前のサンプル アプリを使用して、複数のウィンドウのシナリオをいくつか示します。 このサンプル アプリは、次の機能を示しています。
- メイン ページからコントロールのドッキングを解除し、それを新しいウィンドウで開く。
- Page の新しいインスタンスを新しいウィンドウで開く。
- アプリで新しいウィンドウのサイズと位置をプログラムで設定する。
- アプリで ContentDialog を適切なウィンドウに関連付ける。
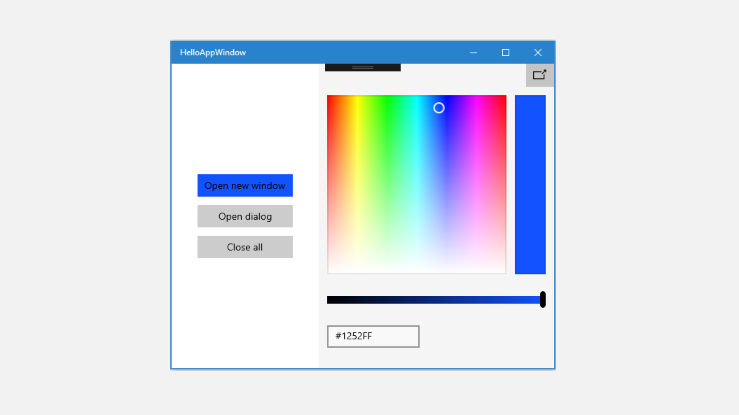
1 つのウィンドウを持つサンプル アプリ
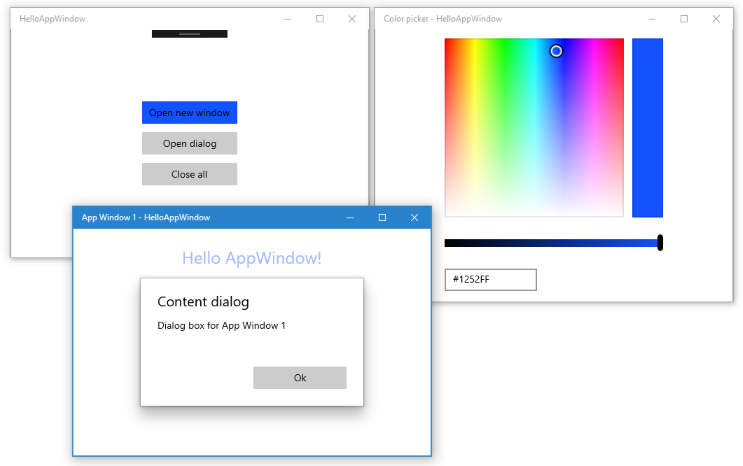
ドッキング解除されたカラー ピッカーとセカンダリ ウィンドウを持つサンプル アプリ
API の概要
WindowManagement 名前空間内の AppWindow クラスやその他の API は、Windows 10 バージョン 1903 (SDK 18362) から使用できます。 アプリが以前のバージョンの Windows 10 を対象としている場合は、ApplicationView を使用してセカンダリ ウィンドウを作成する必要があります。 WindowManagement API はまだ開発段階にあり、API リファレンス ドキュメントで説明されているように制限事項があります。
AppWindow でコンテンツを表示するために使用する重要な API のいくつかを次に示します。
AppWindow
AppWindow クラスを使用すると、Windows ランタイム アプリの一部をセカンダリ ウィンドウに表示できます。 概念的には ApplicationView に似ていますが、動作や有効期間が異なります。 AppWindow の主な機能は、各インスタンスが、作成元である同じ UI 処理スレッド (イベント ディスパッチャーを含む) を共有することです。これにより、マルチウィンドウ アプリが簡略化されます。
XAML コンテンツは自分の AppWindow にしか接続できず、ネイティブな DirectX またはホログラフィック コンテンツのサポートはありません。 ただし、DirectX コンテンツをホストする XAML SwapChainPanel を表示できます。
WindowingEnvironment
WindowingEnvironment API を使用すると、アプリが提供されている環境について知ることができるため、必要に応じてアプリを適応させることができます。 この API では、環境がサポートするウィンドウの種類が説明されます。たとえば、アプリが PC で実行されている場合は Overlapped、アプリが Xbox で実行されている場合は Tiled です。 また、アプリを表示できる論理ディスプレイ上の領域を説明する、一連の DisplayRegion オブジェクトも提供されます。
DisplayRegion
DisplayRegion API は、ビューをユーザーに表示できる論理ディスプレイ上の領域を説明します。たとえば、デスクトップ PC では、これはフル ディスプレイからタスク バーの領域を引いたものです。 これは必ずしも、バッキング モニターの物理ディスプレイ領域との 1:1 のマッピングではありません。 同じモニター内に複数のディスプレイ領域が存在できます。あるいは、これらのモニターがすべての側面で同種である場合は、複数のモニターにまたがるように DisplayRegion を構成できます。
AppWindowPresenter
AppWindowPresenter API を使用すると、ウィンドウを FullScreen や CompactOverlay などの事前定義済みの構成に容易に切り替えることができます。 これらの構成により、ユーザーには、その構成をサポートするすべてのデバイスにわたって一貫したエクスペリエンスが提供されます。
UIContext
UIContext は、アプリ ウィンドウまたはビューの一意識別子です。 これは自動的に作成され、ユーザーは UIElement.UIContext プロパティを使用して UIContext を取得できます。 XAML ツリー内のすべての UIElement に同じ UIContext が割り当てられます。
Window.Current などの API や GetForCurrentView パターンは、操作するスレッドごとに単一の XAML ツリーに単一の ApplicationView/CoreWindow を持つことに依存しているため、UIContext は重要です。 これは AppWindow を使用するケースではないため、代わりに UIContext を使用して特定のウィンドウを識別します。
XamlRoot
XamlRoot クラスは XAML 要素ツリーを保持し、それをウィンドウ ホスト オブジェクト (AppWindow や ApplicationView など) に接続して、サイズや可視性などの情報を提供します。 XamlRoot オブジェクトは、ユーザーが直接作成するわけではありません。 代わりに、ユーザーが XAML 要素を AppWindow にアタッチしたときに作成されます。 その後、UIElement.XamlRoot プロパティを使用して XamlRoot を取得できます。
UIContext と XamlRoot の詳細については、コードをウィンドウ化ホストにわたって移植可能にする方法に関するページを参照してください。
新しいウィンドウを表示する
新しい AppWindow でコンテンツを表示する手順を見てみましょう。
新しいウィンドウを表示するには
静的 AppWindow.TryCreateAsync メソッドを呼び出して、新しい AppWindow を作成します。
AppWindow appWindow = await AppWindow.TryCreateAsync();ウィンドウ コンテンツを作成します。
通常は、XAML Frame を作成した後、Frame からアプリのコンテンツを定義した XAML Page に移動します。 フレームとページの詳細については、2 ページ間でのピア ツー ピアのナビゲーションに関するページを参照してください。
Frame appWindowContentFrame = new Frame();
appWindowContentFrame.Navigate(typeof(AppWindowMainPage));
ただし、AppWindow では Frame と Page だけでなく、任意の XAML コンテンツを表示できます。 たとえば、1 つのコントロール (ColorPicker など) だけを表示したり、DirectX コンテンツをホストする SwapChainPanel を表示したりできます。
ElementCompositionPreview.SetAppWindowContent メソッドを呼び出して、XAML コンテンツを AppWindow にアタッチします。
ElementCompositionPreview.SetAppWindowContent(appWindow, appWindowContentFrame);このメソッドを呼び出すと、XamlRoot オブジェクトが作成され、指定された UIElement の XamlRoot プロパティとして設定されます。
このメソッドは、AppWindow インスタンスあたり 1 回しか呼び出すことができません。 コンテンツが設定された後に、この AppWindow インスタンスで SetAppWindowContent をさらに呼び出すと失敗します。 また、null の UIElement オブジェクトを渡すことによって AppWindow コンテンツとの接続を解除しようとすると、その呼び出しは失敗します。
AppWindow.TryShowAsync メソッドを呼び出して、新しいウィンドウを表示します。
await appWindow.TryShowAsync();
ウィンドウが閉じられたらリソースを解放する
XAML リソース (AppWindow コンテンツ) と AppWindow への参照を解放するには、常に AppWindow.Closed イベントを処理する必要があります。
appWindow.Closed += delegate
{
    appWindowContentFrame.Content = null;
    appWindow = null;
};
ヒント
予期せぬ問題を回避するために、Closed イベント ハンドラー内のコード量を最小限に抑えることをお勧めします。
AppWindow のインスタンスを追跡する
アプリで複数のウィンドウを使用する方法に応じて、作成した AppWindow のインスタンスを追跡する必要がある場合とない場合があります。 HelloAppWindow の例は、一般に AppWindow を使用する可能性があるいくつかの異なる方法を示しています。 ここでは、これらのウィンドウの追跡が必要な理由とその方法について調べます。
単純な追跡
カラー ピッカー ウィンドウは 1 つの XAML コントロールをホストし、カラー ピッカーを操作するためのコードはすべて MainPage.xaml.cs ファイル内に存在します。 カラー ピッカー ウィンドウは 1 つのインスタンスのみを許可し、基本的には MainWindow の拡張です。 確実に 1 つのインスタンスだけが作成されるようにするために、カラー ピッカー ウィンドウはページ レベルの変数で追跡されます。 新しいカラー ピッカー ウィンドウを作成する前に、インスタンスが存在するかどうかを確認し、存在する場合は、新しいウィンドウを作成する手順をスキップして、単に既存のウィンドウで TryShowAsync を呼び出します。
AppWindow colorPickerAppWindow;

// ...

private async void DetachColorPickerButton_Click(object sender, RoutedEventArgs e)
{
    // Create the color picker window.
    if (colorPickerAppWindow == null)
    {
        // ...
        // Create a new window
        colorPickerAppWindow = await AppWindow.TryCreateAsync();
        // ...
    }
    // Show the window.
    await colorPickerAppWindow.TryShowAsync();
}
ホストされているコンテンツで AppWindow インスタンスを追跡する
AppWindowPage ウィンドウは完全な XAML ページをホストし、そのページを操作するためのコードは AppWindowPage.xaml.cs 内に存在します。 これは、それぞれが独立に機能する複数のインスタンスを許可します。
このページの機能を使用すると、ウィンドウを操作してそれを FullScreen または CompactOverlay に設定できます。また、ウィンドウに関する情報を表示するために AppWindow.Changed イベントもリッスンします。 これらの API を呼び出すために、AppWindowPage には、それをホストしている AppWindow インスタンスへの参照が必要です。
それが必要なすべてである場合は、AppWindowPage でプロパティを作成し、作成するときにそれに AppWindow インスタンスを割り当てることができます。
AppWindowPage.xaml.cs
AppWindowPage で、AppWindow 参照を保持するプロパティを作成します。
public sealed partial class AppWindowPage : Page
{
    public AppWindow MyAppWindow { get; set; }

    // ...
}
MainPage.xaml.cs
MainPage で、ページ インスタンスへの参照を取得し、新しく作成された AppWindow を AppWindowPage のプロパティに割り当てます。
private async void ShowNewWindowButton_Click(object sender, RoutedEventArgs e)
{
    // Create a new window.
    AppWindow appWindow = await AppWindow.TryCreateAsync();

    // Create a Frame and navigate to the Page you want to show in the new window.
    Frame appWindowContentFrame = new Frame();
    appWindowContentFrame.Navigate(typeof(AppWindowPage));

    // Get a reference to the page instance and assign the
    // newly created AppWindow to the MyAppWindow property.
    AppWindowPage page = (AppWindowPage)appWindowContentFrame.Content;
    page.MyAppWindow = appWindow;

    // ...
}
UIContext を使用したアプリ ウィンドウの追跡
アプリの他の部分から AppWindow インスタンスにアクセスできるようにすることもできます。 たとえば、MainPage には、追跡されている AppWindow のすべてのインスタンスを閉じる [すべて閉じる] ボタンが存在する可能性があります。
この場合、Dictionary 内のウィンドウ インスタンスを追跡するには UIContext の一意識別子を使用する必要があります。
MainPage.xaml.cs
MainPage で、Dictionary を静的プロパティとして作成します。 次に、作成した Dictionary にページを追加し、ページが閉じられたら Dictionary を削除します。 ElementCompositionPreview.SetAppWindowContent を呼び出した後、コンテンツの Frame (appWindowContentFrame.UIContext) から UIContext を取得できます。
public sealed partial class MainPage : Page
{
    // Track open app windows in a Dictionary.
    public static Dictionary<UIContext, AppWindow> AppWindows { get; set; }
        = new Dictionary<UIContext, AppWindow>();

    // ...

    private async void ShowNewWindowButton_Click(object sender, RoutedEventArgs e)
    {
        // Create a new window.
        AppWindow appWindow = await AppWindow.TryCreateAsync();

        // Create a Frame and navigate to the Page you want to show in the new window.
        Frame appWindowContentFrame = new Frame();
        appWindowContentFrame.Navigate(typeof(AppWindowPage));

        // Attach the XAML content to the window.
        ElementCompositionPreview.SetAppWindowContent(appWindow, appWindowContentFrame);

        // Add the new page to the Dictionary using the UIContext as the Key.
        AppWindows.Add(appWindowContentFrame.UIContext, appWindow);
        appWindow.Title = "App Window " + AppWindows.Count.ToString();

        // When the window is closed, be sure to release
        // XAML resources and the reference to the window.
        appWindow.Closed += delegate
        {
            MainPage.AppWindows.Remove(appWindowContentFrame.UIContext);
            appWindowContentFrame.Content = null;
            appWindow = null;
        };

        // Show the window.
        await appWindow.TryShowAsync();
    }

    private async void CloseAllButton_Click(object sender, RoutedEventArgs e)
    {
        while (AppWindows.Count > 0)
        {
            await AppWindows.Values.First().CloseAsync();
        }
    }
    // ...
}
AppWindowPage.xaml.cs
AppWindowPage コードで AppWindow インスタンスを使用するには、ページの UIContext を使用して MainPage の静的な Dictionary から取得します。 UIContext が null にならないように、これはコンストラクターではなく、ページの Loaded イベント ハンドラーで実行する必要があります。 UIContext は、Page this.UIContext から取得できます。
public sealed partial class AppWindowPage : Page
{
    AppWindow window;

    // ...
    public AppWindowPage()
    {
        this.InitializeComponent();

        Loaded += AppWindowPage_Loaded;
    }

    private void AppWindowPage_Loaded(object sender, RoutedEventArgs e)
    {
        // Get the reference to this AppWindow that was stored when it was created.
        window = MainPage.AppWindows[this.UIContext];

        // Set up event handlers for the window.
        window.Changed += Window_Changed;
    }
    // ...
}
注意
HelloAppWindow の例は、AppWindowPage でウィンドウを追跡する両方の方法を示していますが、一般には両方ではなく、そのどちらかを使用します。
ウィンドウのサイズと位置を要求する
AppWindow クラスには、ウィンドウのサイズと位置を制御するために使用できるいくつかのメソッドがあります。 メソッド名が暗に示しているように、システムが要求された変更に従うかどうかは環境要因によって異なります。
目的のウィンドウ サイズを指定するには、RequestSize を次のように呼び出します。
colorPickerAppWindow.RequestSize(new Size(300, 428));
ウィンドウの配置を管理するためのメソッドには、RequestMove* : RequestMoveAdjacentToCurrentView、RequestMoveAdjacentToWindow、RequestMoveRelativeToDisplayRegion、RequestMoveToDisplayRegion という名前が付けられています。
次の例では、このコードはウィンドウを、そのウィンドウの生成元のメイン ビューの横に移動します。
colorPickerAppWindow.RequestMoveAdjacentToCurrentView();
ウィンドウの現在のサイズと位置に関する情報を取得するには、GetPlacement を呼び出します。 これにより、ウィンドウの現在の DisplayRegion、Offset、Size を提供する AppWindowPlacement オブジェクトが返されます。
たとえば、ウィンドウをディスプレイの右上隅に移動するには、次のコードを呼び出すことができます。 このコードは、ウィンドウが表示された後に呼び出す必要があります。そうしないと、GetPlacement の呼び出しによって返されるウィンドウの Size は 0,0 になり、オフセットは不正確になります。
DisplayRegion displayRegion = window.GetPlacement().DisplayRegion;
double displayRegionWidth = displayRegion.WorkAreaSize.Width;
double windowWidth = window.GetPlacement().Size.Width;
int horizontalOffset = (int)(displayRegionWidth - windowWidth);
window.RequestMoveRelativeToDisplayRegion(displayRegion, new Point(horizontalOffset, 0));
プレゼンテーション構成を要求する
AppWindowPresenter クラスを使用すると、表示されるデバイスに適した事前定義済みの構成を使用して AppWindow を表示できます。 AppWindowPresentationConfiguration 値を使用すると、ウィンドウを FullScreen または CompactOverlay モードで配置できます。
この例は、次の操作を行う方法を示しています。
- 使用可能なウィンドウ プレゼンテーションが変更された場合に通知を受けるようにするには、AppWindow.Changed イベントを使用します。
- 現在の AppWindowPresenter を取得するには、AppWindow.Presenter プロパティを使用します。
- 特定の AppWindowPresentationKind がサポートされているかどうかを確認するには、IsPresentationSupported を呼び出します。
- 現在どのような種類の構成が使用されているかを確認するには、GetConfiguration を呼び出します。
- 現在の構成を変更するには、RequestPresentation を呼び出します。
private void Window_Changed(AppWindow sender, AppWindowChangedEventArgs args)
{
    if (args.DidAvailableWindowPresentationsChange)
    {
        EnablePresentationButtons(sender);
    }

    if (args.DidWindowPresentationChange)
    {
        ConfigText.Text = window.Presenter.GetConfiguration().Kind.ToString();
    }

    if (args.DidSizeChange)
    {
        SizeText.Text = window.GetPlacement().Size.ToString();
    }
}

private void EnablePresentationButtons(AppWindow window)
{
    // Check whether the current AppWindowPresenter supports CompactOverlay.
    if (window.Presenter.IsPresentationSupported(AppWindowPresentationKind.CompactOverlay))
    {
        // Show the CompactOverlay button...
        compactOverlayButton.Visibility = Visibility.Visible;
    }
    else
    {
        // Hide the CompactOverlay button...
        compactOverlayButton.Visibility = Visibility.Collapsed;
    }

    // Check whether the current AppWindowPresenter supports FullScreen?
    if (window.Presenter.IsPresentationSupported(AppWindowPresentationKind.FullScreen))
    {
        // Show the FullScreen button...
        fullScreenButton.Visibility = Visibility.Visible;
    }
    else
    {
        // Hide the FullScreen button...
        fullScreenButton.Visibility = Visibility.Collapsed;
    }
}

private void CompactOverlayButton_Click(object sender, RoutedEventArgs e)
{
    if (window.Presenter.GetConfiguration().Kind != AppWindowPresentationKind.CompactOverlay)
    {
        window.Presenter.RequestPresentation(AppWindowPresentationKind.CompactOverlay);
        fullScreenButton.IsChecked = false;
    }
    else
    {
        window.Presenter.RequestPresentation(AppWindowPresentationKind.Default);
    }
}

private void FullScreenButton_Click(object sender, RoutedEventArgs e)
{
    if (window.Presenter.GetConfiguration().Kind != AppWindowPresentationKind.FullScreen)
    {
        window.Presenter.RequestPresentation(AppWindowPresentationKind.FullScreen);
        compactOverlayButton.IsChecked = false;
    }
    else
    {
        window.Presenter.RequestPresentation(AppWindowPresentationKind.Default);
    }
}
XAML 要素を再利用する
AppWindow を使用すると、同じ UI スレッドで複数の XAML ツリーを保持できます。 ただし、XAML 要素は XAML ツリーに 1 回しか追加できません。 UI の一部をあるウィンドウから別のウィンドウに移動したい場合は、XAML ツリー内のその位置を管理する必要があります。
この例は、ColorPicker コントロールをメイン ウィンドウとセカンダリ ウィンドウの間で移動するときに、そのコントロールを再利用する方法を示しています。
カラー ピッカーは MainPage の XAML で宣言され、それによって MainPage の XAML ツリーに配置されます。
<StackPanel x:Name="colorPickerContainer" Grid.Column="1" Background="WhiteSmoke">
<Button Click="DetachColorPickerButton_Click" HorizontalAlignment="Right">
<FontIcon FontFamily="Segoe MDL2 Assets" Glyph="" />
</Button>
<ColorPicker x:Name="colorPicker" Margin="12" Width="288"
IsColorChannelTextInputVisible="False"
ColorChanged="ColorPicker_ColorChanged"/>
</StackPanel>
カラー ピッカーが新しい AppWindow への配置のためにデタッチされた場合は、まず、それをその親コンテナーから削除することによって MainPage の XAML ツリーから削除する必要があります。 必須ではありませんが、この例では親コンテナーの非表示化も行っています。
colorPickerContainer.Children.Remove(colorPicker);
colorPickerContainer.Visibility = Visibility.Collapsed;
この後、それを新しい XAML ツリーに追加できます。 ここでは、まず ColorPicker の親コンテナーになる Grid を作成し、ColorPicker をそのグリッドの子として追加します。 (これにより、後で ColorPicker をこの XAML ツリーから容易に削除できます。) 次に、グリッドを新しいウィンドウの XAML ツリーのルートとして設定します。
Grid appWindowRootGrid = new Grid();
appWindowRootGrid.Children.Add(colorPicker);

// Create a new window
colorPickerAppWindow = await AppWindow.TryCreateAsync();

// Attach the XAML content to our window
ElementCompositionPreview.SetAppWindowContent(colorPickerAppWindow, appWindowRootGrid);
AppWindow が閉じられたら、このプロセスを逆に実行します。 まず、Grid から ColorPicker を削除し、それを MainPage の StackPanel の子として追加します。
// When the window is closed, be sure to release XAML resources
// and the reference to the window.
colorPickerAppWindow.Closed += delegate
{
    appWindowRootGrid.Children.Remove(colorPicker);
    appWindowRootGrid = null;
    colorPickerAppWindow = null;

    colorPickerContainer.Children.Add(colorPicker);
    colorPickerContainer.Visibility = Visibility.Visible;
};
private async void DetachColorPickerButton_Click(object sender, RoutedEventArgs e)
{
    ColorPickerContainer.Visibility = Visibility.Collapsed;

    // Create the color picker window.
    if (colorPickerAppWindow == null)
    {
        ColorPickerContainer.Children.Remove(colorPicker);

        Grid appWindowRootGrid = new Grid();
        appWindowRootGrid.Children.Add(colorPicker);

        // Create a new window
        colorPickerAppWindow = await AppWindow.TryCreateAsync();
        colorPickerAppWindow.RequestMoveAdjacentToCurrentView();
        colorPickerAppWindow.RequestSize(new Size(300, 428));
        colorPickerAppWindow.Title = "Color picker";

        // Attach the XAML content to our window
        ElementCompositionPreview.SetAppWindowContent(colorPickerAppWindow, appWindowRootGrid);

        // When the window is closed, be sure to release XAML resources
        // and the reference to the window.
        colorPickerAppWindow.Closed += delegate
        {
            appWindowRootGrid.Children.Remove(colorPicker);
            appWindowRootGrid = null;
            colorPickerAppWindow = null;

            ColorPickerContainer.Children.Add(colorPicker);
            ColorPickerContainer.Visibility = Visibility.Visible;
        };
    }
    // Show the window.
    await colorPickerAppWindow.TryShowAsync();
}
ダイアログ ボックスを表示する
既定では、コンテンツ ダイアログはルート ApplicationView を基準としてモーダルに表示されます。 ContentDialog を AppWindow の内部で使用する場合は、ダイアログの XamlRoot を XAML ホストのルートに手動で設定する必要があります。
それを行うには、ContentDialog の XamlRoot プロパティを、既に AppWindow 内にある要素と同じ XamlRoot に設定します。 ここでは、このコードはボタンの Click イベント ハンドラーの内部にあるため、送信者 (クリックされた Button) を使用して XamlRoot を取得できます。
if (ApiInformation.IsApiContractPresent("Windows.Foundation.UniversalApiContract", 8))
{
    simpleDialog.XamlRoot = ((Button)sender).XamlRoot;
}
メイン ウィンドウ (ApplicationView) に加えて 1 つ以上の AppWindows が開いている場合、モーダル ダイアログではそのルートになっているウィンドウのみがブロックされるため、各ウィンドウがダイアログを開こうと試みることができます。 ただし、開くことができるのは、一度にスレッドあたり 1 つの ContentDialog だけです。 2 つの ContentDialog を開こうとすると、個別の AppWindow で開く場合でも、例外がスローされます。
これを管理するには、別のダイアログが既に開いている場合の例外をキャッチするために、少なくとも try/catch ブロックでダイアログを開く必要があります。
try
{
    ContentDialogResult result = await simpleDialog.ShowAsync();
}
catch (Exception)
{
    // The dialog didn't open, probably because another dialog is already open.
}
ダイアログを管理するための別の方法として、現在開いているダイアログを追跡し、新しいダイアログを開こうとする前にそれを閉じることもできます。 ここでは、この目的のために、MainPage で CurrentDialog という名前の静的プロパティを作成します。
public sealed partial class MainPage : Page
{
    // Track the last opened dialog so you can close it if another dialog tries to open.
    public static ContentDialog CurrentDialog { get; set; } = null;

   // ...
}
次に、現在開いているダイアログが存在するかどうかを確認し、存在する場合は、Hide メソッドを呼び出してそれを閉じます。 最後に、CurrentDialog に新しいダイアログを割り当て、それを表示しようとします。
private async void DialogButton_Click(object sender, RoutedEventArgs e)
{
    ContentDialog simpleDialog = new ContentDialog
    {
        Title = "Content dialog",
        Content = "Dialog box for " + window.Title,
        CloseButtonText = "Ok"
    };

    if (MainPage.CurrentDialog != null)
    {
        MainPage.CurrentDialog.Hide();
    }
    MainPage.CurrentDialog = simpleDialog;

    // Use this code to associate the dialog to the appropriate AppWindow by setting
    // the dialog's XamlRoot to the same XamlRoot as an element that is already
    // present in the AppWindow.
    if (ApiInformation.IsApiContractPresent("Windows.Foundation.UniversalApiContract", 8))
    {
        simpleDialog.XamlRoot = ((Button)sender).XamlRoot;
    }

    try
    {
        ContentDialogResult result = await simpleDialog.ShowAsync();
    }
    catch (Exception)
    {
        // The dialog didn't open, probably because another dialog is already open.
    }
}
プログラムでダイアログを閉じることが望ましくない場合は、それを CurrentDialog として割り当てないでください。 この MainPage には、ユーザーが [Ok] をクリックしたときにのみ破棄される重要なダイアログが示されています。 これは CurrentDialog として割り当てられていないため、プログラムで閉じようとはされません。
public sealed partial class MainPage : Page
{
    // Track the last opened dialog so you can close it if another dialog tries to open.
    public static ContentDialog CurrentDialog { get; set; } = null;

    // ...
    private async void DialogButton_Click(object sender, RoutedEventArgs e)
    {
        ContentDialog importantDialog = new ContentDialog
        {
            Title = "Important dialog",
            Content = "This dialog can only be dismissed by clicking Ok.",
            CloseButtonText = "Ok"
        };

        if (MainPage.CurrentDialog != null)
        {
            MainPage.CurrentDialog.Hide();
        }
        // Do not track this dialog as the MainPage.CurrentDialog.
        // It should only be closed by clicking the Ok button.
        MainPage.CurrentDialog = null;

        try
        {
            ContentDialogResult result = await importantDialog.ShowAsync();
        }
        catch (Exception)
        {
            // The dialog didn't open, probably because another dialog is already open.
        }
    }
    // ...
}
完成したコード
MainPage.xaml
<Page
x:Class="HelloAppWindow.MainPage"
xmlns="http://schemas.microsoft.com/winfx/2006/xaml/presentation"
xmlns:x="http://schemas.microsoft.com/winfx/2006/xaml"
xmlns:local="using:HelloAppWindow"
xmlns:d="http://schemas.microsoft.com/expression/blend/2008"
xmlns:mc="http://schemas.openxmlformats.org/markup-compatibility/2006"
mc:Ignorable="d"
Background="{ThemeResource ApplicationPageBackgroundThemeBrush}">
<Grid>
<Grid.ColumnDefinitions>
<ColumnDefinition/>
<ColumnDefinition Width="Auto"/>
</Grid.ColumnDefinitions>
<StackPanel VerticalAlignment="Center" HorizontalAlignment="Center">
<Button x:Name="NewWindowButton" Content="Open new window"
Click="ShowNewWindowButton_Click" Margin="0,12"/>
<Button Content="Open dialog" Click="DialogButton_Click"
HorizontalAlignment="Stretch"/>
<Button Content="Close all" Click="CloseAllButton_Click"
Margin="0,12" HorizontalAlignment="Stretch"/>
</StackPanel>
<StackPanel x:Name="colorPickerContainer" Grid.Column="1" Background="WhiteSmoke">
<Button Click="DetachColorPickerButton_Click" HorizontalAlignment="Right">
<FontIcon FontFamily="Segoe MDL2 Assets" Glyph="" />
</Button>
<ColorPicker x:Name="colorPicker" Margin="12" Width="288"
IsColorChannelTextInputVisible="False"
ColorChanged="ColorPicker_ColorChanged"/>
</StackPanel>
</Grid>
</Page>
MainPage.xaml.cs
using System;
using System.Collections.Generic;
using System.Linq;
using Windows.Foundation;
using Windows.UI;
using Windows.UI.WindowManagement;
using Windows.UI.Xaml;
using Windows.UI.Xaml.Controls;
using Windows.UI.Xaml.Hosting;
using Windows.UI.Xaml.Media;

// The Blank Page item template is documented at https://go.microsoft.com/fwlink/?LinkId=402352&clcid=0x409

namespace HelloAppWindow
{
    /// <summary>
    /// An empty page that can be used on its own or navigated to within a Frame.
    /// </summary>
    public sealed partial class MainPage : Page
    {
        AppWindow colorPickerAppWindow;

        // Track open app windows in a Dictionary.
        public static Dictionary<UIContext, AppWindow> AppWindows { get; set; }
            = new Dictionary<UIContext, AppWindow>();

        // Track the last opened dialog so you can close it if another dialog tries to open.
        public static ContentDialog CurrentDialog { get; set; } = null;

        public MainPage()
        {
            this.InitializeComponent();
        }

        private async void ShowNewWindowButton_Click(object sender, RoutedEventArgs e)
        {
            // Create a new window.
            AppWindow appWindow = await AppWindow.TryCreateAsync();

            // Create a Frame and navigate to the Page you want to show in the new window.
            Frame appWindowContentFrame = new Frame();
            appWindowContentFrame.Navigate(typeof(AppWindowPage));

            // Get a reference to the page instance and assign the
            // newly created AppWindow to the MyAppWindow property.
            AppWindowPage page = (AppWindowPage)appWindowContentFrame.Content;
            page.MyAppWindow = appWindow;
            page.TextColorBrush = new SolidColorBrush(colorPicker.Color);

            // Attach the XAML content to the window.
            ElementCompositionPreview.SetAppWindowContent(appWindow, appWindowContentFrame);

            // Add the new page to the Dictionary using the UIContext as the Key.
            AppWindows.Add(appWindowContentFrame.UIContext, appWindow);
            appWindow.Title = "App Window " + AppWindows.Count.ToString();

            // When the window is closed, be sure to release XAML resources
            // and the reference to the window.
            appWindow.Closed += delegate
            {
                MainPage.AppWindows.Remove(appWindowContentFrame.UIContext);
                appWindowContentFrame.Content = null;
                appWindow = null;
            };

            // Show the window.
            await appWindow.TryShowAsync();
        }

        private async void DialogButton_Click(object sender, RoutedEventArgs e)
        {
            ContentDialog importantDialog = new ContentDialog
            {
                Title = "Important dialog",
                Content = "This dialog can only be dismissed by clicking Ok.",
                CloseButtonText = "Ok"
            };

            if (MainPage.CurrentDialog != null)
            {
                MainPage.CurrentDialog.Hide();
            }
            // Do not track this dialog as the MainPage.CurrentDialog.
            // It should only be closed by clicking the Ok button.
            MainPage.CurrentDialog = null;

            try
            {
                ContentDialogResult result = await importantDialog.ShowAsync();
            }
            catch (Exception)
            {
                // The dialog didn't open, probably because another dialog is already open.
            }
        }

        private async void DetachColorPickerButton_Click(object sender, RoutedEventArgs e)
        {
            // Create the color picker window.
            if (colorPickerAppWindow == null)
            {
                colorPickerContainer.Children.Remove(colorPicker);
                colorPickerContainer.Visibility = Visibility.Collapsed;

                Grid appWindowRootGrid = new Grid();
                appWindowRootGrid.Children.Add(colorPicker);

                // Create a new window
                colorPickerAppWindow = await AppWindow.TryCreateAsync();
                colorPickerAppWindow.RequestMoveAdjacentToCurrentView();
                colorPickerAppWindow.RequestSize(new Size(300, 428));
                colorPickerAppWindow.Title = "Color picker";

                // Attach the XAML content to our window
                ElementCompositionPreview.SetAppWindowContent(colorPickerAppWindow, appWindowRootGrid);

                // Make sure to release the reference to this window,
                // and release XAML resources, when it's closed
                colorPickerAppWindow.Closed += delegate
                {
                    appWindowRootGrid.Children.Remove(colorPicker);
                    appWindowRootGrid = null;
                    colorPickerAppWindow = null;

                    colorPickerContainer.Children.Add(colorPicker);
                    colorPickerContainer.Visibility = Visibility.Visible;
                };
            }
            // Show the window.
            await colorPickerAppWindow.TryShowAsync();
        }

        private void ColorPicker_ColorChanged(ColorPicker sender, ColorChangedEventArgs args)
        {
            NewWindowButton.Background = new SolidColorBrush(args.NewColor);
        }

        private async void CloseAllButton_Click(object sender, RoutedEventArgs e)
        {
            while (AppWindows.Count > 0)
            {
                await AppWindows.Values.First().CloseAsync();
            }
        }
    }
}
AppWindowPage.xaml
<Page
    x:Class="HelloAppWindow.AppWindowPage"
    xmlns="http://schemas.microsoft.com/winfx/2006/xaml/presentation"
    xmlns:x="http://schemas.microsoft.com/winfx/2006/xaml"
    xmlns:local="using:HelloAppWindow"
    xmlns:d="http://schemas.microsoft.com/expression/blend/2008"
    xmlns:mc="http://schemas.openxmlformats.org/markup-compatibility/2006"
    mc:Ignorable="d"
    Background="{ThemeResource ApplicationPageBackgroundThemeBrush}">

    <Grid>
        <TextBlock x:Name="TitleTextBlock" Text="Hello AppWindow!" FontSize="24" HorizontalAlignment="Center" Margin="24"/>

        <StackPanel VerticalAlignment="Center" HorizontalAlignment="Center">
            <Button Content="Open dialog" Click="DialogButton_Click"
                    Width="200" Margin="0,4"/>
            <Button Content="Move window" Click="MoveWindowButton_Click"
                    Width="200" Margin="0,4"/>
            <ToggleButton Content="Compact Overlay" x:Name="compactOverlayButton" Click="CompactOverlayButton_Click"
                          Width="200" Margin="0,4"/>
            <ToggleButton Content="Full Screen" x:Name="fullScreenButton" Click="FullScreenButton_Click"
                          Width="200" Margin="0,4"/>
            <Grid>
                <TextBlock Text="Size:"/>
                <TextBlock x:Name="SizeText" HorizontalAlignment="Right"/>
            </Grid>
            <Grid>
                <TextBlock Text="Presentation:"/>
                <TextBlock x:Name="ConfigText" HorizontalAlignment="Right"/>
            </Grid>
        </StackPanel>
    </Grid>
</Page>
AppWindowPage.xaml.cs
using System;
using Windows.Foundation;
using Windows.Foundation.Metadata;
using Windows.UI;
using Windows.UI.WindowManagement;
using Windows.UI.Xaml;
using Windows.UI.Xaml.Controls;
using Windows.UI.Xaml.Media;

// The Blank Page item template is documented at https://go.microsoft.com/fwlink/?LinkId=234238

namespace HelloAppWindow
{
    /// <summary>
    /// An empty page that can be used on its own or navigated to within a Frame.
    /// </summary>
    public sealed partial class AppWindowPage : Page
    {
        AppWindow window;

        public AppWindow MyAppWindow { get; set; }

        public SolidColorBrush TextColorBrush { get; set; } = new SolidColorBrush(Colors.Black);

        public AppWindowPage()
        {
            this.InitializeComponent();

            Loaded += AppWindowPage_Loaded;
        }

        private void AppWindowPage_Loaded(object sender, RoutedEventArgs e)
        {
            // Get the reference to this AppWindow that was stored when it was created.
            window = MainPage.AppWindows[this.UIContext];

            // Set up event handlers for the window.
            window.Changed += Window_Changed;

            TitleTextBlock.Foreground = TextColorBrush;
        }

        private async void DialogButton_Click(object sender, RoutedEventArgs e)
        {
            ContentDialog simpleDialog = new ContentDialog
            {
                Title = "Content dialog",
                Content = "Dialog box for " + window.Title,
                CloseButtonText = "Ok"
            };

            if (MainPage.CurrentDialog != null)
            {
                MainPage.CurrentDialog.Hide();
            }
            MainPage.CurrentDialog = simpleDialog;

            // Use this code to associate the dialog to the appropriate AppWindow by setting
            // the dialog's XamlRoot to the same XamlRoot as an element that is already
            // present in the AppWindow.
            if (ApiInformation.IsApiContractPresent("Windows.Foundation.UniversalApiContract", 8))
            {
                simpleDialog.XamlRoot = ((Button)sender).XamlRoot;
            }

            try
            {
                ContentDialogResult result = await simpleDialog.ShowAsync();
            }
            catch (Exception)
            {
                // The dialog didn't open, probably because another dialog is already open.
            }
        }

        private void Window_Changed(AppWindow sender, AppWindowChangedEventArgs args)
        {
            if (args.DidAvailableWindowPresentationsChange)
            {
                EnablePresentationButtons(sender);
            }

            if (args.DidWindowPresentationChange)
            {
                ConfigText.Text = window.Presenter.GetConfiguration().Kind.ToString();
            }

            if (args.DidSizeChange)
            {
                SizeText.Text = window.GetPlacement().Size.ToString();
            }
        }

        private void EnablePresentationButtons(AppWindow window)
        {
            // Check whether the current AppWindowPresenter supports CompactOverlay.
            if (window.Presenter.IsPresentationSupported(AppWindowPresentationKind.CompactOverlay))
            {
                // Show the CompactOverlay button...
                compactOverlayButton.Visibility = Visibility.Visible;
            }
            else
            {
                // Hide the CompactOverlay button...
                compactOverlayButton.Visibility = Visibility.Collapsed;
            }

            // Check whether the current AppWindowPresenter supports FullScreen?
            if (window.Presenter.IsPresentationSupported(AppWindowPresentationKind.FullScreen))
            {
                // Show the FullScreen button...
                fullScreenButton.Visibility = Visibility.Visible;
            }
            else
            {
                // Hide the FullScreen button...
                fullScreenButton.Visibility = Visibility.Collapsed;
            }
        }

        private void CompactOverlayButton_Click(object sender, RoutedEventArgs e)
        {
            if (window.Presenter.GetConfiguration().Kind != AppWindowPresentationKind.CompactOverlay)
            {
                window.Presenter.RequestPresentation(AppWindowPresentationKind.CompactOverlay);
                fullScreenButton.IsChecked = false;
            }
            else
            {
                window.Presenter.RequestPresentation(AppWindowPresentationKind.Default);
            }
        }

        private void FullScreenButton_Click(object sender, RoutedEventArgs e)
        {
            if (window.Presenter.GetConfiguration().Kind != AppWindowPresentationKind.FullScreen)
            {
                window.Presenter.RequestPresentation(AppWindowPresentationKind.FullScreen);
                compactOverlayButton.IsChecked = false;
            }
            else
            {
                window.Presenter.RequestPresentation(AppWindowPresentationKind.Default);
            }
        }

        private void MoveWindowButton_Click(object sender, RoutedEventArgs e)
        {
            DisplayRegion displayRegion = window.GetPlacement().DisplayRegion;
            double displayRegionWidth = displayRegion.WorkAreaSize.Width;
            double windowWidth = window.GetPlacement().Size.Width;
            int horizontalOffset = (int)(displayRegionWidth - windowWidth);
            window.RequestMoveRelativeToDisplayRegion(displayRegion, new Point(horizontalOffset, 0));
        }
    }
}
関連トピック

Windows developer