Windows アプリケーションで、キーボード、マウス、タッチ、ペン、ゲームパッドなどのデバイスからのユーザー入力をシミュレートして自動化します。
Important APIs: Windows.UI.Input.Preview.Injection
概要
入力インジェクションを使用すると、Windows アプリケーションはさまざまな入力デバイスからの入力をシミュレートし、その入力をアプリのクライアント領域の外部 (レジストリ エディターなど、管理者特権で実行されているアプリに対しても) を含め、任意の場所に送信できます。
入力挿入は、アクセシビリティ、テスト (アドホック、自動化)、リモート アクセスとサポート機能を含む機能を提供する必要があるWindowsアプリやツールに役立ちます。
セットアップ
Windows アプリで入力挿入 API を使用するには、アプリ マニフェストに次のコードを追加する必要があります。
- Package.appxmanifest ファイルを右クリックし、[コードの表示] を選択します。
-
Packageノードに次のコードを挿入します。xmlns:rescap="http://schemas.microsoft.com/appx/manifest/foundation/windows10/restrictedcapabilities"IgnorableNamespaces="rescap"
-
Capabilitiesノードに次のコードを挿入します。<rescap:Capability Name="inputInjectionBrokered" />
ユーザー入力の重複
|
|---|
| タッチ入力インジェクションのサンプル |
この例では、入力インジェクション API (Windows.UI.Input.Preview.Injection) を使用して、アプリのある領域でマウス入力イベントを監視し、別の領域で対応するタッチ入力イベントをシミュレートする方法を示します。
このサンプルを「入力インジェクション サンプル(マウスからタッチ)」からダウンロードする。
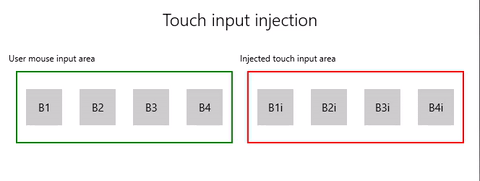
まず、UI (MainPage.xaml) を設定します。
2 つのグリッド領域 (1 つはマウス入力用、1 つは挿入タッチ入力用) があり、それぞれに 4 つのボタンがあります。
注
グリッドの背景には値を割り当てる必要があります (この場合は
Transparent)。それ以外の場合、ポインター イベントは検出されません。入力領域でマウス クリックが検出されると、対応するタッチ イベントが入力挿入領域に挿入されます。 挿入入力からのボタンクリックがタイトル領域に報告されます。
<Grid Background="{ThemeResource ApplicationPageBackgroundThemeBrush}">
    <Grid.RowDefinitions>
        <RowDefinition Height="Auto"/>
        <RowDefinition Height="Auto"/>
        <RowDefinition Height="*"/>
    </Grid.RowDefinitions>
    <StackPanel Grid.Row="0"
                Margin="10">
        <TextBlock Style="{ThemeResource TitleTextBlockStyle}"
                   Name="titleText"
                   Text="Touch input injection"
                   HorizontalTextAlignment="Center" />
        <TextBlock Style="{ThemeResource BodyTextBlockStyle}"
                   Name="statusText"
                   HorizontalTextAlignment="Center" />
    </StackPanel>
    <Grid HorizontalAlignment="Center"
                    Grid.Row="1">
        <Grid.RowDefinitions>
            <RowDefinition Height="Auto"/>
            <RowDefinition Height="*"/>
        </Grid.RowDefinitions>
        <Grid.ColumnDefinitions>
            <ColumnDefinition/>
            <ColumnDefinition/>
        </Grid.ColumnDefinitions>
        <TextBlock Grid.Column="0"
                   Grid.Row="0"
                   Style="{ThemeResource CaptionTextBlockStyle}"
                   Text="User mouse input area"/>
        <!-- Background must be set to something, otherwise pointer events are not detected. -->
        <Grid Name="ContainerInput"
              Grid.Column="0"
              Grid.Row="1"
              HorizontalAlignment="Stretch"
              Background="Transparent"
              BorderBrush="Green"
              BorderThickness="2"
              MinHeight="100" MinWidth="300"
              Margin="10">
            <Grid.ColumnDefinitions>
                <ColumnDefinition/>
                <ColumnDefinition/>
                <ColumnDefinition/>
                <ColumnDefinition/>
            </Grid.ColumnDefinitions>
            <Button Name="B1"
                    Grid.Column="0"
                    HorizontalAlignment="Center"
                    Width="50" Height="50"
                    Content="B1" />
            <Button Name="B2"
                    Grid.Column="1"
                    HorizontalAlignment="Center"
                    Width="50" Height="50"
                    Content="B2" />
            <Button Name="B3"
                    Grid.Column="2"
                    HorizontalAlignment="Center"
                    Width="50" Height="50"
                    Content="B3" />
            <Button Name="B4"
                    Grid.Column="3"
                    HorizontalAlignment="Center"
                    Width="50" Height="50"
                    Content="B4" />
        </Grid>
        <TextBlock Grid.Column="1"
                   Grid.Row="0"
                   Style="{ThemeResource CaptionTextBlockStyle}"
                   Text="Injected touch input area"/>
        <Grid Name="ContainerInject"
              Grid.Column="1"
              Grid.Row="1"
              HorizontalAlignment="Stretch"
              BorderBrush="Red"
              BorderThickness="2"
              MinHeight="100" MinWidth="300"
              Margin="10">
            <Grid.ColumnDefinitions>
                <ColumnDefinition/>
                <ColumnDefinition/>
                <ColumnDefinition/>
                <ColumnDefinition/>
            </Grid.ColumnDefinitions>
            <Button Name="B1i" Click="Button_Click_Injected"
                    Content="B1i"
                    Grid.Column="0"
                    HorizontalAlignment="Center"
                    Width="50" Height="50" />
            <Button Name="B2i" Click="Button_Click_Injected"
                    Content="B2i"
                    Grid.Column="1"
                    HorizontalAlignment="Center"
                    Width="50" Height="50" />
            <Button Name="B3i" Click="Button_Click_Injected"
                    Content="B3i"
                    Grid.Column="2"
                    HorizontalAlignment="Center"
                    Width="50" Height="50" />
            <Button Name="B4i" Click="Button_Click_Injected"
                    Content="B4i"
                    Grid.Column="3"
                    HorizontalAlignment="Center"
                    Width="50" Height="50" />
        </Grid>
    </Grid>
</Grid>
次に、アプリを初期化します。
このスニペットでは、グローバル オブジェクトを宣言し、マウス入力領域内でポインター イベント (AddHandler) のリスナーを宣言します。このリスナーは、ボタン クリック イベントで処理済みとマークされる可能性があります。
InputInjector オブジェクトは、入力データを送信するための仮想入力デバイスを表します。
ContainerInput_PointerPressedハンドラーでは、タッチ挿入関数を呼び出します。ContainerInput_PointerReleasedハンドラーでは、UninitializeTouchInjection を呼び出して InputInjector オブジェクトをシャットダウンします。public sealed partial class MainPage : Page { /// <summary> /// The virtual input device. /// </summary> InputInjector _inputInjector; /// <summary> /// Initialize the app, set the window size, /// and add pointer input handlers for the container. /// </summary> public MainPage() { this.InitializeComponent(); ApplicationView.PreferredLaunchViewSize = new Size(600, 200); ApplicationView.PreferredLaunchWindowingMode = ApplicationViewWindowingMode.PreferredLaunchViewSize; // Button handles PointerPressed/PointerReleased in // the Tapped routed event, but we need the container Grid // to handle them also. Add a handler for both // PointerPressedEvent and PointerReleasedEvent on the input Grid // and set handledEventsToo to true. ContainerInput.AddHandler(PointerPressedEvent, new PointerEventHandler(ContainerInput_PointerPressed), true); ContainerInput.AddHandler(PointerReleasedEvent, new PointerEventHandler(ContainerInput_PointerReleased), true); } /// <summary> /// PointerReleased handler for all pointer conclusion events. /// PointerPressed and PointerReleased events do not always occur /// in pairs, so your app should listen for and handle any event that /// might conclude a pointer down (such as PointerExited, PointerCanceled, /// and PointerCaptureLost). /// </summary> /// <param name="sender">Source of the click event</param> /// <param name="e">Event args for the button click routed event</param> private void ContainerInput_PointerReleased( object sender, PointerRoutedEventArgs e) { // Prevent most handlers along the event route from handling event again. e.Handled = true; // Shut down the virtual input device. _inputInjector.UninitializeTouchInjection(); } /// <summary> /// PointerPressed handler. /// PointerPressed and PointerReleased events do not always occur /// in pairs. Your app should listen for and handle any event that /// might conclude a pointer down (such as PointerExited, /// PointerCanceled, and PointerCaptureLost). /// </summary> /// <param name="sender">Source of the click event</param> /// <param name="e">Event args for the button click routed event</param> private void ContainerInput_PointerPressed( object sender, PointerRoutedEventArgs e) { // Prevent most handlers along the event route from // handling the same event again. e.Handled = true; InjectTouchForMouse(e.GetCurrentPoint(ContainerInput)); } ... }タッチ入力インジェクション関数を次に示します。
まず、 TryCreate を呼び出して InputInjector オブジェクトをインスタンス化します。
次に、の InjectedInputVisualizationMode を使用して
Defaultを呼び出します。挿入ポイントを計算した後、 InjectedInputTouchInfo を呼び出して、挿入するタッチ ポイントのリストを初期化します (この例では、マウス入力ポインターに対応する 1 つのタッチ ポイントを作成します)。
最後に、 InjectTouchInput を 2 回呼び出します。最初はポインターを下に、2 つ目はポインターを上に呼び出します。
/// <summary>
/// Inject touch input on injection target corresponding
/// to mouse click on input target.
/// </summary>
/// <param name="pointerPoint">The mouse click pointer.</param>
private void InjectTouchForMouse(PointerPoint pointerPoint)
{
    // Create the touch injection object.
    _inputInjector = InputInjector.TryCreate();

    if (_inputInjector != null)
    {
        _inputInjector.InitializeTouchInjection(
            InjectedInputVisualizationMode.Default);

        // Create a unique pointer ID for the injected touch pointer.
        // Multiple input pointers would require more robust handling.
        uint pointerId = pointerPoint.PointerId + 1;

        // Get the bounding rectangle of the app window.
        Rect appBounds =
            Windows.UI.ViewManagement.ApplicationView.GetForCurrentView().VisibleBounds;

        // Get the top left screen coordinates of the app window rect.
        Point appBoundsTopLeft = new Point(appBounds.Left, appBounds.Top);

        // Get a reference to the input injection area.
        GeneralTransform injectArea =
            ContainerInject.TransformToVisual(Window.Current.Content);

        // Get the top left screen coordinates of the input injection area.
        Point injectAreaTopLeft = injectArea.TransformPoint(new Point(0, 0));

        // Get the screen coordinates (relative to the input area)
        // of the input pointer.
        int pointerPointX = (int)pointerPoint.Position.X;
        int pointerPointY = (int)pointerPoint.Position.Y;

        // Create the point for input injection and calculate its screen location.
        Point injectionPoint =
            new Point(
                appBoundsTopLeft.X + injectAreaTopLeft.X + pointerPointX,
                appBoundsTopLeft.Y + injectAreaTopLeft.Y + pointerPointY);

        // Create a touch data point for pointer down.
        // Each element in the touch data list represents a single touch contact.
        // For this example, we're mirroring a single mouse pointer.
        List<InjectedInputTouchInfo> touchData =
            new List<InjectedInputTouchInfo>
            {
                new InjectedInputTouchInfo
                {
                    Contact = new InjectedInputRectangle
                    {
                        Left = 30, Top = 30, Bottom = 30, Right = 30
                    },
                    PointerInfo = new InjectedInputPointerInfo
                    {
                        PointerId = pointerId,
                        PointerOptions =
                        InjectedInputPointerOptions.PointerDown |
                        InjectedInputPointerOptions.InContact |
                        InjectedInputPointerOptions.New,
                        TimeOffsetInMilliseconds = 0,
                        PixelLocation = new InjectedInputPoint
                        {
                            PositionX = (int)injectionPoint.X ,
                            PositionY = (int)injectionPoint.Y
                        }
                },
                Pressure = 1.0,
                TouchParameters =
                    InjectedInputTouchParameters.Pressure |
                    InjectedInputTouchParameters.Contact
            }
        };

        // Inject the touch input.
        _inputInjector.InjectTouchInput(touchData);

        // Create a touch data point for pointer up.
        touchData = new List<InjectedInputTouchInfo>
        {
            new InjectedInputTouchInfo
            {
                PointerInfo = new InjectedInputPointerInfo
                {
                    PointerId = pointerId,
                    PointerOptions = InjectedInputPointerOptions.PointerUp
                }
            }
        };

        // Inject the touch input.
        _inputInjector.InjectTouchInput(touchData);
    }
}
最後に、入力挿入領域で Button Click ルーティング イベントを処理し、クリックしたボタンの名前で UI を更新します。