ユニバーサル Windows プラットフォーム (UWP) アプリでは、DisplayInformation::OrientationChanged イベントを処理するときに、複数の画面の向きをサポートできます。 ここでは、Windows 10 デバイスのグラフィックス ハードウェアを効率的かつ効果的に使用できるように、UWP DirectX アプリで画面の回転を処理するためのベスト プラクティスについて説明します。
開始する前に、デバイスの向きに関係なく、グラフィックス ハードウェアは常に同じ方法でピクセル データを出力します。 Windows 10 デバイスは、現在のディスプレイの向き (何らかのセンサーまたはソフトウェアの切り替え) を決定し、ユーザーが表示設定を変更できるようにします。 このため、Windows 10 自体はイメージの回転を処理して、デバイスの向きに基づいて "直立" されるようにします。 既定では、アプリは、ウィンドウ サイズなど、向きが変更されたことを示す通知を受け取ります。 この場合、Windows 10 はイメージをすぐに回転させて最終的な表示を行います。 4 つの特定の画面の向きのうち 3 つ (後で説明) では、Windows 10 では追加のグラフィック リソースと計算を使用して最終的な画像を表示します。
UWP DirectX アプリの場合、 DisplayInformation オブジェクトは、アプリが照会できる基本的な表示方向データを提供します。 既定の向きは landscape で、ディスプレイのピクセル幅が高さを超えています。代替の向きは portrait です。この場合、ディスプレイはいずれかの方向に 90 度回転され、幅は高さよりも小さくなります。
Windows 10 では、次の 4 つの特定の表示方向モードが定義されています。
- 横 - Windows 10 の既定の表示方向であり、回転の基本角度または ID 角度 (0 度) と見なされます。
- 縦 - ディスプレイが時計回りに 90 度回転 (または反時計回り 270 度) されています。
- 横向き、反転 - ディスプレイは 180 度回転 (逆さま表示) されています。
- 縦、反転- ディスプレイは時計回りに 270 度 (または反時計回りに 90 度) 回転しています。
ディスプレイが 1 つの向きから別の向きに回転すると、Windows 10 は内部的に回転操作を実行して、描画された画像を新しい向きに合わせ、ユーザーは画面に直立した画像を表示します。
また、Windows 10 では自動切り替えアニメーションが表示され、ある向きから別の向きに切り替えるときにスムーズなユーザー エクスペリエンスが作成されます。 表示方向が変わると、ユーザーはこれらのシフトを表示画面イメージの固定ズームおよび回転アニメーションとして認識します。 新しい向きのレイアウトのために、Windows 10 によってアプリに時間が割り当てられます。
全体として、これは画面の向きの変更を処理するための一般的なプロセスです。
- ウィンドウ境界値と表示方向データの組み合わせを使用して、スワップ チェーンをデバイスのネイティブ表示方向に合わせて維持します。
- IDXGISwapChain1::SetRotation を使用して、スワップ チェーンの向きを Windows 10 に通知します。
- レンダリング コードを変更して、デバイスのユーザーの向きに合わせて画像を生成します。
スワップ チェーンのサイズを変更し、その内容を事前に回転する
基本的なディスプレイのサイズ変更を実行し、UWP DirectX アプリでその内容を事前に回転するには、次の手順を実装します。
- DisplayInformation::OrientationChanged イベントを処理します。
- スワップ チェーンのサイズをウィンドウの新しいディメンションに変更します。
- IDXGISwapChain1::SetRotation を呼び出して、スワップ チェーンの向きを設定します。
- レンダー ターゲットやその他のピクセル データ バッファーなど、ウィンドウ サイズに依存するリソースを再作成します。
それでは、これらの手順をもう少し詳しく見てみましょう。
最初の手順では、 DisplayInformation::OrientationChanged イベントのハンドラーを登録します。 このイベントは、ディスプレイの回転時など、画面の向きが変わるたびにアプリで発生します。
DisplayInformation::OrientationChanged イベントを処理するには、ビュー プロバイダーが実装する必要がある IFrameworkView インターフェイスのメソッドの 1 つである必須の SetWindow メソッドで、DisplayInformation::OrientationChanged のハンドラーを接続します。
このコード例では、 DisplayInformation::OrientationChanged のイベント ハンドラーは、 OnOrientationChanged と呼ばれるメソッドです。 DisplayInformation::OrientationChanged が発生すると、SetCurrentOrientation というメソッドが呼び出され、CreateWindowSizeDependentResources が呼び出されます。
void App::SetWindow(CoreWindow^ window)
{
  // ... Other UI event handlers assigned here ...

    currentDisplayInformation->OrientationChanged +=
        ref new TypedEventHandler<DisplayInformation^, Object^>(this, &App::OnOrientationChanged);

  // ...
}
}
void App::OnOrientationChanged(DisplayInformation^ sender, Object^ args)
{
    m_deviceResources->SetCurrentOrientation(sender->CurrentOrientation);
    m_main->CreateWindowSizeDependentResources();
}

// This method is called in the event handler for the OrientationChanged event.
void DX::DeviceResources::SetCurrentOrientation(DisplayOrientations currentOrientation)
{
    if (m_currentOrientation != currentOrientation)
    {
        m_currentOrientation = currentOrientation;
        CreateWindowSizeDependentResources();
    }
}
次に、新しい画面の向きのスワップ チェーンのサイズを変更し、レンダリングの実行時にグラフィック パイプラインの内容を回転するように準備します。 この例では、 DirectXBase::CreateWindowSizeDependentResources は、IDXGISwapChain::ResizeBuffers の呼び出し、3D と 2D 回転マトリックスの設定、SetRotation の呼び出し、リソースの再作成を処理するメソッドです。
void DX::DeviceResources::CreateWindowSizeDependentResources()
{
    // Clear the previous window size specific context.
    ID3D11RenderTargetView* nullViews[] = {nullptr};
    m_d3dContext->OMSetRenderTargets(ARRAYSIZE(nullViews), nullViews, nullptr);
    m_d3dRenderTargetView = nullptr;
    m_d2dContext->SetTarget(nullptr);
    m_d2dTargetBitmap = nullptr;
    m_d3dDepthStencilView = nullptr;
    m_d3dContext->Flush();

    // Calculate the necessary render target size in pixels.
    m_outputSize.Width = DX::ConvertDipsToPixels(m_logicalSize.Width, m_dpi);
    m_outputSize.Height = DX::ConvertDipsToPixels(m_logicalSize.Height, m_dpi);

    // Prevent zero size DirectX content from being created.
    m_outputSize.Width = max(m_outputSize.Width, 1);
    m_outputSize.Height = max(m_outputSize.Height, 1);

    // The width and height of the swap chain must be based on the window's
    // natively-oriented width and height. If the window is not in the native
    // orientation, the dimensions must be reversed.
    DXGI_MODE_ROTATION displayRotation = ComputeDisplayRotation();

    bool swapDimensions = displayRotation == DXGI_MODE_ROTATION_ROTATE90 || displayRotation == DXGI_MODE_ROTATION_ROTATE270;
    m_d3dRenderTargetSize.Width = swapDimensions ? m_outputSize.Height : m_outputSize.Width;
    m_d3dRenderTargetSize.Height = swapDimensions ? m_outputSize.Width : m_outputSize.Height;

    if (m_swapChain != nullptr)
    {
        // If the swap chain already exists, resize it.
        HRESULT hr = m_swapChain->ResizeBuffers(
            2, // Double-buffered swap chain.
            lround(m_d3dRenderTargetSize.Width),
            lround(m_d3dRenderTargetSize.Height),
            DXGI_FORMAT_B8G8R8A8_UNORM,
            0
            );

        if (hr == DXGI_ERROR_DEVICE_REMOVED || hr == DXGI_ERROR_DEVICE_RESET)
        {
            // If the device was removed for any reason, a new device and swap chain will need to be created.
            HandleDeviceLost();

            // Everything is set up now. Do not continue execution of this method. HandleDeviceLost will reenter this method
            // and correctly set up the new device.
            return;
        }
        else
        {
            DX::ThrowIfFailed(hr);
        }
    }
    else
    {
        // Otherwise, create a new one using the same adapter as the existing Direct3D device.
        DXGI_SWAP_CHAIN_DESC1 swapChainDesc = {0};

        swapChainDesc.Width = lround(m_d3dRenderTargetSize.Width); // Match the size of the window.
        swapChainDesc.Height = lround(m_d3dRenderTargetSize.Height);
        swapChainDesc.Format = DXGI_FORMAT_B8G8R8A8_UNORM; // This is the most common swap chain format.
        swapChainDesc.Stereo = false;
        swapChainDesc.SampleDesc.Count = 1; // Don't use multi-sampling.
        swapChainDesc.SampleDesc.Quality = 0;
        swapChainDesc.BufferUsage = DXGI_USAGE_RENDER_TARGET_OUTPUT;
        swapChainDesc.BufferCount = 2; // Use double-buffering to minimize latency.
        swapChainDesc.SwapEffect = DXGI_SWAP_EFFECT_FLIP_SEQUENTIAL; // All UWP apps must use this SwapEffect.
        swapChainDesc.Flags = 0;
        swapChainDesc.Scaling = DXGI_SCALING_NONE;
        swapChainDesc.AlphaMode = DXGI_ALPHA_MODE_IGNORE;

        // This sequence obtains the DXGI factory that was used to create the Direct3D device above.
        ComPtr<IDXGIDevice3> dxgiDevice;
        DX::ThrowIfFailed(
            m_d3dDevice.As(&dxgiDevice)
            );

        ComPtr<IDXGIAdapter> dxgiAdapter;
        DX::ThrowIfFailed(
            dxgiDevice->GetAdapter(&dxgiAdapter)
            );

        ComPtr<IDXGIFactory2> dxgiFactory;
        DX::ThrowIfFailed(
            dxgiAdapter->GetParent(IID_PPV_ARGS(&dxgiFactory))
            );

        DX::ThrowIfFailed(
            dxgiFactory->CreateSwapChainForCoreWindow(
                m_d3dDevice.Get(),
                reinterpret_cast<IUnknown*>(m_window.Get()),
                &swapChainDesc,
                nullptr,
                &m_swapChain
                )
            );

        // Ensure that DXGI does not queue more than one frame at a time. This both reduces latency and
        // ensures that the application will only render after each VSync, minimizing power consumption.
        DX::ThrowIfFailed(
            dxgiDevice->SetMaximumFrameLatency(1)
            );
    }

    // Set the proper orientation for the swap chain, and generate 2D and
    // 3D matrix transformations for rendering to the rotated swap chain.
    // Note the rotation angle for the 2D and 3D transforms are different.
    // This is due to the difference in coordinate spaces.  Additionally,
    // the 3D matrix is specified explicitly to avoid rounding errors.

    switch (displayRotation)
    {
    case DXGI_MODE_ROTATION_IDENTITY:
        m_orientationTransform2D = Matrix3x2F::Identity();
        m_orientationTransform3D = ScreenRotation::Rotation0;
        break;

    case DXGI_MODE_ROTATION_ROTATE90:
        m_orientationTransform2D =
            Matrix3x2F::Rotation(90.0f) *
            Matrix3x2F::Translation(m_logicalSize.Height, 0.0f);
        m_orientationTransform3D = ScreenRotation::Rotation270;
        break;

    case DXGI_MODE_ROTATION_ROTATE180:
        m_orientationTransform2D =
            Matrix3x2F::Rotation(180.0f) *
            Matrix3x2F::Translation(m_logicalSize.Width, m_logicalSize.Height);
        m_orientationTransform3D = ScreenRotation::Rotation180;
        break;

    case DXGI_MODE_ROTATION_ROTATE270:
        m_orientationTransform2D =
            Matrix3x2F::Rotation(270.0f) *
            Matrix3x2F::Translation(0.0f, m_logicalSize.Width);
        m_orientationTransform3D = ScreenRotation::Rotation90;
        break;

    default:
        throw ref new FailureException();
    }


    //SDM: only instance of SetRotation
    DX::ThrowIfFailed(
        m_swapChain->SetRotation(displayRotation)
        );

    // Create a render target view of the swap chain back buffer.
    ComPtr<ID3D11Texture2D> backBuffer;
    DX::ThrowIfFailed(
        m_swapChain->GetBuffer(0, IID_PPV_ARGS(&backBuffer))
        );

    DX::ThrowIfFailed(
        m_d3dDevice->CreateRenderTargetView(
            backBuffer.Get(),
            nullptr,
            &m_d3dRenderTargetView
            )
        );

    // Create a depth stencil view for use with 3D rendering if needed.
    CD3D11_TEXTURE2D_DESC depthStencilDesc(
        DXGI_FORMAT_D24_UNORM_S8_UINT,
        lround(m_d3dRenderTargetSize.Width),
        lround(m_d3dRenderTargetSize.Height),
        1, // This depth stencil view has only one texture.
        1, // Use a single mipmap level.
        D3D11_BIND_DEPTH_STENCIL
        );

    ComPtr<ID3D11Texture2D> depthStencil;
    DX::ThrowIfFailed(
        m_d3dDevice->CreateTexture2D(
            &depthStencilDesc,
            nullptr,
            &depthStencil
            )
        );

    CD3D11_DEPTH_STENCIL_VIEW_DESC depthStencilViewDesc(D3D11_DSV_DIMENSION_TEXTURE2D);
    DX::ThrowIfFailed(
        m_d3dDevice->CreateDepthStencilView(
            depthStencil.Get(),
            &depthStencilViewDesc,
            &m_d3dDepthStencilView
            )
        );

    // Set the 3D rendering viewport to target the entire window.
    m_screenViewport = CD3D11_VIEWPORT(
        0.0f,
        0.0f,
        m_d3dRenderTargetSize.Width,
        m_d3dRenderTargetSize.Height
        );

    m_d3dContext->RSSetViewports(1, &m_screenViewport);

    // Create a Direct2D target bitmap associated with the
    // swap chain back buffer and set it as the current target.
    D2D1_BITMAP_PROPERTIES1 bitmapProperties =
        D2D1::BitmapProperties1(
            D2D1_BITMAP_OPTIONS_TARGET | D2D1_BITMAP_OPTIONS_CANNOT_DRAW,
            D2D1::PixelFormat(DXGI_FORMAT_B8G8R8A8_UNORM, D2D1_ALPHA_MODE_PREMULTIPLIED),
            m_dpi,
            m_dpi
            );

    ComPtr<IDXGISurface2> dxgiBackBuffer;
    DX::ThrowIfFailed(
        m_swapChain->GetBuffer(0, IID_PPV_ARGS(&dxgiBackBuffer))
        );

    DX::ThrowIfFailed(
        m_d2dContext->CreateBitmapFromDxgiSurface(
            dxgiBackBuffer.Get(),
            &bitmapProperties,
            &m_d2dTargetBitmap
            )
        );

    m_d2dContext->SetTarget(m_d2dTargetBitmap.Get());

    // Grayscale text anti-aliasing is recommended for all UWP apps.
    m_d2dContext->SetTextAntialiasMode(D2D1_TEXT_ANTIALIAS_MODE_GRAYSCALE);

}
このメソッドが次回呼び出されるときにウィンドウの現在の高さと幅の値を保存した後、表示境界のデバイスに依存しないピクセル (DIP) の値をピクセルに変換します。 このサンプルでは、 ConvertDipsToPixels を呼び出します。これは、このコードを実行する単純な関数です。
floor((dips * dpi / 96.0f) + 0.5f);
0.5f を追加して、最も近い整数値に丸めます。
余談ですが、 CoreWindow 座標は常に DIP で定義されます。 Windows 10 以前のバージョンの Windows の場合、DIP は 1/96 インチとして定義され、OS の up の定義に合わせて調整されます。 表示方向が縦モードに回転すると、アプリは CoreWindow の幅と高さを反転し、それに応じてレンダー ターゲット のサイズ (境界) を変更する必要があります。 Direct3D の座標は常に物理ピクセル単位であるため、スワップ チェーンを設定するには、これらの値を Direct3D に渡す前に、 CoreWindow の DIP 値から整数のピクセル値に変換する必要があります。
プロセス的には、単にスワップ チェーンのサイズを変更した場合よりも少し多くの作業が行われます。プレゼンテーション用に合成する前にイメージの Direct2D コンポーネントと Direct3D コンポーネントを実際に回転させ、結果を新しい向きでレンダリングしたことをスワップ チェーンに伝えます。 DX::D eviceResources::CreateWindowSizeDependentResources のコード例に示すように、このプロセスについてもう少し詳しく説明します。
ディスプレイの新しい向きを決定します。 ディスプレイが横向きから縦向き、またはその逆の場合は、表示境界の高さと幅の値 (DIP 値からピクセルに変更) を入れ替えます。
次に、スワップ チェーンが作成されているかどうかを確認します。 まだ作成されていない場合は、 IDXGIFactory2::CreateSwapChainForCoreWindow を呼び出して作成します。 それ以外の場合は、 IDXGISwapchain:ResizeBuffers を呼び出して、既存のスワップ チェーンのバッファーのサイズを新しい表示ディメンションに変更します。 回転イベントのスワップ チェーンのサイズを変更する必要はありませんが、レンダリング パイプラインによって既に回転されたコンテンツを出力します。結局のところ、サイズ変更が必要なスナップ イベントやフィル イベントなど、他にもサイズ変更イベントがあります。
その後、スワップ チェーンにレンダリングするときに、グラフィックス パイプライン内のピクセルまたは頂点 (それぞれ) に適用する適切な 2-D または 3-D 行列変換を設定します。 次の 4 つの回転行列が考えられます。
- 横 (DXGI_MODE_ROTATION_IDENTITY)
- 縦 (DXGI_MODE_ROTATION_ROTATE270)
- 横、反転 (DXGI_MODE_ROTATION_ROTATE180)
- 縦、反転 (DXGI_MODE_ROTATION_ROTATE90)
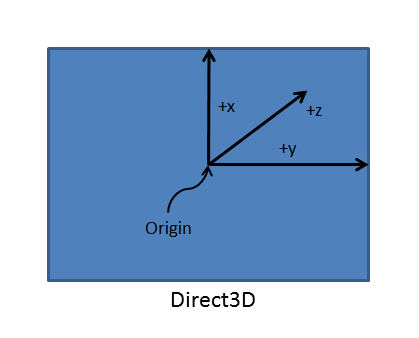
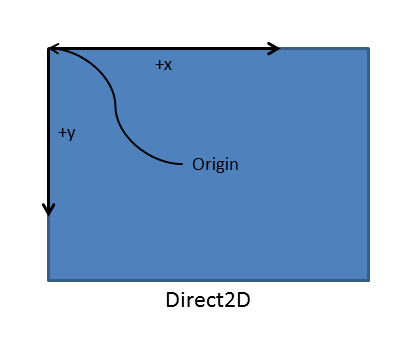
正しいマトリックスは、表示方向を決定するために Windows 10 によって提供されるデータ ( DisplayInformation::OrientationChanged の結果など) に基づいて選択され、シーン内の各ピクセル (Direct2D) または頂点 (Direct3D) の座標が乗算され、効果的に回転して画面の向きに合わせます。 (Direct2D では画面の原点が左上隅として定義され、Direct3D では原点がウィンドウの論理中心として定義されていることに注意してください)。
注 回転で使われる 2-D 変換とその定義方法について詳しくは、「画面の回転のためのマトリックスの適用 (2-D)」をご覧ください。 回転に使用される 3-D 変換の詳細については、「 画面回転用のマトリックスの定義 (3-D)を参照してください。
ここで重要なビットを次に示します。 IDXGISwapChain1::SetRotation を呼び出し、次のように更新されたローテーション マトリックスを提供します。
m_swapChain->SetRotation(rotation);
また、選択した回転マトリックスを、新しいプロジェクションの計算時にレンダー メソッドが取得できる場所にも格納します。 このマトリックスは、最終的な 3-D プロジェクションをレンダリングするとき、または最終的な 2-D レイアウトを合成するときに使用します。 (自動的には適用されません)。
その後、回転した 3-D ビューの新しいレンダー ターゲットと、ビューの新しい深度ステンシル バッファーを作成します。 回転シーンの 3-D レンダリング ビューポートを設定するには、 ID3D11DeviceContext:RSSetViewports を呼び出します。
最後に、回転またはレイアウトする 2-D イメージがある場合は、 ID2D1DeviceContext::CreateBitmapFromDxgiSurface を使用してサイズ変更されたスワップ チェーンの書き込み可能なビットマップとして 2-D レンダー ターゲットを作成し新しいレイアウトを更新された向きに合成します。 アンチエイリアシング モードなど、レンダー ターゲットで必要なプロパティを設定します (コード例を参照)。
次に、スワップ チェーンを提示します。
CoreWindowResizeManager を使用して回転遅延を減らす
既定では、Windows 10 では、アプリ モデルや言語に関係なく、イメージの回転を完了するための短い時間が提供されますが、どのアプリにも顕著な時間枠が提供されます。 ただし、ここで説明するいずれかの手法を使用してアプリが回転計算を実行すると、この時間枠が閉じる前に十分に実行される可能性があります。 その時間を取り戻して回転アニメーションを完了したいと思います。 ここで、 CoreWindowResizeManager が登場します。
CoreWindowResizeManager: DisplayInformation::OrientationChanged イベントが発生した場合の使用方法を次に示します。 イベントのハンドラー内で CoreWindowResizeManager::GetForCurrentView を呼び出して、CoreWindowResizeManagerのインスタンスを取得し、新しい向きのレイアウトが完了して表示されたら、NotifyLayoutCompleted を呼び出します回転アニメーションを完了し、アプリ画面を表示できることを Windows に通知します。
DisplayInformation::OrientationChanged のイベント ハンドラーのコードは次のようになります。
CoreWindowResizeManager^ resizeManager = Windows::UI::Core::CoreWindowResizeManager::GetForCurrentView();

// ... build the layout for the new display orientation ...

resizeManager->NotifyLayoutCompleted();
ユーザーがディスプレイの向きを回転させると、Windows 10 では、アプリに依存しないアニメーションがユーザーへのフィードバックとして表示されます。 そのアニメーションには、次の順序で発生する 3 つの部分があります。
- Windows 10 では、元のイメージが縮小されます。
- Windows 10 は、新しいレイアウトの再構築にかかる時間のイメージを保持します。 これは、アプリで必要とされない可能性があるため、減らしたい期間です。
- レイアウト ウィンドウが期限切れになった場合、またはレイアウト完了の通知を受信すると、Windows はイメージを回転させ、クロスフェード ズームを新しい向きに変更します。
3 番目の箇条書きで示されているように、アプリが NotifyLayoutCompleted を呼び出すと、Windows 10 はタイムアウト ウィンドウを停止し、回転アニメーションを完了し、新しい表示方向で描画されるアプリに制御を返します。 全体的な効果は、アプリが少し流動的で応答性が高く、もう少し効率的に動作するようになったということです。
付録 A: 画面回転のためのマトリックスの適用 (2-D)
スワップ チェーンを表示し、その内容を事前にローテーションするコード例 (および DXGI スワップ チェーンのローテーション サンプル) では、Direct2D 出力と Direct3D 出力用に個別の回転マトリックスがあることに気付いたかもしれません。 最初に、2-D 行列を見てみましょう。
Direct2D コンテンツと Direct3D コンテンツに同じ回転マトリックスを適用できない理由は 2 つあります。
1 つは、異なるデカルト座標モデルを使用します。 Direct2D では、右利きのルールが使用されます。y 座標は、原点から上に向かって正の値が増加します。 ただし、Direct3D では左利きのルールが使用され、y 座標は原点から右方向に正の値で増加します。 結果として、画面座標の原点は Direct2D の左上に配置され、画面の原点 (投影平面) は Direct3D の左下にあります。 (詳細については、 3-D 座標系 を参照してください)。
2 つ、丸め誤差を回避するには、3-D 回転行列を明示的に指定する必要があります。
スワップ チェーンでは、原点が左下に配置されていることを前提としているため、回転を実行して、右側の Direct2D 座標系をスワップ チェーンで使用される左利きの座標系に合わせる必要があります。 具体的には、回転行列と回転座標系の原点の平行移動行列を乗算して、新しい左向きのイメージの位置を変更し、イメージを CoreWindow の座標空間からスワップ チェーンの座標空間に変換します。 また、Direct2D レンダー ターゲットがスワップ チェーンに接続されている場合も、アプリでこの変換を一貫して適用する必要があります。 ただし、アプリがスワップ チェーンに直接関連付けられていない中間サーフェスに描画している場合は、この座標空間変換を適用しないでください。
4 つの可能な回転から正しい行列を選択するコードは次のようになります (新しい座標系の原点への平行移動に注意してください)。
// Set the proper orientation for the swap chain, and generate 2D and
// 3D matrix transformations for rendering to the rotated swap chain.
// Note the rotation angle for the 2D and 3D transforms are different.
// This is due to the difference in coordinate spaces.  Additionally,
// the 3D matrix is specified explicitly to avoid rounding errors.

switch (displayRotation)
{
case DXGI_MODE_ROTATION_IDENTITY:
    m_orientationTransform2D = Matrix3x2F::Identity();
    m_orientationTransform3D = ScreenRotation::Rotation0;
    break;

case DXGI_MODE_ROTATION_ROTATE90:
    m_orientationTransform2D =
        Matrix3x2F::Rotation(90.0f) *
        Matrix3x2F::Translation(m_logicalSize.Height, 0.0f);
    m_orientationTransform3D = ScreenRotation::Rotation270;
    break;

case DXGI_MODE_ROTATION_ROTATE180:
    m_orientationTransform2D =
        Matrix3x2F::Rotation(180.0f) *
        Matrix3x2F::Translation(m_logicalSize.Width, m_logicalSize.Height);
    m_orientationTransform3D = ScreenRotation::Rotation180;
    break;

case DXGI_MODE_ROTATION_ROTATE270:
    m_orientationTransform2D =
        Matrix3x2F::Rotation(270.0f) *
        Matrix3x2F::Translation(0.0f, m_logicalSize.Width);
    m_orientationTransform3D = ScreenRotation::Rotation90;
    break;

default:
    throw ref new FailureException();
}
2-D イメージの正しい回転マトリックスと原点を作成したら、ID2D1DeviceContext::BeginDraw と ID2D1DeviceContext::EndDraw の呼び出しの間に、ID2D1DeviceContext::SetTransform を呼び出して設定します。
警告 Direct2D には、変換スタックがありません。 アプリで描画コードの一部として ID2D1DeviceContext::SetTransform も使用している場合は、このマトリックスを、適用した他の変換に後乗算する必要があります。
    ID2D1DeviceContext* context = m_deviceResources->GetD2DDeviceContext();
    Windows::Foundation::Size logicalSize = m_deviceResources->GetLogicalSize();

    context->SaveDrawingState(m_stateBlock.Get());
    context->BeginDraw();

    // Position on the bottom right corner.
    D2D1::Matrix3x2F screenTranslation = D2D1::Matrix3x2F::Translation(
        logicalSize.Width - m_textMetrics.layoutWidth,
        logicalSize.Height - m_textMetrics.height
        );

    context->SetTransform(screenTranslation * m_deviceResources->GetOrientationTransform2D());

    DX::ThrowIfFailed(
        m_textFormat->SetTextAlignment(DWRITE_TEXT_ALIGNMENT_TRAILING)
        );

    context->DrawTextLayout(
        D2D1::Point2F(0.f, 0.f),
        m_textLayout.Get(),
        m_whiteBrush.Get()
        );

    // Ignore D2DERR_RECREATE_TARGET here. This error indicates that the device
    // is lost. It will be handled during the next call to Present.
    HRESULT hr = context->EndDraw();
次にスワップ チェーンを表示すると、新しい表示方向に合わせて 2-D イメージが回転します。
付録 B: 画面回転のためのマトリックスの適用 (3-D)
スワップ チェーンを表示し、その内容を事前に回転させるコード例では (および DXGI スワップ チェーンの回転サンプル)、可能な画面の向きごとに特定の変換マトリックスを定義しました。 次に、3-D シーンを回転させるマトリックスを見てみましょう。 前と同様に、4 つの可能な向きごとに一連のマトリックスを作成します。 丸めエラーや小さな視覚的アーティファクトを防ぐには、コードでマトリックスを明示的に宣言します。
これらの 3-D 回転マトリックスは、次のように設定します。 次のコード例に示すマトリックスは、カメラの 3-D シーン空間内のポイントを定義する頂点の 0、90、180、270 度回転の標準回転行列です。 シーン内の各頂点の [x, y, z] 座標値は、シーンの 2-D プロジェクションが計算されるときに、この回転マトリックスによって乗算されます。
// 0-degree Z-rotation
static const XMFLOAT4X4 Rotation0(
    1.0f, 0.0f, 0.0f, 0.0f,
    0.0f, 1.0f, 0.0f, 0.0f,
    0.0f, 0.0f, 1.0f, 0.0f,
    0.0f, 0.0f, 0.0f, 1.0f
    );

// 90-degree Z-rotation
static const XMFLOAT4X4 Rotation90(
    0.0f, 1.0f, 0.0f, 0.0f,
    -1.0f, 0.0f, 0.0f, 0.0f,
    0.0f, 0.0f, 1.0f, 0.0f,
    0.0f, 0.0f, 0.0f, 1.0f
    );

// 180-degree Z-rotation
static const XMFLOAT4X4 Rotation180(
    -1.0f, 0.0f, 0.0f, 0.0f,
    0.0f, -1.0f, 0.0f, 0.0f,
    0.0f, 0.0f, 1.0f, 0.0f,
    0.0f, 0.0f, 0.0f, 1.0f
    );

// 270-degree Z-rotation
static const XMFLOAT4X4 Rotation270(
    0.0f, -1.0f, 0.0f, 0.0f,
    1.0f, 0.0f, 0.0f, 0.0f,
    0.0f, 0.0f, 1.0f, 0.0f,
    0.0f, 0.0f, 0.0f, 1.0f
    );
    }
スワップ チェーンの回転の種類は、次のように IDXGISwapChain1::SetRotation を呼び出して設定します。
m_swapChain->SetRotation(rotation);
ここで、render メソッドで、次のようなコードを実装します。
struct ConstantBuffer // This struct is provided for illustration.
{
    // Other constant buffer matrices and data are defined here.

    float4x4 projection; // Current matrix for projection
} ;
ConstantBuffer  m_constantBufferData;          // Constant buffer resource data

// ...

// Rotate the projection matrix as it will be used to render to the rotated swap chain.
m_constantBufferData.projection = mul(m_constantBufferData.projection, m_rotationTransform3D);
これで、レンダリング メソッドを呼び出すと、現在の回転マトリックス (クラス変数 m_orientationTransform3D によって指定されたもの) が現在のプロジェクション マトリックスで乗算され、この演算の結果がレンダラーの新しいプロジェクション マトリックスとして割り当てられます。 スワップ チェーンを表示して、更新された表示方向でシーンを表示します。