次の手順では、Windows Touch を使用して複数のタッチ ポイントを追跡する方法について説明します。
- アプリケーションを作成し、Windows Touch を有効にします。
- WM_TOUCHと追跡ポイントのハンドラーを追加します。
- ポイントを描画します。
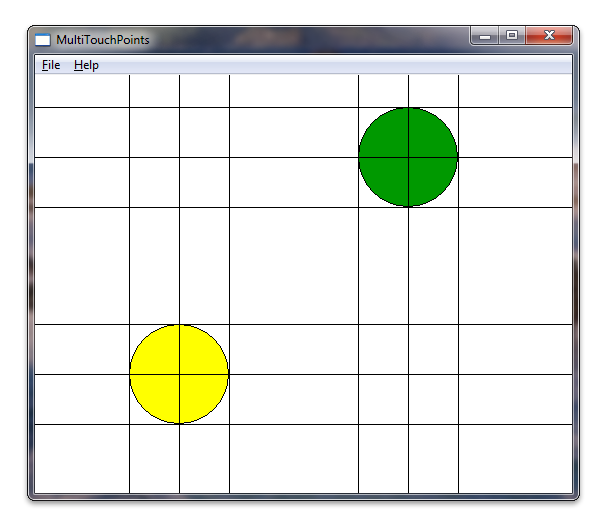
アプリケーションを実行すると、各タッチの下に円がレンダリングされます。 次のスクリーン ショットは、実行中のアプリケーションの外観を示しています。
アプリケーションを作成して Windows Touch を有効にする
Microsoft Visual Studio ウィザードを使用して、Microsoft Win32 アプリケーションから開始します。 ウィザードが完了したら、targetver.h で Windows バージョンを設定し、アプリケーションに windows.h と windowsx.h を含めることで、Windows Touch メッセージのサポートを追加します。 次のコードは、targetver.h で Windows バージョンを設定する方法を示しています。
#ifndef WINVER                  // Specifies that the minimum required platform is Windows 7.
#define WINVER 0x0601           // Change this to the appropriate value to target other versions of Windows.
#endif

#ifndef _WIN32_WINNT            // Specifies that the minimum required platform is Windows 7.
#define _WIN32_WINNT 0x0601     // Change this to the appropriate value to target other versions of Windows.
#endif

#ifndef _WIN32_WINDOWS          // Specifies that the minimum required platform is Windows 98.
#define _WIN32_WINDOWS 0x0410 // Change this to the appropriate value to target Windows Me or later.
#endif

#ifndef _WIN32_IE                       // Specifies that the minimum required platform is Internet Explorer 7.0.
#define _WIN32_IE 0x0700        // Change this to the appropriate value to target other versions of IE.
#endif
次のコードは、インクルード ディレクティブを追加する方法を示しています。 また、後で使用するグローバル変数を作成することもできます。
#include <windows.h>    // included for Windows Touch
#include <windowsx.h>   // included for point conversion

#define MAXPOINTS 10

// You will use this array to track touch points
int points[MAXPOINTS][2];

// You will use this array to switch the color / track ids
int idLookup[MAXPOINTS];


// You can make the touch points larger
// by changing this radius value
static int radius      = 50;

// There should be at least as many colors
// as there can be touch points so that you
// can have different colors for each point
COLORREF colors[] = { RGB(153,255,51),
                      RGB(153,0,0),
                      RGB(0,153,0),
                      RGB(255,255,0),
                      RGB(255,51,204),
                      RGB(0,0,0),
                      RGB(0,153,0),
                      RGB(153, 255, 255),
                      RGB(153,153,255),
                      RGB(0,51,153)
                    };
WM_TOUCHおよびトラック ポイントのハンドラーを追加する
まず、WndProc でWM_TOUCH ハンドラーによって使用される変数をいくつか宣言します。
int wmId, wmEvent, i, x, y;

UINT cInputs;
PTOUCHINPUT pInputs;
POINT ptInput;
ここで、タッチ ポイントの格納に使用する変数を初期化し、 InitInstance メソッドからタッチ入力用のウィンドウを登録します。
BOOL InitInstance(HINSTANCE hInstance, int nCmdShow)
{
   HWND hWnd;

   hInst = hInstance; // Store instance handle in our global variable

   hWnd = CreateWindow(szWindowClass, szTitle, WS_OVERLAPPEDWINDOW,
      CW_USEDEFAULT, 0, CW_USEDEFAULT, 0, NULL, NULL, hInstance, NULL);

   if (!hWnd) {
      return FALSE;
   }

   // register the window for touch instead of gestures
   RegisterTouchWindow(hWnd, 0);

   // the following code initializes the points
   for (int i=0; i< MAXPOINTS; i++){
     points[i][0] = -1;
     points[i][1] = -1;
     idLookup[i]  = -1;
   }

   ShowWindow(hWnd, nCmdShow);
   UpdateWindow(hWnd);

   return TRUE;
}
次に、WndProc メソッドからWM_TOUCHメッセージを処理します。 次のコードは、 WM_TOUCHのハンドラーの実装を示しています。
case WM_TOUCH:
  cInputs = LOWORD(wParam);
  pInputs = new TOUCHINPUT[cInputs];
  if (pInputs){
    if (GetTouchInputInfo((HTOUCHINPUT)lParam, cInputs, pInputs, sizeof(TOUCHINPUT))){
      for (int i=0; i < static_cast<INT>(cInputs); i++){
        TOUCHINPUT ti = pInputs[i];
        index = GetContactIndex(ti.dwID);
        if (ti.dwID != 0 && index < MAXPOINTS){
          // Do something with your touch input handle
          ptInput.x = TOUCH_COORD_TO_PIXEL(ti.x);
          ptInput.y = TOUCH_COORD_TO_PIXEL(ti.y);
          ScreenToClient(hWnd, &ptInput);

          if (ti.dwFlags & TOUCHEVENTF_UP){
            points[index][0] = -1;
            points[index][1] = -1;
          }else{
            points[index][0] = ptInput.x;
            points[index][1] = ptInput.y;
          }
        }
      }

      InvalidateRect(hWnd, NULL, FALSE);
    }
    // If you handled the message and don't want anything else done with it, you can close it
    CloseTouchInputHandle((HTOUCHINPUT)lParam);
    delete [] pInputs;
  }else{
    // Handle the error here
  }
Note
ScreenToClient 関数を使用するには、アプリケーションで高 DPI のサポートが必要です。 高 DPI のサポートの詳細については、「 高 DPI」を参照してください。
これで、ユーザーが画面に触れると、タッチしている位置がポイント配列に格納されます。 TOUCHINPUT 構造体の dwID メンバーは、ハードウェアに依存する識別子を格納します。
dwID メンバーがハードウェアに依存している問題に対処するために、WM_TOUCH ケース ハンドラーは、TOUCHINPUT 構造体の dwID メンバーを画面に描画されるポイントにマップする関数 GetContactIndex を使用します。 次のコードは、この関数の実装を示しています。
// This function is used to return an index given an ID
int GetContactIndex(int dwID){
  for (int i=0; i < MAXPOINTS; i++){
    if (idLookup[i] == -1){
      idLookup[i] = dwID;
      return i;
    }else{
      if (idLookup[i] == dwID){
        return i;
      }
    }
  }
  // Out of contacts
  return -1;
}
重要
Windows 11 以降
"既定では、3 本および 4 本の指によるタッチ操作は、Windows アプリでは動作しなくなります。"
既定では、3 本および 4 本の指によるタッチ操作は、ウィンドウの切り替えや最小化、仮想デスクトップの変更などの操作のためにシステムによって使用されるようになりました。 これらの操作はシステム レベルで処理されるようになったため、この変更によってアプリの機能が影響を受ける可能性があります。
アプリケーション内で 3 本または 4 本の指による操作をサポートするために、システムでこれらの操作を処理するかどうかを指定する新しいユーザー設定が導入されました。
[Bluetooth とデバイス] > [タッチ] > [3 本および 4 本の指によるタッチ ジェスチャ]
"オン" (既定値) に設定すると、システムによって 3 本および 4 本の指によるすべての操作が処理されます (アプリではそれらをサポートできません)。
"オフ" に設定した場合、アプリで 3 本および 4 本の指による操作をサポートできます (システムによって処理されません)。
アプリケーションでこれらの操作をサポートする必要がある場合は、この設定についてユーザーに通知し、設定アプリを起動するためのリンクを関連ページに配置することをお勧めします (ms-settings:devices-touch)。 詳細については、「 Launcher.LaunchUriAsync メソッド」を参照してください。
ポイントを描画する
描画ルーチンの次の変数を宣言します。
    // For double buffering
    static HDC memDC       = 0;
    static HBITMAP hMemBmp = 0;
    HBITMAP hOldBmp        = 0;

    // For drawing / fills
    PAINTSTRUCT ps;
    HDC hdc;
    HBRUSH hBrush;

    // For tracking dwId to points
    int index;
メモリ表示コンテキスト memDC は、ちらつきを排除するために、レンダリングされた表示コンテキスト hdc とスワップされる一時的なグラフィックス コンテキストを格納するために使用されます。 格納したポイントを受け取り、ポイントに円を描画する描画ルーチンを実装します。 次のコードは、 WM_PAINT ハンドラーを実装する方法を示しています。
  case WM_PAINT:
    hdc = BeginPaint(hWnd, &ps);
    RECT client;
    GetClientRect(hWnd, &client);

    // start double buffering
    if (!memDC){
      memDC = CreateCompatibleDC(hdc);
    }
    hMemBmp = CreateCompatibleBitmap(hdc, client.right, client.bottom);
    hOldBmp = (HBITMAP)SelectObject(memDC, hMemBmp);

    hBrush = CreateSolidBrush(RGB(255, 255, 255));
    FillRect(memDC, &client, hBrush);
    DeleteObject(hBrush);

    //Draw Touched Points
    for (i=0; i < MAXPOINTS; i++){
      hBrush = CreateSolidBrush(colors[i]);
      SelectObject( memDC, hBrush);

      x = points[i][0];
      y = points[i][1];
      if  (x >0 && y>0){
        Ellipse(memDC, x - radius, y - radius, x+ radius, y + radius);
      }

      DeleteObject(hBrush);
    }

    BitBlt(hdc, 0,0, client.right, client.bottom, memDC, 0,0, SRCCOPY);
    EndPaint(hWnd, &ps);

    SelectObject(memDC, hOldBmp);
    DeleteObject(hMemBmp);

    break;
アプリケーションを実行すると、このセクションの最初の図のようになります。
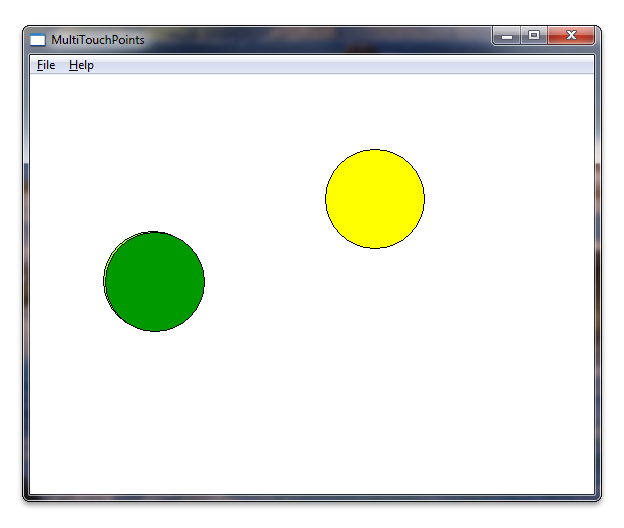
楽しみのために、タッチポイントの周りにいくつかの余分な線を描くことができます。 次のスクリーン ショットは、円の周りに描かれたいくつかの余分な線でアプリケーションがどのように見えるかを示しています。