Xamarin.Forms でのローカル通知
 サンプルのダウンロード
ローカル通知は、モバイル デバイスにインストールされているアプリケーションによって送信されるアラートです。 多くの場合、ローカル通知は次のような機能のために使用されます。
- カレンダー イベント
- リマインダー
- 位置情報に基づくトリガー
ローカル通知の作成、表示、および使用は、プラットフォームごとに異なる方法で処理されます。 この記事では、Xamarin.Forms を使ってローカル通知の送信、スケジュール設定、および受信を行うためのクロスプラットフォームの抽象化を作成する方法について説明します。

クロスプラットフォーム インターフェイスの作成
Xamarin.Forms アプリケーションでは、基になるプラットフォームの実装を気にすることなく通知を作成して使用できるようにする必要があります。 共有コード ライブラリで実装されている次の INotificationManager インターフェイスでは、通知を操作するためにアプリケーションで使用できるクロスプラットフォーム API が定義されています。
public interface INotificationManager
{
    event EventHandler NotificationReceived;
    void Initialize();
    void SendNotification(string title, string message, DateTime? notifyTime = null);
    void ReceiveNotification(string title, string message);
}
このインターフェイスは、各プラットフォームのプロジェクトで実装されます。 NotificationReceived イベントを使うと、アプリケーションで受信した通知を処理できるようになります。 Initialize メソッドでは、通知システムを準備するために必要なネイティブ プラットフォームのロジックをすべて実行する必要があります。 SendNotification メソッドでは、省略可能な DateTime に通知を送信する必要があります。 ReceiveNotification メソッドは、メッセージを受信したときに基になるプラットフォームによって呼び出される必要があります。
Xamarin.Forms でのインターフェイスの使用
作成されたインターフェイスは、プラットフォームの実装がまだ作成されていない場合でも、Xamarin.Forms の共有プロジェクトで使用することができます。 サンプル アプリケーションには、次の内容が記載された MainPage.xaml という ContentPage が含まれています。
<StackLayout Margin="0,35,0,0"
             x:Name="stackLayout">
    <Label Text="Click the button below to create a local notification."
           TextColor="Red"
           HorizontalOptions="Center"
           VerticalOptions="Start" />
    <Button Text="Create Notification"
            HorizontalOptions="Center"
            VerticalOptions="Start"
            Clicked="OnSendClick" />
    <Label Text="Click the button below to schedule a local notification for in 10 seconds time."
           TextColor="Red"
           HorizontalOptions="Center"
           VerticalOptions="Start" />
    <Button Text="Create Notification"
            HorizontalOptions="Center"
            VerticalOptions="Start"
            Clicked="OnScheduleClick" />
</StackLayout>
レイアウトには、手順について説明する Label 要素と、タップしたときに通知を送信またはスケジュール設定する Button 要素が含まれています。
MainPage クラスのコードビハインドによって、通知の送受信が処理されます。
public partial class MainPage : ContentPage
{
    INotificationManager notificationManager;
    int notificationNumber = 0;

    public MainPage()
    {
        InitializeComponent();

        notificationManager = DependencyService.Get<INotificationManager>();
        notificationManager.NotificationReceived += (sender, eventArgs) =>
        {
            var evtData = (NotificationEventArgs)eventArgs;
            ShowNotification(evtData.Title, evtData.Message);
        };
    }

    void OnSendClick(object sender, EventArgs e)
    {
        notificationNumber++;
        string title = $"Local Notification #{notificationNumber}";
        string message = $"You have now received {notificationNumber} notifications!";
        notificationManager.SendNotification(title, message);
    }

    void OnScheduleClick(object sender, EventArgs e)
    {
        notificationNumber++;
        string title = $"Local Notification #{notificationNumber}";
        string message = $"You have now received {notificationNumber} notifications!";
        notificationManager.SendNotification(title, message, DateTime.Now.AddSeconds(10));
    }

    void ShowNotification(string title, string message)
    {
        Device.BeginInvokeOnMainThread(() =>
        {
            var msg = new Label()
            {
                Text = $"Notification Received:\nTitle: {title}\nMessage: {message}"
            };
            stackLayout.Children.Add(msg);
        });
    }
}
クラス コンストラクターは MainPage 、 を Xamarin.FormsDependencyService 使用して のプラットフォーム固有のインスタンスを INotificationManager取得します。 OnSendClick および OnScheduleClicked メソッドでは、INotificationManager インスタンスを使用して、新しい通知が送信およびスケジュール設定されます。 NotificationReceived イベントにアタッチされたイベント ハンドラーから呼び出される ShowNotification メソッドでは、そのイベントが呼び出されたときに、ページに新しい Label が挿入されます。
NotificationReceived イベント ハンドラーは、そのイベント引数を NotificationEventArgs にキャストします。 この型は、共有の Xamarin.Forms プロジェクトで定義されています。
public class NotificationEventArgs : EventArgs
{
    public string Title { get; set; }
    public string Message { get; set; }
}
の詳細Xamarin.FormsDependencyServiceについては、「DependencyService」を参照してくださいXamarin.Forms。
Android 用のインターフェイスの実装を作成する
Android 上で INotificationManager アプリケーションによる通知の送受信を実現するには、アプリケーションで Xamarin.Forms インターフェイスの実装を提供する必要があります。
AndroidNotificationManager クラスの作成
AndroidNotificationManager クラスによって、INotificationManager インターフェイスが実装されます。
using System;
using Android.App;
using Android.Content;
using Android.Graphics;
using Android.OS;
using AndroidX.Core.App;
using Xamarin.Forms;
using AndroidApp = Android.App.Application;

[assembly: Dependency(typeof(LocalNotifications.Droid.AndroidNotificationManager))]
namespace LocalNotifications.Droid
{
    public class AndroidNotificationManager : INotificationManager
    {
        const string channelId = "default";
        const string channelName = "Default";
        const string channelDescription = "The default channel for notifications.";

        public const string TitleKey = "title";
        public const string MessageKey = "message";

        bool channelInitialized = false;
        int messageId = 0;
        int pendingIntentId = 0;

        NotificationManager manager;

        public event EventHandler NotificationReceived;

        public static AndroidNotificationManager Instance { get; private set; }

        public AndroidNotificationManager() => Initialize();

        public void Initialize()
        {
            if (Instance == null)
            {
                CreateNotificationChannel();
                Instance = this;
            }
        }

        public void SendNotification(string title, string message, DateTime? notifyTime = null)
        {
            if (!channelInitialized)
            {
                CreateNotificationChannel();
            }

            if (notifyTime != null)
            {
                Intent intent = new Intent(AndroidApp.Context, typeof(AlarmHandler));
                intent.PutExtra(TitleKey, title);
                intent.PutExtra(MessageKey, message);

                PendingIntent pendingIntent = PendingIntent.GetBroadcast(AndroidApp.Context, pendingIntentId++, intent, PendingIntentFlags.CancelCurrent);
                long triggerTime = GetNotifyTime(notifyTime.Value);
                AlarmManager alarmManager = AndroidApp.Context.GetSystemService(Context.AlarmService) as AlarmManager;
                alarmManager.Set(AlarmType.RtcWakeup, triggerTime, pendingIntent);
            }
            else
            {
                Show(title, message);
            }
        }

        public void ReceiveNotification(string title, string message)
        {
            var args = new NotificationEventArgs()
            {
                Title = title,
                Message = message,
            };
            NotificationReceived?.Invoke(null, args);
        }

        public void Show(string title, string message)
        {
            Intent intent = new Intent(AndroidApp.Context, typeof(MainActivity));
            intent.PutExtra(TitleKey, title);
            intent.PutExtra(MessageKey, message);

            PendingIntent pendingIntent = PendingIntent.GetActivity(AndroidApp.Context, pendingIntentId++, intent, PendingIntentFlags.UpdateCurrent);

            NotificationCompat.Builder builder = new NotificationCompat.Builder(AndroidApp.Context, channelId)
                .SetContentIntent(pendingIntent)
                .SetContentTitle(title)
                .SetContentText(message)
                .SetLargeIcon(BitmapFactory.DecodeResource(AndroidApp.Context.Resources, Resource.Drawable.xamagonBlue))
                .SetSmallIcon(Resource.Drawable.xamagonBlue)
                .SetDefaults((int)NotificationDefaults.Sound | (int)NotificationDefaults.Vibrate);

            Notification notification = builder.Build();
            manager.Notify(messageId++, notification);
        }

        void CreateNotificationChannel()
        {
            manager = (NotificationManager)AndroidApp.Context.GetSystemService(AndroidApp.NotificationService);

            if (Build.VERSION.SdkInt >= BuildVersionCodes.O)
            {
                var channelNameJava = new Java.Lang.String(channelName);
                var channel = new NotificationChannel(channelId, channelNameJava, NotificationImportance.Default)
                {
                    Description = channelDescription
                };
                manager.CreateNotificationChannel(channel);
            }

            channelInitialized = true;
        }

        long GetNotifyTime(DateTime notifyTime)
        {
            DateTime utcTime = TimeZoneInfo.ConvertTimeToUtc(notifyTime);
            double epochDiff = (new DateTime(1970, 1, 1) - DateTime.MinValue).TotalSeconds;
            long utcAlarmTime = utcTime.AddSeconds(-epochDiff).Ticks / 10000;
            return utcAlarmTime; // milliseconds
        }
    }
}
名前空間の上の assembly 属性によって、INotificationManager インターフェイスの実装が DependencyService に登録されます。
Android のアプリケーションでは、通知用に複数のチャネルを定義することができます。 Initialize メソッドにより、サンプル アプリケーションで通知を送信するために使用される基本チャネルが作成されます。 SendNotification メソッドでは、通知の作成と送信に必要なプラットフォーム固有のロジックが定義されます。 メッセージを受信すると Android OS によって ReceiveNotification メソッドが呼び出され、イベント ハンドラーが呼び出されます。
SendNotification メソッドによって、ローカル通知が直ちに (または正確な DateTime に) 作成されます。 AlarmManager クラスを使用して、正確な DateTime に通知をスケジュール設定できます。通知は BroadcastReceiver クラスから派生したオブジェクトによって受信されます。
[BroadcastReceiver(Enabled = true, Label = "Local Notifications Broadcast Receiver")]
public class AlarmHandler : BroadcastReceiver
{
    public override void OnReceive(Context context, Intent intent)
    {
        if (intent?.Extras != null)
        {
            string title = intent.GetStringExtra(AndroidNotificationManager.TitleKey);
            string message = intent.GetStringExtra(AndroidNotificationManager.MessageKey);

            AndroidNotificationManager manager = AndroidNotificationManager.Instance ?? new AndroidNotificationManager();
            manager.Show(title, message);
        }
    }
}
重要
既定では、AlarmManager クラスを使用してスケジュール設定された通知は、デバイスを再起動すると無効になります。 ただし、デバイスが再起動された場合に自動的に通知を再スケジュール設定するようにアプリケーションを設計することができます。 詳細については、developer.android.com の「反復アラームのスケジュール設定」の「デバイスの再起動時にアラームを開始する」と、サンプルを参照してください。 Android でのバックグラウンド処理の詳細については、developer.android.com の「バックグラウンド処理ガイド」を参照してください。
ブロードキャスト レシーバーの詳細については、「Xamarin.Android でのブロードキャスト レシーバー」を参照してください。
Android 上で受信した通知を処理する
MainActivity クラスでは、受信した通知を検出し、AndroidNotificationManager インスタンスに通知する必要があります。 MainActivity クラスに付けられた Activity 属性では、LaunchMode.SingleTop という LaunchMode 値を指定する必要があります。
[Activity(
        //...
        LaunchMode = LaunchMode.SingleTop]
    public class MainActivity : global::Xamarin.Forms.Platform.Android.FormsAppCompatActivity
    {
        // ...
    }
SingleTop モードでは、アプリケーションがフォアグラウンドにある間、複数の Activity のインスタンスを起動できなくなります。 より複雑な通知シナリオで、複数のアクティビティを起動するアプリケーションの場合、この LaunchMode は適切でない場合があります。 LaunchMode 列挙値の詳細については、Android アクティビティの LaunchMode に関するページをご覧ください。
MainActivity クラスの内部は、受信した通知を受け取るように変更されます。
protected override void OnCreate(Bundle savedInstanceState)
{
    // ...

    global::Xamarin.Forms.Forms.Init(this, savedInstanceState);
    LoadApplication(new App());
    CreateNotificationFromIntent(Intent);
}

protected override void OnNewIntent(Intent intent)
{
    CreateNotificationFromIntent(intent);
}

void CreateNotificationFromIntent(Intent intent)
{
    if (intent?.Extras != null)
    {
        string title = intent.GetStringExtra(AndroidNotificationManager.TitleKey);
        string message = intent.GetStringExtra(AndroidNotificationManager.MessageKey);
        DependencyService.Get<INotificationManager>().ReceiveNotification(title, message);
    }
}
CreateNotificationFromIntent メソッドでは、intent 引数から通知データが抽出され、ReceiveNotification メソッドを使って AndroidNotificationManager に渡されます。 CreateNotificationFromIntent メソッドは、OnCreate メソッドと OnNewIntent メソッドの両方から呼び出されます。
- 通知データによってアプリケーションが開始された場合、
IntentデータはOnCreateメソッドに渡されます。 - アプリケーションが既にフォアグランドにあった場合、
IntentデータはOnNewIntentメソッドに渡されます。
Android には、通知用の高度なオプションが多数用意されています。 詳しくは、「Xamarin.Android での通知」をご覧ください。
iOS 用のインターフェイスの実装を作成する
iOS 上で Xamarin.Forms アプリケーションによる通知の送受信を実現するには、アプリケーションで INotificationManager の実装を提供する必要があります。
iOSNotificationManager クラスの作成
iOSNotificationManager クラスによって、INotificationManager インターフェイスが実装されます。
using System;
using Foundation;
using UserNotifications;
using Xamarin.Forms;

[assembly: Dependency(typeof(LocalNotifications.iOS.iOSNotificationManager))]
namespace LocalNotifications.iOS
{
    public class iOSNotificationManager : INotificationManager
    {
        int messageId = 0;
        bool hasNotificationsPermission;
        public event EventHandler NotificationReceived;

        public void Initialize()
        {
            // request the permission to use local notifications
            UNUserNotificationCenter.Current.RequestAuthorization(UNAuthorizationOptions.Alert, (approved, err) =>
            {
                hasNotificationsPermission = approved;
            });
        }

        public void SendNotification(string title, string message, DateTime? notifyTime = null)
        {
            // EARLY OUT: app doesn't have permissions
            if (!hasNotificationsPermission)
            {
                return;
            }

            messageId++;

            var content = new UNMutableNotificationContent()
            {
                Title = title,
                Subtitle = "",
                Body = message,
                Badge = 1
            };

            UNNotificationTrigger trigger;
            if (notifyTime != null)
            {
                // Create a calendar-based trigger.
                trigger = UNCalendarNotificationTrigger.CreateTrigger(GetNSDateComponents(notifyTime.Value), false);
            }
            else
            {
                // Create a time-based trigger, interval is in seconds and must be greater than 0.
                trigger = UNTimeIntervalNotificationTrigger.CreateTrigger(0.25, false);
            }

            var request = UNNotificationRequest.FromIdentifier(messageId.ToString(), content, trigger);
            UNUserNotificationCenter.Current.AddNotificationRequest(request, (err) =>
            {
                if (err != null)
                {
                    throw new Exception($"Failed to schedule notification: {err}");
                }
            });
        }

        public void ReceiveNotification(string title, string message)
        {
            var args = new NotificationEventArgs()
            {
                Title = title,
                Message = message
            };
            NotificationReceived?.Invoke(null, args);
        }

        NSDateComponents GetNSDateComponents(DateTime dateTime)
        {
            return new NSDateComponents
            {
                Month = dateTime.Month,
                Day = dateTime.Day,
                Year = dateTime.Year,
                Hour = dateTime.Hour,
                Minute = dateTime.Minute,
                Second = dateTime.Second
            };
        }
    }
}
名前空間の上の assembly 属性によって、INotificationManager インターフェイスの実装が DependencyService に登録されます。
iOS では、通知のスケジュール設定を試みる前に、通知を使用するためのアクセス許可を要求する必要があります。 Initialize メソッドでは、ローカル通知を使用するための承認を要求します。 SendNotification メソッドでは、通知の作成と送信に必要なロジックが定義されます。 メッセージを受信すると iOS によって ReceiveNotification メソッドが呼び出され、イベント ハンドラーが呼び出されます。
注意
SendNotification メソッドによって、ローカル通知が UNTimeIntervalNotificationTrigger を使用して直ちに (または UNCalendarNotificationTrigger オブジェクトを使用して正確な DateTime に) 作成されます。
iOS 上で受信した通知を処理する
iOS では、受信メッセージを処理するために UNUserNotificationCenterDelegate をサブクラスとして持つデリゲートを作成する必要があります。 サンプル アプリケーションでは、iOSNotificationReceiver クラスが定義されています。
public class iOSNotificationReceiver : UNUserNotificationCenterDelegate
{
    public override void WillPresentNotification(UNUserNotificationCenter center, UNNotification notification, Action<UNNotificationPresentationOptions> completionHandler)
    {
        ProcessNotification(notification);
        completionHandler(UNNotificationPresentationOptions.Alert);
    }

    void ProcessNotification(UNNotification notification)
    {
        string title = notification.Request.Content.Title;
        string message = notification.Request.Content.Body;

        DependencyService.Get<INotificationManager>().ReceiveNotification(title, message);
    }
}
このクラスでは、iOSNotificationManager クラスのインスタンスを取得するために DependencyService が使用され、受信した通知のデータが ReceiveNotification メソッドに渡されています。
AppDelegate クラスでは、アプリケーションの起動時に、UNUserNotificationCenter デリゲートとして iOSNotificationReceiver オブジェクトを指定する必要があります。 これは FinishedLaunching メソッド内で行われます。
public override bool FinishedLaunching(UIApplication app, NSDictionary options)
{
    global::Xamarin.Forms.Forms.Init();

    UNUserNotificationCenter.Current.Delegate = new iOSNotificationReceiver();

    LoadApplication(new App());
    return base.FinishedLaunching(app, options);
}
iOS には、通知用の高度なオプションが多数用意されています。 詳しくは、Xamarin.iOS での通知に関する記事をご覧ください。
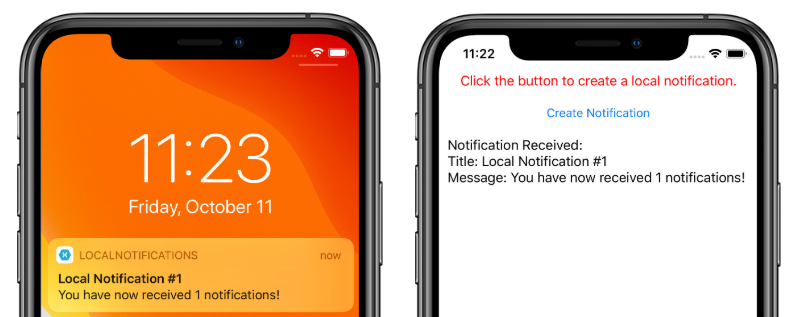
アプリケーションをテストする
プラットフォームのプロジェクトに INotificationManager インターフェイスの登録済みの実装が含まれていれば、両方のプラットフォーム上でアプリケーションをテストすることができます。 アプリケーションを実行し、いずれかの [Create Notification] ボタンをクリックして通知を作成します。
Android では、通知は通知領域に表示されます。 通知がタップされると、アプリケーションによって通知が受信され、メッセージが表示されます。

iOS の場合、受信した通知は、ユーザーの入力を必要とせずに、アプリケーションによって自動的に受信されます。 アプリケーションによって通知が受信され、メッセージが表示されます。