円弧を描画する 3 つの方法
 サンプルのダウンロード
SkiaSharp を使用して円弧を定義するための 3 つの異なる方法の説明
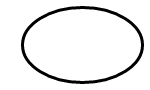
円弧とは、楕円の円周での曲線部であり、たとえば、この無限大記号の丸い部分などのことです。

その定義は単純なのですが、すべてのニーズを満たす円弧描画関数を定義する方法は存在していません。そのため、グラフィックス システムにおいて、円弧を描画する最適な方法についてのコンセンサスはありません。このため SKPath クラスでは、 1 つだけのアプローチに、それ自体を制限してはいません。
SKPath では、AddArc メソッド、5 つの異なる ArcTo メソッド、および 2 つの相対的な RArcTo メソッドを定義しています。 これらのメソッドは、円弧を指定するための 3 つの非常に異なるアプローチを代表する、3 つのカテゴリに分類されます。どれを使用するかは、円弧の定義に使用できる情報と、この円弧が他に描画しているグラフィックスにどのように適合するかによって異なります。
角度円弧
角度円弧で円弧を描画するアプローチでは、楕円を囲む四角形を指定する必要があります。 この楕円の円周上の円弧は、円弧の始点とその長さを示す、楕円の中心からの角度によって表されます。 2 つの異なるメソッドが、角度円弧を描画します。 これら 2 つとは、AddArc メソッドと ArcTo メソッドです。
public void AddArc (SKRect oval, Single startAngle, Single sweepAngle)

public void ArcTo (SKRect oval, Single startAngle, Single sweepAngle, Boolean forceMoveTo)
これらのメソッドは、Android の AddArc および [ArcTo]xref:Android.Graphics.Path.ArcTo*) メソッドと同じです。 iOS の AddArc メソッドは似ていますが、楕円として一般化されてはいなく、円の円周での円弧に制限されています。
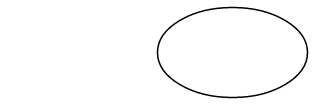
どのメソッドも、楕円の位置とサイズの両方を定義する SKRect 値を最初に定義します。
円弧は、この楕円の円周の一部です。
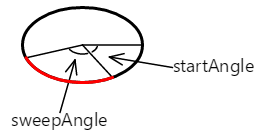
startAngle 引数は、楕円の中心から右に描画された水平線を基準にした時計回りの相対角度で、度数で表します。 sweepAngle 引数は、startAngle に対し相対的です。 ここでの startAngle と sweepAngle は、それぞれ 60 度と100 度の値を取っています。

円弧は開始角度が起点になります。 その長さは掃引 (スイープ) 角度によって制御されます。 ここでは、円弧を赤色で示しています。
AddArc または ArcTo メソッドを使用 してこのパスに追加される曲線は、単純に楕円の円周のその部分を示します。

startAngle または sweepAngle 引数は 負の値を取ることができます。sweepAngle が正の値の場合は円弧が時計回りに、負の値の場合は反時計回りになります。
ただし、AddArc は閉じた輪郭線を定義しません。 AddArc の後に LineTo を呼び出すと、円弧の終点から LineTo メソッド内の点までの線が描画されます。これは ArcTo でも同様です。
AddArc では、自動的に新しい輪郭が開始され、機能としては最後の引数に true を指定して ArcTo を呼び出したのと同等です。
path.ArcTo (oval, startAngle, sweepAngle, true);
その最後の引数の名前は forceMoveTo で、これにより、実質的に円弧の開始時に MoveTo が呼び出されるようになります。これで新しい輪郭が開始されます。 最後の引数が false の場合、これは実行されません。
path.ArcTo (oval, startAngle, sweepAngle, false);
このバージョンの ArcTo では、現在の位置から円弧の開始点までの線が描画されます。つまり円弧を、より大きな輪郭の中間のどこかに配置することができます。
[Angle Arc] ページでは、2 つのスライダーを使用して、開始の角度と掃引する角度を指定できます。 XAML ファイルは、2 つの Slider 要素と 1 つの SKCanvasView 要素をインスタンス化します。 AngleArcPage.xaml.cs ファイル内の PaintCanvas ハンドラーは、フィールドとして定義された 2 つの SKPaint オブジェクトを使用して、楕円と円弧の両方を描画できます。
void OnCanvasViewPaintSurface(object sender, SKPaintSurfaceEventArgs args)
{
    SKImageInfo info = args.Info;
    SKSurface surface = args.Surface;
    SKCanvas canvas = surface.Canvas;

    canvas.Clear();

    SKRect rect = new SKRect(100, 100, info.Width - 100, info.Height - 100);
    float startAngle = (float)startAngleSlider.Value;
    float sweepAngle = (float)sweepAngleSlider.Value;

    canvas.DrawOval(rect, outlinePaint);

    using (SKPath path = new SKPath())
    {
        path.AddArc(rect, startAngle, sweepAngle);
        canvas.DrawPath(path, arcPaint);
    }
}
ごこで示しているように、開始角度と掃引角度の両方とも、負の値を取ることができます。

円弧を生成するためのこの方法は、アルゴリズム的に最も簡単であり、円弧を記述する媒介変数方程式を簡単に導き出せます。楕円のサイズと位置、開始角度と掃引角度を把握することで、単純な三角法を使用して円弧の始点と終点が計算できます。
x = oval.MidX + (oval.Width / 2) * cos(angle)
y = oval.MidY + (oval.Height / 2) * sin(angle)
angle 値は、startAngle または startAngle + sweepAngle のどちらかです。
円弧の定義に 2 つの角度を使用することは、たとえば円グラフを作成する場合など、描画する円弧の角度的な長さを把握している場合に最適です。 [Exploded Pie Chart] ページでこれを示します。 ExplodedPieChartPage クラスでは、内部クラスを使用して、データと色の組み合わせをいくつか定義します。
class ChartData
{
    public ChartData(int value, SKColor color)
    {
        Value = value;
        Color = color;
    }

    public int Value { private set; get; }

    public SKColor Color { private set; get; }
}

ChartData[] chartData =
{
    new ChartData(45, SKColors.Red),
    new ChartData(13, SKColors.Green),
    new ChartData(27, SKColors.Blue),
    new ChartData(19, SKColors.Magenta),
    new ChartData(40, SKColors.Cyan),
    new ChartData(22, SKColors.Brown),
    new ChartData(29, SKColors.Gray)
};
PaintSurface ハンドラーは、最初に各項目をループ処理し、totalValues の数を計算します。 その後は、合計に対する比率として各項目のサイズを決定し、角度に変換できます。
void OnCanvasViewPaintSurface(object sender, SKPaintSurfaceEventArgs args)
{
    SKImageInfo info = args.Info;
    SKSurface surface = args.Surface;
    SKCanvas canvas = surface.Canvas;

    canvas.Clear();

    int totalValues = 0;

    foreach (ChartData item in chartData)
    {
        totalValues += item.Value;
    }

    SKPoint center = new SKPoint(info.Width / 2, info.Height / 2);
    float explodeOffset = 50;
    float radius = Math.Min(info.Width / 2, info.Height / 2) - 2 * explodeOffset;
    SKRect rect = new SKRect(center.X - radius, center.Y - radius,
                             center.X + radius, center.Y + radius);

    float startAngle = 0;

    foreach (ChartData item in chartData)
    {
        float sweepAngle = 360f * item.Value / totalValues;

        using (SKPath path = new SKPath())
        using (SKPaint fillPaint = new SKPaint())
        using (SKPaint outlinePaint = new SKPaint())
        {
            path.MoveTo(center);
            path.ArcTo(rect, startAngle, sweepAngle, false);
            path.Close();

            fillPaint.Style = SKPaintStyle.Fill;
            fillPaint.Color = item.Color;

            outlinePaint.Style = SKPaintStyle.Stroke;
            outlinePaint.StrokeWidth = 5;
            outlinePaint.Color = SKColors.Black;

            // Calculate "explode" transform
            float angle = startAngle + 0.5f * sweepAngle;
            float x = explodeOffset * (float)Math.Cos(Math.PI * angle / 180);
            float y = explodeOffset * (float)Math.Sin(Math.PI * angle / 180);

            canvas.Save();
            canvas.Translate(x, y);

            // Fill and stroke the path
            canvas.DrawPath(path, fillPaint);
            canvas.DrawPath(path, outlinePaint);
            canvas.Restore();
        }

        startAngle += sweepAngle;
    }
}
円グラフの各片ごとに、新しい SKPath オブジェクトが作成されます。 パスは、中心からの線、円弧を描画する ArcTo、および Close を呼び出した結果として中央に戻る別の線で構成されます。 このプログラムでは、"分割" された円のスライスを、中央から 50 ピクセル離れた位置に移動させ表示します。 このタスクには、各片の掃引角度の中間点に向かうベクトルが必要です。

"分割" なしで表示される内容を確認するには、単純に Translate の呼び出しをコメントアウトします。

正接円弧
SKPath で 2 番目にサポートされる円弧の種類は、正接円弧です。円弧が 2 本の接続された線に接する円の円周であるため、このように呼ばれています。
正接円弧は、2 つの SKPoint パラメータを持つ ArcTo メソッドの呼び出しを使用してパスに追加されます。または、各点の個別の Single パラメータを使用して、ArcTo でオーバーロードされます。
public void ArcTo (SKPoint point1, SKPoint point2, Single radius)

public void ArcTo (Single x1, Single y1, Single x2, Single y2, Single radius)
この ArcTo メソッドは、PostScript arct 関数 (532 ページ) と iOS の AddArcToPoint メソッドに似ています。
この ArcTo メソッドには、次の 3 つの点が関係します。
- 輪郭の現在の点、または
MoveToが呼び出されていない場合には、(0, 0) の点 ArcToメソッドの 最初の点の引数は、コーナー ポイントと呼ばれますArcToに渡される 2 番目の点の引数は、移動先ポイントと呼ばれます。

次の 3 つの点によって、2 つの接続された線が定義されます。

3 つの点が共線、つまり、同じ直線上にある場合、円弧は描画されません。
また、ArcTo メソッドには radius パラメータも含まれています。 これにより、円の半径が定義されます。

正接円弧は楕円に対して一般化されていません。
2 本の線が任意の角度で一致する場合は、その円をそれらの線の間に挿入できます。つまり、円は両方の線に正接されます。

輪郭に追加された曲線は、ArcTo メソッドで指定された点にも接触しません。 これは、現在の点から最初の接線までの直線と、2 番目の接線で終わる円弧で構成されており、ここでは赤で示されています。

次に、輪郭に追加される最終的な直線と円弧を示します。

この輪郭は、2 番目の正接点から継続することができます。
[Tangent Arc] ページでは、正接円弧の実験を行なえます。これは、InteractivePage から 派生する数ページの最初で、いくつかの便利な SKPaint オブジェクトを定義し、さらに TouchPoint の処理を実行します。
public class InteractivePage : ContentPage
{
    protected SKCanvasView baseCanvasView;
    protected TouchPoint[] touchPoints;

    protected SKPaint strokePaint = new SKPaint
    {
        Style = SKPaintStyle.Stroke,
        Color = SKColors.Black,
        StrokeWidth = 3
    };

    protected SKPaint redStrokePaint = new SKPaint
    {
        Style = SKPaintStyle.Stroke,
        Color = SKColors.Red,
        StrokeWidth = 15
    };

    protected SKPaint dottedStrokePaint = new SKPaint
    {
        Style = SKPaintStyle.Stroke,
        Color = SKColors.Black,
        StrokeWidth = 3,
        PathEffect = SKPathEffect.CreateDash(new float[] { 7, 7 }, 0)
    };

    protected void OnTouchEffectAction(object sender, TouchActionEventArgs args)
    {
        bool touchPointMoved = false;

        foreach (TouchPoint touchPoint in touchPoints)
        {
            float scale = baseCanvasView.CanvasSize.Width / (float)baseCanvasView.Width;
            SKPoint point = new SKPoint(scale * (float)args.Location.X,
                                        scale * (float)args.Location.Y);
            touchPointMoved |= touchPoint.ProcessTouchEvent(args.Id, args.Type, point);
        }

        if (touchPointMoved)
        {
            baseCanvasView.InvalidateSurface();
        }
    }
}
TangentArcPage クラスは、InteractivePage から派生したものです。 TangentArcPage.xaml.cs ファイル内の コンストラクターにより、touchPoints 配列がインスタンス化および初期化され、TangentArcPage.xaml ファイルで インスタンス化された SKCanvasView オブジェクトに対し、 (InteractivePage 内の) baseCanvasView が設定されます。
public partial class TangentArcPage : InteractivePage
{
    public TangentArcPage()
    {
        touchPoints = new TouchPoint[3];

        for (int i = 0; i < 3; i++)
        {
            TouchPoint touchPoint = new TouchPoint
            {
                Center = new SKPoint(i == 0 ? 100 : 500,
                                     i != 2 ? 100 : 500)
            };
            touchPoints[i] = touchPoint;
        }

        InitializeComponent();

        baseCanvasView = canvasView;
        radiusSlider.Value = 100;
    }

    void sliderValueChanged(object sender, ValueChangedEventArgs args)
    {
        if (canvasView != null)
        {
            canvasView.InvalidateSurface();
        }
    }
    ...
}
PaintSurface ハンドラーは ArcTo メソッドを使用して、接点と Sliderに基づいて円弧を描画しますが、角度の基になっている円についても、アルゴリズム的な計算を実行します。
public partial class TangentArcPage : InteractivePage
{
    ...
    void OnCanvasViewPaintSurface(object sender, SKPaintSurfaceEventArgs args)
    {
        SKImageInfo info = args.Info;
        SKSurface surface = args.Surface;
        SKCanvas canvas = surface.Canvas;

        canvas.Clear();

        // Draw the two lines that meet at an angle
        using (SKPath path = new SKPath())
        {
            path.MoveTo(touchPoints[0].Center);
            path.LineTo(touchPoints[1].Center);
            path.LineTo(touchPoints[2].Center);
            canvas.DrawPath(path, dottedStrokePaint);
        }

        // Draw the circle that the arc wraps around
        float radius = (float)radiusSlider.Value;

        SKPoint v1 = Normalize(touchPoints[0].Center - touchPoints[1].Center);
        SKPoint v2 = Normalize(touchPoints[2].Center - touchPoints[1].Center);

        double dotProduct = v1.X * v2.X + v1.Y * v2.Y;
        double angleBetween = Math.Acos(dotProduct);
        float hypotenuse = radius / (float)Math.Sin(angleBetween / 2);
        SKPoint vMid = Normalize(new SKPoint((v1.X + v2.X) / 2, (v1.Y + v2.Y) / 2));
        SKPoint center = new SKPoint(touchPoints[1].Center.X + vMid.X * hypotenuse,
                                     touchPoints[1].Center.Y + vMid.Y * hypotenuse);

        canvas.DrawCircle(center.X, center.Y, radius, this.strokePaint);

        // Draw the tangent arc
        using (SKPath path = new SKPath())
        {
            path.MoveTo(touchPoints[0].Center);
            path.ArcTo(touchPoints[1].Center, touchPoints[2].Center, radius);
            canvas.DrawPath(path, redStrokePaint);
        }

        foreach (TouchPoint touchPoint in touchPoints)
        {
            touchPoint.Paint(canvas);
        }
    }

    // Vector methods
    SKPoint Normalize(SKPoint v)
    {
        float magnitude = Magnitude(v);
        return new SKPoint(v.X / magnitude, v.Y / magnitude);
    }

    float Magnitude(SKPoint v)
    {
        return (float)Math.Sqrt(v.X * v.X + v.Y * v.Y);
    }
}
次に、実行中の [Tangent Arc] ページを示します。

正接円弧は、四角形での面取りなど、丸い角を作成するのに最適です。 [Rounded Heptagon] ページでは、SKPath に既に含まれている AddRoundedRect メソッドにより、ArcTo を使用して 7 辺の多角形の角を丸める方法 を示しています。 (このコードは、通常の多角形に対して一般化されています。)
PaintSurface クラスの RoundedHeptagonPage ハンドラーには、7 つの頂点の座標を計算する 1 つの for ループと、これらの頂点から 7 つの辺の中間点を計算する 2 つ目のループが含まれています。 その後、これらの中間点がパスを構築するために使用されます。
void OnCanvasViewPaintSurface(object sender, SKPaintSurfaceEventArgs args)
{
    SKImageInfo info = args.Info;
    SKSurface surface = args.Surface;
    SKCanvas canvas = surface.Canvas;

    canvas.Clear();

    float cornerRadius = 100;
    int numVertices = 7;
    float radius = 0.45f * Math.Min(info.Width, info.Height);

    SKPoint[] vertices = new SKPoint[numVertices];
    SKPoint[] midPoints = new SKPoint[numVertices];

    double vertexAngle = -0.5f * Math.PI;       // straight up

    // Coordinates of the vertices of the polygon
    for (int vertex = 0; vertex < numVertices; vertex++)
    {
        vertices[vertex] = new SKPoint(radius * (float)Math.Cos(vertexAngle),
                                       radius * (float)Math.Sin(vertexAngle));
        vertexAngle += 2 * Math.PI / numVertices;
    }

    // Coordinates of the midpoints of the sides connecting the vertices
    for (int vertex = 0; vertex < numVertices; vertex++)
    {
        int prevVertex = (vertex + numVertices - 1) % numVertices;
        midPoints[vertex] = new SKPoint((vertices[prevVertex].X + vertices[vertex].X) / 2,
                                        (vertices[prevVertex].Y + vertices[vertex].Y) / 2);
    }

    // Create the path
    using (SKPath path = new SKPath())
    {
        // Begin at the first midpoint
        path.MoveTo(midPoints[0]);

        for (int vertex = 0; vertex < numVertices; vertex++)
        {
            SKPoint nextMidPoint = midPoints[(vertex + 1) % numVertices];

            // Draws a line from the current point, and then the arc
            path.ArcTo(vertices[vertex], nextMidPoint, cornerRadius);

            // Connect the arc with the next midpoint
            path.LineTo(nextMidPoint);
        }
        path.Close();

        // Render the path in the center of the screen
        using (SKPaint paint = new SKPaint())
        {
            paint.Style = SKPaintStyle.Stroke;
            paint.Color = SKColors.Blue;
            paint.StrokeWidth = 10;

            canvas.Translate(info.Width / 2, info.Height / 2);
            canvas.DrawPath(path, paint);
        }
    }
}
実行中のプログラムを次に示します。

楕円円弧
楕円円弧は、2 つの SKPoint パラメータを持つ ArcTo メソッドを 呼び出してパスに追加するか、分離した X 座標と Y 座標使用して ArcTo でオーバーロードされます。
public void ArcTo (SKPoint r, Single xAxisRotate, SKPathArcSize largeArc, SKPathDirection sweep, SKPoint xy)

public void ArcTo (Single rx, Single ry, Single xAxisRotate, SKPathArcSize largeArc, SKPathDirection sweep, Single x, Single y)
この楕円円弧は、スケーラブル ベクター グラフィックス (SVG) およびユニバーサル Windows プラットフォームの ArcSegment クラスに含まれる、楕円円弧 と一致 します。
これらの ArcTo メソッドは、輪郭の現在の点である 2 つの点と、ArcTo メソッドの最後のパラメータ (xy パラメータまたは、x および y に分離したパラメータ) の間に円弧を描画します。

ArcTo メソッドへの最初の点のパラメータ (r、rx、ry) は、実は点ではなく、楕円の水平方向と垂直方向の半径を指定するものです。
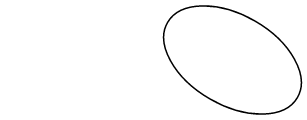
xAxisRotate パラメータは、この楕円を回転させる時計回りの度数を表します。
この傾いた楕円が 2 つの点に接するように配置されている場合、これらの点は 2 つの異なる円弧で接続されます。

この 2 つの円弧は、2 つの見方で区別できます。上の円弧は下の円弧よりも大きく、円弧が左から右に描画される際は、上の円弧が時計回りの方向に描画され、下の円弧が反時計回りの方向に描画されます。
また、別の方法で、この楕円を 2 点間に収めることもできます。

この場合は、上の小さな円弧は時計回りで描画され、下の大きな円弧は反時計回りに描画されます。
以上のように、全部で 4 つの方法により、傾いた楕円によって定義された円弧によって、これら 2 つの点を接続できます。
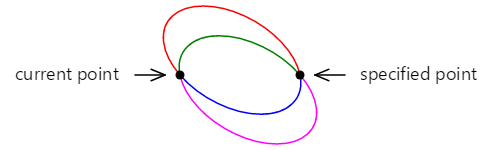
これら 4 つの円弧は、ArcTo メソッドへの SKPathArcSize と SKPathDirection 列挙型引数の 4 つの組み合わせによって区別されます。
- 赤: SKPathArcSize.Large と SKPathDirection.Clockwise
- 緑: SKPathArcSize.Small と SKPathDirection.Clockwise
- 青: SKPathArcSize.Small と SKPathDirection.CounterClockwise
- マゼンタ: SKPathArcSize.Large と SKPathDirection.CounterClockwise
傾いた楕円が 2 つの点の間に合うほど大きくない場合は、十分な大きさになるまで均一に拡大されます。 その場合、2 つの点を接続するのは 2 つの一意の円弧だけです。 これらは SKPathDirection パラメータで区別できます。
初めて接すると、円弧を定義するこのアプローチは複雑に聞こえますが、これが回転楕円で円弧を定義できる唯一のアプローチであり、円弧を輪郭の他の部分と統合する必要がある場合の最も簡単な方法です。
[Elliptical Arc] ページを使用すると、2 つの点と楕円のサイズと回転を対話形式で設定できます。 EllipticalArcPage クラスは InteractivePage から派生されており、EllipticalArcPage.xaml.cs 分離コード ファイル内の PaintSurface ハンドラーによって、これら 4 種類の円弧が描画 されます。
void OnCanvasViewPaintSurface(object sender, SKPaintSurfaceEventArgs args)
{
    SKImageInfo info = args.Info;
    SKSurface surface = args.Surface;
    SKCanvas canvas = surface.Canvas;

    canvas.Clear();

    using (SKPath path = new SKPath())
    {
        int colorIndex = 0;
        SKPoint ellipseSize = new SKPoint((float)xRadiusSlider.Value,
                                          (float)yRadiusSlider.Value);
        float rotation = (float)rotationSlider.Value;

        foreach (SKPathArcSize arcSize in Enum.GetValues(typeof(SKPathArcSize)))
            foreach (SKPathDirection direction in Enum.GetValues(typeof(SKPathDirection)))
            {
                path.MoveTo(touchPoints[0].Center);
                path.ArcTo(ellipseSize, rotation,
                           arcSize, direction,
                           touchPoints[1].Center);

                strokePaint.Color = colors[colorIndex++];
                canvas.DrawPath(path, strokePaint);
                path.Reset();
            }
    }

    foreach (TouchPoint touchPoint in touchPoints)
    {
        touchPoint.Paint(canvas);
    }
}
次は、これを実行しているようすです。

[Arc Infinity] ページでは、 楕円の円弧を使用して無限大記号を描画しています。 この無限大記号は、半径が 100 単位であり、100 単位ごとにで区切られた 2 つの円に基づいています。
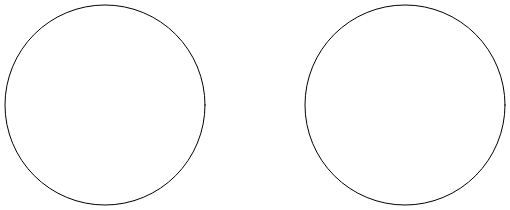
互いに交差する 2 本の線は、これら両方の円に正接しています。

この無限大記号は、これらの円と 2 つの線の部分の組み合わせです。 楕円円弧を使用して無限大記号を描画するには、これら 2 本の線が円に接する座標を決定する必要があります。
円の 1 つの中に、適合する四角形を作成します。
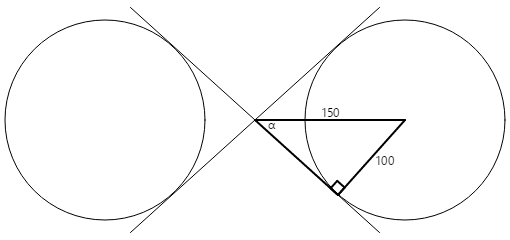
円の半径は 100 単位で、三角形の斜線は 150 単位であるため、α角度はアークサイン (逆正弦) 100 を 150 で割った値、つまり 41.8 度です。 三角形の反対側の長さは、41.8 度の余弦の 150 倍、つまり 112 であり、ピタゴラスの定理によって計算することもできます。
次に、この情報を使用して、接線の座標を算出できます。
x = 112·cos(41.8) = 83
y = 112·sin(41.8) = 75
4 つの接線ポイントのすべてが、円半径が 100 で、点 (0, 0) を中心とする無限大符号を描画するために必要です。

ArcInfinityPage クラス内の PaintSurface ハンドラーは、(0, 0) の点がページの中央になるように無限大記号を配置し、画面サイズに合わせてパスをスケーリングします。
void OnCanvasViewPaintSurface(object sender, SKPaintSurfaceEventArgs args)
{
    SKImageInfo info = args.Info;
    SKSurface surface = args.Surface;
    SKCanvas canvas = surface.Canvas;

    canvas.Clear();

    using (SKPath path = new SKPath())
    {
        path.LineTo(83, 75);
        path.ArcTo(100, 100, 0, SKPathArcSize.Large, SKPathDirection.CounterClockwise, 83, -75);
        path.LineTo(-83, 75);
        path.ArcTo(100, 100, 0, SKPathArcSize.Large, SKPathDirection.Clockwise, -83, -75);
        path.Close();

        // Use path.TightBounds for coordinates without control points
        SKRect pathBounds = path.Bounds;

        canvas.Translate(info.Width / 2, info.Height / 2);
        canvas.Scale(Math.Min(info.Width / pathBounds.Width,
                              info.Height / pathBounds.Height));

        using (SKPaint paint = new SKPaint())
        {
            paint.Style = SKPaintStyle.Stroke;
            paint.Color = SKColors.Blue;
            paint.StrokeWidth = 5;

            canvas.DrawPath(path, paint);
        }
    }
}
このコードでは、SKPath の Bounds プロパティ を使用して無限サインの大きさを決定し、キャンバスのサイズにスケーリングしています。

この結果は少し小さいように感じられます。これは、SKPath の Bounds プロパティが、パスよりも大きなサイズを表していることを示唆しています。
Skia は内部的に、複数の 2 次ベジエ曲線を使用して円弧を近似します。 これらの (次のセクションで示される) 曲線には、曲線の描画方法を制御するコントロール ポイントが含まれていますが、これらはレンダリングされた曲線の一部ではありません。 Bounds プロパティが、これらのコントロール ポイントを含んでいます。
より厳密に適合させるには、TightBounds プロパティを使用し、コントロール ポイントを除外します。 次に、横モードで実行され、TightBounds プロパティを使用してパスの境界を取得するプログラムを示します。

円弧と直線の間の接続は数学的に滑らかですが、円弧から直線への変化が少し急に見えることがあります。 「3 種類のベジエ曲線」での次の記事では、より優れた無限大記号を紹介しています。