사용자 지정 스타일과 함께 Azure Maps Indoor Maps 모듈 사용(미리 보기)
Azure Maps Web SDK에는 Indoor Maps 모듈이 포함되어 있어 Azure Maps Creator 서비스에서 만든 실내 맵을 렌더링할 수 있습니다.
Azure Maps Creator를 사용하여 실내 맵을 만들 때 기본 스타일이 적용됩니다. 이제 Azure Maps Creator는 Style Rest API 또는 시각적 스타일 편집기를 사용하여 실내 맵의 다양한 요소 스타일 사용자 지정도 지원합니다.
필수 조건
- Azure Maps 계정
- Azure Maps Creator 리소스
- 구독 키
- 맵 구성 별칭 또는 ID. 자세한 내용은 맵 구성 API를 참조하세요.
팁
Azure Maps Creator를 사용하여 실내 맵을 만든 적이 없는 경우 Creator를 사용하여 실내 지도 만들기 자습서가 유용할 수 있습니다.
Azure Maps Indoor Maps 모듈을 통해 사용자 지정 스타일로 실내 맵을 렌더링하려면 맵 구성 alias(또는 mapConfigurationId)가 필요합니다.
Indoor Maps 모듈 포함
두 가지 방법 중 하나로 Azure Maps Indoor 모듈을 설치하고 포함할 수 있습니다.
전역적으로 호스팅되는 Azure Content Delivery Network 버전의 Azure Maps Indoor 모듈을 사용하려면, HTML 파일의 <head> 요소에 다음 script 및 stylesheet를 참조합니다.
<link rel="stylesheet" href="https://atlas.microsoft.com/sdk/javascript/indoor/0.2/atlas-indoor.min.css" type="text/css"/>
<script src="https://atlas.microsoft.com/sdk/javascript/indoor/0.2/atlas-indoor.min.js"></script>
또는 Azure Maps Indoor 모듈을 다운로드할 수 있습니다. Azure Maps Indoor 모듈은 Azure Maps 서비스에 액세스하기 위한 클라이언트 라이브러리를 포함합니다. 다음 단계에서는 Indoor 모듈을 설치하고 웹 애플리케이션에 로드하는 방법을 보여 줍니다.
최신 azure-maps-indoor 패키지를 설치합니다.
>npm install azure-maps-indoor원본 파일에서 Azure Maps Indoor 모듈 JavaScript를 가져옵니다.
import * as indoor from "azure-maps-indoor";또한 다양한 컨트롤이 올바르게 표시되도록 CSS 스타일시트를 포함해야 합니다. JavaScript 번들러를 사용하여 종속성을 번들로 묶고 코드를 패키지하는 경우 수행 방법에 대해 번들러 설명서를 참조하세요. Webpack의 경우 이 작업은 일반적으로 style-loader에서 사용할 수 있는 설명서와
style-loader및css-loader조합을 통해 수행됩니다.시작하려면 style-loader 및 css-loader를 설치합니다.
npm install --save-dev style-loader css-loader원본 파일 내에서 atlas-indoor.min.css를 가져옵니다.
import "azure-maps-indoor/dist/atlas-indoor.min.css";그런 다음, Webpack 구성의 모듈 규칙 부분에 로더를 추가합니다.
module.exports = {
  module: {
    rules: [
      {
        test: /\.css$/i,
        use: ["style-loader", "css-loader"]
      }
    ]
  }
};
자세한 내용은 Azure Maps 맵 컨트롤 npm 패키지를 사용하는 방법을 참조하세요.
도메인 설정 및 Map 개체 인스턴스화
Creator 리소스의 위치와 일치하는 접두사(US 또는 EU)로 맵 도메인을 설정합니다. 예를 들면 다음과 같습니다.
atlas.setDomain('us.atlas.microsoft.com');
자세한 내용은 Azure Maps 서비스 지리적 범위를 참조하세요.
다음으로, 맵 구성의 alias 또는 mapConfigurationId 속성으로 설정된 맵 구성 개체로 맵 개체를 인스턴스화한 다음 styleAPIVersion을 2023-03-01-preview로 설정합니다.
Map 개체는 다음 단계에서 Indoor Manager 개체를 인스턴스화하는 데 사용됩니다. 다음 코드는 mapConfiguration, styleAPIVersion 및 맵 도메인 집합으로 맵 개체를 인스턴스화하는 방법을 보여 줍니다.
const subscriptionKey = "<Your Azure Maps Subscription Key>";
const region = "<Your Creator resource region: us or eu>"
const mapConfiguration = "<map configuration alias or ID>"
atlas.setDomain(`${region}.atlas.microsoft.com`);

const map = new atlas.Map("map-id", {
  //use your facility's location
  center: [-122.13315, 47.63637],
  //or, you can use bounds: [# west, # south, # east, # north] and replace # with your Map bounds
  authOptions: {
      authType: 'subscriptionKey',
      subscriptionKey: subscriptionKey
  },
  zoom: 19,

  mapConfiguration: mapConfiguration,
  styleAPIVersion: '2023-03-01-preview'
});
Indoor Manager 인스턴스화
타일의 실내 맵 스타일을 로드하려면 실내 관리자를 인스턴스화해야 합니다. 맵 개체를 제공하여 Indoor 관리자를 인스턴스화합니다. 동적 맵 스타일 지정을 지원하려면 statesetId를 전달해야 합니다. statesetId 변수 이름은 대/소문자를 구분합니다. 코드는 다음 JavaScript 코드 조각과 비슷합니다.
const statesetId = "<statesetId>";

const indoorManager = new atlas.indoor.IndoorManager(map, {
  statesetId: statesetId // Optional
});
제공한 상태 데이터의 폴링이 가능하도록 설정하려면 statesetId를 제공하고 indoorManager.setDynamicStyling(true)을 호출해야 합니다. 폴링 상태 데이터를 사용하면 state 또는 동적 속성의 상태를 동적으로 업데이트할 수 있습니다. 예를 들어 room과 같은 기능에는 occupancy라는 동적 속성(상태)이 있을 수 있습니다. 애플리케이션은 시각 맵 내부의 변화를 반영하기 위해 state 변경 사항이 있는지 폴링할 수 있습니다. 다음 코드에서는 상태 폴링을 사용하도록 설정하는 방법을 보여 줍니다.
const statesetId = "<statesetId>";

const indoorManager = new atlas.indoor.IndoorManager(map, {
  statesetId: statesetId // Optional
});

if (statesetId.length > 0) {
    indoorManager.setDynamicStyling(true);
}
실내 수준 선택기 컨트롤
Indoor Level Picker 컨트롤을 사용하여 렌더링된 맵의 수준을 변경할 수 있습니다. 필요에 따라 Indoor Manager를 통해 Indoor Level Picker 컨트롤을 초기화할 수 있습니다. Level Control Picker를 초기화하는 코드는 다음과 같습니다.
const levelControl = new atlas.control.LevelControl({ position: "top-right" });
indoorManager.setOptions({ levelControl });
Indoor 이벤트
Azure Maps Indoor 모듈은 Map 개체 이벤트를 지원합니다. Map 개체 이벤트 수신기는 수준이나 설비가 변경되면 호출됩니다. 수준이나 설비가 변경되었을 때 코드를 실행하려면 수신기 내부에 코드를 배치합니다. 아래 코드는 Map 개체에 이벤트 수신기를 추가하는 방법을 보여줍니다.
map.events.add("levelchanged", indoorManager, (eventData) => {

  //code that you want to run after a level has been changed
  console.log("The level has changed: ", eventData);
});

map.events.add("facilitychanged", indoorManager, (eventData) => {

  //code that you want to run after a facility has been changed
  console.log("The facility has changed: ", eventData);
});
eventData 변수는 각각 levelchanged 또는 facilitychanged 이벤트를 호출한 수준이나 설비에 대한 정보를 포함합니다. 수준이 변경되면 eventData 개체에 facilityId, 새 levelNumber 및 기타 메타데이터가 포함됩니다. 설비가 변경되면 eventData 개체에 새 facilityId, 새 levelNumber 및 기타 메타데이터가 포함됩니다.
예: 사용자 지정 스타일 지정: WebSDK에서 맵 구성 사용(미리 보기)
Azure Maps Creator를 사용하여 실내 맵을 만들 때 기본 스타일이 적용됩니다. Azure Maps Creator는 이제 실내 스타일 사용자 지정도 지원합니다. 자세한 내용은 실내 맵용 사용자 지정 스타일 만들기를 참조하세요. Creator는 시각적 스타일 편집기도 제공합니다.
실내 맵용 사용자 지정 스타일 만들기 방법 문서를 따라 사용자 지정 스타일을 만듭니다. 변경 내용을 저장한 후 맵 구성 별칭을 기록해 둡니다.
Azure Content Delivery Network 옵션을 사용하여 Azure Maps Indoor 모듈을 설치합니다.
새 HTML 파일 만들기
HTML 헤더에서 Azure Maps Indoor 모듈 JavaScript 및 스타일시트를 참조합니다.
Creator 리소스의 위치와 일치하는 접두사로 맵 도메인을 설정합니다. Creator 리소스가 미국 지역에서 만들어진 경우
atlas.setDomain('us.atlas.microsoft.com');, Creator 리소스가 EU 지역에서 만들어진 경우atlas.setDomain('eu.atlas.microsoft.com');입니다.Map 개체를 초기화합니다. Map 개체는 다음과 같은 옵션을 지원합니다.
Subscription key는 Azure Maps 구독 키입니다.center는 실내 맵 가운데 위치의 위도와 경도를 정의합니다.bounds값을 제공하지 않으려면center값을 제공합니다. 형식은center: [-122.13315, 47.63637]과 같이 표시되어야 합니다.bounds는 타일 세트 맵 데이터가 포함된 가장 작은 직사각형 모양입니다.center값을 설정하지 않으려면bounds값을 설정합니다. Tileset List API를 호출하여 맵 경계를 찾을 수 있습니다. Tileset List API는bbox를 반환하며, 이것을 파싱하여bounds에 할당할 수 있습니다.bounds[# west, # south, # east, # north]와 같은 형식으로 표시하여야 합니다.mapConfiguration맵에 표시하려는 사용자 지정 스타일을 정의하는 맵 구성의 ID 또는 별칭은 1단계의 맵 구성 ID 또는 별칭을 사용합니다.style을 사용하면 표시되는 맵 구성에서 초기 스타일을 설정할 수 있습니다. 설정하지 않으면 맵 구성의 기본 구성과 일치하는 스타일이 사용됩니다.zoom을 사용하면 맵의 최소 및 최대 확대/축소 수준을 지정할 수 있습니다.styleAPIVersion: '2023-03-01-preview'를 전달합니다(사용자 지정 스타일이 공개 미리 보기 상태인 동안 필요함).
그런 다음 Indoor 관리자 옵션의 일부로 인스턴스화된 Indoor 수준 선택 컨트롤이 있는 Indoor 관리자 모듈을 만들고 선택적으로
statesetId옵션을 설정합니다.Map 개체 이벤트 수신기를 추가합니다.
팁
맵 구성은 mapConfigurationId 또는 alias를 사용하여 참조됩니다. 맵 구성을 편집하거나 변경할 때마다 ID는 변경되지만 별칭은 동일하게 유지됩니다. 애플리케이션에서 별칭으로 맵 구성을 참조하는 것이 좋습니다. 자세한 내용은 개념 문서의 맵 구성을 참조하세요.
이제 파일은 다음 HTML과 비슷하게 표시됩니다.
<!DOCTYPE html>
<html lang="en">
  <head>
    <meta charset="utf-8" />
    <meta name="viewport" content="width=device-width, user-scalable=no" />
    <title>Indoor Maps App</title>

    <link rel="stylesheet" href="https://atlas.microsoft.com/sdk/javascript/mapcontrol/3/atlas.min.css" type="text/css" />
    <link rel="stylesheet" href="https://atlas.microsoft.com/sdk/javascript/indoor/0.2/atlas-indoor.min.css" type="text/css"/>

    <script src="https://atlas.microsoft.com/sdk/javascript/mapcontrol/3/atlas.min.js"></script>
    <script src="https://atlas.microsoft.com/sdk/javascript/indoor/0.2/atlas-indoor.min.js"></script>

    <style>
      html,
      body {
        width: 100%;
        height: 100%;
        padding: 0;
        margin: 0;
      }

      #map-id {
        width: 100%;
        height: 100%;
      }
    </style>
  </head>

  <body>
    <div id="map-id"></div>
    <script>
      const subscriptionKey = "<Your Azure Maps Subscription Key>";
      const mapConfig = "<Your map configuration id or alias>";
      const statesetId = "<Your statesetId>";
      const region = "<Your Creator resource region: us or eu>"
      atlas.setDomain(`${region}.atlas.microsoft.com`);

      const map = new atlas.Map("map-id", {
        //use your facility's location
        center: [-122.13315, 47.63637],
        //or, you can use bounds: [# west, # south, # east, # north] and replace # with your Map bounds
        authOptions: {
            authType: 'subscriptionKey',
            subscriptionKey: subscriptionKey
        },
        zoom: 19,

        mapConfiguration: mapConfig,
        styleAPIVersion: '2023-03-01-preview'
      });

      const levelControl = new atlas.control.LevelControl({
        position: "top-right",
      });

      const indoorManager = new atlas.indoor.IndoorManager(map, {
        levelControl: levelControl, //level picker
        statesetId: statesetId // Optional
      });

      if (statesetId.length > 0) {
        indoorManager.setDynamicStyling(true);
      }

      map.events.add("levelchanged", indoorManager, (eventData) => {
        //put code that runs after a level has been changed
        console.log("The level has changed:", eventData);
      });

      map.events.add("facilitychanged", indoorManager, (eventData) => {
        //put code that runs after a facility has been changed
        console.log("The facility has changed:", eventData);
      });
    </script>
  </body>
</html>
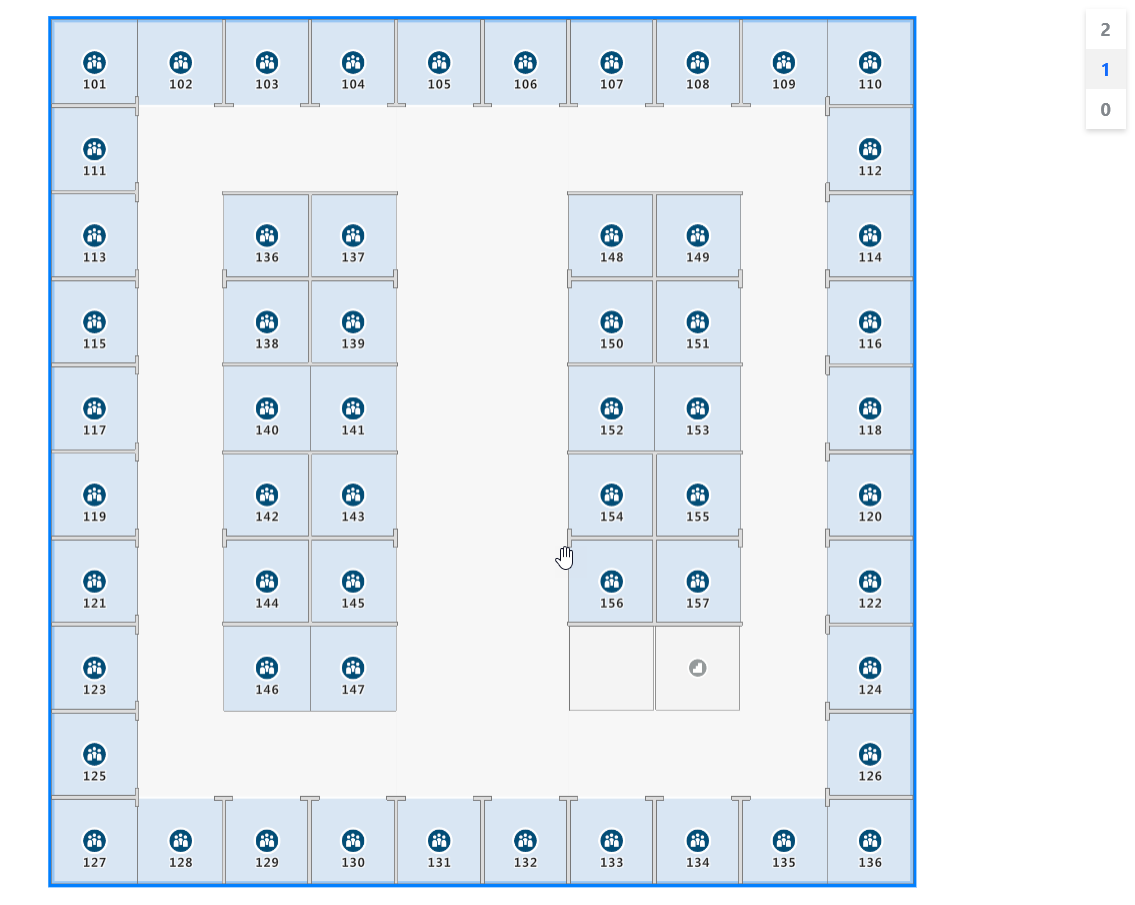
실내 맵을 보려면 웹 브라우저에 로드합니다. 다음 이미지와 비슷하게 표시됩니다. 계단 공간을 선택하면 수준 선택기가 오른쪽 위 모서리에 나타납니다.
사용 가능한 소스 코드가 있는 실내 맵의 라이브 데모는 [Azure Maps 샘플]의 Creator Indoor Maps를 참조하세요.
다음 단계
Azure Maps Indoor 모듈과 관련된 API에 대해 알아봅니다.
맵에 데이터를 더 추가하는 방법을 알아봅니다.