기계 학습 파이프라인 게시 및 추적
적용 대상: Python SDK azureml v1
이 문서에서는 동료 또는 고객과 기계 학습 파이프라인을 공유하는 방법을 보여 줍니다.
기계 학습 파이프라인은 기계 학습 작업에 재사용 가능한 워크플로입니다. 파이프라인의 이점 중 하나는 협업입니다. 또한 새 버전을 만드는 동안 고객이 현재 모델을 사용할 수 있도록 파이프라인의 버전을 관리할 수 있습니다.
필수 조건
모든 파이프라인 리소스를 수용할 Azure Machine Learning 작업 영역을 만듭니다.
Azure Machine Learning SDK를 설치하거나 SDK가 이미 설치된 Azure Machine Learning 컴퓨팅 인스턴스를 사용하도록 개발 환경을 구성합니다.
자습서: 일괄 처리 채점용 Azure Machine Learning 파이프라인 빌드에 따라 기계 학습 파이프라인을 만들고 실행합니다. 다른 옵션은 Azure Machine Learning SDK를 사용하여 기계 학습 파이프라인 만들기 및 실행을 참조하세요.
파이프라인 게시
파이프라인을 실행한 후에는 다른 입력으로 실행되도록 파이프라인을 게시할 수 있습니다. 매개 변수를 허용하는 이미 게시된 파이프라인의 REST 엔드포인트의 경우에는 다른 인수에 PipelineParameter 개체를 사용하도록 파이프라인을 구성해야 합니다.
파이프라인 매개 변수를 만들려면 기본값으로 PipelineParameter 개체를 사용합니다.
from azureml.pipeline.core.graph import PipelineParameter

pipeline_param = PipelineParameter(
  name="pipeline_arg",
  default_value=10)
다음과 같이 이
PipelineParameter개체를 파이프라인의 단계에 대한 매개 변수로 추가합니다.compareStep = PythonScriptStep( script_name="compare.py", arguments=["--comp_data1", comp_data1, "--comp_data2", comp_data2, "--output_data", out_data3, "--param1", pipeline_param], inputs=[ comp_data1, comp_data2], outputs=[out_data3], compute_target=compute_target, source_directory=project_folder)이 파이프라인을 게시하면 호출 시 매개 변수를 허용합니다.
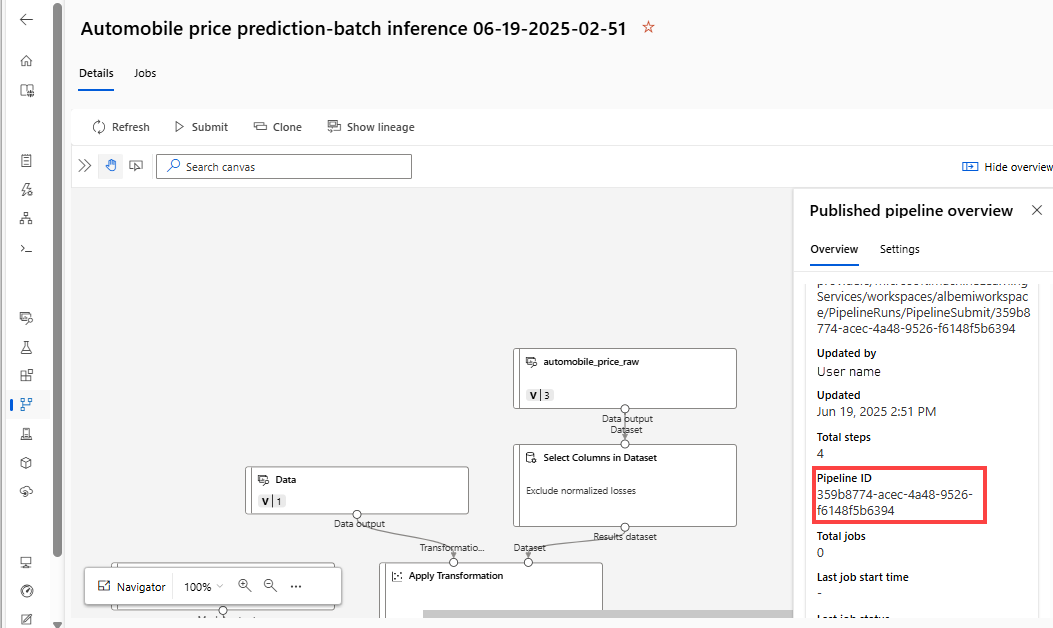
published_pipeline1 = pipeline_run1.publish_pipeline(
     name="My_Published_Pipeline",
     description="My Published Pipeline Description",
     version="1.0")
파이프라인을 게시한 후 UI에서 확인할 수 있습니다. 파이프라인 ID는 게시된 파이프라인의 고유 식별입니다.

게시된 파이프라인 실행
게시된 모든 파이프라인에는 REST 엔드포인트가 있습니다. 파이프라인 엔드포인트를 사용하면 Python이 아닌 클라이언트를 비롯한 모든 외부 시스템에서 파이프라인 실행을 트리거할 수 있습니다. 이 엔드포인트는 일괄 처리 채점 및 다시 학습 시나리오에서 “관리되는 반복 가능성”을 지원합니다.
Important
Azure RBAC(역할 기반 액세스 제어)를 사용하여 파이프라인에 대한 액세스를 관리하는 경우 파이프라인 시나리오(학습 또는 채점)에 대한 사용 권한을 설정합니다.
이전 파이프라인의 실행을 호출하려면 Microsoft Entra 인증 헤더 토큰이 필요합니다. 토큰을 가져오는 방법은 AzureCliAuthentication 클래스 참조 및 Azure Machine Learning에서의 인증 Notebook에 설명되어 있습니다.
from azureml.pipeline.core import PublishedPipeline
import requests

response = requests.post(published_pipeline1.endpoint,
                         headers=aad_token,
                         json={"ExperimentName": "My_Pipeline",
                               "ParameterAssignments": {"pipeline_arg": 20}})
POST 요청에 대한 json 인수에는 ParameterAssignments 키의 경우 파이프라인 매개 변수 및 해당 값이 포함된 사전이 있어야 합니다. 또한 json 인수에는 다음 키가 포함될 수 있습니다.
| 키 | 설명 |
|---|---|
ExperimentName |
이 엔드포인트와 연동된 실험의 이름 |
Description |
엔드포인트를 설명하는 자유 형식 텍스트 |
Tags |
요청에 레이블을 지정하고 주석을 추가하는 데 사용할 수 있는 자유 형식의 키-값 쌍 |
DataSetDefinitionValueAssignments |
재학습 없이 데이터 세트를 변경하는 데 사용되는 사전(아래 설명 참조) |
DataPathAssignments |
재학습 없이 데이터 경로를 변경하는 데 사용되는 사전(아래 설명 참조) |
C#을 사용하여 게시된 파이프라인 실행
다음 코드에서는 C#에서 비동기적으로 파이프라인을 호출하는 방법을 보여 줍니다. 부분 코드 조각은 호출 구조만 보여 주며 Microsoft 샘플의 일부가 아닙니다. 전체 클래스나 오류 처리는 표시되지 않습니다.
[DataContract]
public class SubmitPipelineRunRequest
{
    [DataMember]
    public string ExperimentName { get; set; }

    [DataMember]
    public string Description { get; set; }

    [DataMember(IsRequired = false)]
    public IDictionary<string, string> ParameterAssignments { get; set; }
}

// ... in its own class and method ...
const string RestEndpoint = "your-pipeline-endpoint";

using (HttpClient client = new HttpClient())
{
    var submitPipelineRunRequest = new SubmitPipelineRunRequest()
    {
        ExperimentName = "YourExperimentName",
        Description = "Asynchronous C# REST api call",
        ParameterAssignments = new Dictionary<string, string>
        {
            {
                // Replace with your pipeline parameter keys and values
                "your-pipeline-parameter", "default-value"
            }
        }
    };

    string auth_key = "your-auth-key";
    client.DefaultRequestHeaders.Authorization = new AuthenticationHeaderValue("Bearer", auth_key);

    // submit the job
    var requestPayload = JsonConvert.SerializeObject(submitPipelineRunRequest);
    var httpContent = new StringContent(requestPayload, Encoding.UTF8, "application/json");
    var submitResponse = await client.PostAsync(RestEndpoint, httpContent).ConfigureAwait(false);
    if (!submitResponse.IsSuccessStatusCode)
    {
        await WriteFailedResponse(submitResponse); // ... method not shown ...
        return;
    }

    var result = await submitResponse.Content.ReadAsStringAsync().ConfigureAwait(false);
    var obj = JObject.Parse(result);
    // ... use `obj` dictionary to access results
}
Java를 사용하여 게시된 파이프라인 실행
다음 코드에서는 인증을 요구하는 파이프라인에 대한 호출을 보여 줍니다(Azure Machine Learning 리소스 및 워크플로에 대한 인증 설정 참조). 파이프라인을 공개적으로 배포하는 경우 authKey를 생성하는 호출이 필요하지 않습니다. 부분 코드 조각은 Java 클래스 및 예외 처리 상용구를 표시하지 않습니다. 이 코드는 빈 Optional을 반환할 수 있는 연결 함수로 Optional.flatMap을 사용합니다. flatMap을 사용하면 코드를 단축하고 명확하게 할 수 있지만 getRequestBody()는 예외를 무효화합니다.
import java.net.URI;
import java.net.http.HttpClient;
import java.net.http.HttpRequest;
import java.net.http.HttpResponse;
import java.util.Optional;
// JSON library
import com.google.gson.Gson;

String scoringUri = "scoring-endpoint";
String tenantId = "your-tenant-id";
String clientId = "your-client-id";
String clientSecret = "your-client-secret";
String resourceManagerUrl = "https://management.azure.com";
String dataToBeScored = "{ \"ExperimentName\" : \"My_Pipeline\", \"ParameterAssignments\" : { \"pipeline_arg\" : \"20\" }}";

HttpClient client = HttpClient.newBuilder().build();
Gson gson = new Gson();

HttpRequest tokenAuthenticationRequest = tokenAuthenticationRequest(tenantId, clientId, clientSecret, resourceManagerUrl);
Optional<String> authBody = getRequestBody(client, tokenAuthenticationRequest);
Optional<String> authKey = authBody.flatMap(body -> Optional.of(gson.fromJson(body, AuthenticationBody.class).access_token);;
Optional<HttpRequest> scoringRequest = authKey.flatMap(key -> Optional.of(scoringRequest(key, scoringUri, dataToBeScored)));
Optional<String> scoringResult = scoringRequest.flatMap(req -> getRequestBody(client, req));
// ... etc (`scoringResult.orElse()`) ...

static HttpRequest tokenAuthenticationRequest(String tenantId, String clientId, String clientSecret, String resourceManagerUrl)
{
    String authUrl = String.format("https://login.microsoftonline.com/%s/oauth2/token", tenantId);
    String clientIdParam = String.format("client_id=%s", clientId);
    String resourceParam = String.format("resource=%s", resourceManagerUrl);
    String clientSecretParam = String.format("client_secret=%s", clientSecret);

    String bodyString = String.format("grant_type=client_credentials&%s&%s&%s", clientIdParam, resourceParam, clientSecretParam);

    HttpRequest request = HttpRequest.newBuilder()
        .uri(URI.create(authUrl))
        .POST(HttpRequest.BodyPublishers.ofString(bodyString))
        .build();
    return request;
}

static HttpRequest scoringRequest(String authKey, String scoringUri, String dataToBeScored)
{
    HttpRequest request = HttpRequest.newBuilder()
        .uri(URI.create(scoringUri))
        .header("Authorization", String.format("Token %s", authKey))
        .POST(HttpRequest.BodyPublishers.ofString(dataToBeScored))
        .build();
    return request;

}

static Optional<String> getRequestBody(HttpClient client, HttpRequest request) {
    try {
        HttpResponse<String> response = client.send(request, HttpResponse.BodyHandlers.ofString());
        if (response.statusCode() != 200) {
            System.out.println(String.format("Unexpected server response %d", response.statusCode()));
            return Optional.empty();
        }
        return Optional.of(response.body());
    }catch(Exception x)
    {
        System.out.println(x.toString());
        return Optional.empty();
    }
}

class AuthenticationBody {
    String access_token;
    String token_type;
    int expires_in;
    String scope;
    String refresh_token;
    String id_token;

    AuthenticationBody() {}
}
재학습 없이 데이터 세트 및 데이터 경로 변경
다른 데이터 세트 및 데이터 경로를 기반으로 학습하고 유추하는 것이 좋은 경우도 있습니다. 예를 들어 학습은 더 작은 데이터 세트를 대상으로 하고 유추는 전체 데이터 세트를 대상으로 하는 것이 좋을 수도 있습니다. 요청의 json 인수에 DataSetDefinitionValueAssignments 키를 사용하여 데이터 세트를 전환합니다. DataPathAssignments를 사용하여 데이터 경로를 전환합니다. 두 방법은 비슷합니다.
파이프라인 정의 스크립트에서 데이터 세트를 위한
PipelineParameter를 만듭니다.PipelineParameter에서DatasetConsumptionConfig또는DataPath를 만듭니다.tabular_dataset = Dataset.Tabular.from_delimited_files('https://dprepdata.blob.core.windows.net/demo/Titanic.csv') tabular_pipeline_param = PipelineParameter(name="tabular_ds_param", default_value=tabular_dataset) tabular_ds_consumption = DatasetConsumptionConfig("tabular_dataset", tabular_pipeline_param)ML 스크립트에서
Run.get_context().input_datasets를 사용하여 동적으로 지정된 데이터 세트에 액세스합니다.from azureml.core import Run input_tabular_ds = Run.get_context().input_datasets['tabular_dataset'] dataframe = input_tabular_ds.to_pandas_dataframe() # ... etc ...ML 스크립트는
PipelineParameter(tabular_ds_param)가 아닌DatasetConsumptionConfig(tabular_dataset)에 지정된 값에 액세스합니다.파이프라인 정의 스크립트에서
PipelineScriptStep에 대한 매개 변수로DatasetConsumptionConfig를 설정합니다.train_step = PythonScriptStep( name="train_step", script_name="train_with_dataset.py", arguments=["--param1", tabular_ds_consumption], inputs=[tabular_ds_consumption], compute_target=compute_target, source_directory=source_directory) pipeline = Pipeline(workspace=ws, steps=[train_step])추론 REST 호출에서 데이터 세트를 동적으로 전환하려면
DataSetDefinitionValueAssignments를 사용합니다.tabular_ds1 = Dataset.Tabular.from_delimited_files('path_to_training_dataset') tabular_ds2 = Dataset.Tabular.from_delimited_files('path_to_inference_dataset') ds1_id = tabular_ds1.id d22_id = tabular_ds2.id response = requests.post(rest_endpoint, headers=aad_token, json={ "ExperimentName": "MyRestPipeline", "DataSetDefinitionValueAssignments": { "tabular_ds_param": { "SavedDataSetReference": {"Id": ds1_id #or ds2_id }}}})
Showcasing Dataset and PipelineParameter(Dataset 및 PipelineParameter 표시) 및 Showcasing DataPath and PipelineParameter(DataPath 및 PipelineParameter 표시) Notebook에는 이 방법의 예제 전체가 수록되어 있습니다.
버전이 지정된 파이프라인 엔드포인트 만들기
배후에 게시된 파이프라인이 여러 개 있는 파이프라인 엔드포인트를 만들 수 있습니다. 이 방법은 ML 파이프라인을 반복하고 업데이트할 때 고정된 REST 엔드포인트를 제공합니다.
from azureml.pipeline.core import PipelineEndpoint

published_pipeline = PublishedPipeline.get(workspace=ws, id="My_Published_Pipeline_id")
pipeline_endpoint = PipelineEndpoint.publish(workspace=ws, name="PipelineEndpointTest",
                                            pipeline=published_pipeline, description="Test description Notebook")
파이프라인 엔드포인트에 작업 제출
파이프라인 엔드포인트의 기본 버전에 작업을 제출할 수 있습니다.
pipeline_endpoint_by_name = PipelineEndpoint.get(workspace=ws, name="PipelineEndpointTest")
run_id = pipeline_endpoint_by_name.submit("PipelineEndpointExperiment")
print(run_id)
특정 버전으로 작업을 제출할 수도 있습니다.
run_id = pipeline_endpoint_by_name.submit("PipelineEndpointExperiment", pipeline_version="0")
print(run_id)
REST API를 사용하여 동일한 작업을 수행할 수 있습니다.
rest_endpoint = pipeline_endpoint_by_name.endpoint
response = requests.post(rest_endpoint,
                         headers=aad_token,
                         json={"ExperimentName": "PipelineEndpointExperiment",
                               "RunSource": "API",
                               "ParameterAssignments": {"1": "united", "2":"city"}})
스튜디오에서 게시된 파이프라인 사용
스튜디오에서 게시된 파이프라인을 실행할 수도 있습니다.
Azure Machine Learning Studio에 로그인합니다.
작업 영역을 확인합니다.
왼쪽에서 엔드포인트를 선택합니다.
위쪽에서 파이프라인 엔드포인트를 선택합니다.
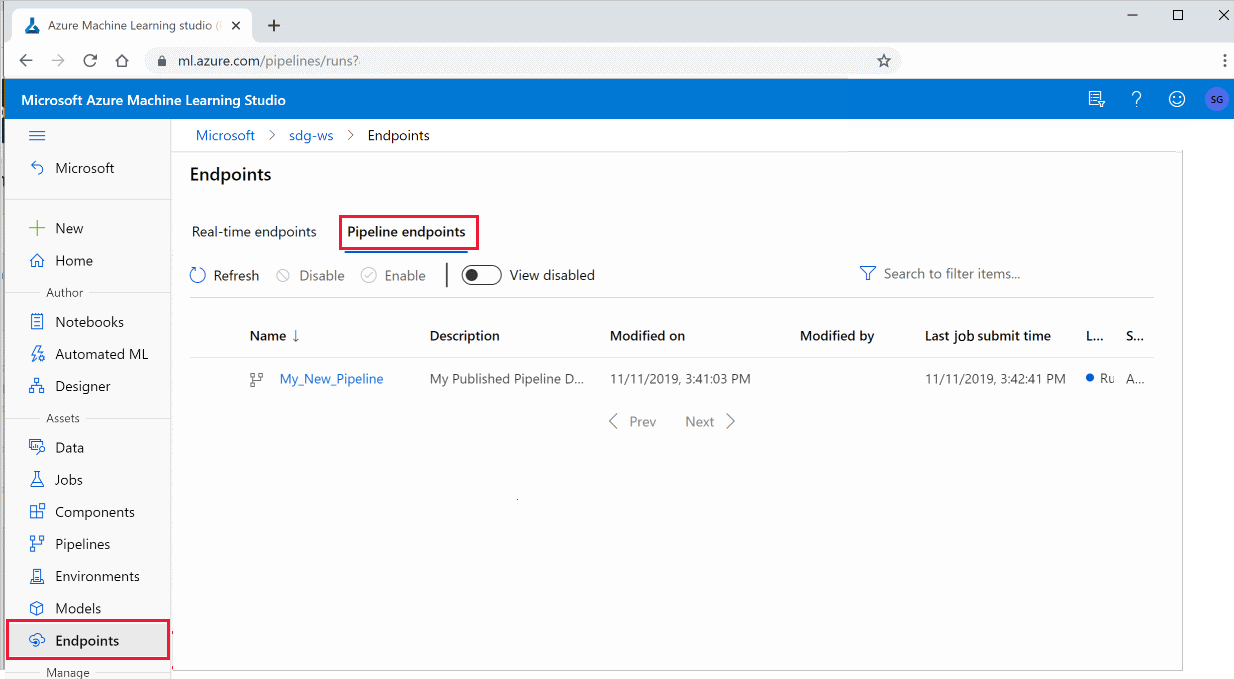
파이프라인 엔드포인트의 이전 실행 결과를 실행, 사용 또는 검토하려면 특정 파이프라인을 선택합니다.
게시된 파이프라인 사용 안 함
게시된 파이프라인 목록에서 파이프라인을 숨기려면 스튜디오 또는 SDK에서 파이프라인을 사용하지 않도록 설정합니다.
# Get the pipeline by using its ID from Azure Machine Learning studio
p = PublishedPipeline.get(ws, id="068f4885-7088-424b-8ce2-eeb9ba5381a6")
p.disable()
p.enable()을 사용하면 이를 다시 사용하도록 설정할 수 있습니다. 자세한 내용은 PublishedPipeline 클래스 참조를 확인하세요.
다음 단계
- GitHub의 Jupyter 노트북을 사용하여 기계 학습 파이프라인을 추가로 살펴봅니다.
- azureml-pipelines-core 패키지 및 azureml-pipelines-steps 패키지에 대한 SDK 참조 도움말을 확인하세요.
- 파이프라인 디버깅 및 문제 해결에 대한 팁은 방법을 참조하세요.