빠른 시작: Azure PowerShell을 사용하여 Private Link 서비스 만들기
서비스를 참조하는 Private Link 서비스 만들기를 시작합니다. Azure 표준 Load Balancer 배후에 배포된 서비스 또는 리소스에 대한 Private Link 액세스를 제공합니다. 서비스 사용자는 가상 네트워크에서 비공개로 액세스할 수 있습니다.
필수 조건
활성 구독이 있는 Azure 계정. 체험 계정을 만듭니다.
Azure Cloud Shell 또는 Azure PowerShell.
이 빠른 시작의 단계에서는 Azure Cloud Shell에서 대화형으로 Azure PowerShell cmdlet을 실행합니다. Cloud Shell에서 명령을 실행하려면 코드 블록의 오른쪽 위 모서리에서 Cloudshell 열기를 선택합니다. 복사를 선택하여 코드를 복사한 다음, 복사한 코드를 Cloud Shell에 붙여넣어 실행합니다. Azure Portal 내에서 Cloud Shell을 실행할 수도 있습니다.
Azure PowerShell을 로컬에 설치하여 cmdlet을 실행할 수도 있습니다. 이 문서에서 설명할 단계를 실행하기 위해서는 Azure PowerShell 모듈 버전 5.4.1 또는 그 이후 버전이 필요합니다. 설치되어 있는 버전을 확인하려면
Get-Module -ListAvailable Az을 실행합니다. 업그레이드가 필요한 경우 Azure PowerShell 모듈 업데이트를 참조하세요.PowerShell을 로컬에서 실행하는 경우
Connect-AzAccount를 실행하여 Azure에 연결합니다.
리소스 그룹 만들기
Azure 리소스 그룹은 Azure 리소스가 배포 및 관리되는 논리적 컨테이너입니다.
New-AzResourceGroup을 사용하여 다음 리소스 그룹을 만듭니다.
New-AzResourceGroup -Name 'test-rg' -Location 'eastus2'
내부 부하 분산 장치 만들기
이 섹션에서는 가상 네트워크 및 내부 Azure Load Balancer를 만듭니다.
가상 네트워크
이 섹션에서는 Private Link 서비스에 액세스하는 부하 분산 장치를 호스팅할 가상 네트워크와 서브넷을 만듭니다.
- New-AzVirtualNetwork를 사용하여 가상 네트워크를 만듭니다.
## Create backend subnet config ##
$subnet = @{
    Name = 'subnet-1'
    AddressPrefix = '10.0.0.0/24'
}
$subnetConfig = New-AzVirtualNetworkSubnetConfig @subnet

## Create the virtual network ##
$net = @{
    Name = 'vnet-1'
    ResourceGroupName = 'test-rg'
    Location = 'eastus2'
    AddressPrefix = '10.0.0.0/16'
    Subnet = $subnetConfig
}
$vnet = New-AzVirtualNetwork @net
표준 부하 분산 장치 만들기
이 섹션에서는 다음과 같은 부하 분산 장치 구성 요소를 만들고 구성하는 방법에 대해 자세히 설명합니다.
프런트 엔드 IP 풀에 대해 New-AzLoadBalancerFrontendIpConfig를 사용하여 프런트 엔드 IP를 만듭니다. 이 IP는 부하 분산 장치에서 들어오는 트래픽을 수신합니다.
부하 분산 장치의 프런트 엔드에서 보낸 트래픽에 대해 New-AzLoadBalancerBackendAddressPoolConfig를 사용하여 백 엔드 주소 풀을 만듭니다. 이 풀은 백 엔드 가상 머신을 배포하는 위치입니다.
백 엔드 VM 인스턴스의 상태를 결정하는 Add-AzLoadBalancerProbeConfig를 사용하여 상태 프로브를 만듭니다.
트래픽을 VM에 분산하는 방법을 정의하는 Add-AzLoadBalancerRuleConfig를 사용하여 부하 분산 장치 규칙을 만듭니다.
New-AzLoadBalancer를 사용하여 공용 부하 분산 장치를 만듭니다.
## Place virtual network created in previous step into a variable. ##
$vnet = Get-AzVirtualNetwork -Name 'vnet-1' -ResourceGroupName 'test-rg'

## Create load balancer frontend configuration and place in variable. ##
$lbip = @{
    Name = 'frontend'
    PrivateIpAddress = '10.0.0.4'
    SubnetId = $vnet.subnets[0].Id
}
$feip = New-AzLoadBalancerFrontendIpConfig @lbip

## Create backend address pool configuration and place in variable. ##
$bepool = New-AzLoadBalancerBackendAddressPoolConfig -Name 'backend-pool'

## Create the health probe and place in variable. ##
$probe = @{
    Name = 'health-probe'
    Protocol = 'http'
    Port = '80'
    IntervalInSeconds = '360'
    ProbeCount = '5'
    RequestPath = '/'
}
$healthprobe = New-AzLoadBalancerProbeConfig @probe

## Create the load balancer rule and place in variable. ##
$lbrule = @{
    Name = 'http-rule'
    Protocol = 'tcp'
    FrontendPort = '80'
    BackendPort = '80'
    IdleTimeoutInMinutes = '15'
    FrontendIpConfiguration = $feip
    BackendAddressPool = $bePool
}
$rule = New-AzLoadBalancerRuleConfig @lbrule -EnableTcpReset

## Create the load balancer resource. ##
$loadbalancer = @{
    ResourceGroupName = 'test-rg'
    Name = 'load-balancer'
    Location = 'eastus2'
    Sku = 'Standard'
    FrontendIpConfiguration = $feip
    BackendAddressPool = $bePool
    LoadBalancingRule = $rule
    Probe = $healthprobe
}
New-AzLoadBalancer @loadbalancer
네트워크 정책 사용 안 함
가상 네트워크에서 프라이빗 링크 서비스를 만들려면 먼저 privateLinkServiceNetworkPolicies 설정을 사용하지 않도록 설정해야 합니다.
- Set-AzVirtualNetwork를 사용하여 네트워크 정책을 사용하지 않도록 설정합니다.
## Place the subnet name into a variable. ##
$subnet = 'subnet-1'

## Place the virtual network configuration into a variable. ##
$net = @{
    Name = 'vnet-1'
    ResourceGroupName = 'test-rg'
}
$vnet = Get-AzVirtualNetwork @net

## Set the policy as disabled on the virtual network. ##
($vnet | Select -ExpandProperty subnets | Where-Object {$_.Name -eq $subnet}).privateLinkServiceNetworkPolicies = "Disabled"

## Save the configuration changes to the virtual network. ##
$vnet | Set-AzVirtualNetwork
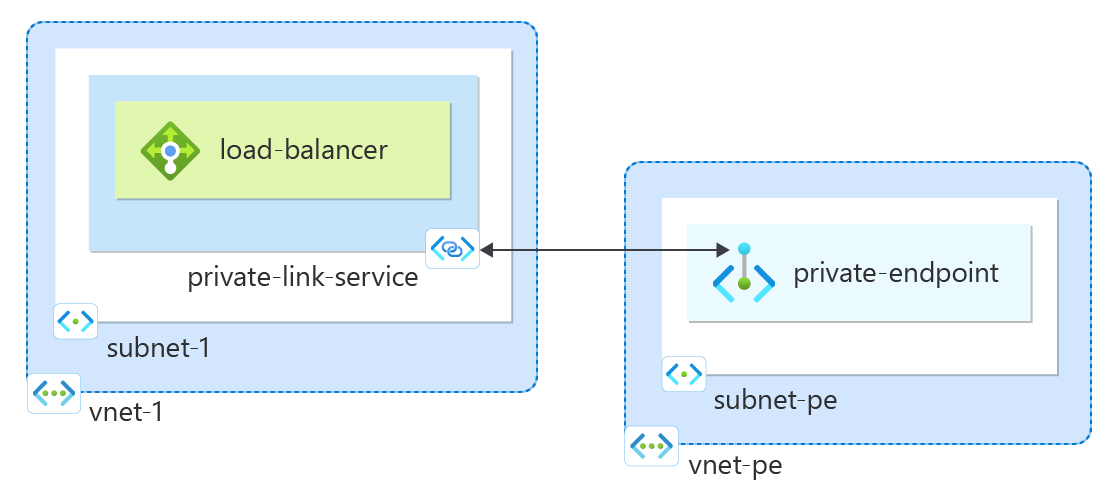
Private Link 서비스 만들기
이 섹션에서는 이전 단계에서 만든 표준 Azure Load Balancer를 사용하는 프라이빗 링크 서비스를 만듭니다.
New-AzPrivateLinkServiceIpConfig를 사용하여 프라이빗 링크 서비스 IP 구성을 만듭니다.
New-AzPrivateLinkService를 사용하여 프라이빗 링크 서비스를 만듭니다.
## Place the virtual network into a variable. ##
$vnet = Get-AzVirtualNetwork -Name 'vnet-1' -ResourceGroupName 'test-rg'

## Create the IP configuration for the private link service. ##
$ipsettings = @{
    Name = 'ipconfig-1'
    PrivateIpAddress = '10.0.0.5'
    Subnet = $vnet.subnets[0]
}
$ipconfig = New-AzPrivateLinkServiceIpConfig @ipsettings

## Place the load balancer frontend configuration into a variable. ##
$par = @{
    Name = 'load-balancer'
    ResourceGroupName = 'test-rg'
}
$fe = Get-AzLoadBalancer @par | Get-AzLoadBalancerFrontendIpConfig

## Create the private link service for the load balancer. ##
$privlinksettings = @{
    Name = 'private-link-service'
    ResourceGroupName = 'test-rg'
    Location = 'eastus2'
    LoadBalancerFrontendIpConfiguration = $fe
    IpConfiguration = $ipconfig
}
New-AzPrivateLinkService @privlinksettings
프라이빗 링크 서비스가 생성되고 트래픽을 수신할 수 있습니다. 트래픽 흐름을 보려면 표준 부하 분산 장치 뒤에 애플리케이션을 구성합니다.
프라이빗 엔드포인트 만들기
이 섹션에서는 프라이빗 링크 서비스를 프라이빗 엔드포인트에 매핑합니다. 가상 네트워크는 프라이빗 링크 서비스에 대한 프라이빗 엔드포인트를 포함합니다. 이 가상 네트워크에는 프라이빗 링크 서비스에 액세스하는 리소스가 포함되어 있습니다.
프라이빗 엔드포인트 가상 네트워크 만들기
- New-AzVirtualNetwork를 사용하여 가상 네트워크를 만듭니다.
## Create backend subnet config ##
$subnet = @{
    Name = 'subnet-pe'
    AddressPrefix = '10.1.0.0/24'
}
$subnetConfig = New-AzVirtualNetworkSubnetConfig @subnet

## Create the virtual network ##
$net = @{
    Name = 'vnet-pe'
    ResourceGroupName = 'test-rg'
    Location = 'eastus2'
    AddressPrefix = '10.1.0.0/16'
    Subnet = $subnetConfig
}
$vnetpe = New-AzVirtualNetwork @net
엔드포인트 및 연결 만들기
Get-AzPrivateLinkService를 사용하여 초기에 만든 프라이빗 링크 서비스의 구성을 나중에 사용할 수 있도록 변수에 배치합니다.
New-AzPrivateLinkServiceConnection을 사용하여 연결 구성을 만듭니다.
New-AzPrivateEndpoint를 사용하여 엔드포인트를 만듭니다.
## Place the private link service configuration into variable. ##
$par1 = @{
    Name = 'private-link-service'
    ResourceGroupName = 'test-rg'
}
$pls = Get-AzPrivateLinkService @par1

## Create the private link configuration and place in variable. ##
$par2 = @{
    Name = 'connection-1'
    PrivateLinkServiceId = $pls.Id
}
$plsConnection = New-AzPrivateLinkServiceConnection @par2

## Place the virtual network into a variable. ##
$par3 = @{
    Name = 'vnet-pe'
    ResourceGroupName = 'test-rg'
}
$vnetpe = Get-AzVirtualNetwork @par3

## Create private endpoint ##
$par4 = @{
    Name = 'private-endpoint'
    ResourceGroupName = 'test-rg'
    Location = 'eastus2'
    Subnet = $vnetpe.subnets[0]
    PrivateLinkServiceConnection = $plsConnection
}
New-AzPrivateEndpoint @par4 -ByManualRequest
프라이빗 엔드포인트 연결 승인
이 섹션에서는 이전 단계에서 만든 연결을 승인합니다.
- Approve-AzPrivateEndpointConnection을 사용하여 연결을 승인합니다.
## Place the private link service configuration into variable. ##
$par1 = @{
    Name = 'private-link-service'
    ResourceGroupName = 'test-rg'
}
$pls = Get-AzPrivateLinkService @par1

$par2 = @{
    Name = $pls.PrivateEndpointConnections[0].Name
    ServiceName = 'private-link-service'
    ResourceGroupName = 'test-rg'
    Description = 'Approved'
    PrivateLinkResourceType = 'Microsoft.Network/privateLinkServices'
}
Approve-AzPrivateEndpointConnection @par2
프라이빗 엔드포인트의 IP 주소
이 섹션에서는 부하 분산 장치 및 프라이빗 링크 서비스에 해당하는 프라이빗 엔드포인트의 IP 주소를 찾을 수 있습니다.
- Get-AzPrivateEndpoint를 사용하여 IP 주소를 검색합니다.
## Get private endpoint and the IP address and place in a variable for display. ##
$par1 = @{
    Name = 'private-endpoint'
    ResourceGroupName = 'test-rg'
    ExpandResource = 'networkinterfaces'
}
$pe = Get-AzPrivateEndpoint @par1

## Display the IP address by expanding the variable. ##
$pe.NetworkInterfaces[0].IpConfigurations[0].PrivateIpAddress
❯ $pe.NetworkInterfaces[0].IpConfigurations[0].PrivateIpAddress
10.1.0.4
리소스 정리
더 이상 필요하지 않은 경우 Remove-AzResourceGroup 명령을 사용하여 리소스 그룹, 부하 분산 장치 및 나머지 리소스를 제거할 수 있습니다.
Remove-AzResourceGroup -Name 'test-rg'
다음 단계
이 빠른 시작에서 관련 정보는 다음과 같습니다.
가상 네트워크 및 내부 Azure Load Balancer를 만들었습니다.
프라이빗 링크 서비스를 만들었습니다.
Azure 프라이빗 엔드포인트에 대해 자세히 알아보려면 계속 진행하세요.