Azure CLI
az group create --name "myResourceGroup" --location eastus
Azure PowerShell
New-AzResourceGroup -Name "myResourceGroup" -Location "EastUS"
Create a key vault
If you already have a key vault, you can skip to Set key vault advanced access policies.
Create a key vault using the az keyvault create Azure CLI command, the New-AzKeyvault Azure PowerShell command, the Azure portal, or a Resource Manager template.
Warning
To ensure that encryption secrets don't cross regional boundaries, you must create and use a key vault that's in the same region and tenant as the VMs to be encrypted.
Each Key Vault must have a unique name. Replace <your-unique-keyvault-name> with the name of your key vault in the following examples.
Azure CLI
When creating a key vault by using the Azure CLI, add the "--enabled-for-disk-encryption" flag.
az keyvault create --name "<your-unique-keyvault-name>" --resource-group "myResourceGroup" --location "eastus" --enabled-for-disk-encryption
Azure PowerShell
When creating a key vault using Azure PowerShell, add the "-EnabledForDiskEncryption" flag.
New-AzKeyvault -name "<your-unique-keyvault-name>" -ResourceGroupName "myResourceGroup" -Location "eastus" -EnabledForDiskEncryption
Resource Manager template
You can also create a key vault by using the Resource Manager template.
- On the Azure Quickstart Template, click Deploy to Azure.
- Select the subscription, resource group, resource group location, Key Vault name, Object ID, legal terms, and agreement, and then click Purchase.
Set key vault advanced access policies
Important
Newly-created key vaults have soft-delete on by default. If you are using a pre-existing key vault, you must enable soft-delete. See Azure Key Vault soft-delete overview.
The Azure platform needs access to the encryption keys or secrets in your key vault to make them available to the VM for booting and decrypting the volumes.
If you didn't enable your key vault for disk encryption, deployment, or template deployment at the time of creation (as demonstrated in the previous step), you must update its advanced access policies.
Azure CLI
Use az keyvault update to enable disk encryption for the key vault.
Enable Key Vault for disk encryption: Enabled-for-disk-encryption is required.
az keyvault update --name "<your-unique-keyvault-name>" --resource-group "MyResourceGroup" --enabled-for-disk-encryption "true"
Enable Key Vault for deployment, if needed: Enables the Microsoft.Compute resource provider to retrieve secrets from this key vault when this key vault is referenced in resource creation, for example when creating a virtual machine.
az keyvault update --name "<your-unique-keyvault-name>" --resource-group "MyResourceGroup" --enabled-for-deployment "true"
Enable Key Vault for template deployment, if needed: Allow Resource Manager to retrieve secrets from the vault.
az keyvault update --name "<your-unique-keyvault-name>" --resource-group "MyResourceGroup" --enabled-for-template-deployment "true"
Azure PowerShell
Use the key vault PowerShell cmdlet Set-AzKeyVaultAccessPolicy to enable disk encryption for the key vault.
Enable Key Vault for disk encryption: EnabledForDiskEncryption is required for Azure Disk encryption.
Set-AzKeyVaultAccessPolicy -VaultName "<your-unique-keyvault-name>" -ResourceGroupName "MyResourceGroup" -EnabledForDiskEncryption
Enable Key Vault for deployment, if needed: Enables the Microsoft.Compute resource provider to retrieve secrets from this key vault when this key vault is referenced in resource creation, for example when creating a virtual machine.
Set-AzKeyVaultAccessPolicy -VaultName "<your-unique-keyvault-name>" -ResourceGroupName "MyResourceGroup" -EnabledForDeployment
Enable Key Vault for template deployment, if needed: Enables Azure Resource Manager to get secrets from this key vault when this key vault is referenced in a template deployment.
Set-AzKeyVaultAccessPolicy -VaultName "<your-unique-keyvault-name>" -ResourceGroupName "MyResourceGroup" -EnabledForTemplateDeployment
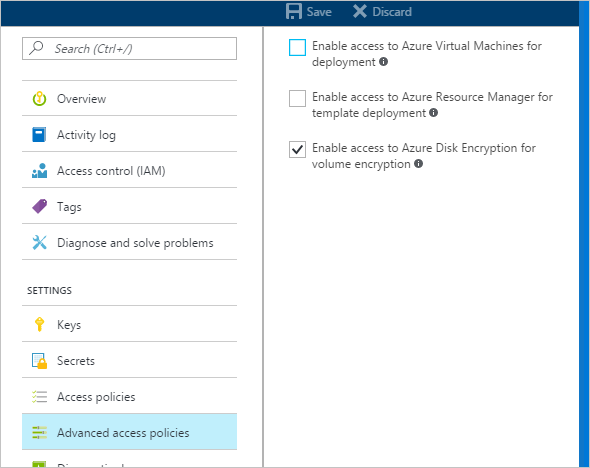
Azure portal
Select your key vault and go to Access Policies.
Under "Enable Access to", select the box labeled Azure Disk Encryption for volume encryption.
Select Azure Virtual Machines for deployment and/or Azure Resource Manager for template deployment, if needed.
Click Save.
Azure Disk Encryption and auto-rotation
Although Azure Key Vault now has key auto-rotation, it isn't currently compatible with Azure Disk Encryption. Specifically, Azure Disk Encryption will continue to use the original encryption key, even after it has been auto-rotated.
Rotating an encryption key won't break Azure Disk Encryption, but disabling the "old" encryption key (in other words, the key Azure Disk Encryption is still using) will.
Set up a key encryption key (KEK)
Important
The account running to enable disk encryption over the key vault must have "reader" permissions.
If you want to use a key encryption key (KEK) for an additional layer of security for encryption keys, add a KEK to your key vault. When a key encryption key is specified, Azure Disk Encryption uses that key to wrap the encryption secrets before writing to Key Vault.
You can generate a new KEK by using the Azure CLI az keyvault key create command, the Azure PowerShell Add-AzKeyVaultKey cmdlet, or the Azure portal. You must generate an RSA key type; Azure Disk Encryption doesn't currently support using Elliptic Curve keys.
You can instead import a KEK from your on-premises key management HSM. For more information, see Key Vault Documentation.
Your key vault KEK URLs must be versioned. Azure enforces this restriction of versioning. For valid secret and KEK URLs, see the following examples:
Azure CLI
Use the Azure CLI az keyvault key create command to generate a new KEK and store it in your key vault.
az keyvault key create --name "myKEK" --vault-name "<your-unique-keyvault-name>" --kty RSA --size 4096
You may instead import a private key by using the Azure CLI az keyvault key import command:
In either case, you supply the name of your KEK to the Azure CLI az vm encryption enable --key-encryption-key parameter.
az vm encryption enable -g "MyResourceGroup" --name "myVM" --disk-encryption-keyvault "<your-unique-keyvault-name>" --key-encryption-key "myKEK"
Azure PowerShell
Use the Azure PowerShell Add-AzKeyVaultKey cmdlet to generate a new KEK and store it in your key vault.
Add-AzKeyVaultKey -Name "myKEK" -VaultName "<your-unique-keyvault-name>" -Destination "HSM" -Size 4096
You may instead import a private key using the Azure PowerShell az keyvault key import command.
In either case, you will supply the ID of your KEK key Vault and the URL of your KEK to the Azure PowerShell Set-AzVMDiskEncryptionExtension -KeyEncryptionKeyVaultId and -KeyEncryptionKeyUrl parameters. This example assumes that you are using the same key vault for both the disk encryption key and the KEK.
$KeyVault = Get-AzKeyVault -VaultName "<your-unique-keyvault-name>" -ResourceGroupName "myResourceGroup"
$KEK = Get-AzKeyVaultKey -VaultName "<your-unique-keyvault-name>" -Name "myKEK"

Set-AzVMDiskEncryptionExtension -ResourceGroupName MyResourceGroup -VMName "MyVM" -DiskEncryptionKeyVaultUrl $KeyVault.VaultUri -DiskEncryptionKeyVaultId $KeyVault.ResourceId -KeyEncryptionKeyVaultId $KeyVault.ResourceId -KeyEncryptionKeyUrl $KEK.Id -SkipVmBackup -VolumeType All