Xamarin.iOS에서 Apple로 로그인
 샘플 다운로드
Apple로 로그인은 타사 인증 서비스의 사용자에게 ID 보호를 제공하는 새로운 서비스입니다. iOS 13부터 Apple은 타사 인증 서비스를 사용하는 모든 새 앱도 Apple에 로그인을 제공해야 합니다. 업데이트 중인 기존 앱은 2020년 4월까지 Apple에서 로그인을 추가할 필요가 없습니다.
이 문서에서는 iOS 13 애플리케이션에 Apple로 로그인을 추가하는 방법을 소개합니다.
Apple 개발자 설정
Apple에서 로그인을 사용하여 앱을 빌드하고 실행하기 전에 다음 단계를 완료해야 합니다. Apple 개발자 인증서에서 식별자 및 프로필 포털:
- 새 앱 ID 식별자를 만듭니다.
- 설명 필드에 설명을 설정합니다.
- 명시적 번들 ID를 선택하고 필드에 설정합니다
com.xamarin.AddingTheSignInWithAppleFlowToYourApp. - Apple 기능으로 로그인을 사용하도록 설정하고 새 ID를 등록합니다.
- 새 ID를 사용하여 새 프로비전 프로필을 만듭니다.
- 디바이스에 다운로드하여 설치합니다.
- Visual Studio에서 Entitlements.plist 파일에서 Apple 기능으로 로그인을 사용하도록 설정합니다.
로그인 상태 확인
앱이 시작되거나 사용자의 인증 상태 먼저 검사 때 현재 상태를 인스턴스화 ASAuthorizationAppleIdProvider 하고 검사.
var appleIdProvider = new ASAuthorizationAppleIdProvider ();
appleIdProvider.GetCredentialState (KeychainItem.CurrentUserIdentifier, (credentialState, error) => {
    switch (credentialState) {
    case ASAuthorizationAppleIdProviderCredentialState.Authorized:
        // The Apple ID credential is valid.
        break;
    case ASAuthorizationAppleIdProviderCredentialState.Revoked:
        // The Apple ID credential is revoked.
        break;
    case ASAuthorizationAppleIdProviderCredentialState.NotFound:
        // No credential was found, so show the sign-in UI.
        InvokeOnMainThread (() => {
            var storyboard = UIStoryboard.FromName ("Main", null);

            if (!(storyboard.InstantiateViewController (nameof (LoginViewController)) is LoginViewController viewController))
                return;

            viewController.ModalPresentationStyle = UIModalPresentationStyle.FormSheet;
            viewController.ModalInPresentation = true;
            Window?.RootViewController?.PresentViewController (viewController, true, null);
        });
        break;
    }
});
이 코드에서 호출되는 AppDelegate.cs동안 FinishedLaunching 앱은 NotFound 상태가 있는 경우를 처리하고 사용자에게 표시 LoginViewController 합니다. 상태가 반환 Authorized 되었거나 Revoked사용자에게 다른 작업이 표시될 수 있습니다.
Apple로 로그인하기 위한 LoginViewController
로그인 논리를 구현하고 Apple에서 로그인을 제공하는 기능은 UIViewController 아래 예제와 IASAuthorizationControllerPresentationContextProviding 같이 LoginViewController 구현 IASAuthorizationControllerDelegate 해야 합니다.
public partial class LoginViewController : UIViewController, IASAuthorizationControllerDelegate, IASAuthorizationControllerPresentationContextProviding {
    public LoginViewController (IntPtr handle) : base (handle)
    {
    }

    public override void ViewDidLoad ()
    {
        base.ViewDidLoad ();
        // Perform any additional setup after loading the view, typically from a nib.

        SetupProviderLoginView ();
    }

    public override void ViewDidAppear (bool animated)
    {
        base.ViewDidAppear (animated);

        PerformExistingAccountSetupFlows ();
    }

    void SetupProviderLoginView ()
    {
        var authorizationButton = new ASAuthorizationAppleIdButton (ASAuthorizationAppleIdButtonType.Default, ASAuthorizationAppleIdButtonStyle.White);
        authorizationButton.TouchUpInside += HandleAuthorizationAppleIDButtonPress;
        loginProviderStackView.AddArrangedSubview (authorizationButton);
    }

    // Prompts the user if an existing iCloud Keychain credential or Apple ID credential is found.
    void PerformExistingAccountSetupFlows ()
    {
        // Prepare requests for both Apple ID and password providers.
        ASAuthorizationRequest [] requests = {
            new ASAuthorizationAppleIdProvider ().CreateRequest (),
            new ASAuthorizationPasswordProvider ().CreateRequest ()
        };

        // Create an authorization controller with the given requests.
        var authorizationController = new ASAuthorizationController (requests);
        authorizationController.Delegate = this;
        authorizationController.PresentationContextProvider = this;
        authorizationController.PerformRequests ();
    }

    private void HandleAuthorizationAppleIDButtonPress (object sender, EventArgs e)
    {
        var appleIdProvider = new ASAuthorizationAppleIdProvider ();
        var request = appleIdProvider.CreateRequest ();
        request.RequestedScopes = new [] { ASAuthorizationScope.Email, ASAuthorizationScope.FullName };

        var authorizationController = new ASAuthorizationController (new [] { request });
        authorizationController.Delegate = this;
        authorizationController.PresentationContextProvider = this;
        authorizationController.PerformRequests ();
    }
}
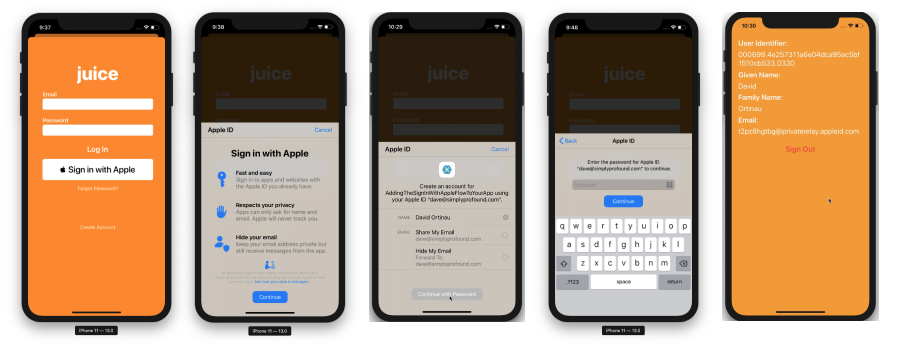
이 예제 코드는 현재 로그인 상태 검사 PerformExistingAccountSetupFlows 대리자로 현재 뷰에 연결합니다. 기존 iCloud 키 집합 자격 증명 또는 Apple ID 자격 증명이 발견되면 이 자격 증명을 사용하라는 메시지가 사용자에게 표시됩니다.
Apple은 이 목적을 위해 특별히 단추를 제공합니다 ASAuthorizationAppleIdButton. 터치하면 단추가 메서드 HandleAuthorizationAppleIDButtonPress에서 처리되는 워크플로를 트리거합니다.
권한 부여 처리
IASAuthorizationController 사용자 계정을 저장하는 사용자 지정 논리를 구현합니다. 아래 예제에서는 사용자의 계정을 Apple의 스토리지 서비스인 Keychain에 저장합니다.
#region IASAuthorizationController Delegate

[Export ("authorizationController:didCompleteWithAuthorization:")]
public void DidComplete (ASAuthorizationController controller, ASAuthorization authorization)
{
    if (authorization.GetCredential<ASAuthorizationAppleIdCredential> () is ASAuthorizationAppleIdCredential appleIdCredential) {
        var userIdentifier = appleIdCredential.User;
        var fullName = appleIdCredential.FullName;
        var email = appleIdCredential.Email;

        // Create an account in your system.
        // For the purpose of this demo app, store the userIdentifier in the keychain.
        try {
            new KeychainItem ("com.example.apple-samplecode.juice", "userIdentifier").SaveItem (userIdentifier);
        } catch (Exception) {
            Console.WriteLine ("Unable to save userIdentifier to keychain.");
        }

        // For the purpose of this demo app, show the Apple ID credential information in the ResultViewController.
        if (!(PresentingViewController is ResultViewController viewController))
            return;

        InvokeOnMainThread (() => {
            viewController.UserIdentifierText = userIdentifier;
            viewController.GivenNameText = fullName?.GivenName ?? "";
            viewController.FamilyNameText = fullName?.FamilyName ?? "";
            viewController.EmailText = email ?? "";

            DismissViewController (true, null);
        });
    } else if (authorization.GetCredential<ASPasswordCredential> () is ASPasswordCredential passwordCredential) {
        // Sign in using an existing iCloud Keychain credential.
        var username = passwordCredential.User;
        var password = passwordCredential.Password;

        // For the purpose of this demo app, show the password credential as an alert.
        InvokeOnMainThread (() => {
            var message = $"The app has received your selected credential from the keychain. \n\n Username: {username}\n Password: {password}";
            var alertController = UIAlertController.Create ("Keychain Credential Received", message, UIAlertControllerStyle.Alert);
            alertController.AddAction (UIAlertAction.Create ("Dismiss", UIAlertActionStyle.Cancel, null));

            PresentViewController (alertController, true, null);
        });
    }
}

[Export ("authorizationController:didCompleteWithError:")]
public void DidComplete (ASAuthorizationController controller, NSError error)
{
    Console.WriteLine (error);
}

#endregion
권한 부여 컨트롤러
이 구현의 마지막 부분에서는 공급자에 ASAuthorizationController 대한 권한 부여 요청을 관리합니다.
#region IASAuthorizationControllerPresentation Context Providing

public UIWindow GetPresentationAnchor (ASAuthorizationController controller) => View.Window;

#endregion