Network Watcher 에이전트 가상 머신 확장은 네트워크 트래픽을 캡처하여 Azure VM(가상 머신)을 진단하고 모니터링하는 일부 Azure Network Watcher 기능에 대한 요구 사항입니다. 자세한 내용은 Azure Network Watcher란?을 참조하세요.
이 글에서는 Windows와 Linux용 Network Watcher Agent를 설치, 업데이트, 삭제하는 방법을 배웁니다. 에이전트 설치는 가상 머신을 중단하거나, 다시 부팅이 필요하지 않습니다. 가상 머신이 Azure 서비스에 의해 배포되었다면, 서비스 문서를 확인하여 해당 서비스가 가상 머신에 확장 프로그램 설치를 허용하는지 확인하세요.
메모
Network Watcher Agent 확장 기능은 AKS 클러스터에서 지원되지 않습니다.
사전 요구 사항
지원되는 운영체제를 실행하는 Azure 가상 머신(VM)입니다. 자세한 내용은 지원 운영체제를 참조하세요.
169.254.169.254을 통한 port 80 및 168.63.129.16을 통한 port 8037에 대한 아웃바운드 TCP 연결입니다. 에이전트는 이러한 IP 주소를 사용하여 Azure 플랫폼과 통신합니다.
인터넷 연결: Network Watcher Agent는 일부 기능이 제대로 작동하려면 인터넷 연결이 필요합니다. 예를 들어 패킷 캡처를 업로드하려면 스토리지 계정에 연결해야 합니다.
지원되는 운영체제를 실행하는 Azure 가상 머신(VM)입니다. 자세한 내용은 지원 운영체제를 참조하세요.
169.254.169.254을 통한 port 80 및 168.63.129.16을 통한 port 8037에 대한 아웃바운드 TCP 연결입니다. 에이전트는 이러한 IP 주소를 사용하여 Azure 플랫폼과 통신합니다.
인터넷 연결: Network Watcher Agent는 일부 기능이 제대로 작동하려면 인터넷 연결이 필요합니다. 예를 들어 패킷 캡처를 업로드하려면 스토리지 계정에 연결해야 합니다.
Azure Cloud Shell 또는 Azure PowerShell.
이 문서의 단계에서는 Azure Cloud Shell에서 Azure PowerShell cmdlet을 대화형으로 실행합니다. Cloud Shell에서 명령을 실행하려면 코드 블록의 오른쪽 위 모서리에서 Cloud Shell을 엽니다.
복사를 선택하여 코드를 복사한 다음, 복사한 코드를 Cloud Shell에 붙여넣어 실행합니다. Cloud Shell은 Azure Portal 내에서도 실행할 수 있습니다.
Azure PowerShell을 로컬로 설치하여 cmdlet을 실행할 수도 있습니다. PowerShell을 로컬로 실행하는 경우 Connect-AzAccount cmdlet을 사용하여 Azure에 로그인합니다.
지원되는 운영체제를 실행하는 Azure 가상 머신(VM)입니다. 자세한 내용은 지원 운영체제를 참조하세요.
169.254.169.254을 통한 port 80 및 168.63.129.16을 통한 port 8037에 대한 아웃바운드 TCP 연결입니다. 에이전트는 이러한 IP 주소를 사용하여 Azure 플랫폼과 통신합니다.
인터넷 연결: Network Watcher Agent는 일부 기능이 제대로 작동하려면 인터넷 연결이 필요합니다. 예를 들어 패킷 캡처를 업로드하려면 스토리지 계정에 연결해야 합니다.
Azure Cloud Shell 또는 Azure CLI.
이 문서의 단계에서는 Azure Cloud Shell에서 대화형으로 Azure CLI 명령을 실행합니다. Cloud Shell에서 명령을 실행하려면 코드 블록의 오른쪽 위 모서리에서 Cloud Shell을 엽니다.
복사를 선택하여 코드를 복사하고 Cloud Shell에 붙여넣어 실행합니다. Cloud Shell은 Azure Portal 내에서도 실행할 수 있습니다.
Azure CLI를 로컬로 설치하여 명령을 실행할 수도 있습니다. Azure CLI를 로컬로 실행하는 경우 az login 명령을 사용하여 Azure에 로그인합니다.
지원되는 운영체제를 실행하는 Azure 가상 머신(VM)입니다. 자세한 내용은 지원 운영체제를 참조하세요.
169.254.169.254을 통한 port 80 및 168.63.129.16을 통한 port 8037에 대한 아웃바운드 TCP 연결입니다. 에이전트는 이러한 IP 주소를 사용하여 Azure 플랫폼과 통신합니다.
인터넷 연결: Network Watcher Agent는 일부 기능이 제대로 작동하려면 인터넷 연결이 필요합니다. 예를 들어 패킷 캡처를 업로드하려면 스토리지 계정에 연결해야 합니다.
템플릿을 배포하기 위해 로컬로 설치된 Azure PowerShell 또는 Azure CLI
지원되는 운영 체제
다음 운영 체제에 Windows용 Network Watcher Agent 확장을 설치할 수 있습니다:
- Windows Server 2012, 2012 R2, 2016, 2019, 2022, 2025 버전입니다.
- Windows 10 및 11 릴리스.
메모
현재 Nano 서버는 지원되지 않습니다.
다음 리눅스 배포판에서 Network Watcher Agent 확장 프로그램을 설치할 수 있습니다:
| Distribution |
버전 |
| 알마리눅스 |
9.2 |
| Azure 리눅스 |
2.0 |
| CentOS 1 |
6.10 및 7 |
| Debian |
7 및 8 |
| openSUSE Leap |
42.3+ |
| 오라클 리눅스 |
6.10 2, 7, 8, 그리고 9+ |
| Red Hat Enterprise Linux(RHEL) |
6.10 3, 7, 8, 그리고 9.2 |
| 록키 Linux |
9.1 |
| SUSE Linux Enterprise Server(SLES) |
12 및 15(SP2, SP3, SP4) |
| Ubuntu |
16+ |
1 CentOS 리눅스는 2024년 6월 30일에 수명이 종료되었습니다. 자세한 내용은 CentOS 수명 종료 지침을 참조하세요.
2 Oracle Linux 버전 6.X에 대한 ELS(확장 수명 주기) 지원이 2024년 7월 1일에 종료되었습니다.
3 Red Hat Enterprise Linux 6.X에 대한 ELS(확장 수명 주기) 지원이 2024년 6월 30일에 종료되었습니다.
메모
현재 Oracle Linux의 Network Watcher 에이전트에서는 배포판 특유의 커널 수준 제한 때문에 인터넷 제어 메시지 프로토콜(ICMP) 모니터링을 지원하지 않습니다.
확장 스키마
다음 JSON은 Network Watcher 에이전트 확장에 대한 스키마를 보여 줍니다. 확장 프로그램은 사용자가 제공한 설정을 필요로 하거나 지원하지 않으며, 기본 설정에 의존합니다.
{
    "name": "[concat(parameters('vmName'), '/AzureNetworkWatcherExtension')]",
    "type": "Microsoft.Compute/virtualMachines/extensions",
    "apiVersion": "2023-03-01",
    "location": "[resourceGroup().location]",
    "dependsOn": [
        "[concat('Microsoft.Compute/virtualMachines/', parameters('vmName'))]"
    ],
    "properties": {
        "autoUpgradeMinorVersion": true,
        "publisher": "Microsoft.Azure.NetworkWatcher",
        "type": "NetworkWatcherAgentWindows",
        "typeHandlerVersion": "1.4"
    }
}
{
    "name": "[concat(parameters('vmName'), '/AzureNetworkWatcherExtension')]",
    "type": "Microsoft.Compute/virtualMachines/extensions",
    "apiVersion": "2023-03-01",
    "location": "[resourceGroup().location]",
    "dependsOn": [
        "[concat('Microsoft.Compute/virtualMachines/', parameters('vmName'))]"
    ],
    "properties": {
        "autoUpgradeMinorVersion": true,
        "publisher": "Microsoft.Azure.NetworkWatcher",
        "type": "NetworkWatcherAgentLinux",
        "typeHandlerVersion": "1.4"
    }
}
설치된 확장 나열
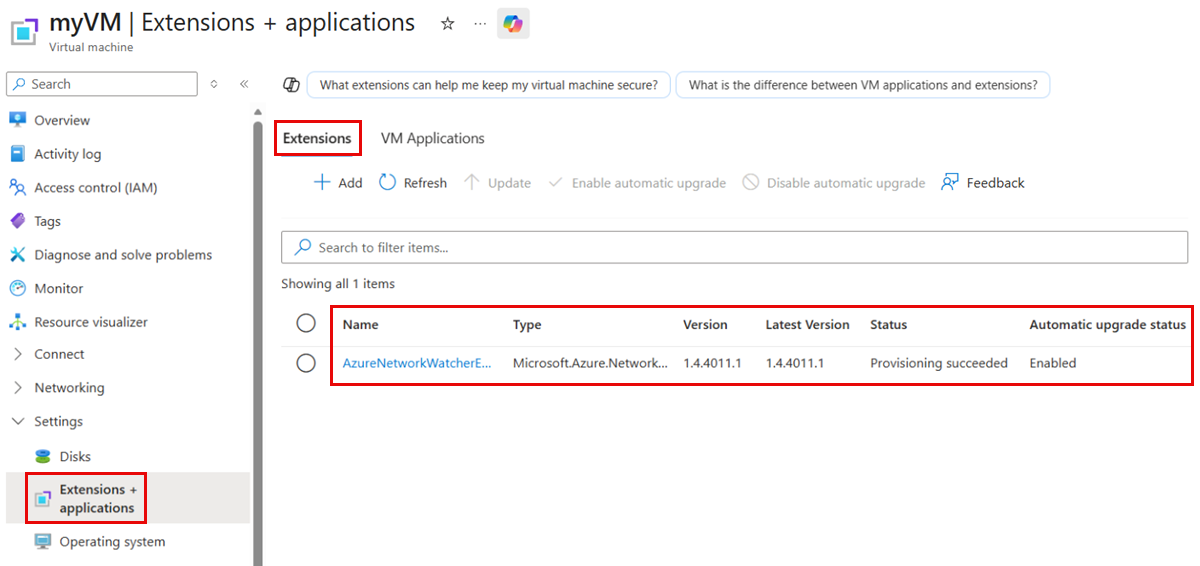
Azure 포털의 가상 머신 페이지에서 다음 단계를 따라 설치된 확장 프로그램을 확인할 수 있습니다:
설정에서 확장 + 애플리케이션을 선택합니다.
확장 탭에서는 가상 머신에 설치된 모든 확장을 볼 수 있습니다. 목록이 길면 검색창을 사용해 목록을 필터링하세요.
Get-AzVMExtension cmdlet을 사용해 가상 머신에 설치된 모든 확장 프로그램을 나열하세요.
# List the installed extensions on the virtual machine.
Get-AzVMExtension -ResourceGroupName 'myResourceGroup' -VMName 'myVM' | format-table Name, Publisher, ExtensionType, AutoUpgradeMinorVersion, EnableAutomaticUpgrade
cmdlet의 출력에는 설치된 확장이 나열됩니다.
Name                         Publisher                      ExtensionType              AutoUpgradeMinorVersion EnableAutomaticUpgrade
----                         ---------                      -------------              ----------------------- ----------------------
AzureNetworkWatcherExtension Microsoft.Azure.NetworkWatcher NetworkWatcherAgentWindows                    True                   True
Name                         Publisher                      ExtensionType            AutoUpgradeMinorVersion EnableAutomaticUpgrade
----                         ---------                      -------------            ----------------------- ----------------------
AzureNetworkWatcherExtension Microsoft.Azure.NetworkWatcher NetworkWatcherAgentLinux                    True                   True
az vm 확장 목록 명령어를 사용해 가상 머신에 설치된 모든 확장 프로그램을 나열하세요.
# List the installed extensions on the virtual machine.
az vm extension list --resource-group 'myResourceGroup' --vm-name 'myVM' --out table
명령의 출력에는 설치된 확장이 나열됩니다.
Name                          ProvisioningState    Publisher                       Version    AutoUpgradeMinorVersion
----------------------------  -------------------  ------------------------------  ---------  -------------------------
AzureNetworkWatcherExtension  Succeeded            Microsoft.Azure.NetworkWatcher  1.4        True
Network Watcher 에이전트 VM 확장 설치
Azure Portal의 가상 머신 페이지에서 다음 단계에 따라 Network Watcher 에이전트 VM 확장을 설치할 수 있습니다.
설정에서 확장 + 애플리케이션을 선택합니다.
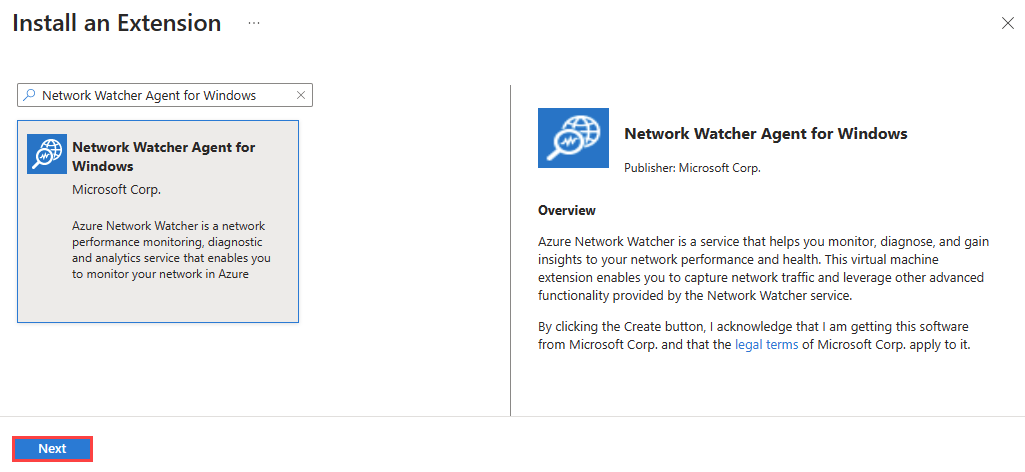
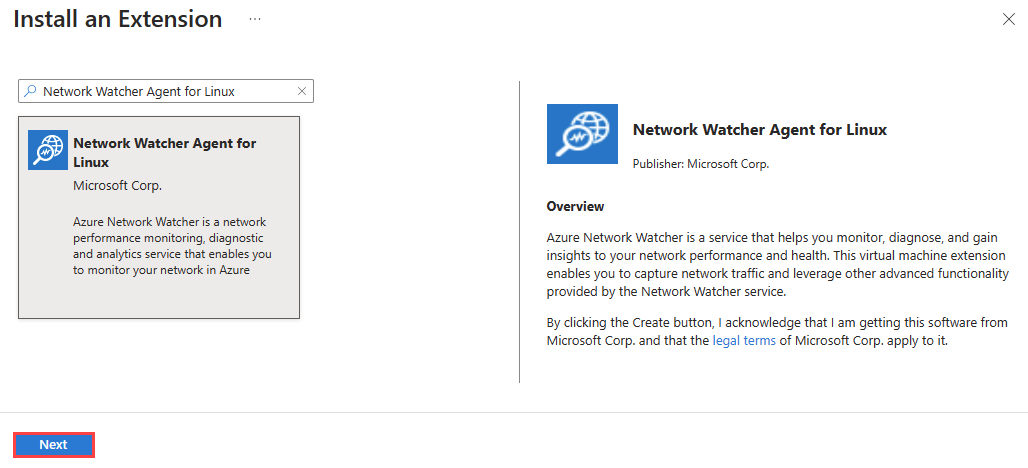
+ Add를 선택하고 Network Watcher Agent를 검색한 후 설치하세요. 확장이 이미 설치된 경우 확장 목록에서 볼 수 있습니다.
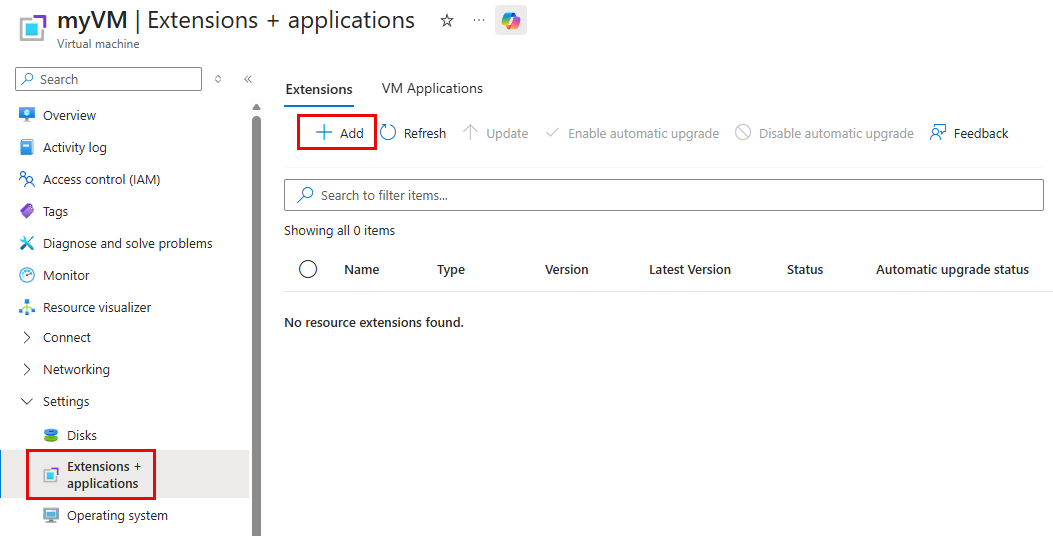
확장 프로그램 설치 검색창에서 Network Watcher Agent를 입력하고, 운영체제에 맞는 확장 프로그램을 선택한 후 다음을 선택하세요.
검토 + 생성를 선택한 다음, 생성를 선택합니다.
Set-AzVMExtension cmdlet을 사용하여 가상 머신에 Network Watcher Agent VM 확장 프로그램을 설치하세요:
# Install Network Watcher Agent for Windows on the virtual machine.
Set-AzVMExtension -Name 'AzureNetworkWatcherExtension' -Publisher 'Microsoft.Azure.NetworkWatcher' -ExtensionType 'NetworkWatcherAgentWindows' -EnableAutomaticUpgrade 1 -TypeHandlerVersion '1.4' -ResourceGroupName 'myResourceGroup' -VMName 'myVM'
# Install Network Watcher Agent for Linux on the virtual machine.
Set-AzVMExtension -Name 'AzureNetworkWatcherExtension' -Publisher 'Microsoft.Azure.NetworkWatcher' -ExtensionType 'NetworkWatcherAgentLinux' -EnableAutomaticUpgrade 1 -TypeHandlerVersion '1.4' -ResourceGroupName 'myResourceGroup' -VMName 'myVM'
설치가 완료되면 다음과 같은 출력물을 보게 됩니다:
RequestId IsSuccessStatusCode StatusCode ReasonPhrase
--------- ------------------- ---------- ------------
                         True         OK
az vm 확장 명령어를 사용하여 가상 머신에 Network Watcher Agent VM 확장 프로그램을 설치하세요:
# Install Network Watcher Agent for Windows on the virtual machine.
az vm extension set --name 'NetworkWatcherAgentWindows' --extension-instance-name 'AzureNetworkWatcherExtension' --publisher 'Microsoft.Azure.NetworkWatcher' --enable-auto-upgrade 'true' --version '1.4' --resource-group 'myResourceGroup' --vm-name 'myVM'
# Install Network Watcher Agent for Linux on the virtual machine.
az vm extension set --name 'NetworkWatcherAgentLinux' --extension-instance-name 'AzureNetworkWatcherExtension' --publisher 'Microsoft.Azure.NetworkWatcher' --enable-auto-upgrade 'true' --version '1.4' --resource-group 'myResourceGroup' --vm-name 'myVM'
다음 Azure Resource Manager 템플릿(ARM 템플릿)을 사용하여 가상 머신에 Network Watcher Agent VM 확장 프로그램을 설치하세요:
{
    "$schema": "https://schema.management.azure.com/schemas/2019-04-01/deploymentTemplate.json#",
    "contentVersion": "1.0.0.0",
    "parameters": {
        "vmName": {
            "type": "string"
        }
    },
    "resources": [
        {
            "name": "[concat(parameters('vmName'), '/AzureNetworkWatcherExtension')]",
            "type": "Microsoft.Compute/virtualMachines/extensions",
            "apiVersion": "2024-07-01",
            "location": "[resourceGroup().location]",
            "properties": {
                "autoUpgradeMinorVersion": true,
                "publisher": "Microsoft.Azure.NetworkWatcher",
                "type": "NetworkWatcherAgentWindows",
                "typeHandlerVersion": "1.4"
            }
        }
    ]
}
{
    "$schema": "https://schema.management.azure.com/schemas/2019-04-01/deploymentTemplate.json#",
    "contentVersion": "1.0.0.0",
    "parameters": {
        "vmName": {
            "type": "string"
        }
    },
    "resources": [
        {
            "name": "[concat(parameters('vmName'), '/AzureNetworkWatcherExtension')]",
            "type": "Microsoft.Compute/virtualMachines/extensions",
            "apiVersion": "2024-07-01",
            "location": "[resourceGroup().location]",
            "properties": {
                "autoUpgradeMinorVersion": true,
                "publisher": "Microsoft.Azure.NetworkWatcher",
                "type": "NetworkWatcherAgentLinux",
                "typeHandlerVersion": "1.4"
            }
        }
    ]
}
Azure PowerShell 또는 Azure CLI를 사용하여 Resource Manager 템플릿을 배포할 수 있습니다.
# Deploy the JSON template file using Azure PowerShell.
New-AzResourceGroupDeployment -ResourceGroupName 'myResourceGroup' -TemplateFile 'agent.json'
# Deploy the JSON template file using the Azure CLI.
az deployment group create --resource-group 'myResourceGroup' --template-file 'agent.json'
Network Watcher Agent VM 확장 프로그램 업데이트
확장 버전 확인
Azure Portal, Azure CLI 또는 PowerShell을 사용하여 확장 버전을 확인할 수 있습니다.
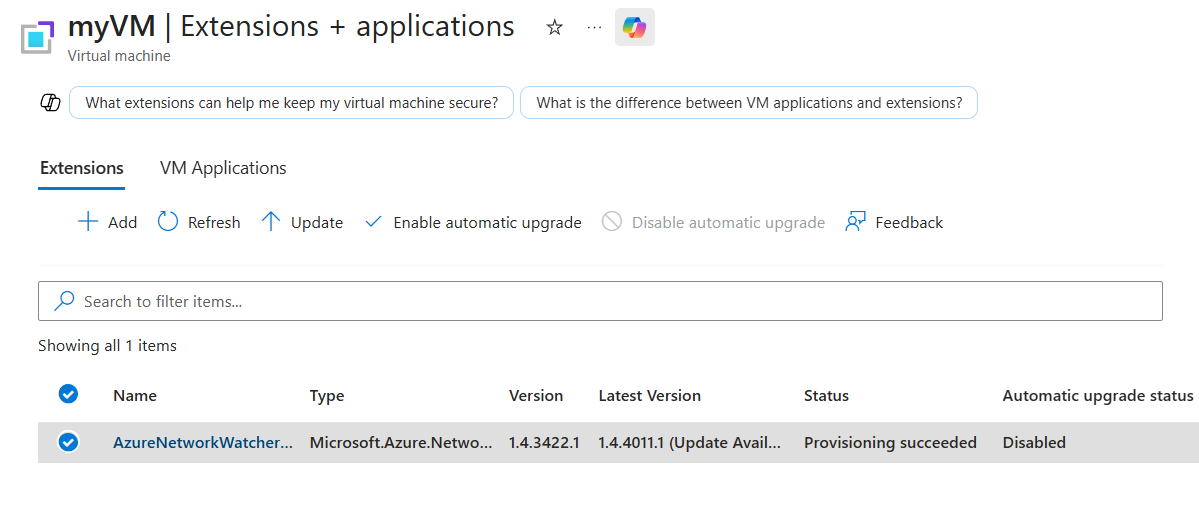
Azure 포털에서 VM의 확장 + 애플리케이션으로 가세요.
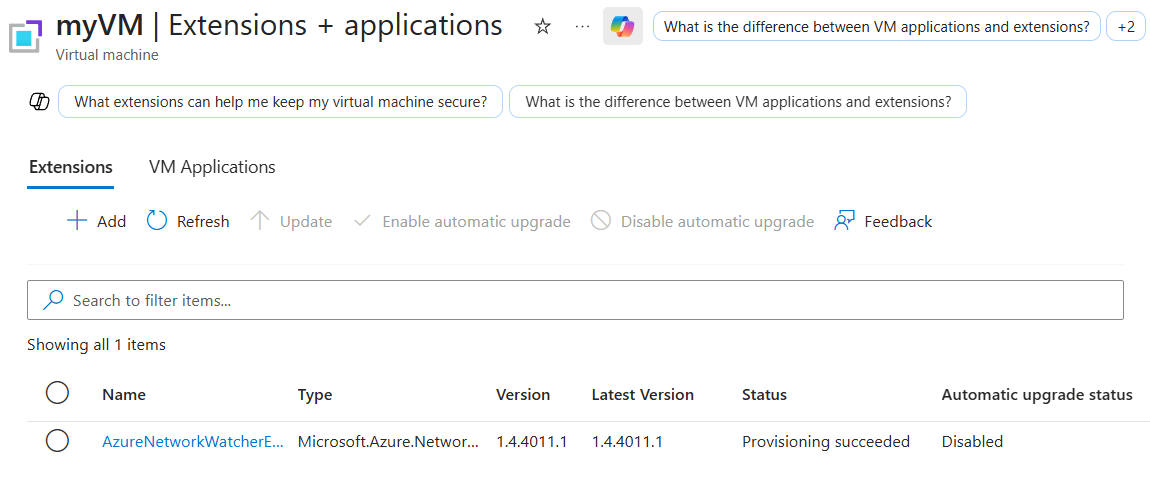
확장 프로그램 목록에서 AzureNetworkWatcherExtension의 버전 열을 확인하세요. 최신 버전이 있으면 최신 버전(Latest Version ) 열에 (업데이트 가능 여부)가 표시됩니다.
Get-AzVM 명령어를 사용해 확장 프로그램의 설치 버전을 확인하세요:
(Get-AzVM -ResourceGroupName 'myResourceGroup' -Name 'myVM' -Status).Extensions | Where-Object { $_.Name -eq 'AzureNetworkWatcherExtension' } | Select-Object Name, TypeHandlerVersion
Get-AzVMExtensionImage cmdlet을 사용하여 VM의 운영체제와 지역에서 사용 가능한 확장 프로그램의 최신 버전을 찾아보세요:
Get-AzVMExtensionImage -Location '<region>' -PublisherName 'Microsoft.Azure.NetworkWatcher' -Type 'NetworkWatcherAgentWindows' | Sort-Object -Property { [Version]$_.Version } -Descending | Select-Object -First 1
Get-AzVMExtensionImage -Location '<region>' -PublisherName 'Microsoft.Azure.NetworkWatcher' -Type 'NetworkWatcherAgentLinux' | Sort-Object -Property { [Version]$_.Version } -Descending | Select-Object -First 1
az vm get-instance-view 명령어를 사용하여 확장 프로그램의 설치 버전을 확인하세요:
az vm get-instance-view --resource-group 'myResourceGroup' --name 'myVM' --query "extensions[?name=='AzureNetworkWatcherExtension'].typeHandlerVersion" --output tsv
az vm 확장 프로그램 이미지 리스트 명령을 사용하여 VM 운영체제에서 사용 가능한 최신 확장 버전을 찾아보세요:
az vm extension image list --name 'NetworkWatcherAgentWindows' --publisher 'Microsoft.Azure.NetworkWatcher' --latest
az vm extension image list --name 'NetworkWatcherAgentLinux' --publisher 'Microsoft.Azure.NetworkWatcher' --latest
메모
Network Watcher 확장의 최신 버전은 1.4.4011.1입니다.
자동 업그레이드 활성화
자동 업그레이드를 통해 Azure 플랫폼이 수동 개입 없이 확장 기능을 최신 버전으로 업데이트할 수 있습니다. 다음 단계를 통해 자동 업그레이드가 활성화되어 있는지 확인하고, 활성화되어 있지 않으면 활성화하세요.
Azure 포털의 VM 설정에서 확장 + 애플리케이션을 선택하세요.
확장 프로그램 목록에서 AzureNetworkWatcherExtension 을 선택한 후 자동 업그레이드 상태 열을 확인하세요.
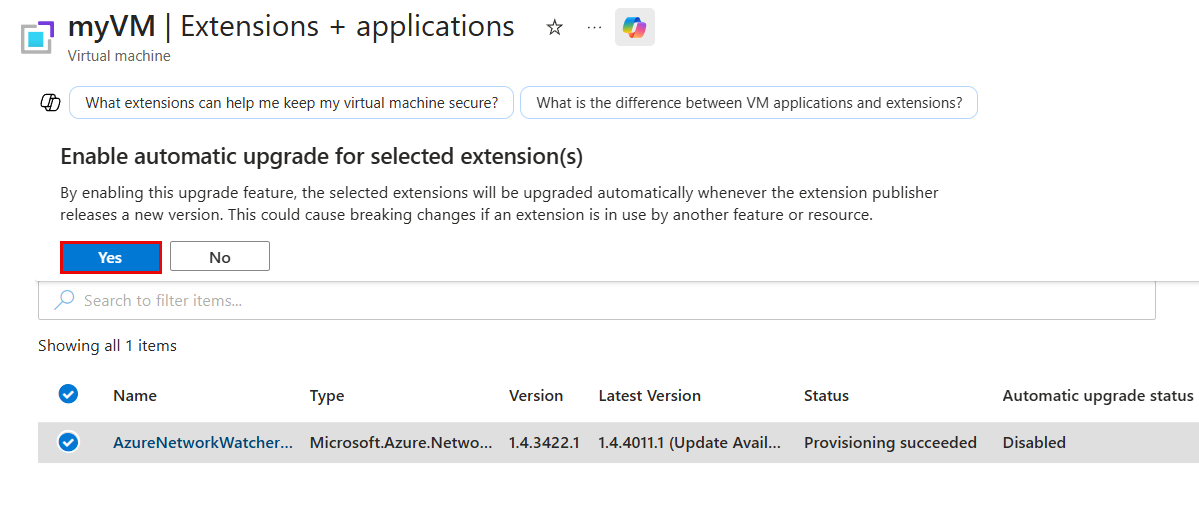
비활성화 화면이 뜨면 툴바에서 자동 업그레이드 활성화를 선택하세요.
예를 선택하여 확인합니다.
Get-AzVMExtension cmdlet을 사용하여 자동 업그레이드가 활성화되어 있는지 확인하세요:
Get-AzVMExtension -ResourceGroupName 'myResourceGroup' -VMName 'myVM' -Name 'AzureNetworkWatcherExtension' | Select-Object Name, EnableAutomaticUpgrade
만약 가 이라False면EnableAutomaticUpgrade, Set-AzVMExtension cmdlet을 사용하여 이를 활성화하세요:
Set-AzVMExtension -ResourceGroupName 'myResourceGroup' -VMName 'myVM' -Name 'AzureNetworkWatcherExtension' -Publisher 'Microsoft.Azure.NetworkWatcher' -ExtensionType 'NetworkWatcherAgentWindows' -EnableAutomaticUpgrade $true
Set-AzVMExtension -ResourceGroupName 'myResourceGroup' -VMName 'myVM' -Name 'AzureNetworkWatcherExtension' -Publisher 'Microsoft.Azure.NetworkWatcher' -ExtensionType 'NetworkWatcherAgentLinux' -EnableAutomaticUpgrade $true
az vm 확장 show 명령어를 사용하여 자동 업그레이드가 활성화되어 있는지 확인하세요:
az vm extension show --resource-group 'myResourceGroup' --vm-name 'myVM' --name 'AzureNetworkWatcherExtension' --query 'enableAutomaticUpgrade'
명령에서 false이 반환되면 이를 사용하도록 설정하려면 az vm extension set 명령을 사용하세요:
az vm extension set --resource-group 'myResourceGroup' --vm-name 'myVM' --name 'NetworkWatcherAgentWindows' --publisher 'Microsoft.Azure.NetworkWatcher' --enable-auto-upgrade 'true'
az vm extension set --resource-group 'myResourceGroup' --vm-name 'myVM' --name 'NetworkWatcherAgentLinux' --publisher 'Microsoft.Azure.NetworkWatcher' --enable-auto-upgrade 'true'
다음 Azure Resource Manager 템플릿(ARM 템플릿)을 사용하여 Network Watcher Agent VM 확장 기능을 자동 업그레이드할 수 있습니다:
{
    "$schema": "https://schema.management.azure.com/schemas/2019-04-01/deploymentTemplate.json#",
    "contentVersion": "1.0.0.0",
    "parameters": {
        "vmName": {
            "type": "string"
        }
    },
    "resources": [
        {
            "name": "[concat(parameters('vmName'), '/AzureNetworkWatcherExtension')]",
            "type": "Microsoft.Compute/virtualMachines/extensions",
            "apiVersion": "2024-07-01",
            "location": "[resourceGroup().location]",
            "properties": {
                "autoUpgradeMinorVersion": true,
                "enableAutomaticUpgrade": true,
                "publisher": "Microsoft.Azure.NetworkWatcher",
                "type": "NetworkWatcherAgentWindows",
                "typeHandlerVersion": "1.4"
            }
        }
    ]
}
{
    "$schema": "https://schema.management.azure.com/schemas/2019-04-01/deploymentTemplate.json#",
    "contentVersion": "1.0.0.0",
    "parameters": {
        "vmName": {
            "type": "string"
        }
    },
    "resources": [
        {
            "name": "[concat(parameters('vmName'), '/AzureNetworkWatcherExtension')]",
            "type": "Microsoft.Compute/virtualMachines/extensions",
            "apiVersion": "2024-07-01",
            "location": "[resourceGroup().location]",
            "properties": {
                "autoUpgradeMinorVersion": true,
                "enableAutomaticUpgrade": true,
                "publisher": "Microsoft.Azure.NetworkWatcher",
                "type": "NetworkWatcherAgentLinux",
                "typeHandlerVersion": "1.4"
            }
        }
    ]
}
Azure PowerShell 또는 Azure CLI를 사용하여 Resource Manager 템플릿을 배포할 수 있습니다.
# Deploy the JSON template file using Azure PowerShell.
New-AzResourceGroupDeployment -ResourceGroupName 'myResourceGroup' -TemplateFile 'agent.json'
# Deploy the JSON template file using the Azure CLI.
az deployment group create --resource-group 'myResourceGroup' --template-file 'agent.json'
메모
자동 업그레이드를 활성화하면 Azure가 가상 머신 재시작 없이 확장 프로그램을 자동으로 업데이트합니다. 이 과정은 새 버전이 출시된 후 최대 30일이 소요될 수 있습니다.
수동으로 업데이트합니다
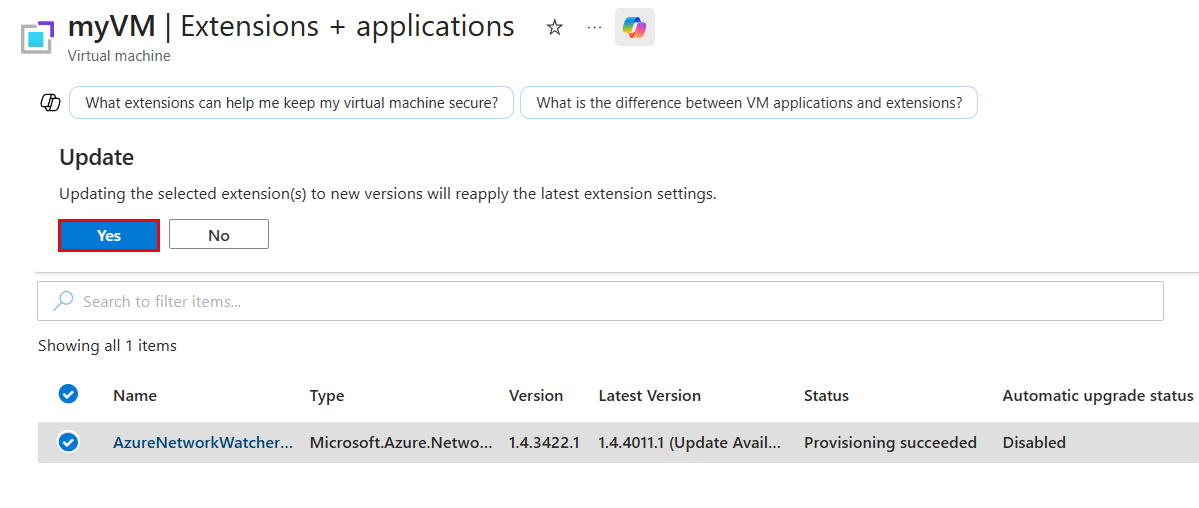
Azure 포털의 VM 설정에서 확장 + 애플리케이션을 선택하세요.
확장 프로그램 목록에서 AzureNetworkWatcherExtension 을 선택한 후, 툴바에서 Update 를 선택하세요.
예를 선택하여 확인합니다.
업데이트가 완료되면 버전 과 최신 버전 열에 동일한 버전 번호가 표시됩니다.
업데이트해도 최신 버전이 적용되지 않는다면, 확장 프로그램을 제거하고 다시 설치하세요:
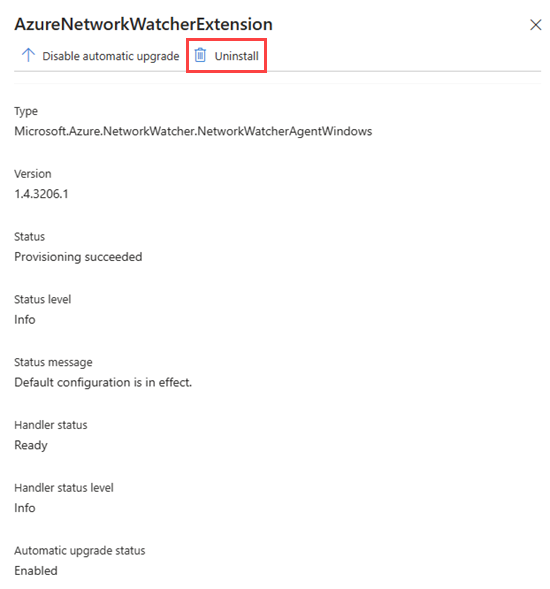
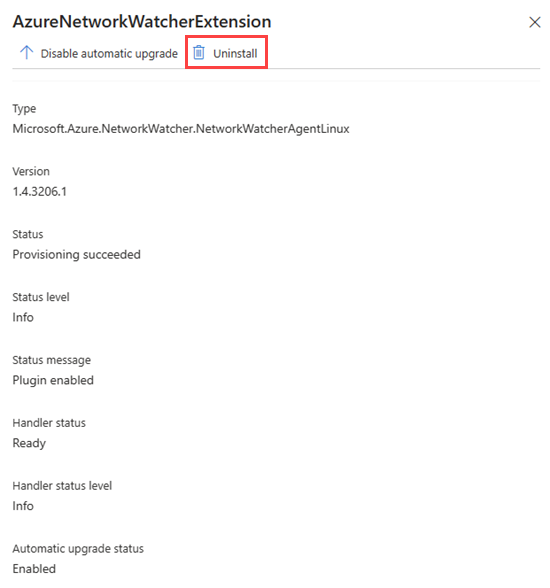
- 확장 목록에서 AzureNetworkWatcherExtension을 선택한 다음, 제거를 선택합니다.
-
+ 추가를 선택하고 Network Watcher Agent를 검색한 후 다시 설치하세요. 플랫폼은 최신 버전을 자동으로 설치합니다. 자세한 내용은 'Install Network Watcher Agent VM 확장'을 참조하세요.
Set-AzVMExtension cmdlet과 매개변수를 -ForceRerun 사용해 확장 기능을 삭제하지 않고 다시 적용하세요. 명령어를 실행할 때마다 값이 -ForceRerun 현재 값과 달라져야 하므로, 현재 날짜와 시간과 같이 변하는 값을 사용하세요:
Set-AzVMExtension -ResourceGroupName 'myResourceGroup' -VMName 'myVM' -Name 'AzureNetworkWatcherExtension' -Publisher 'Microsoft.Azure.NetworkWatcher' -Type 'NetworkWatcherAgentWindows' -ForceRerun (Get-Date -Format o)
Set-AzVMExtension -ResourceGroupName 'myResourceGroup' -VMName 'myVM' -Name 'AzureNetworkWatcherExtension' -Publisher 'Microsoft.Azure.NetworkWatcher' -Type 'NetworkWatcherAgentLinux' -ForceRerun (Get-Date -Format o)
그 조건이 확장 프로그램을 업데이트하지 않는다면, 확장 프로그램을 제거하고 다시 설치하면 최신 버전이 됩니다:
Remove-AzVMExtension -ResourceGroupName 'myResourceGroup' -VMName 'myVM' -Name 'AzureNetworkWatcherExtension'
Set-AzVMExtension -ResourceGroupName 'myResourceGroup' -VMName 'myVM' -Name 'AzureNetworkWatcherExtension' -Publisher 'Microsoft.Azure.NetworkWatcher' -Type 'NetworkWatcherAgentWindows'
Set-AzVMExtension -ResourceGroupName 'myResourceGroup' -VMName 'myVM' -Name 'AzureNetworkWatcherExtension' -Publisher 'Microsoft.Azure.NetworkWatcher' -Type 'NetworkWatcherAgentLinux'
az vm 확장 집합 명령어와 매개변수를 --force-update 사용하여 확장 기능을 삭제하지 않고 다시 적용할 수 있습니다:
az vm extension set --resource-group 'myResourceGroup' --vm-name 'myVM' --name 'NetworkWatcherAgentWindows' --publisher 'Microsoft.Azure.NetworkWatcher' --force-update
az vm extension set --resource-group 'myResourceGroup' --vm-name 'myVM' --name 'NetworkWatcherAgentLinux' --publisher 'Microsoft.Azure.NetworkWatcher' --force-update
그 조건이 확장 프로그램을 업데이트하지 않는다면, 확장 프로그램을 제거하고 다시 설치하면 최신 버전이 됩니다:
az vm extension delete --resource-group 'myResourceGroup' --vm-name 'myVM' --name 'AzureNetworkWatcherExtension'
az vm extension set --resource-group 'myResourceGroup' --vm-name 'myVM' --name 'NetworkWatcherAgentWindows' --publisher 'Microsoft.Azure.NetworkWatcher'
az vm extension set --resource-group 'myResourceGroup' --vm-name 'myVM' --name 'NetworkWatcherAgentLinux' --publisher 'Microsoft.Azure.NetworkWatcher'
다음 Azure Resource Manager 템플릿(ARM 템플릿)을 사용하여 확장을 다시 적용하세요. 확장 버전 확인에서 확인한 최신 버전으로 매개변수를 typeHandlerVersion 업데이트한 후 템플릿을 재배포하세요:
{
    "$schema": "https://schema.management.azure.com/schemas/2019-04-01/deploymentTemplate.json#",
    "contentVersion": "1.0.0.0",
    "parameters": {
        "vmName": {
            "type": "string"
        },
        "typeHandlerVersion": {
            "type": "string"
        }
    },
    "resources": [
        {
            "name": "[concat(parameters('vmName'), '/AzureNetworkWatcherExtension')]",
            "type": "Microsoft.Compute/virtualMachines/extensions",
            "apiVersion": "2024-07-01",
            "location": "[resourceGroup().location]",
            "properties": {
                "autoUpgradeMinorVersion": true,
                "publisher": "Microsoft.Azure.NetworkWatcher",
                "type": "NetworkWatcherAgentWindows",
                "typeHandlerVersion": "[parameters('typeHandlerVersion')]"
            }
        }
    ]
}
{
    "$schema": "https://schema.management.azure.com/schemas/2019-04-01/deploymentTemplate.json#",
    "contentVersion": "1.0.0.0",
    "parameters": {
        "vmName": {
            "type": "string"
        },
        "typeHandlerVersion": {
            "type": "string"
        }
    },
    "resources": [
        {
            "name": "[concat(parameters('vmName'), '/AzureNetworkWatcherExtension')]",
            "type": "Microsoft.Compute/virtualMachines/extensions",
            "apiVersion": "2024-07-01",
            "location": "[resourceGroup().location]",
            "properties": {
                "autoUpgradeMinorVersion": true,
                "publisher": "Microsoft.Azure.NetworkWatcher",
                "type": "NetworkWatcherAgentLinux",
                "typeHandlerVersion": "[parameters('typeHandlerVersion')]"
            }
        }
    ]
}
Azure PowerShell 또는 Azure CLI를 사용하여 Resource Manager 템플릿을 배포할 수 있습니다.
# Deploy the JSON template file using Azure PowerShell.
New-AzResourceGroupDeployment -ResourceGroupName 'myResourceGroup' -TemplateFile 'agent.json' -typeHandlerVersion '<version>'
# Deploy the JSON template file using the Azure CLI.
az deployment group create --resource-group 'myResourceGroup' --template-file 'agent.json' --parameters typeHandlerVersion='<version>'
PowerShell 스크립트로 대규모 업데이트
대규모 배포가 있다면, PowerShell 스크립트를 사용해 구독 내 여러 VM을 한 번에 업데이트하세요. 다음 스크립트는 구독 내 모든 구버전 VM에서 Network Watcher 확장 기능을 업데이트합니다:
<#
    .SYNOPSIS
    This script scans all VMs in the provided subscription and upgrades any out-of-date AzureNetworkWatcherExtensions to the latest available version.
    .DESCRIPTION
    This script is a no-op if AzureNetworkWatcherExtensions are already up to date.
    Requires Azure PowerShell 4.2 or higher to be installed.
    .EXAMPLE
    .\UpdateVMAgentsInSub.ps1 -SubID aaaa0a0a-bb1b-cc2c-dd3d-eeeeee4e4e4e -NoUpdate
#>

[CmdletBinding()]
param(
    [Parameter(Mandatory=$true)]
    [string] $SubID,
    [Parameter(Mandatory=$false)]
    [Switch] $NoUpdate = $false
)
function Get-LatestExtensionVersion($location, $extensionType)
{
    $latestImage = Get-AzVMExtensionImage -Location $location -PublisherName "Microsoft.Azure.NetworkWatcher" -Type $extensionType |
        Sort-Object -Property { [Version]$_.Version } -Descending |
        Select-Object -First 1
    return $latestImage.Version
}
Write-Host "Scanning all VMs in the subscription: $($SubID)"
Set-AzContext -SubscriptionId $SubID
$vms = Get-AzVM
$foundVMs = $false
Write-Host "Starting VM search, this may take a while"
foreach ($vmName in $vms)
{
    # Get Detailed VM info
    $vm = Get-AzVM -ResourceGroupName $vmName.ResourceGroupName -Name $vmName.name -Status
    $isitWindows = $vm.OsName -like "*Windows*"
    $type = if ($isitWindows) { "NetworkWatcherAgentWindows" } else { "NetworkWatcherAgentLinux" }
    $latestVersion = Get-LatestExtensionVersion -location $vmName.Location -extensionType $type

    foreach ($extension in $vm.Extensions)
    {
        if ($extension.Name -eq "AzureNetworkWatcherExtension")
        {
            if ([Version]$extension.TypeHandlerVersion -lt [Version]$latestVersion)
            {
                $foundVMs = $true
                if (-not ($NoUpdate))
                {
                    Write-Host "Found VM that needs to be updated: subscriptions/$($SubID)/resourceGroups/$($vm.ResourceGroupName)/providers/Microsoft.Compute/virtualMachines/$($vm.Name) -> Updating to $latestVersion " -NoNewline
                    Remove-AzVMExtension -ResourceGroupName $vm.ResourceGroupName -VMName $vm.Name -Name "AzureNetworkWatcherExtension" -Force
                    Write-Host "... " -NoNewline
                    Set-AzVMExtension -ResourceGroupName $vm.ResourceGroupName -Location $vmName.Location -VMName $vm.Name -Name "AzureNetworkWatcherExtension" -Publisher "Microsoft.Azure.NetworkWatcher" -Type $type -TypeHandlerVersion $latestVersion
                    Write-Host "Done"
                }
                else
                {
                    Write-Host "Found $(if ($isitWindows) {"Windows"} else {"Linux"}) VM that needs to be updated to $($latestVersion): subscriptions/$($SubID)/resourceGroups/$($vm.ResourceGroupName)/providers/Microsoft.Compute/virtualMachines/$($vm.Name)"
                }
            }
        }
    }
}

if ($foundVMs)
{
    Write-Host "Finished $(if ($NoUpdate) {"searching"} else {"updating"}) out of date AzureNetworkWatcherExtension on VMs"
}
else
{
    Write-Host "All AzureNetworkWatcherExtensions up to date"
}
Network Watcher 에이전트 VM 확장 제거
Azure Portal의 가상 머신 페이지에서 다음 단계에 따라 Network Watcher 에이전트 VM 확장을 제거할 수 있습니다.
설정에서 확장 + 애플리케이션을 선택합니다.
확장 목록에서 AzureNetworkWatcherExtension을 선택한 다음, 제거를 선택합니다.
메모
AzureNetworkWatcherExtension과 다르게 명명된 Network Watcher 에이전트 VM 확장이 표시될 수 있습니다.
Remove-AzVMExtension cmdlet을 사용해 가상 머신에서 Network Watcher Agent VM 확장 기능을 제거하세요:
# Uninstall Network Watcher Agent VM extension.
Remove-AzVMExtension -Name 'AzureNetworkWatcherExtension' -ResourceGroupName 'myResourceGroup' -VMName 'myVM'
az vm 확장 프로그램 delete 명령어를 사용하여 가상 머신에서 Network Watcher Agent VM 확장 프로그램을 제거하세요:
# Uninstall Network Watcher Agent VM extension.
az vm extension delete --name 'AzureNetworkWatcherExtension' --resource-group 'myResourceGroup' --vm-name 'myVM'
질문과 대답(FAQ)
Network Watcher Agent에 관한 가장 자주 묻는 질문에 대한 답변을 원하시면 Network Watcher Agent FAQ를 참조하세요.
관련 콘텐츠